Working with Swagger and Postman
Get Started Making API Calls
The easiest way to get started is to use the test harness built into the Swagger docs. We will also look at getting started on Postman. Every other technical guide will assume you are using one of these two methods or building a client application that can programmatically call the APIs.
Some Assumptions:
- To follow along with this document you will need to have access to a provisioned Fenergo SaaS Tenant.
- You can be a UI user where you can log in and copy the access-token from the
Developer Toolsof a web browser. We will be referring to "Chrome" - You can use the access token taken from a browser in both swagger and Postman. It will be easier to use the
client credentialmethod in Postman. - Your UI user or Client Credential should have all appropriate permissions to access the APIs.
Authentication on Fenergo
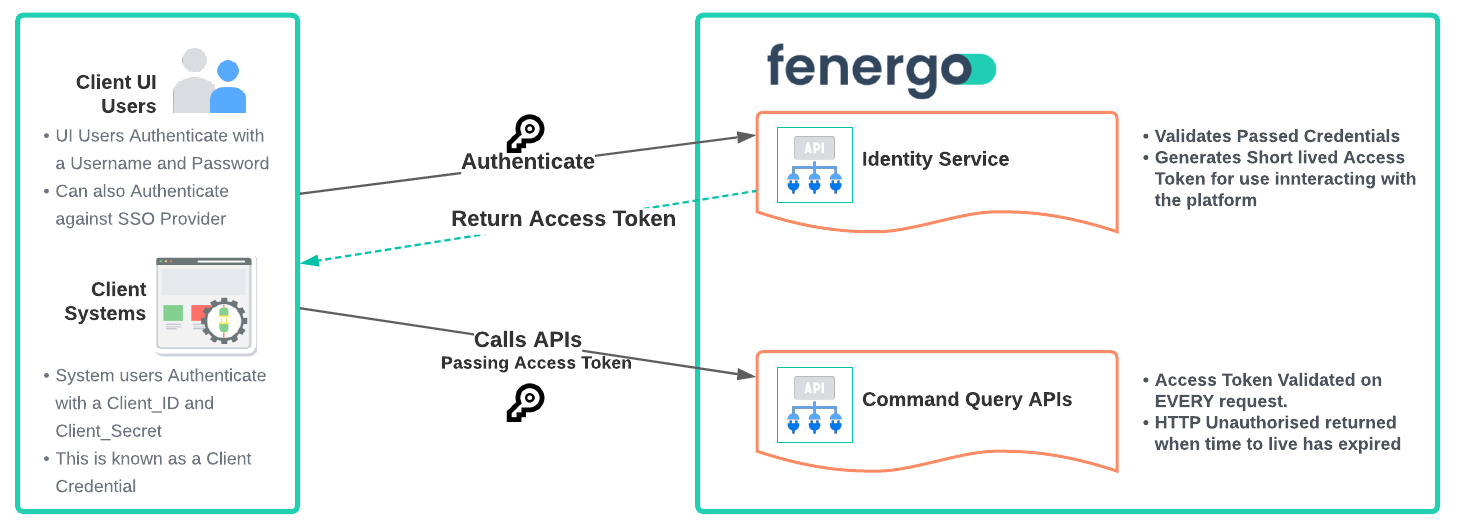
Before calling any APIs clients must first authenticate against the platform. It is best practice for API authentication to use Access Tokens in place of credentials such as usernames and passwords when making API calls. As illustrated below, a UI user or Client Integration first authenticates against the Fenergo Identity Server before making an API calls. The Identity server returns an access token and then the token is used as a substitute for live credentials in all subsequent API calls. Some key reasons as to why this is best practice are:
Protect Sensitive CredentialsThe credentials are passed only once for authentication instead of for every API call. The Access Token which itself has a short time to live is used for all API calls and sensitive data is not exchanged for every call.Scope ControlAccess Tokens can have a granular level of scope applied, meaning that a token for only a sub set of permissions can be requested following the principal of least privilege.Reduced Attack SurfaceThe Time To Live for Access Tokens is defaulted to 15 minutes. So if a token were to be compromised, it would not be valid for a long time. As opposed to credentials being compromised would require that they are replaced.
In the samples below, the access token is required to successfully make API calls. As described below, this can be retrieved from the developer tools in the Fenergo UI or requested directly from the Fenergo Identity Server.
Using SWAGGER to test the APIs
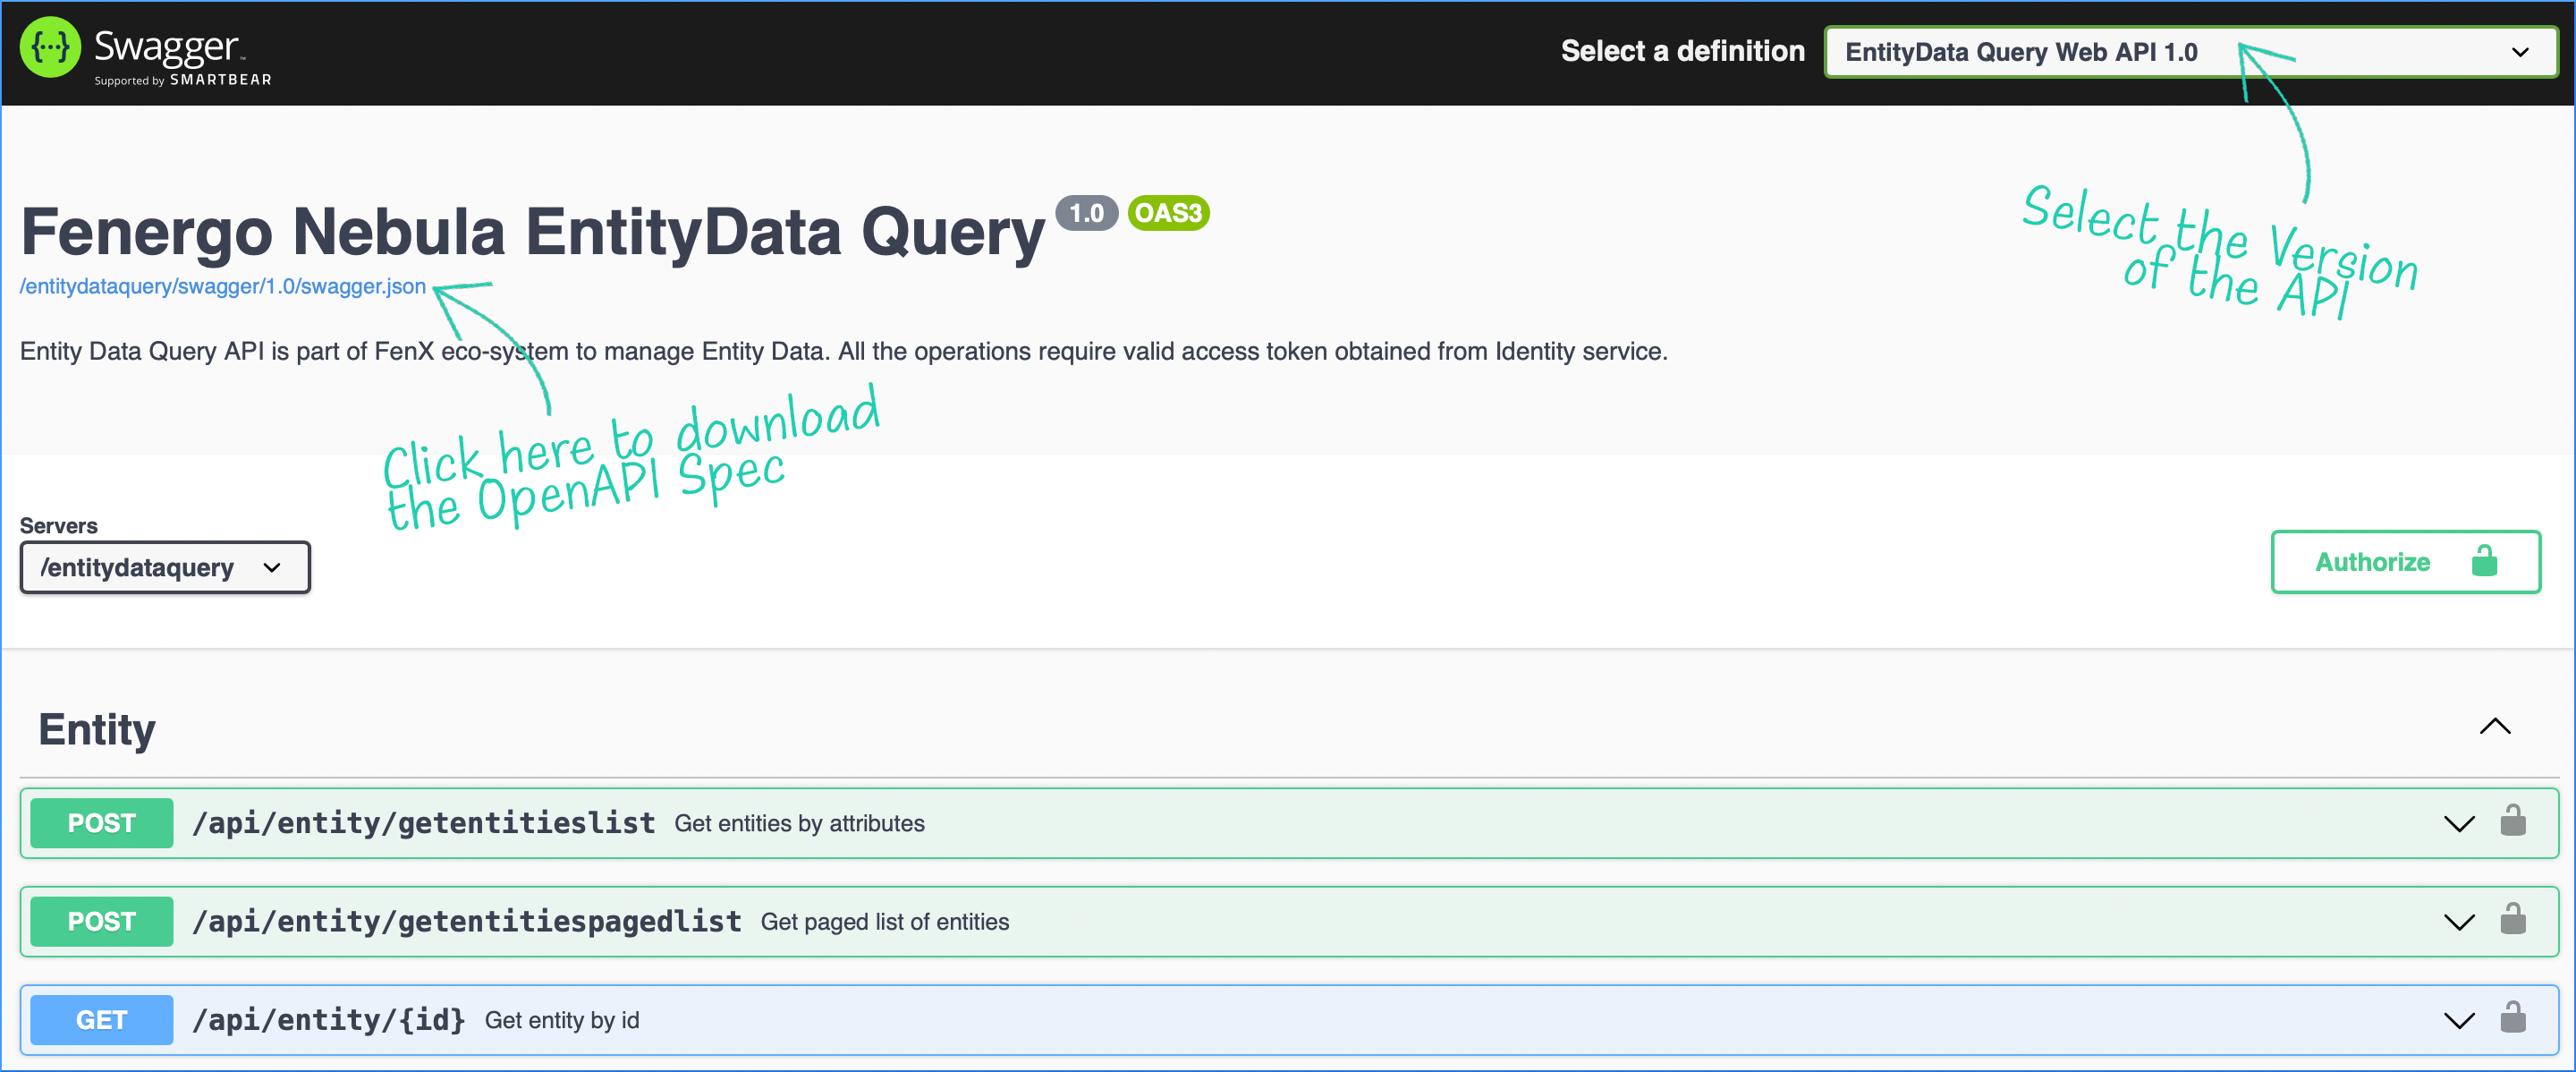
The API Catalogue contains a listing of all the Swagger Docs and APIs available on the Fenergo SaaS Platform. These links will take you to the Swagger User Interface of the selected API where you can download the Open API Specification and also browse / interact with the APIs. Screen will be presented as below.
Use Developer Tools
In Google Chrome you can open the Developer Tools and use this to retrieve an access token from SaaS User Interface.

Retrieve and Paste in the Bearer Token
To get an access token, simply login to the Fenergo UI and bring up Developer Tools. On the Network Tab if you type into the filter api, it will filter the requests which have been sent to api.fenergox.com (replace this with the API endpoint for your region). Scroll to the bottom of the requests and you will see an Authorization header. Copy the entire value (including the word Bearer) and paste that into the Swagger Authorization Value.
Copy the entire value (including the word Bearer) and paste that into the Swagger Authorization Value.uary | 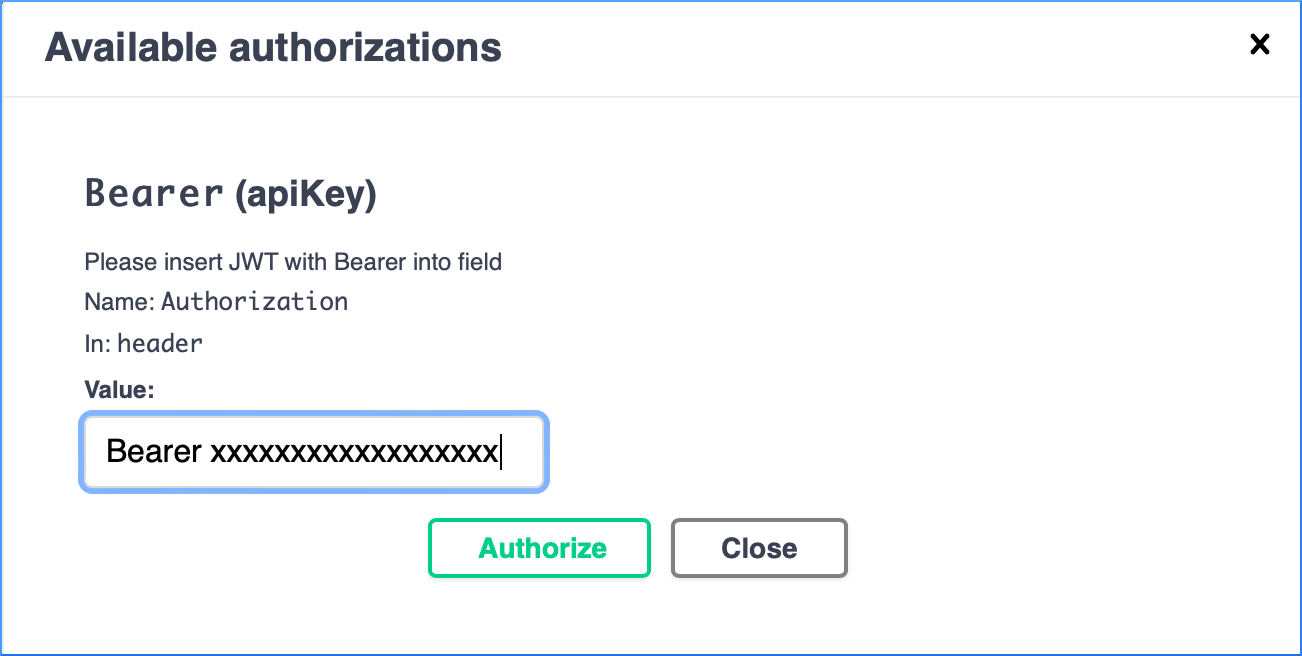 |
Once this is accepted you will see the following success dialog which will say Authorized, you can now use the Try It Out button on the API Methods. | 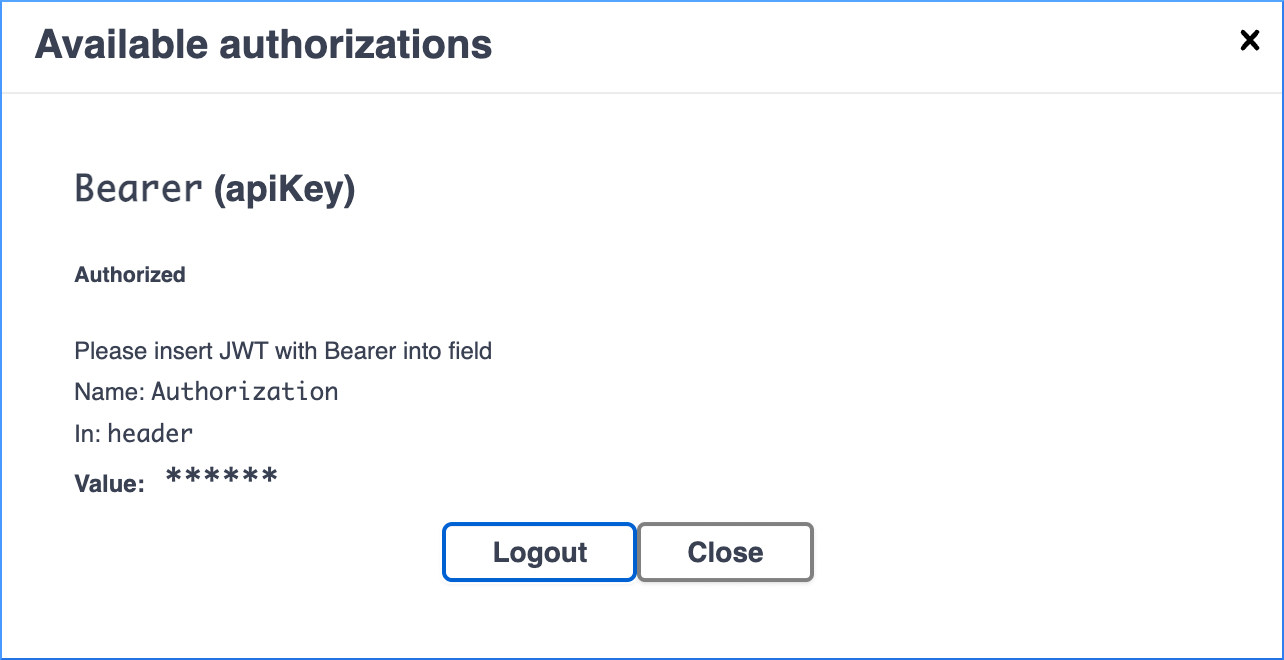 |
Try It Out
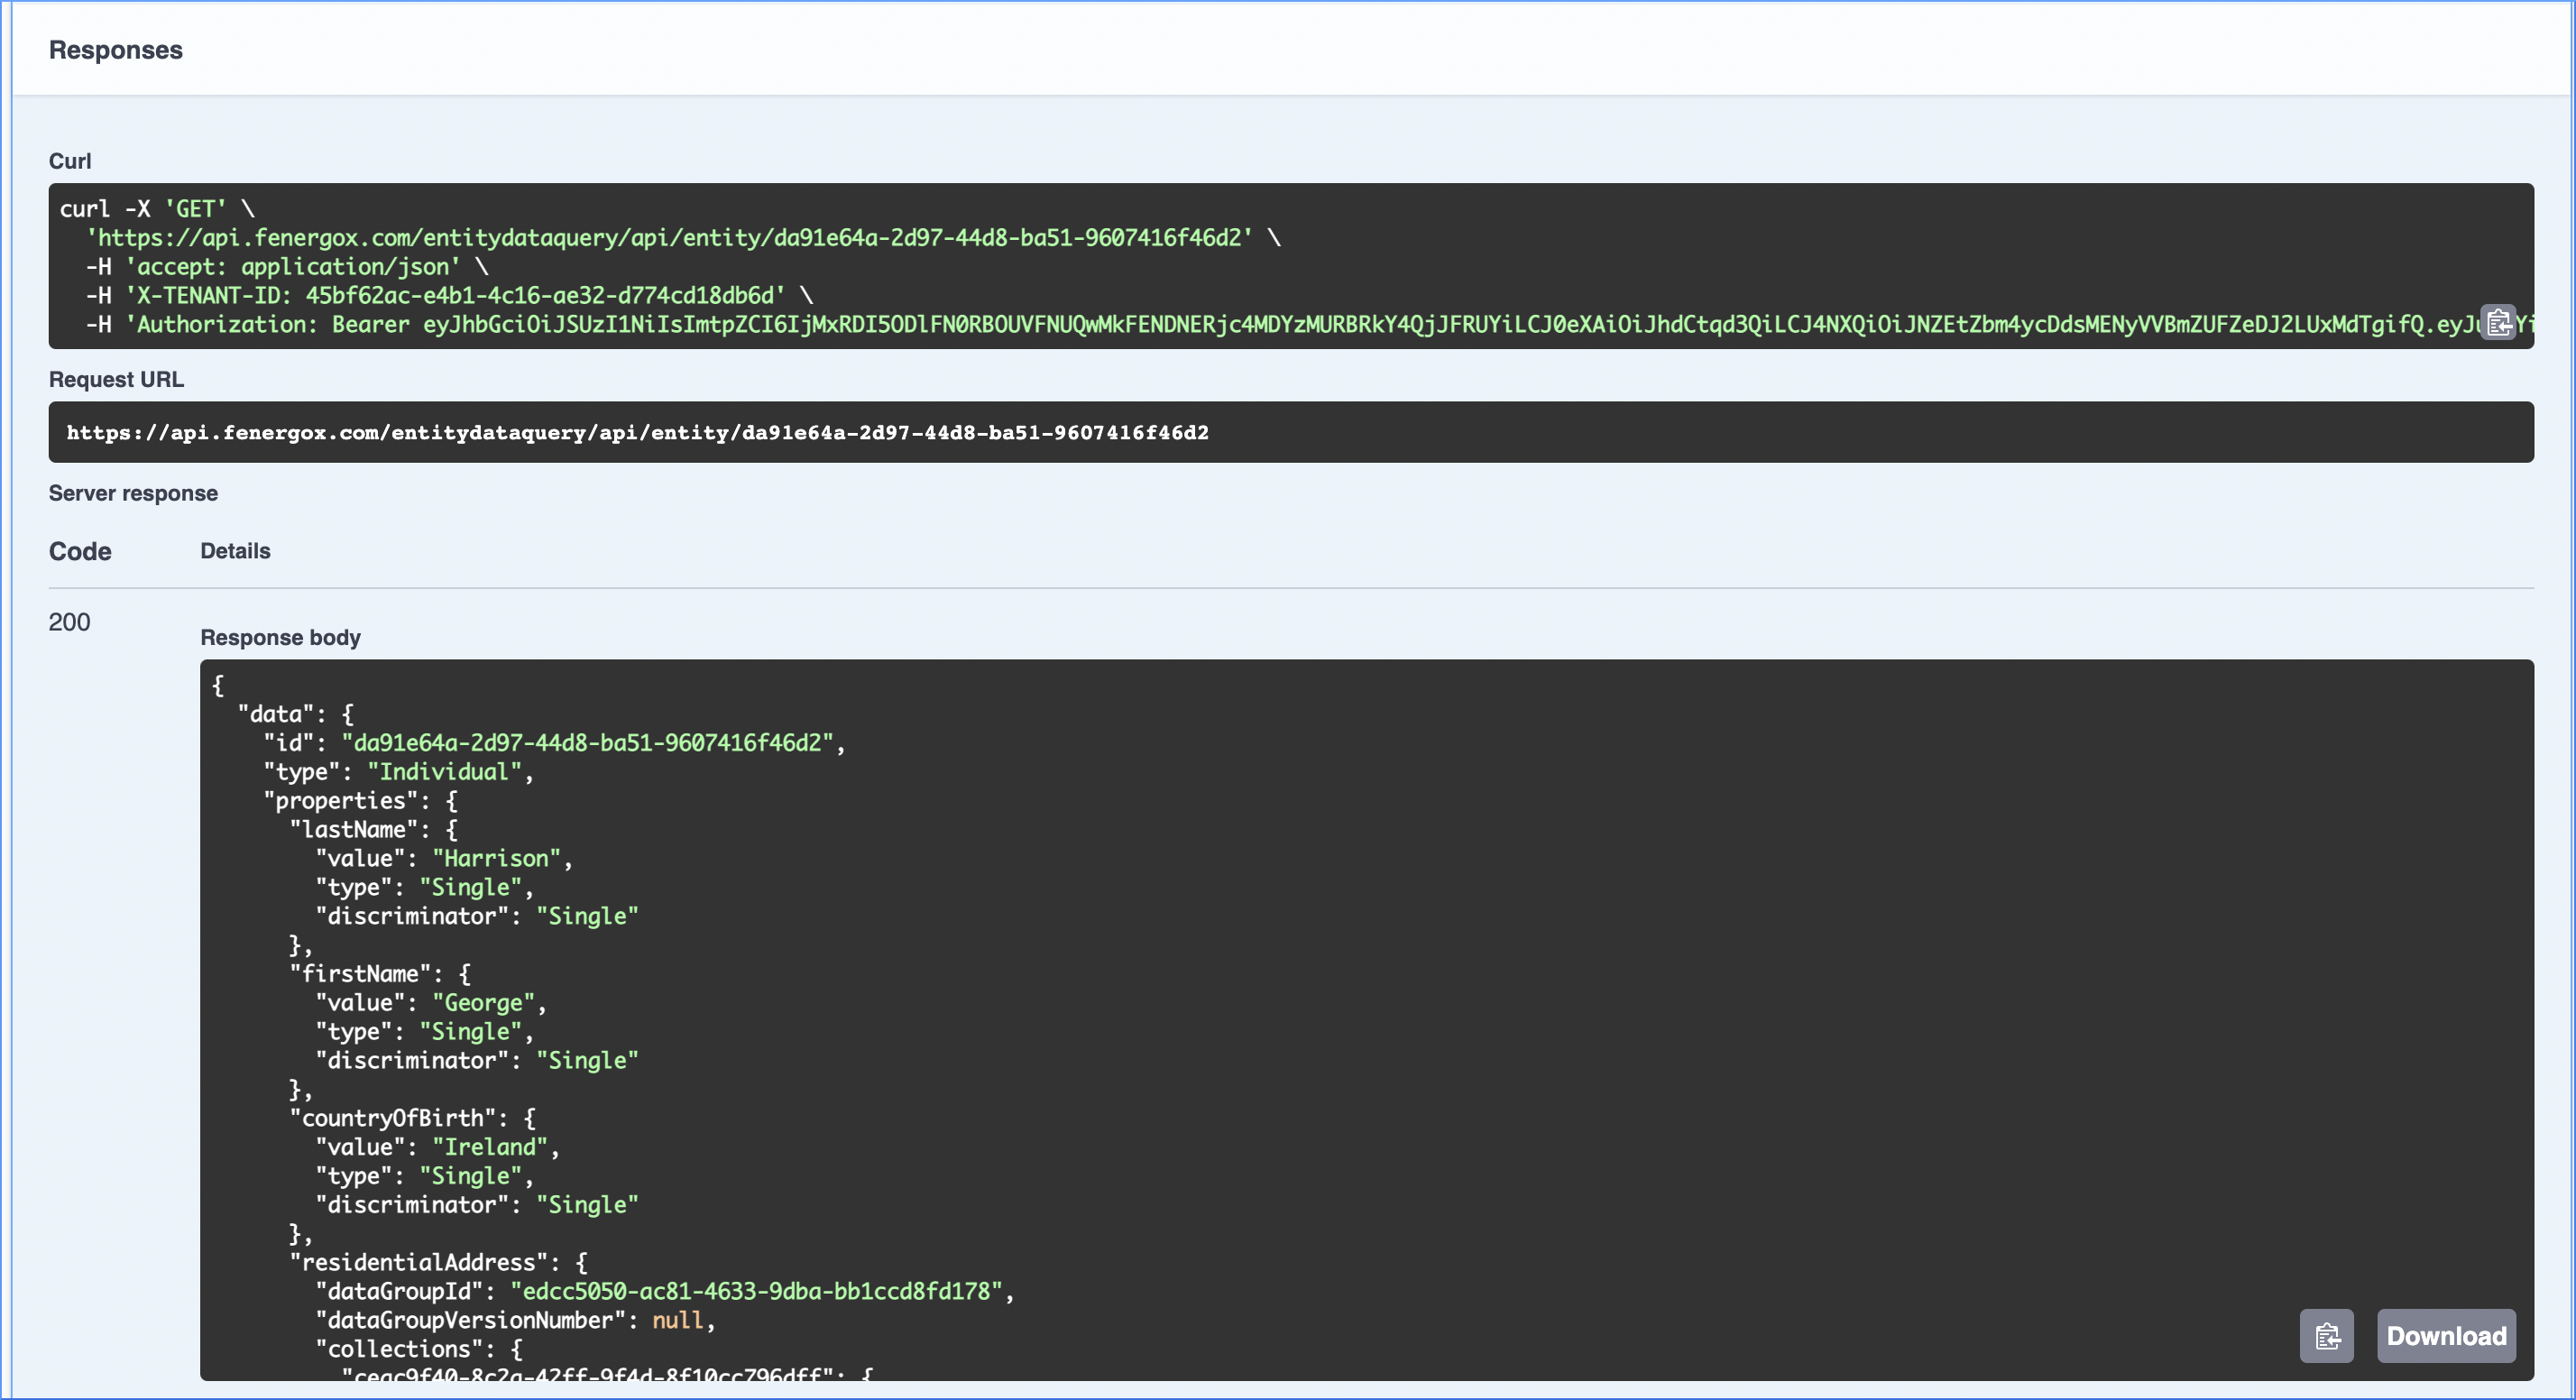
When you select the Try It Out button you must provide the Tenant Id and the parameters. This example the parameters are just an Entity Id.
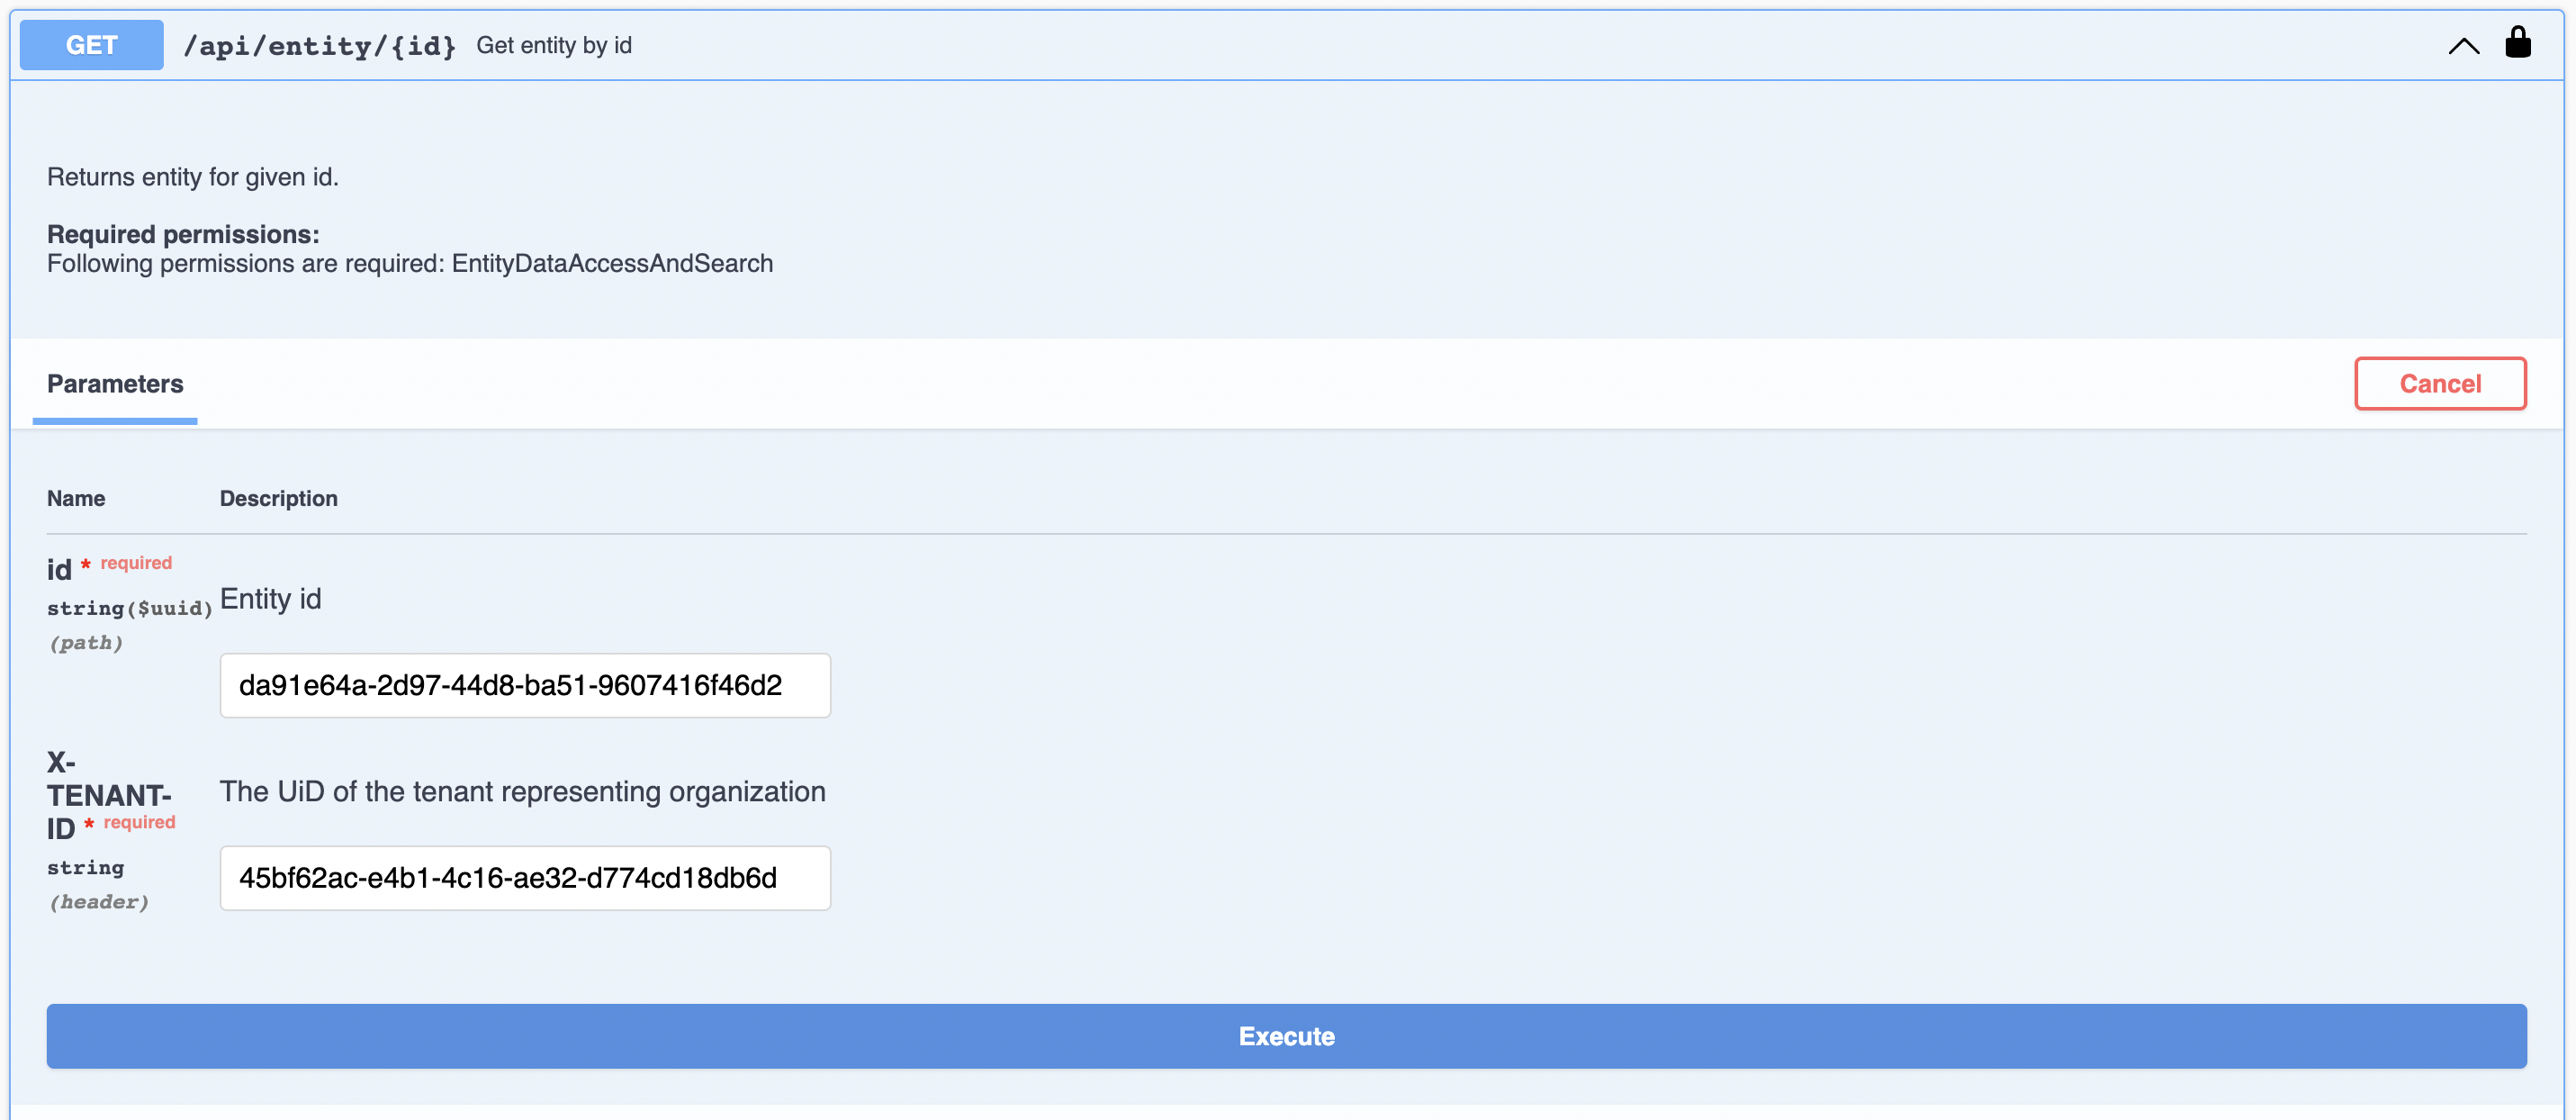
You can then interact with the response back from your tenant. Swagger is the simplest way to test out APIs.
Using Postman to make API calls
Postman is a world class tool for testing and if you are going to be working with FenX APIs to design solutions and build integrations, Postman will be a massively valuable asset to have in your arsenal. You can get it here : Download Postman and there are tons of tutorials and help guides available. This documentation makes extensive use of and references to, Postman. To demonstrate testing APIs and working with the features. It is not necessary to follow using Postman but it gives us a coding agnostic platform to show how to work with our APIs.
Using a Client Credential to Request an Access Token
Postman can often be thought of as a way to simulate programmatic activity from a controlled environment and interact with the Request and Response level detail of the APIs. For system to system integration the recommended method for authentication is to use a Client Credential. This can be issued for clients from our Cloud Business Office and can be used in Postman to request an Access Token before making API calls. To use a client credential against the Fenergo SaaS platform, follow the below steps
- Request a Client Credential : This can be requested from our cloud business office and can be configured with the appropriate level of Scope to suit the use cases.
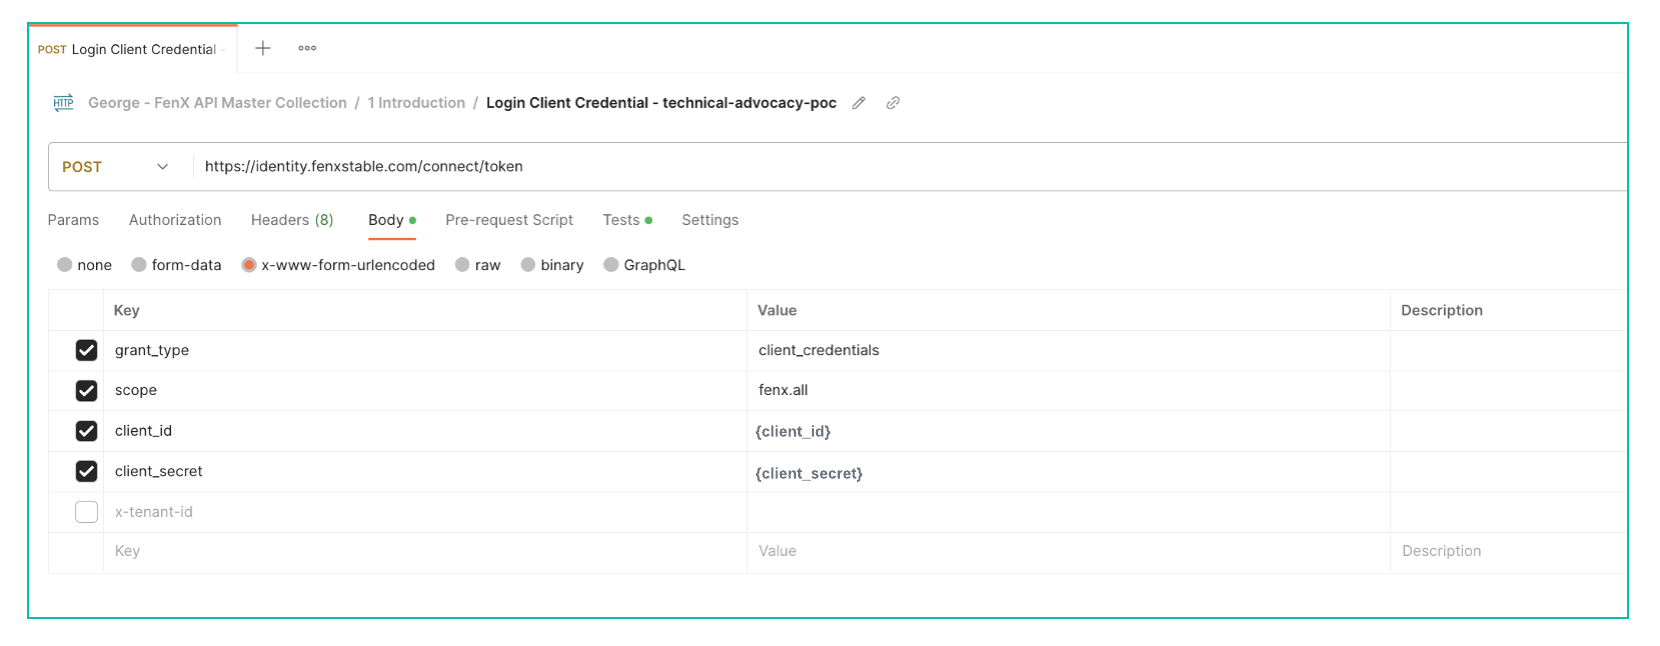
- Identity Server URL - as per the screenshot, populate the Token Endpoint of the Identity Server URL :
https://identity.fenxstable.com/connect/token(this will differ depending on the region you have chosen) - Body Form URL Encoded Values You will have to set the parameters as per the screenshot below.
- grant_type: This should be set to client_credentials as below.
- scope: This can define the scopes required for the credential. See API Scopes and Access Control.
- client_id: This will be supplied by a SaaS Request and should be kept securely.
- client_secret: This will be supplied by a SaaS Request and should be kept securely.
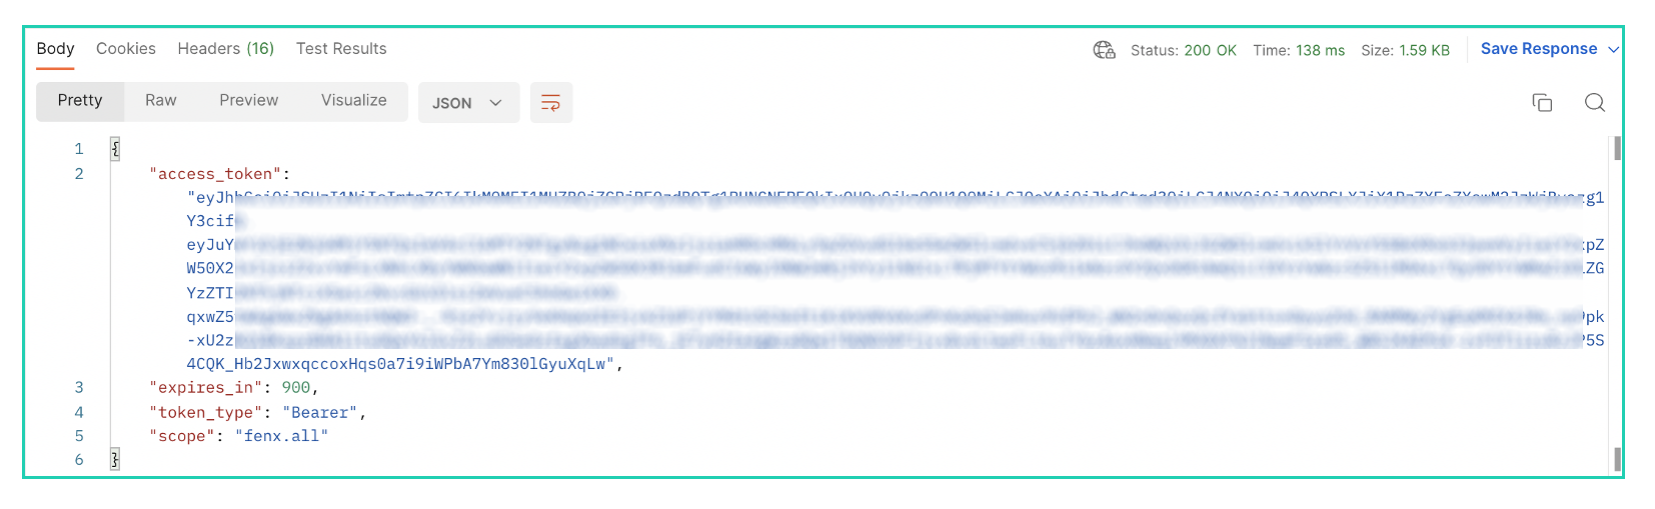
Postman Auth Response
With the above details populated, the response from postman will be as below. Using the programmatic aspects of postman you can also set this token as a variable for convenance of working with other API calls in your collection.
Tests and Variables in Postman
You may also find that Postman collections get passed around like code and just like code, everyone has their own preferred styles and configurations. To level the playing field however - lets look at two features which you will find referenced in most of the Postman Samples in this documentation and then you can use whatever approach you prefer.
As convenient as Postman is, it is not a linear programming language, each request is stateless and unrelated to other requests. With the Fenergo SaaS APIs its often necessary to Chain together requests in order to achieve a desired result such as follows :
- A Journey API call can get the details of the instance of a Journey.
- It will contain the detail of a "entity id" and also the "draft entity Id"
- So you can use the response from the first call to get the detail you want in the second call.
If you don't want to spend your time "Copy and Pasting - Ctrl+C --> Ctrl+V" and switching between tabs, it is easier to use variables and tests in Postman. A very Simple example is how we set up to start an API session. You cant access any APIs without generating an Access Token so the first call in any Postman Collection will be an Authorize call against the identity provider. See below:
In the Above example you can see that the details of the request are all in place and the response is displayed below containing the access token.
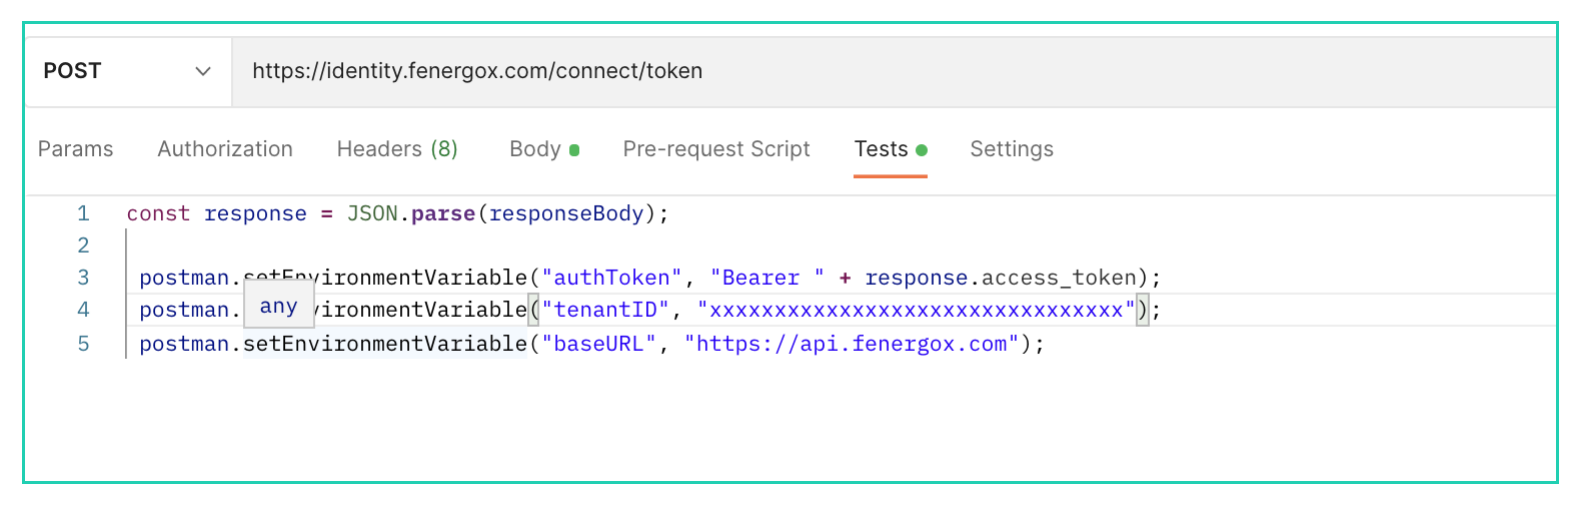
Next the Tests tab of the Request has been configured to read this response, parse out the access token and set it in a variable. This variable can then be referred to in other requests using the double curly braces syntax. {{Variable-Name}}.
Postman achieves this in the following pattern:
- Run the Request
- Returns the Response
- The Test runs after the response and sets variables with the data from the response object.
In the example we are setting the following variables:
  postman.setEnvironmentVariable("authToken", "Bearer " + response.access_token);
  postman.setEnvironmentVariable("tenantID", "xxxxxxxxxxxxxxxxxx");
  postman.setEnvironmentVariable("baseURL", "https://api.fenergox.com");
So we can now reference the {{authToken}}, {{tenantID}} and {{baseURL}} in the headers of all other requests inside our postman collection which is why you will see HTTP Examples such as the following across this documentation.
{{baseURL}}/entitydatacommand/api/v2/entity
Postman Tests Tab