Execute a Data Migration
Once all the files are uploaded, the Migration can be started. To start a migration call the following PUT Command.
HTTP PUT FORMAT:
==================
{{baseURL}}/datamigrationcommand/api/v2/migration/{{migrationID}}/start

HTTP PUT EXAMPLE
==================
{{baseURL}}/datamigrationcommand/api/v2/migration/a5261b21-2eee-45ce-b629-b53b6b5f1b81/start
The process runs asynchronously and returns an "accepted" response.
 HTTP RESPONSE:
 ==================

 HTTP 202 Accepted
Checking the Status of a Migration and handling Failures
As done previously the status of the migration can be checked with the following command
HTTP GET FORMAT:
==================
{{baseURL}}/datamigrationquery/api/migration/{{migrationID}}
If there is an issue with the Migration the details will be returned and the "status" will be failed: as below:
    HTTP PARTIAL RESPONSE:
    ======================

    {
        "data": {
            "id": "a5261b21-2eee-45ce-b629-b53b6b5f1b81",
            "createdDate": "2021-10-11T16:31:10.434+00:00",
            "completedDate": null,
            "status": "Failed",
            "entityCount": 0,
            "migratedEntityCount": 0,
            "failedEntityCount": 0,
            "associationCount": 0,
            "migratedAssociationCount": 0,
            "dataMigrationFilesDto": [
            .
            .
            .
Retrieving a Migration Error File
As the migration has failed, regardless of the root cause, no entities are migrated. The next step will be to retrieve the Error-File from the migration making one of the following calls. There are two ways to retrieve the "Error-file". If the quantity of errors is more than 30000, you must use Option 2.
HTTP GET FORMAT:
==================
{{baseURL}}/datamigrationquery/api/migration/{{migrationID}}/get-error-file

HTTP GET EXAMPLE:
=================
{{baseURL}}/datamigrationquery/api/migration/a5261b21-2eee-45ce-b629-b53b6b5f1b81/get-error-file
HTTP GET FORMAT:
==================
{{baseURL}}/datamigrationquery/api/migration/{{migrationID}}/get-error-file-signed-url

HTTP GET EXAMPLE:
=================
{{baseURL}}/datamigrationquery/api/migration/a5261b21-2eee-45ce-b629-b53b6b5f1b81/get-error-file-signed-url

HTTP RESPONSE:
=================
{
    "data": <span class="blue">"https://docmanagement-production-5a56efda-a391-4d69-abc6-354a613a771a.s3.eu-west-1.amazonaws.com/datamigration/a5261b21-2eee-45ce-b629-b53b6b5f1b81/internal/Errors/data.csv?X-Amz-Expires=30&X-Amz-Security-Token=FwoGZXIvYXdzEAEaDDhxWzd0cltwopWfniLIAYWqSVfdnQ0W2w5%2B%2FYgojEXQOnch%2Fk4yVurBthwuI8B6osN%2FRaGKZZiVfOLw55y6TILWGYOmkq3gDM%2BYnNDHXXwIwRTbFgHtanE74tL0rF4%2Bxblo3lpjzxFvQ7F4utj6rm9OdS%2Fo%2B5eWIVj0ra0f9XfRnmPO%2FLuwOUD%2F0xmdYVF9LJbgo84%2F%2Bb6tUFIe83wvtBgzy%2FX0rgXkLQelEvxGg%2BLtooeJZMCJiqMzp4EEIngryWDhWIms2si1aqtP7hU2ozDKSfEdA5e%2FKOuB7JkGMi1vgBhXC0Dd3lN51vW0LV6d8Fc1t%2FDC%2FSHToK8ehwf0RI9nnGxB5z8FYj0StdA%3D&response-content-disposition=inline%3B%20filename%3Ddata.csv&X-Amz-Algorithm=AWS4-HMAC-SHA256&X-Amz-Credential=ASIAX4JM4C5OGM4YV2FK/20221003/eu-west-1/s3/aws4_request&X-Amz-Date=20221003T153403Z&X-Amz-SignedHeaders=host&X-Amz-Signature=ffb858026205ff587a79d8f2abe782ed9e289b7edaad243c2fe40d0f53e8c018",
        "messages": null
}
Option 1 above will return the error file content as a CSV file and option 2 returns an url that can be used to download the CSV file and contains verbose details that allow for data to be updated.
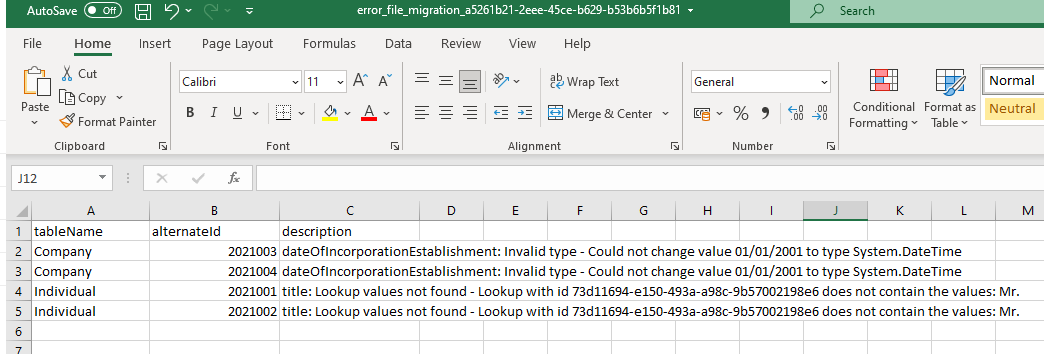
In this case, there are errors with both Company and Individual Data. The Date format provided is not correct, the date must be in a compatible format.
Also a Lookup value supplied for "Title" is not correct.
Once the data is fixed, the files can be deleted from the Migration Session and then re-uploaded again. However, its easier to just create a new migration from scratch and upload all the assets again.
Migration Reconciliation
Clients pass up their foreign keys as "alternateId's" in the migration. There may be a need for clients to then reconcile their new data on FenX with an existing system or a Data Master. For this reason once a migration has completed, there is a call that can be used to retrieve the list of "Migrated Records". This is a returned list of the clients "AlternateId's" and the corresponding newly created FenX Ids.
HTTP GET FORMAT:
================
{{baseURL}}/datamigrationquery/api/migration/{{migrationID}}/get-migrated-records-file

HTTP GET EXAMPLE:
{{baseURL}}/datamigrationquery/api/migration/a5261b21-2eee-45ce-b629-b53b6b5f1b81/get-migrated-records-file
If you get an error like below:, indicating that the volume of the migration exceeds the size of reconciliation file which can be returned via the API Gateway. You need to look at the V2 of the Data Migration APIs and use the new command API: {{baseURL}}/datamigrationcommand/api/migration/{{migrationID}}/migration-records-file-signed-url.
Entity Migration
{
    "message": "File Size Limit Exceeded for MigrationId: be09ec00-dce2-4d45-9e41-2e6012578db0 has more than 30000 records",
    "type": "Error"
}
Get Migrated Records File Signed URL
The best way to get the reconciliation file if the volume of data is > 30k records is as below, where the Command API is used to generate a Secure URL which can then be used to retrieve the file back in a secure way regardless the size.
HTTP GET FORMAT:
================
{{baseURL}}/datamigrationcommand/api/v2/migration/{{migrationID}}/migration-records-file-signed-url

HTTP GET EXAMPLE:
==================
{{baseURL}}/datamigrationcommand/api/v2/migration/a5261b21-2eee-45ce-b629-b53b6b5f1b81/migration-records-file-signed-url

HTTP GET RESPONSE:
==================
{
    "data": "https://docmanagement-production-45bf62ac-e4b1-4c16-ae32-d774cd18db6d.s3.eu-west-1.amazonaws.com/datamigration/c13668b9-cf56-4613-aeb2-21c8bf8486c7/internal/MigratedRecords/data.csv?X-Amz-Expires=30&X-Amz-Security-Token=FwoGZXIvYXdzEGUair%2BqdTlq1O2ypKrqQ73CMZgZk951nminvajzjj1dxeww48EYtNrRLnKJrA9qEGMi18KHIVA57Fj9Yh0LJnzR4PXcuKDbgtEGhL8QG2nKSeQUUfDC32HzWHGyI2Haw%3D&response-content-disposition=inline%3B%20filename%3Ddata.csv&X-Amz-Algorithm=AWS4-HMAC-SHA256&X-Amz-Credential=ASIAX26ODGH4OOWUU75J/20230417/eu-west-1/s3/aws4_request&X-Amz-Date=20230417T193802Z&X-Amz-SignedHeaders=host&X-Amz-Signature=e2bd1fa8f35451e8381b74738e00b51eb87d3e1a9a2f9c4a565e1039da3516bb",
        "messages": null
}
The response CSV file for the 4 entities migrated in this exercise are as follows:
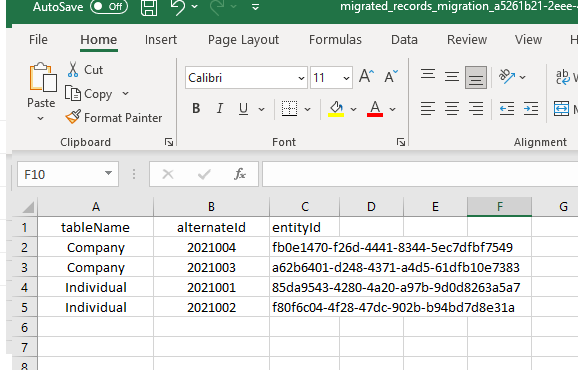
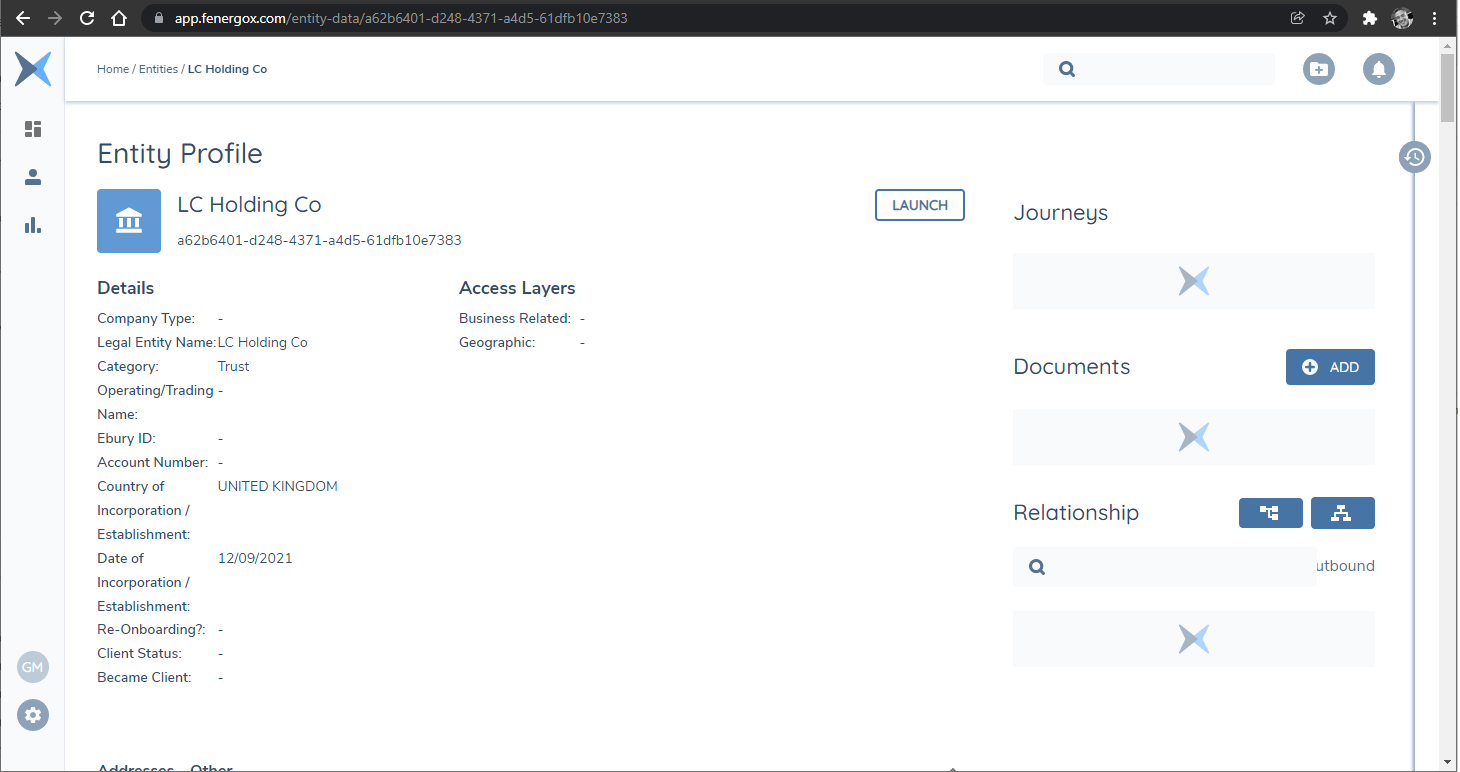
One of these IDs can now be used to retrieve the LE Details on FenX either through the UI or an API call.
Assigning an Alternate ID
An Alternate ID can be assigned to a manually created record by using the record-reference-ingestion endpoint. This is typically required to enable updates to such records via the Data Migration process.
The Alternate ID can be assigned to a manually created record via the following Post Command
HTTP PUT FORMAT:
==================
{{baseURL}}/datamigrationcommand/api/record-reference-ingestion
This request will return a pre-signed URL, which is used to upload a file containing the Alternate ID assignment details.
File Format Requirements The file must contain the following headers:
- tableName
- alternateId
- fenxId
Valid Values for tableName:
- Company
- Individual
- Entity Group
- Product
- Association
Once the file has been uploaded, execute the ingestion process using the following post endpoint. The Id is the unique identifier returned in the initial pre-signed URL response.
HTTP PUT FORMAT:
==================
{{baseURL}}/datamigrationcommand/api/v2/record-reference-ingestion/{{Id}}/execution
The record-reference-ingestion endpoint is only intended for assigning an Alternate ID to manually created records that do not already have and Alternate ID assigned. This ensures these records can be properly referenced and updated through Data Migration.
Do not use this endpoint to update or overwrite an existing Alternate ID. Doing so may disrupt future data migrations and lead to potential data integrity issues.
If an existing Alternate ID must be changed, contact Fenergo Support. Support will handle the update to ensure it is applied safely and consistently across the platform.
Additionally, if any entities are deleted, it is critical to notify Fenergo. We will remove any associated Alternate IDs proactively to prevent migration errors caused by unresolved references.
By following these guidelines, you help maintain the integrity of your data and ensure a smooth and error-free migration process.