Configuring Advanced Journeys
Creating Scheduled Journeys
Journey Scheduler Component in Journey Builder
The Journey Scheduler allows configurators to create / edit Journey Schedules whereby specific Journey types will be launched automatically without requiring manual user input. The most common Journey this is used for is Periodic Review.
Screengrab of Journey Schedules
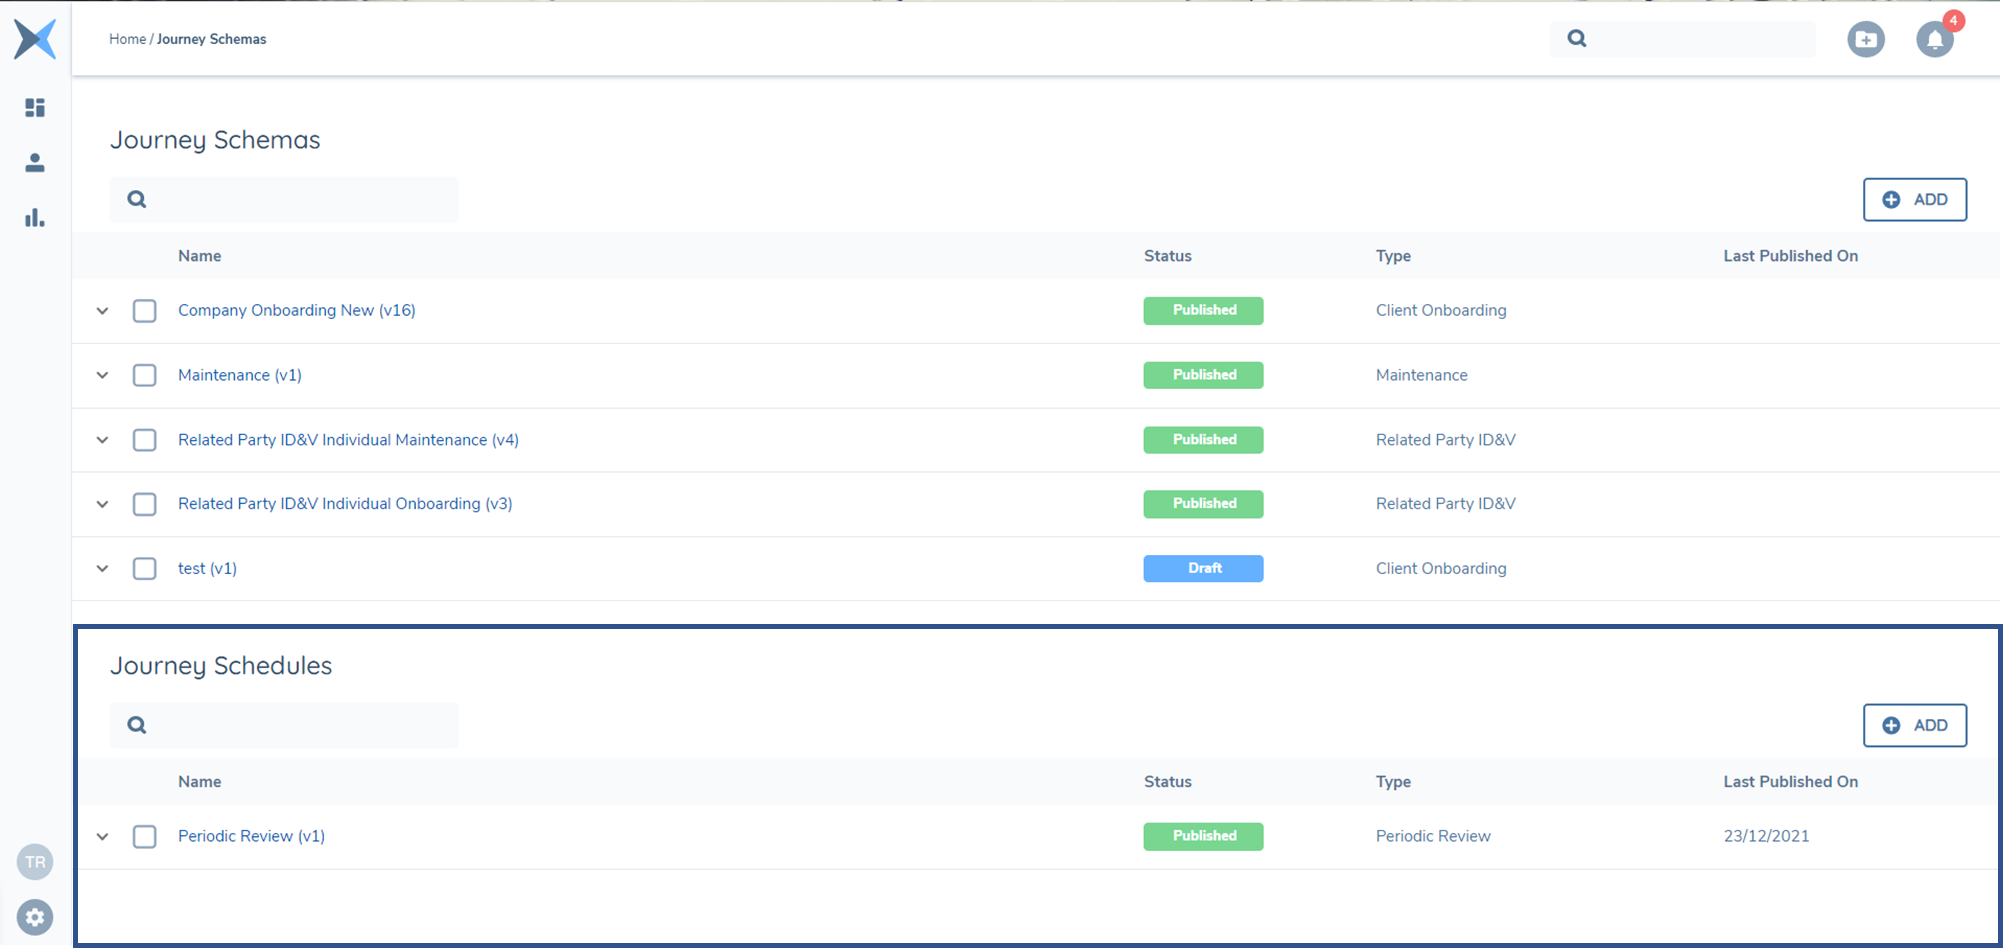
To create a scheduled Journey, we must navigate to the ‘+’ on in the Journey Schedules component. This will take us to the Journey Schedule Builder screen. On this screen, we will see the fields Journey Schedule Name and Journey Type which are both mandatory fields. Once these fields are populated, the Save button on screen will become active.
We must save these values before we can add Journey Schedule Scoping Conditions.
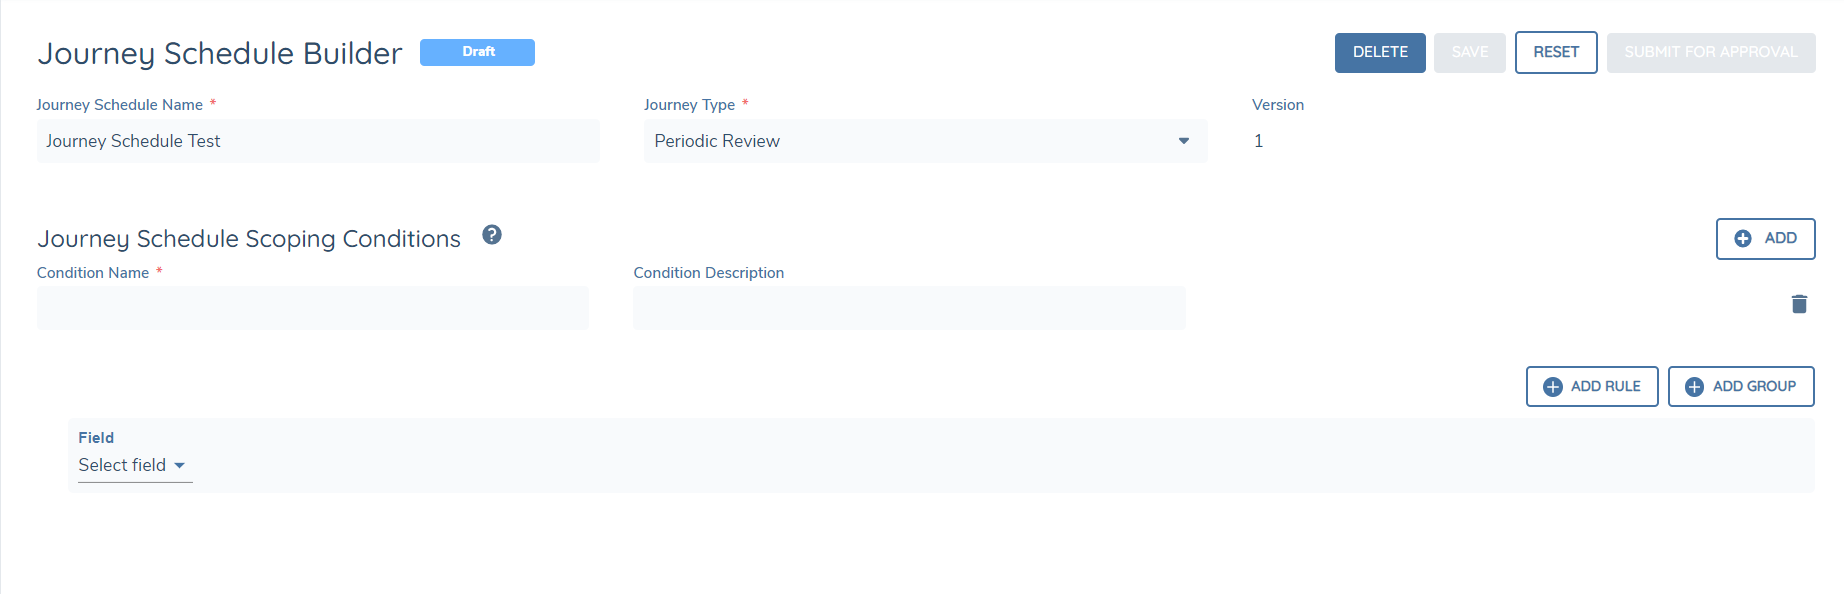
Screengrab of Journey Schedule Builder - Name/Type

Once we select save, additional options will become available to Reset the values, Submit for Approval or Delete the Journey Schedule:
Screengrab of Journey Schedule Builder - Reset/Submit for Approval/Delete
Within the Journey Schedule Scoping Conditions, we can set out the logic for this scheduled Journey to Launch. The current available fields for selection in conditions are the fields which have been identified as Indexable in Policy:
Screengrab of Journey Schedule Builder Indexable Fields
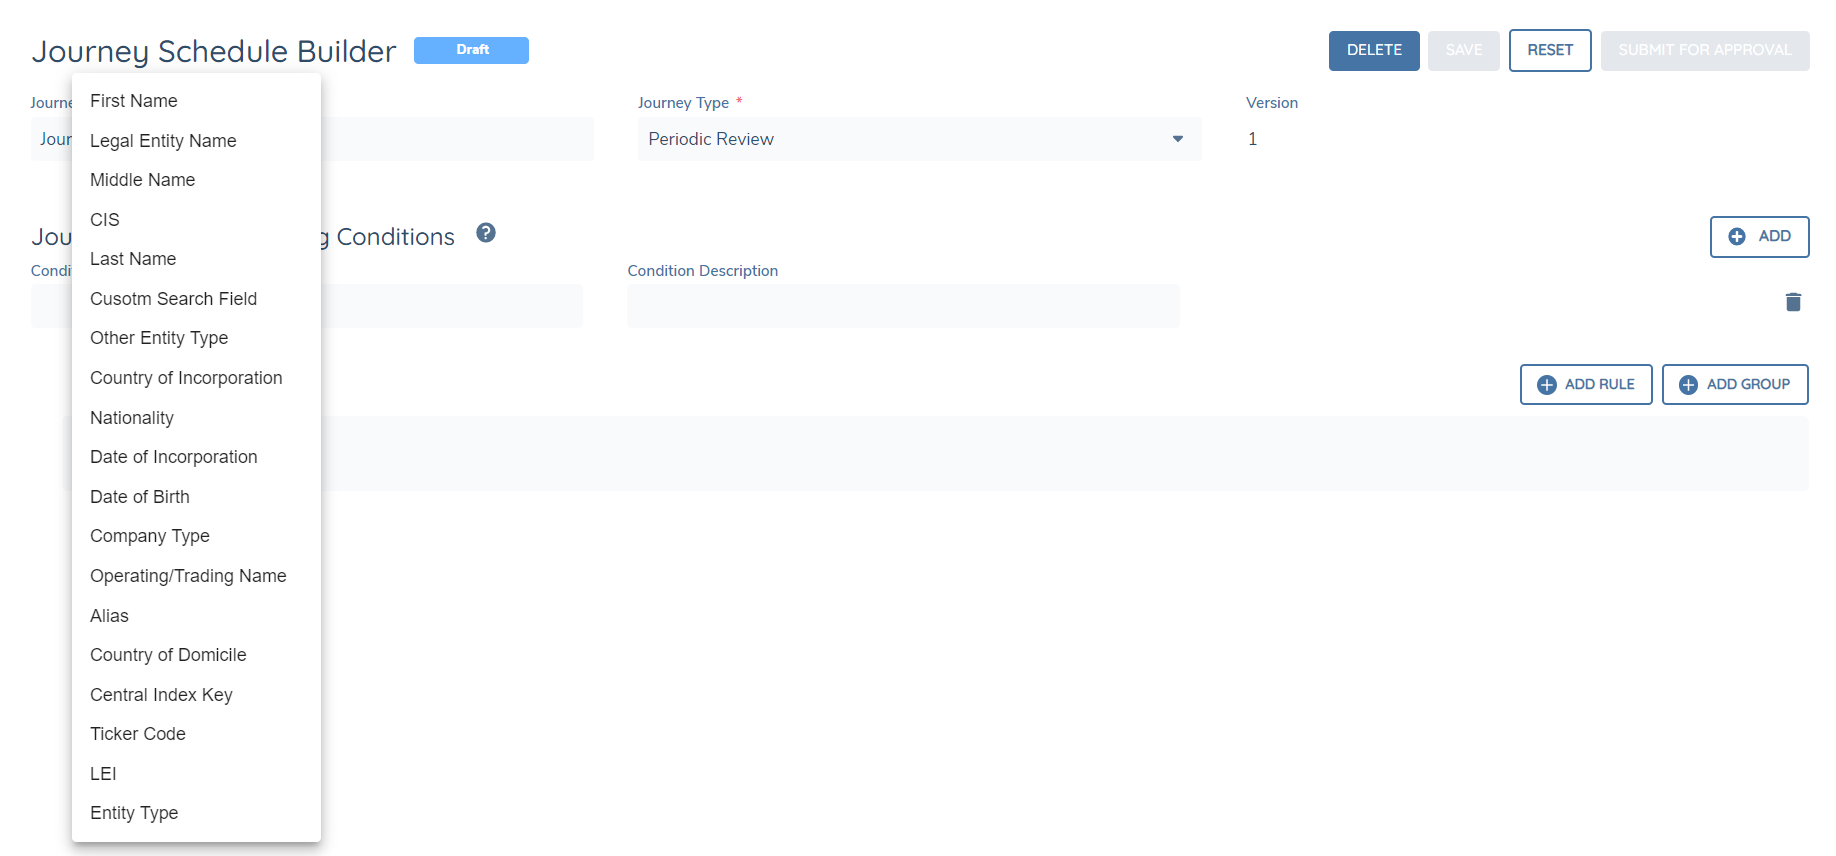
A number of fields are mandatory indexable and can’t be unindexed. Those fields are:
- firstName
- countryOfIncorporation
- middleName
- countryOfDomicile
- lastName
- dateOfIncorporation
- alias
- companyType
- dateOfBirth
- lei
- nationality
- centralIndexKey
- legalEntityName
- tickerCode
- operatingTradeName
- otherEntityType
The user has the option to add a further ten non-mandatory indexable fields if they wish from any of the standard ‘Data Requirement’ fields (non-data group fields).
After the field is made indexable, and the new Policy Draft published, the field will be indexable in Elasticsearch and any newly created or updated (verified) entities will be available in the Advanced Search results for that field.
Currently, the Journey Schedule can only work on ‘AND’ conditions. This means that we cannot add any ‘OR’ conditions in Journey Schedule.
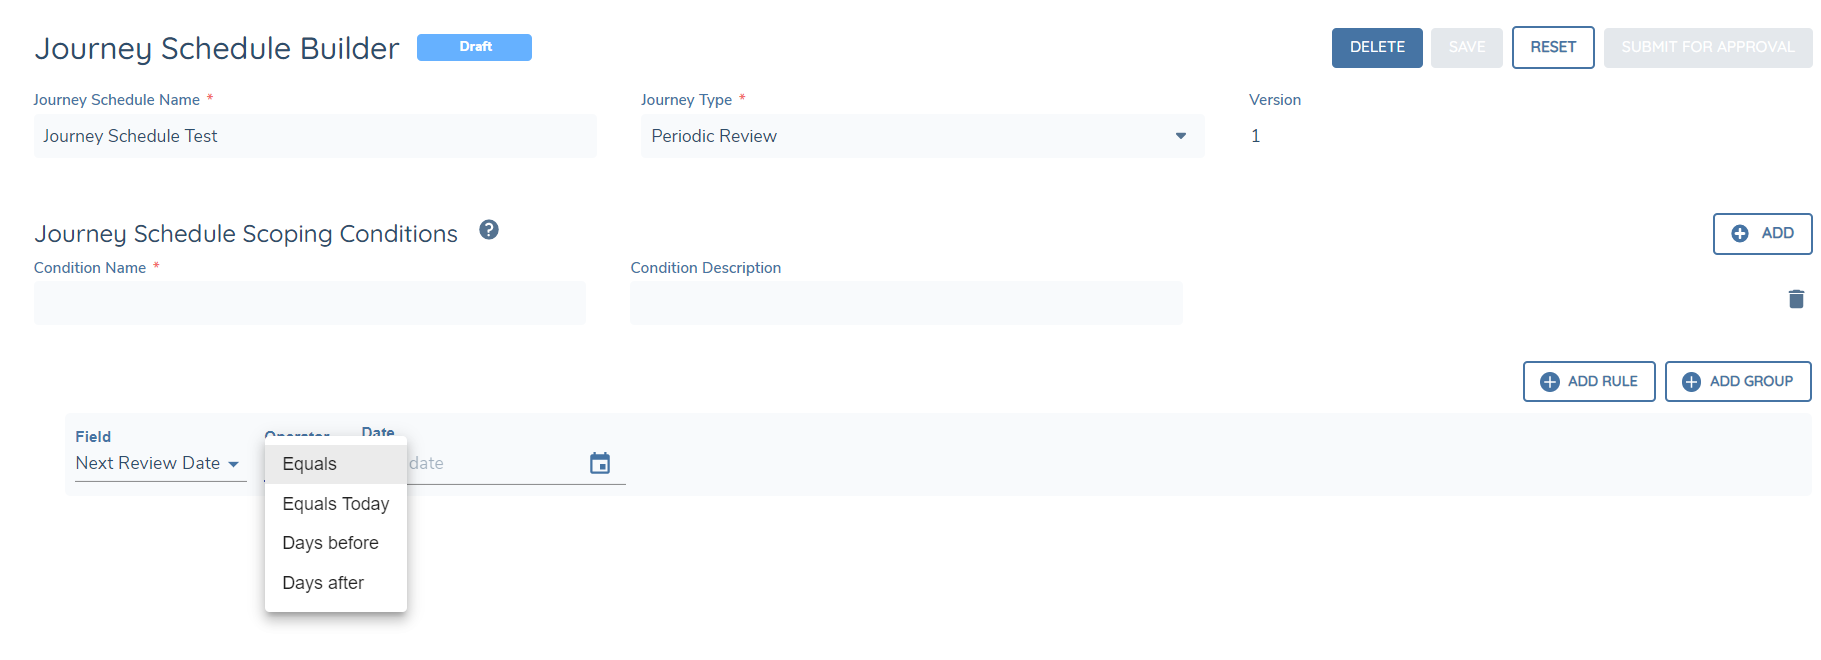
For Date fields in conditions, we have included the following Operators:
- Equals
- Equals Today
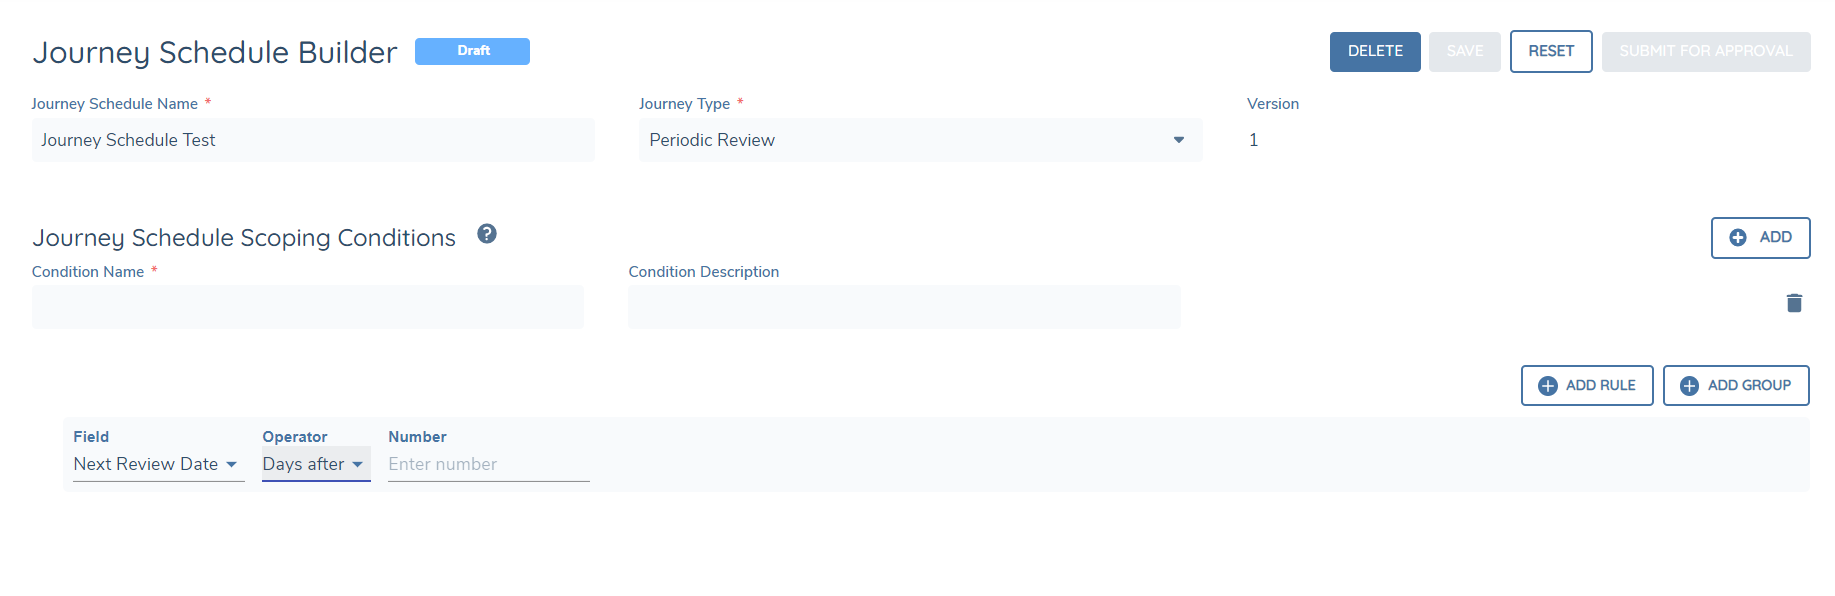
- Days before (with ability to set number)
- Days after (with ability to set number)
Screengrab of Journey Schedule Scoping Conditions Operators
Screengrab of Journey Schedule Scoping Conditions Days After Operator
Field Types Supported in Journey Scheduler Conditions
- Select Dropdown
- Multiple Select Dropdown
- Date
- Number
- Text Field
Field Types not Supported
- Text Area
- Linked Select Dropdown
- Multiple Linked Select Dropdown
- Legacy Linked Select Dropdown
- Legacy Linked Select Dropdown
- Status
- Legacy Status
- Rich Text Editor
- Search Text Field
The Journey Scheduler component is versioned, similar to Journey Schemas, in order to not directly impact any existing Scheduled Journeys.
Please note that given their status, offboarded entities are excluded from the Journey Scheduler.
Journey Launch Controls
Configuring a Journey Launch Control
Assuming the User has the requisite Journey Launch Controls - Access & Edit permissions, they can then begin configuring. To support the use-cases whereby a Journey should be conditionally available, based on the progression of another Journey Type, we have introduced a new Source of "Current Journeys". This new "Current Journeys" source will allow a User to define the scenario under which a Journey Type is eligible to be initiated, relative to the progression of other Journey Types already in-progress for that Entity.
In a simple example below, this Tenant has a Journey Launch Control that states the following conditions, when satisfied, will not allow for a Maintenance Journey Type to be initiated.
- If there is currently a "Client Onboarding" Journey Type in-progress.
- OR if there is currently a "Maintenance" Journey Type in-progress.
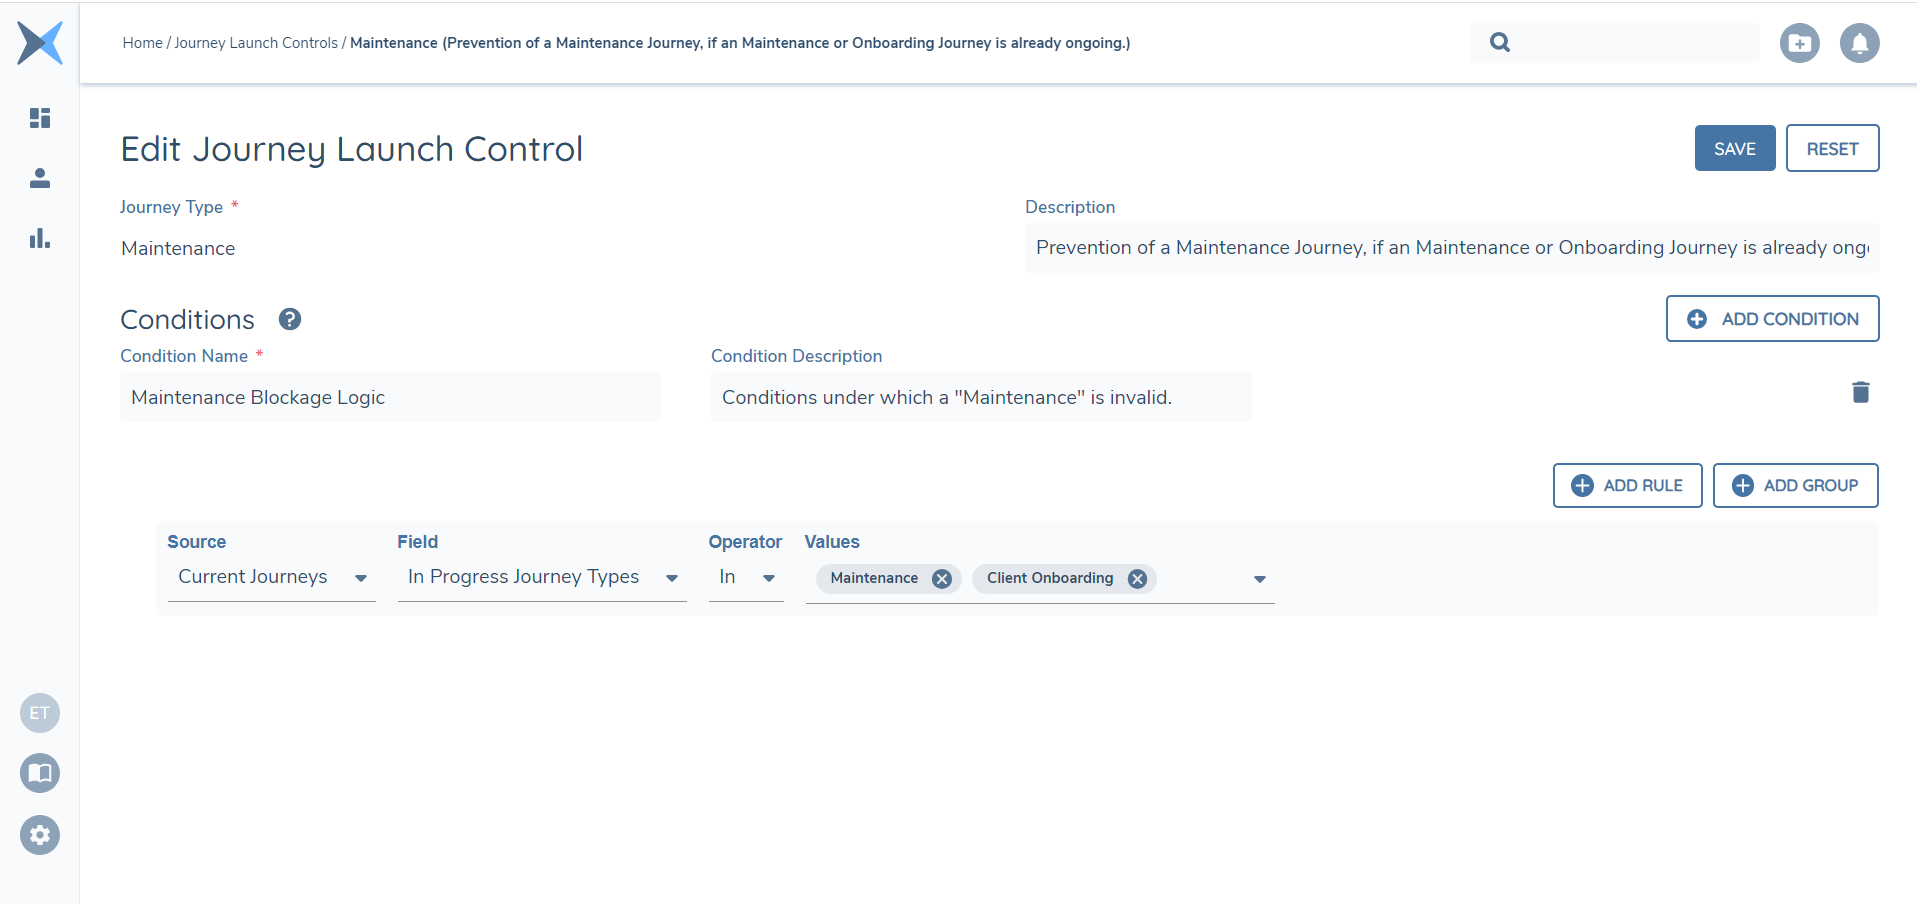
A User can configure Journey Launch Controls using a combination of Entity Data (defined within the Policies of the Tenant) via the "Current Entity" Source, as well as the aforementioned "Current Journeys" Source.

Currently, the only field within the "Current Journeys" Source is "In Progress Journey Types". Users can configure by stating if a given Journey Type is or is not in-progress, to determine the current progression of an Entity, by using the "In" and "Not In" operators. The "Values" here will simply be the latest Published version of the "Journey Types" lookup - the same lookup we reference in our Journey Builder to configure the Journey Type a given Journey Schema should be associated to.
Finally, only one Journey Launch Control may be configured against a Journey Type. A User will be blocked in the scenario where they try to create a new Journey Launch Control for a Journey Type, when one already exists within the tenant. In this scenario, a User should edit the existing Journey Launch Control.
Task Types
Assignment Conditions Tab
Task Assignment configuration is done at a Task-by-Task level. A User can configure Tasks to be assigned to a Team by Default, and additionally can configure the Task to be conditionally assigned to a Team based on pre-defined Entity Data conditions being met. The combination of a Default Team and Conditional Task Assignment conditions being configured means that Fenergo SaaS can solve for the reassigning of a Task throughout the lifespan of a Journey, based on condition-based rules baked into the Journey Schema. This ensures that the correct Team is being always being assigned to the correct Tasks as the Journey progresses.
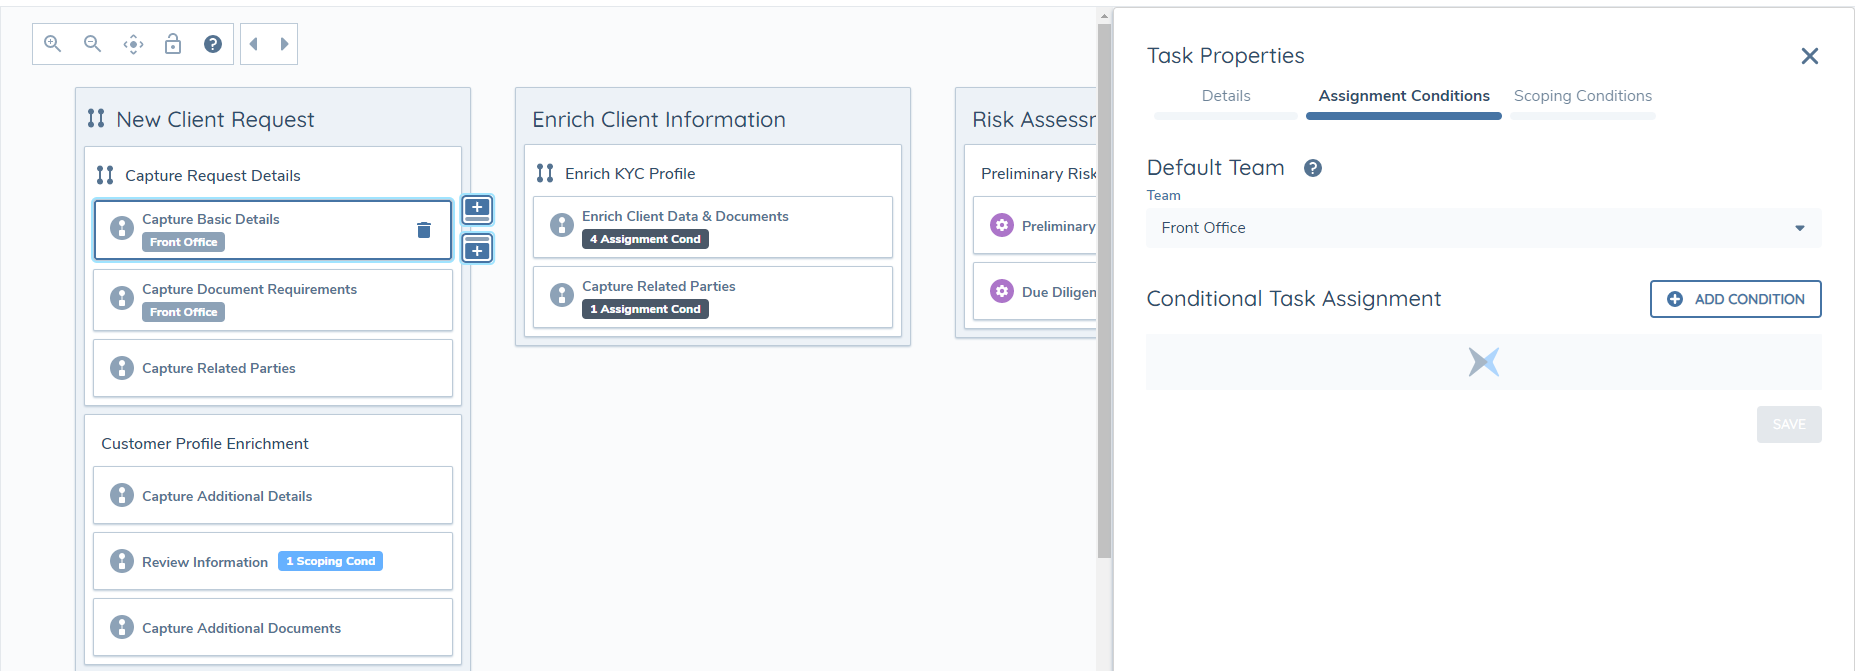
To Configure Dynamic Task Assignment, a User will navigate to the Assignment Conditions Tab within the Task Properties of a selected Task. Here, two separate sections will be displayed:
- Default Team: The Default Team will be assigned to the Task if none of the given Conditional Task Assignment conditions are met.
- Conditional Task Assignment: The Team that should be assigned to the Task when the accompanying Condition is met.
Screengrab of Default and Conditional Task Assignment
A User can configure a Team to be conditionally assigned to the Task by selecting the "Add Condition" button. This will present a mandatory "Team" dropdown - the Team that the Task will be assigned to when the accompanying Condition is met - and a non-mandatory "Description" text-field. Finally, a User must configure the Logic Engine condition that must be met. These can be AND/OR conditions, and are configured in the same manner as other instances of the Logic Engine used throughout Fenergo SaaS. A User must hit "Save" before leaving this tab, to ensure their Conditional Task Assignment conditions are saved down against the Journey Schema.
Screengrab of Conditional Task Assignment
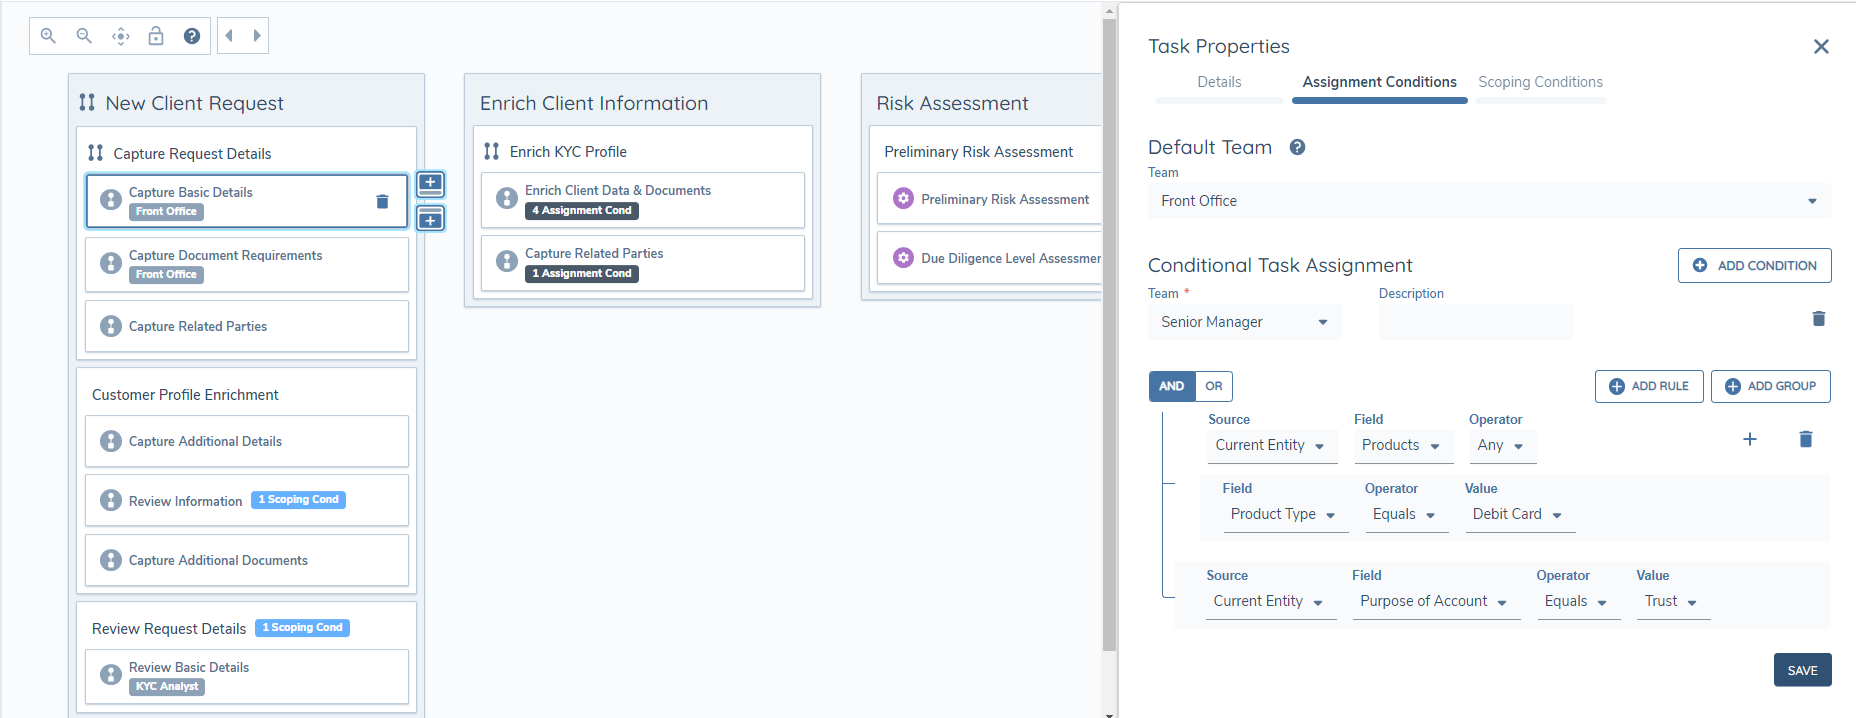
Multiple Conditional Task Assignment conditions can be configured to allow a Task to be conditionally reassigned to different Teams, based on the associated Condition being true. It is therefore important to note that Conditional Task Assignment rules are hierarchical, meaning the first rule that is met will be the Team assigned to the Task, when multiple Conditional Task Assignment rules are configured. Users should configure the Conditional Task Assignment rules appropriately in terms of the highest priority Team to be assigned.
Maker/Checker
To configure Maker/Checker on a Task, a new property has been added to the Task Properties component within Journey Builder. This will allow a User to define which Tasks are Checker Tasks in a Journey, and provides the ability to link specified Maker Tasks.
To opt-in a Task to Maker/Check functionality, a configurator can select the "Checker Task" toggle seen below. Doing so will display the secondary "Linked Maker Task(s)" field:
Screengrab of Checker Task toggle enabled
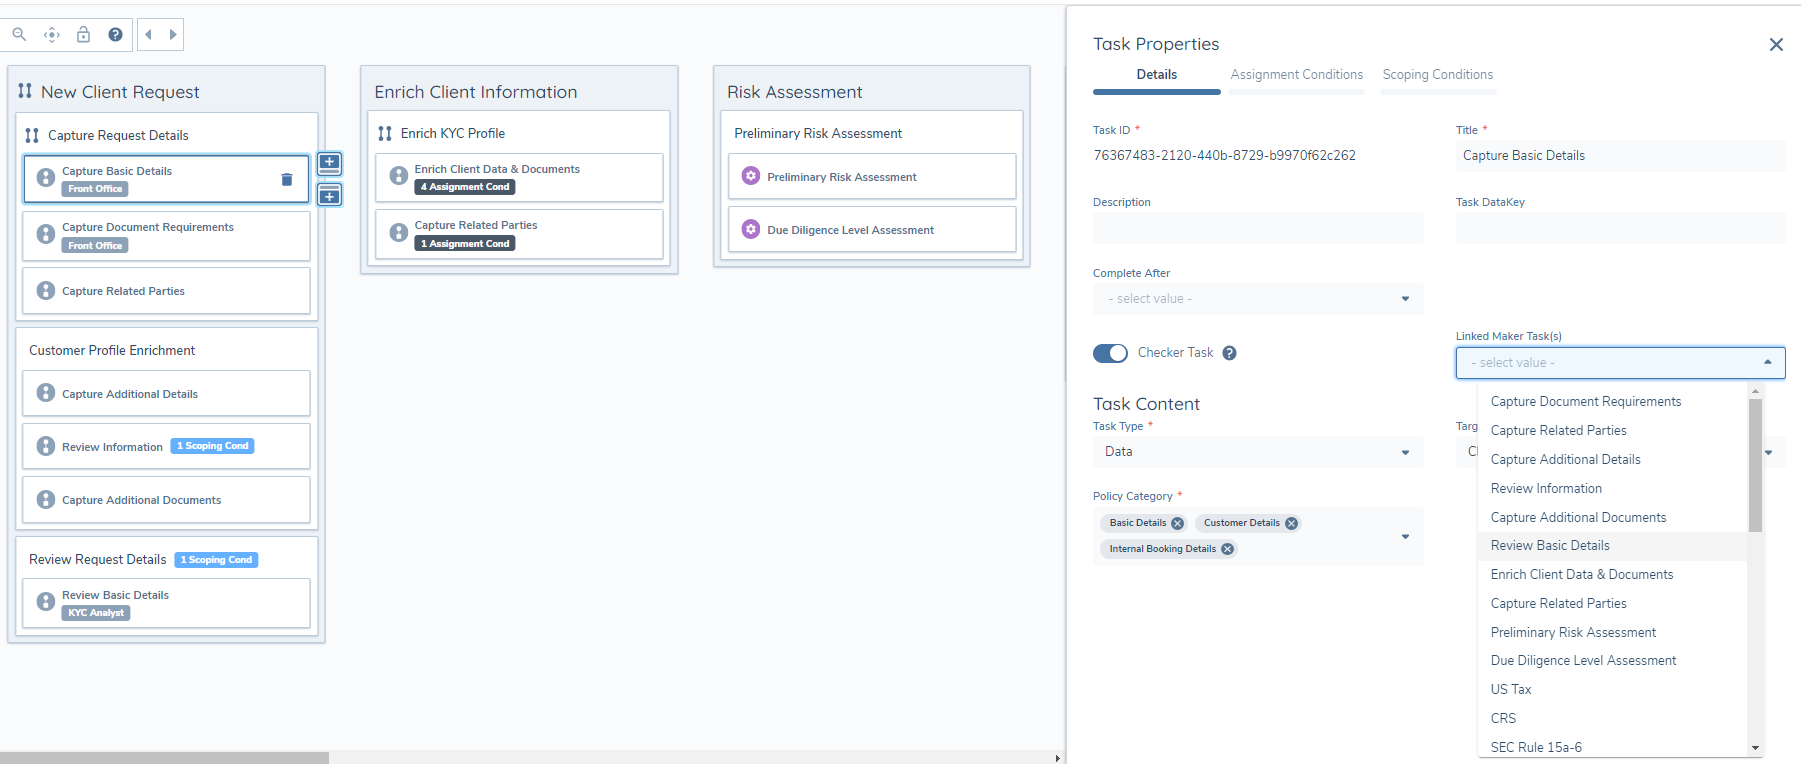
The "Linked Maker Task(s)" field is a multi-select dropdown, allowing the configurator to define which Tasks will be linked to this Checker task. This will mean that if a User completes the specified Maker Task(s), they will not be able to complete the associated Checker task. The Linked Maker Task(s) may only be completed by a separate User in order for the Journey to progress.
Additional Task Configuration Information in Journey Builder
Some tasks used in Journey Builder require additional steps completed before they can be used. Below is a walkthrough of each task where this is required.
Risk Requirement Tasks
Screengrab of Risk Requirement Task
Risk Model The risk factor set configuration model that should be used for this task.
Risk Threshold The risk threshold configuration model that should be used for this task.
Risk Configuration The risk calculation model that should be used for this task.
Risk Rating Datakey The Datakey that the Risk Rating value should be populated against.
Risk Score Datakey The Datakey that the Risk Score value should be populated against.
Risk Assessment Policy Output Task
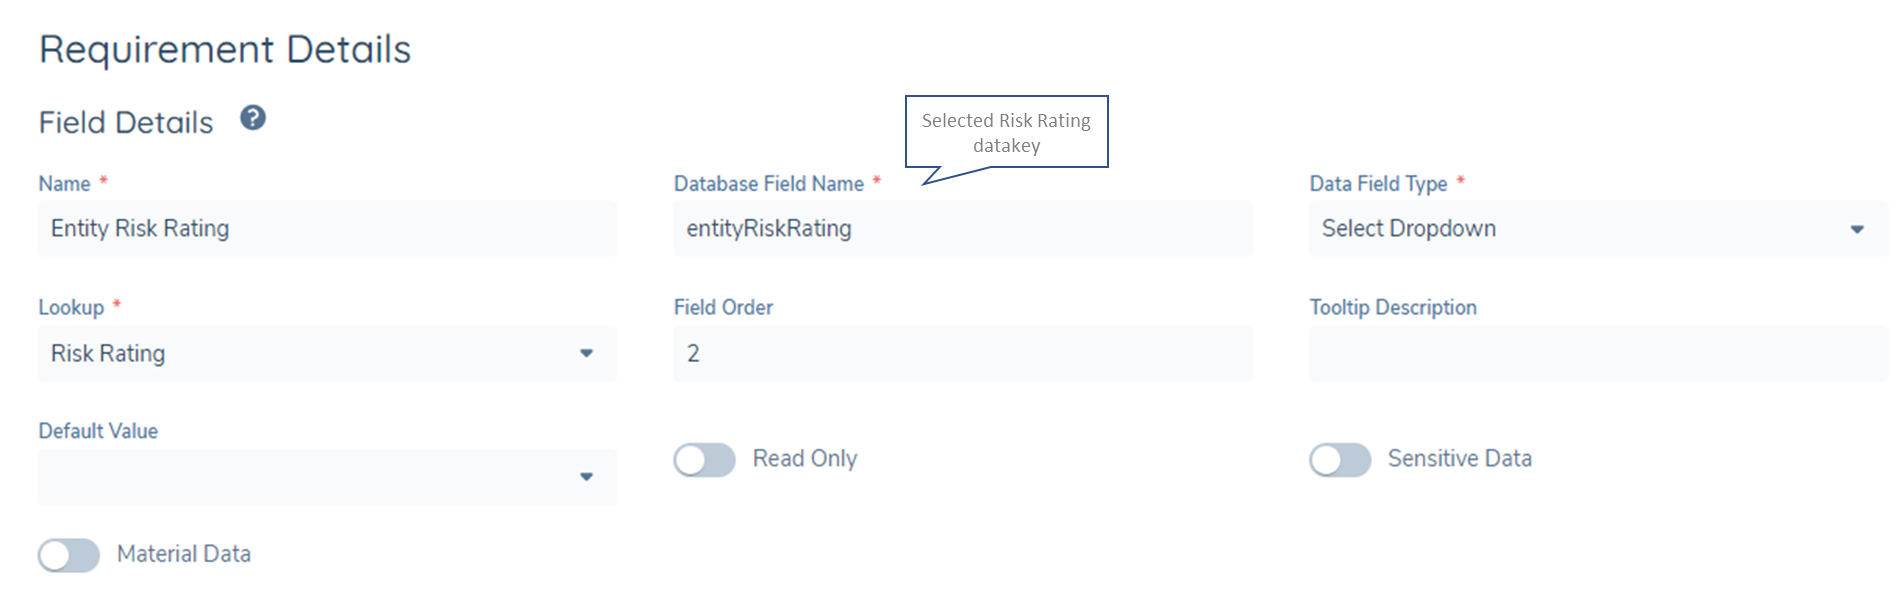
With the new Risk Assessment Policy Output task, when the risk is calculated, the risk output (i.e., risk rating and risk score) is sent to specific data fields chosen by the user.
This is done by the user first creating the fields in Policy for:
- Risk Rating
- Risk Score
Risk Rating field example in Policy:
Screengrab of Risk Rating field example
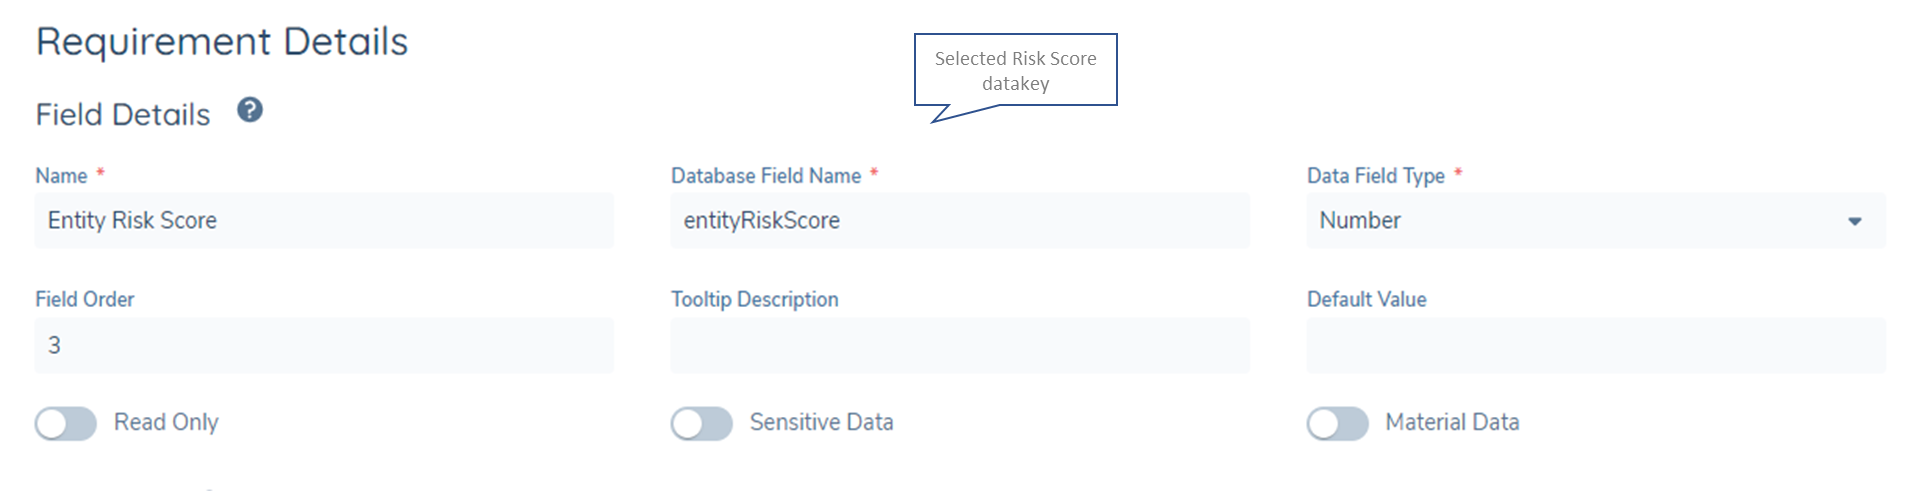
Risk Score field example in Policy:
Screengrab of Risk Score field example used in Policy
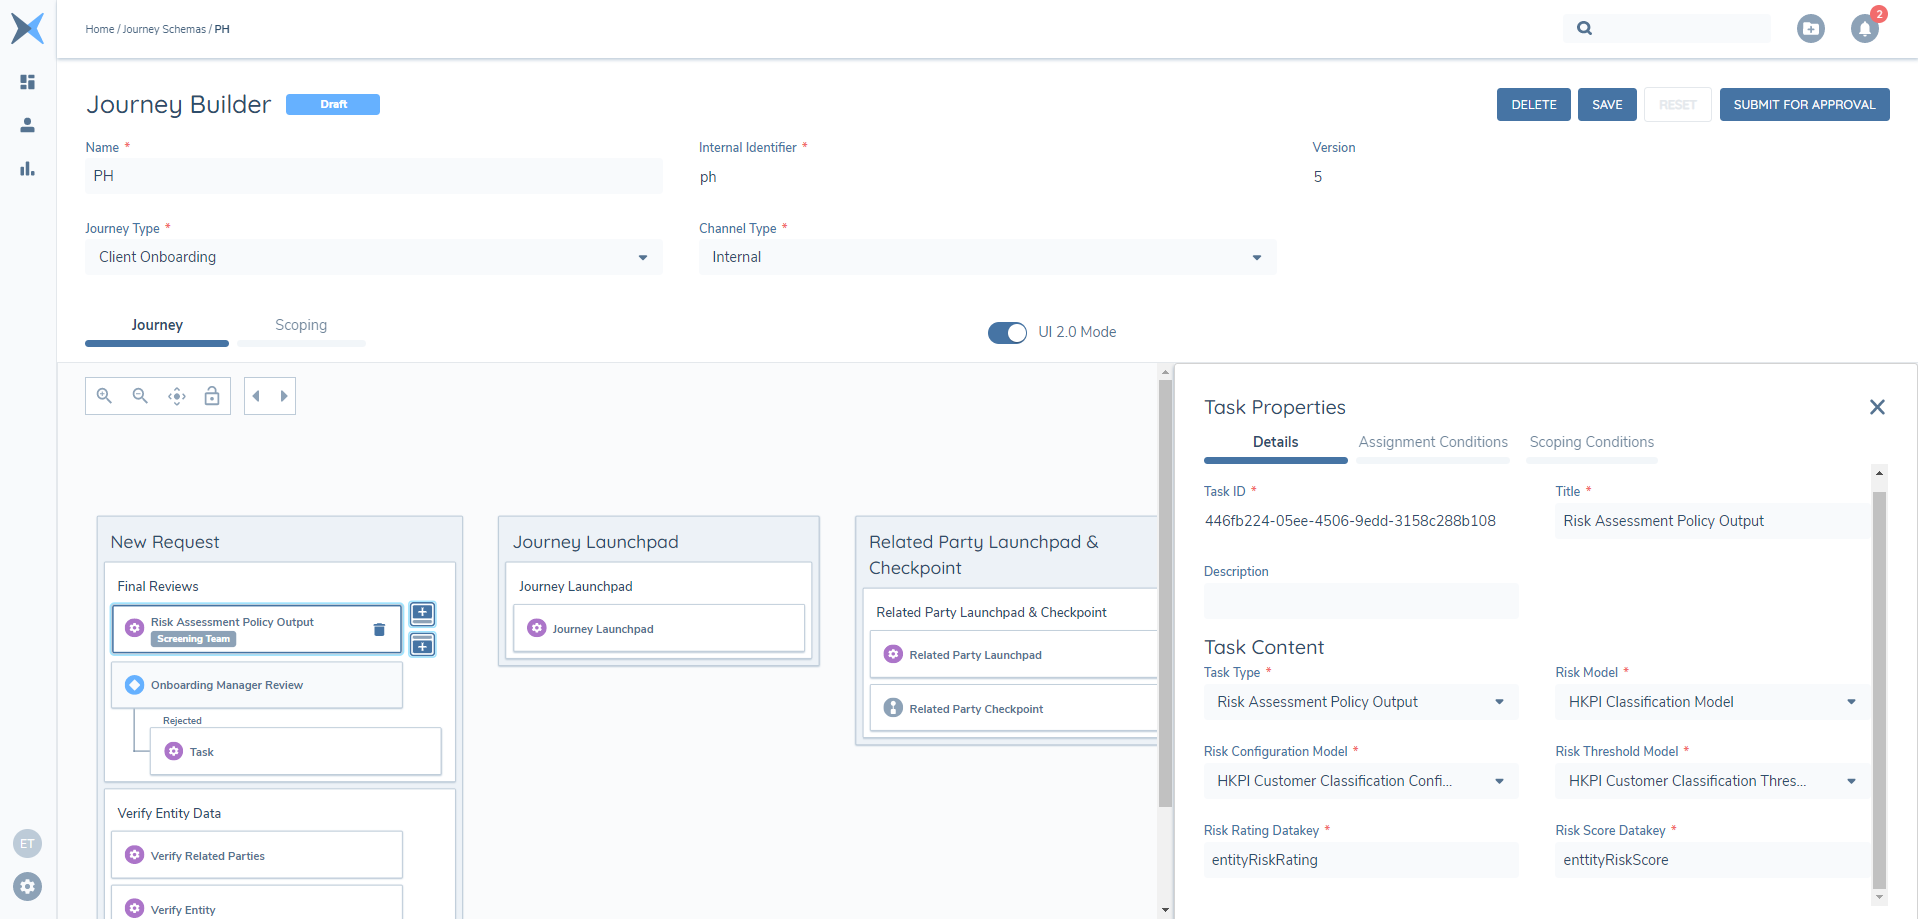
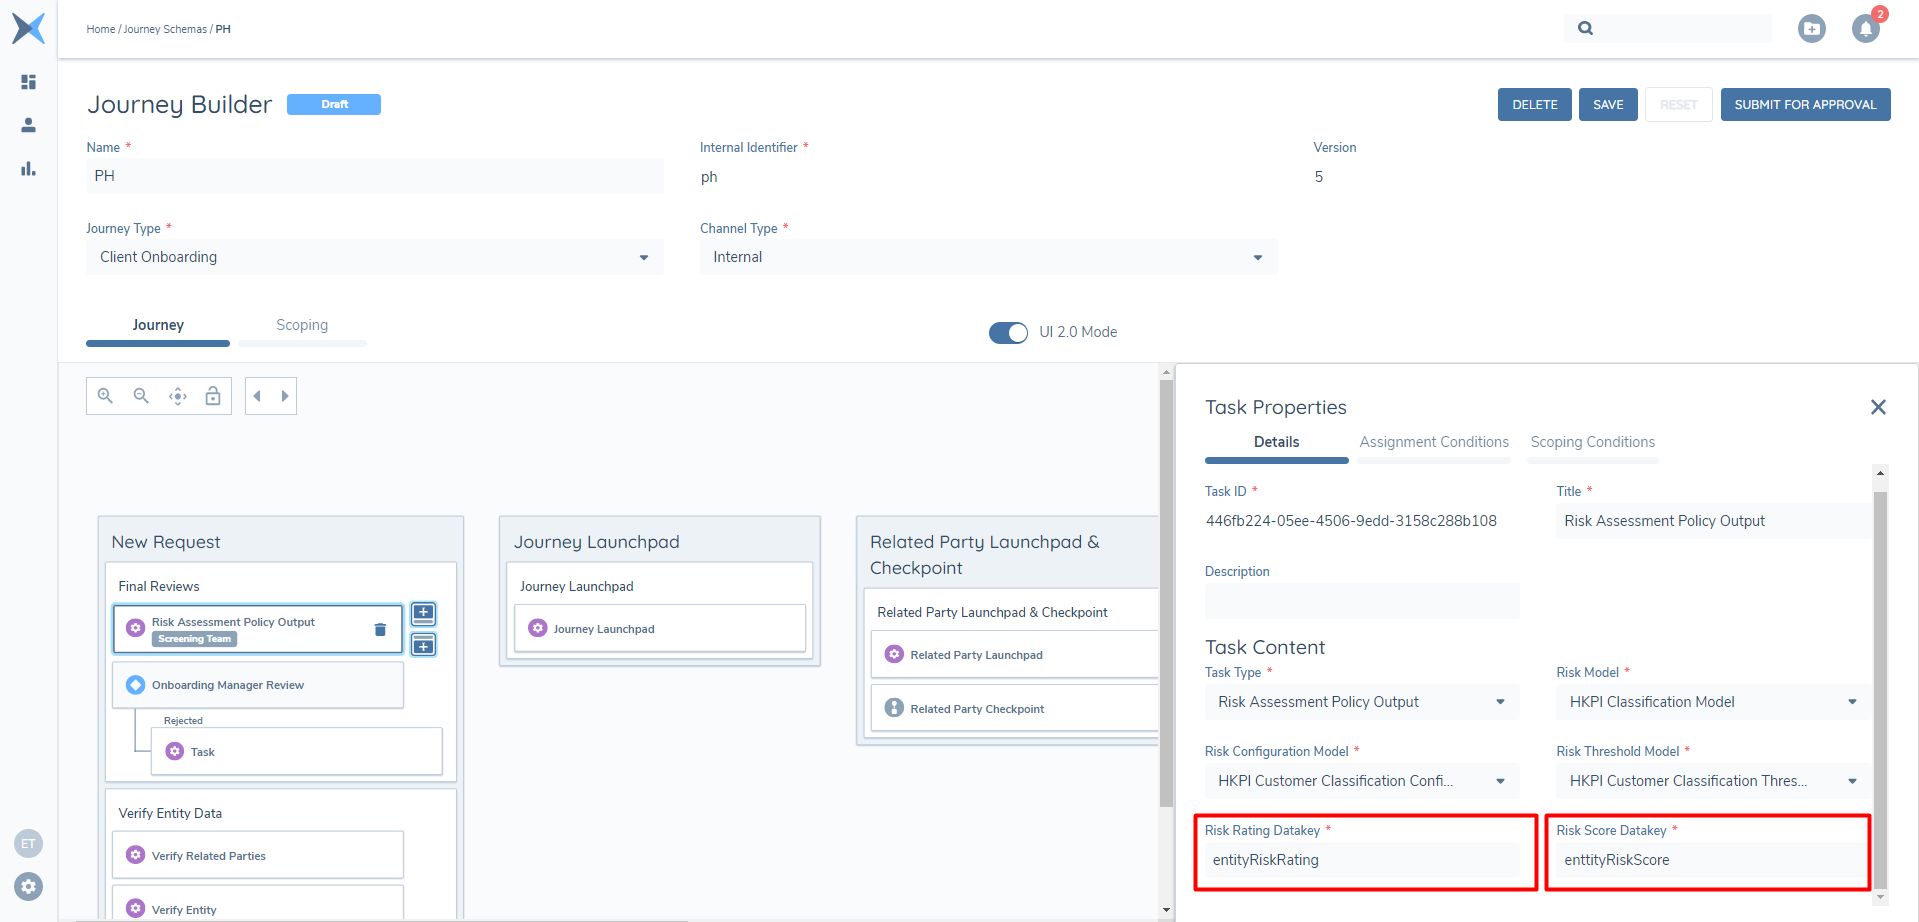
The user will then take the datakeys created for these fields and add them to the task properties of the new Risk Assessment Policy task in Journey Builder for the Journey that they are configuring:
Screengrab of Risk Rating and Risk Score Datakey in Task Properties
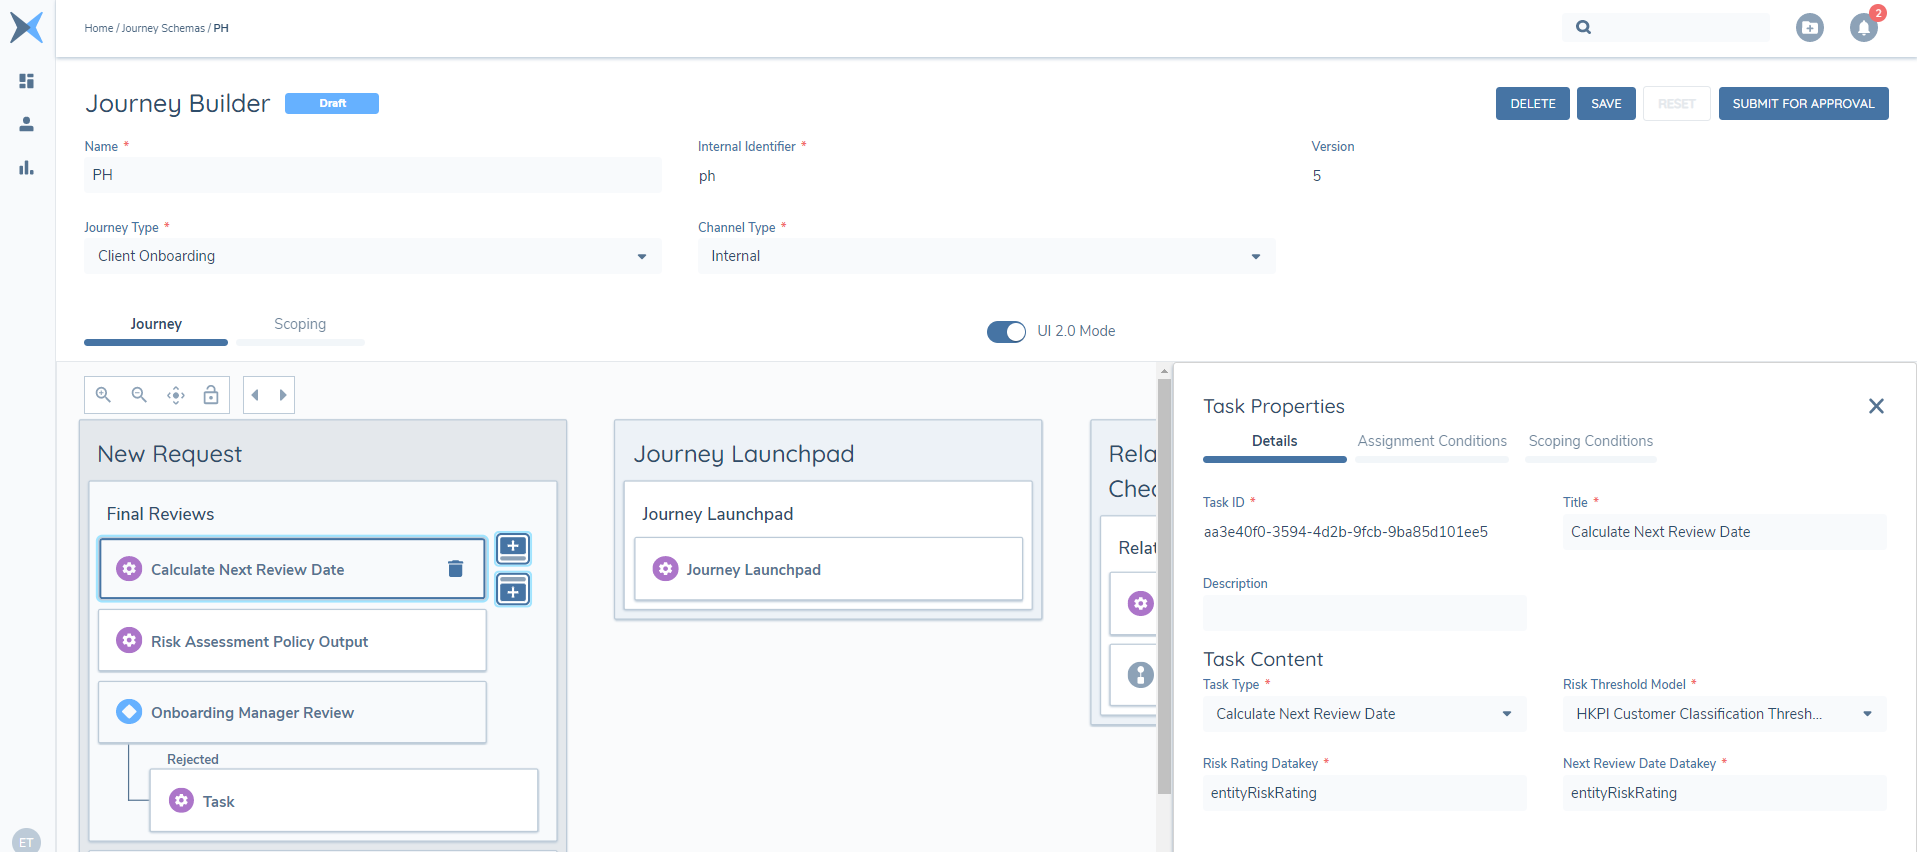
Calculate Next Review Date task
The Calculate Next Review Date task in Journey Builder will be used to take the Risk Rating output in a Risk task and the selected Risk Threshold model to determine when the Entity should next be reviewed. The periods for Next Review Dates will be configurable and will be available in the Risk Domain under each Risk threshold model created.
Within the task properties of the Next Review Date task, users will be required to populate the below fields:
Screengrab of Calculate Next Review Date Manual Task
-
The Risk Threshold model: Within each Risk Threshold model, users will have the ability to set an associated Review Date Period for the Risk Rating that is returned (see section – “Configuring Next Review Periods within Risk Threshold models” below). So, when we are calculating the Next Review Date, the system needs to know which threshold the task should call and what the Review Periods are within that threshold.
-
Risk Rating Datakey: This is the field which will drive the Next Review Date Calculation (e.g., Risk rating = Low / Medium / High / Restricted then Next Review Date will be X depending on what has been configured in the threshold model).
-
Next Review Date Datakey: This will be the field that the Next Review Date will be written to. It is important to keep note of the above instruction for the initial rollout of Periodic Reviews – that the datakey used here is one of the datakeys listed in the above table.
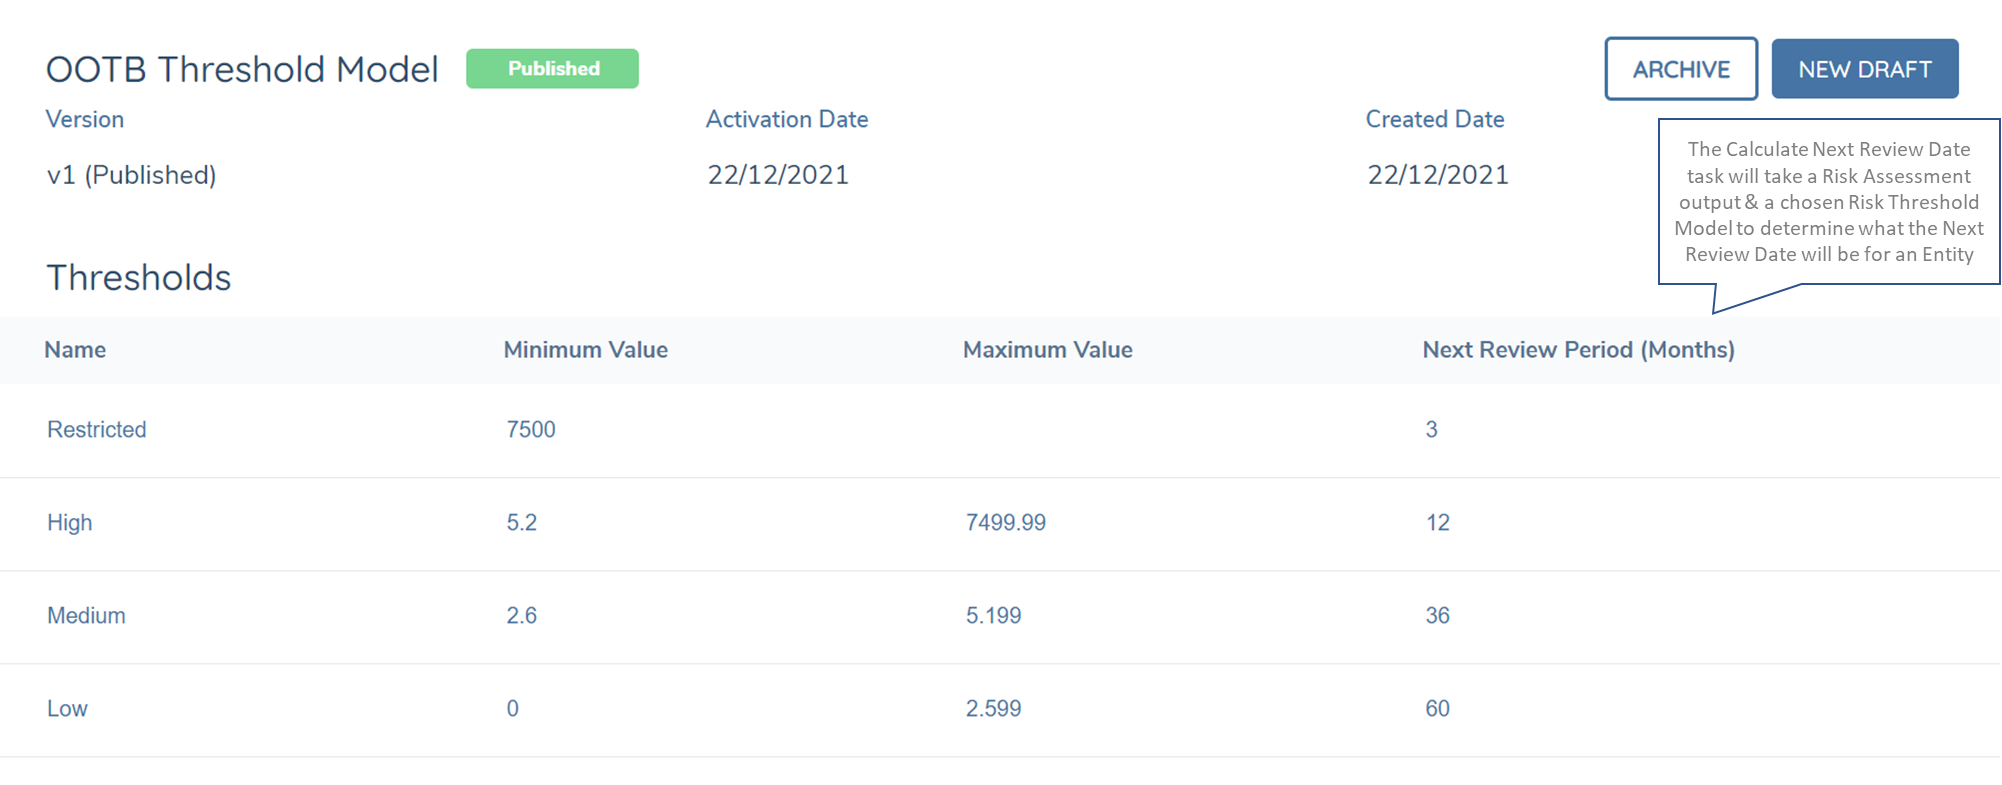
To determine what Next Review Date should be set against an Entity based on its Risk Rating, configurators will be required to navigate to the chosen Risk Threshold which is available in the Risk Domain of Fenergo SaaS.
Based on the selection of the Ratings within the Risk Threshold model (e.g., Low, Medium, High, Restricted), configurators will have the ability to set a period (in Month’s format) in which Entities should be Next Reviewed.
This will then set the next review date based on the time period set and the date of the last Risk Assessment. For clients that do not wish to use this functionality, this field is not mandatory to populate and can be left blank if required.
Screengrab of Risk Threshold Model
Configurable Milestones
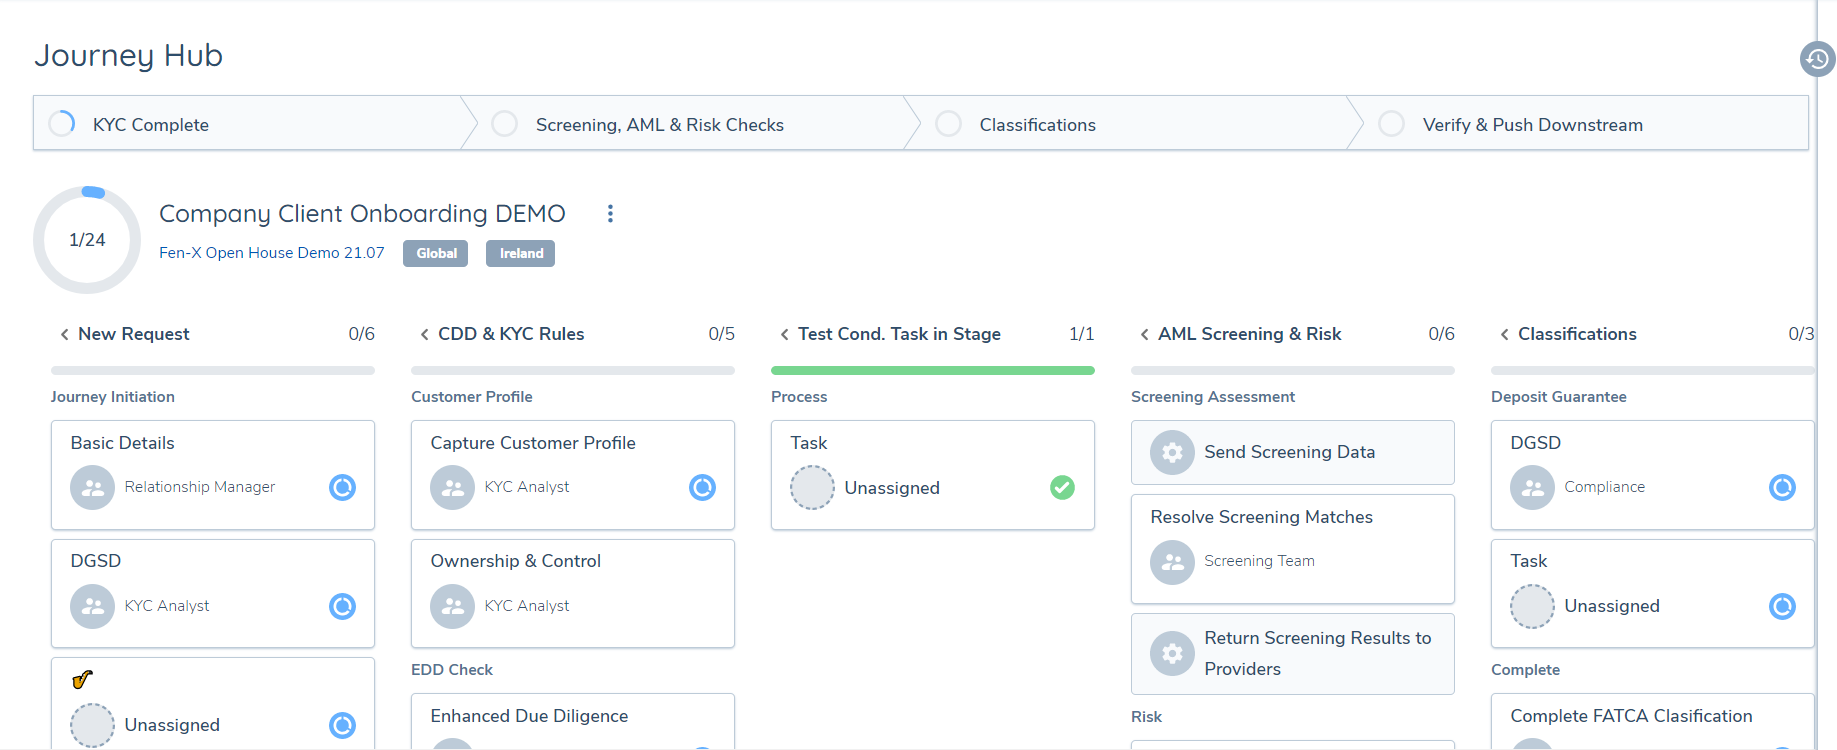
By default, the configured Stages of a Journey Schema will appear statically as a "Milestone" component in the Journey Hub, where each configured Stage will appear as a singular Milestone. Milestones in this context are a direct copy of the Stage Names of all configured Stages within a Journey.
Screengrab of Default view of Milestones
Configurable Milestones allows a User to configure the view of these Milestone components, offering the ability to group one or multiple Stages within a higher-level Milestone component. This allows a User to display a higher-level view of a Journey's progression, by displaying Configured Milestones comprised of like-minded of Stages. For example, if the Stages of "New Request, "Capture Customer Profile" and "Enhanced Due Diligence" all pertained to the overall KYC of a Journey, a User could group these Stages under a single "KYC Progression" Milestone. This Milestone would provide a quick and easy identification of the overall KYC progress of the Journey, based off the status of each Stage within the Milestone.
Configurable Milestones - Journey Builder
If a Client wishes to utilise Configurable Milestones, they can select the "Milestones" tab within Journey Builder. This will be in an initial blank state.
Screengrab of Milestones - Blank State

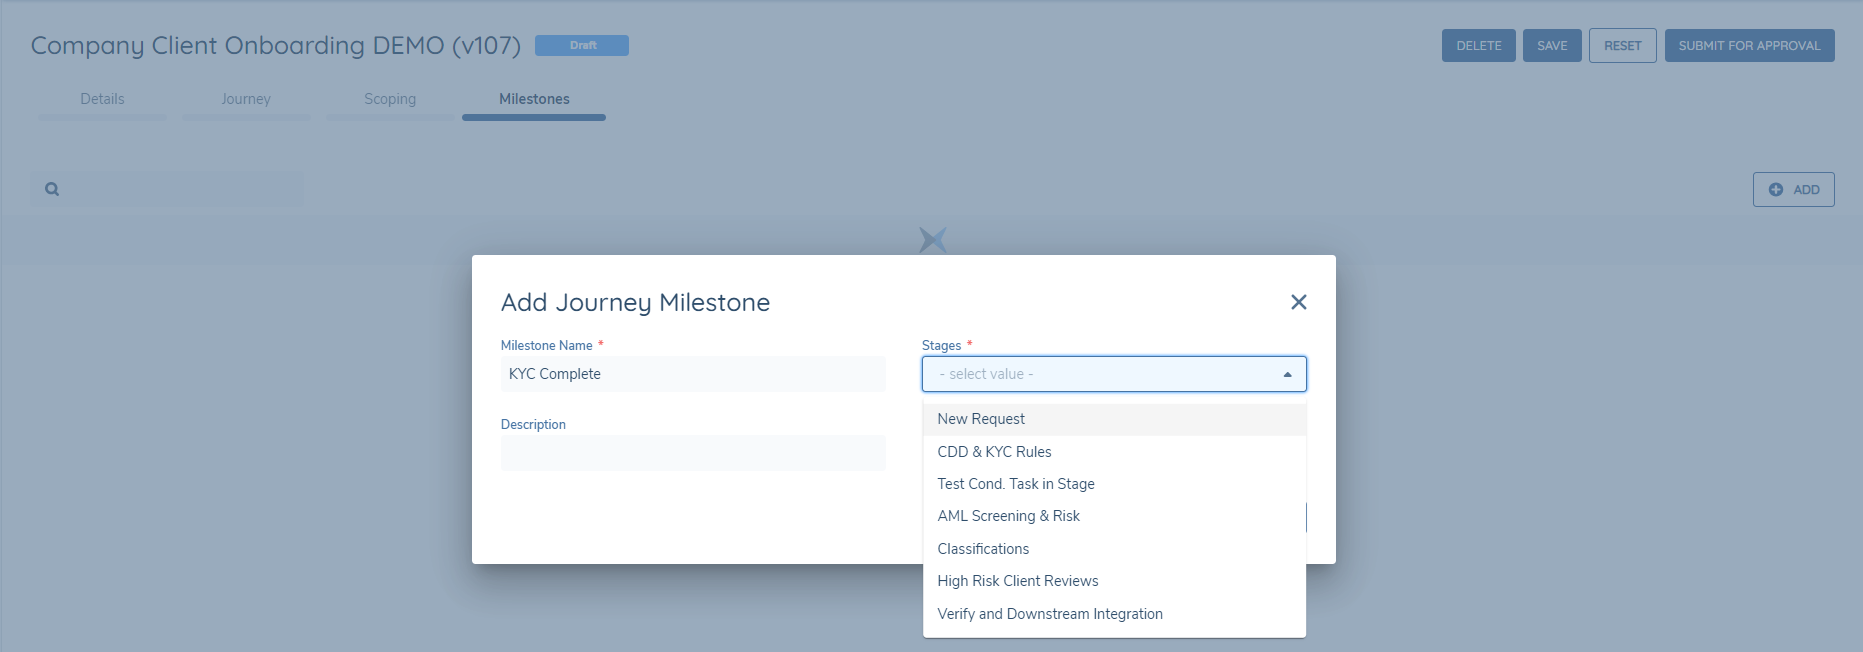
When the User selects the "+ ADD" button, they will be brought to the "Add Journey Milestone" modal. Here, they can configure the given Milestone based off three criteria:
- Milestone Name: the UI label of the Milestone to be displayed.
- Stages: a multi-select lookup that will allow the User to select the Stages that should belong to this Milestone.
- Description: a text-field where the Configurator can provide some context or detail of the given Milestone.
The Stages dropdown will display all of the configured Stages of the Journey Schema; both conditional and non-conditional.
Screengrab of all configured stages within the Milestone
Stages that already belong to a Milestone will be filtered out of the Stages dropdown in future instances. This ensures that a Stage can only belong to a singular Milestone.
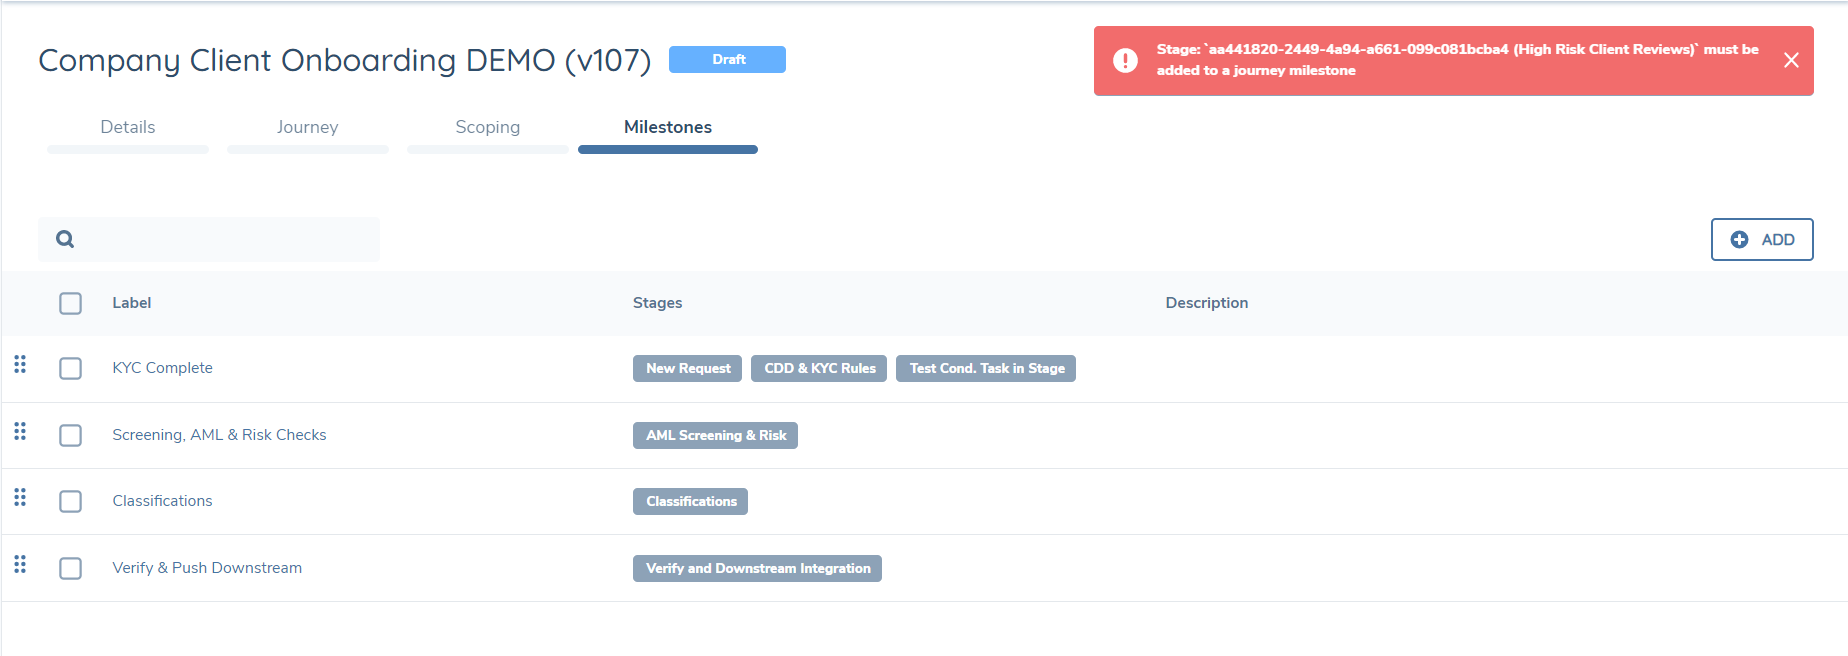
If Configurable Milestones are being used by a Client, all configured Stages must be placed within a Milestone. If the User hits "Save" or "Submit to Approval" when one or more Stages don't belong to a Configured Milestone, an error message will be displayed notifying the User that there is a Journey that has not been placed within a Configurable Milestone:
Screengrab of Milestones Error Message
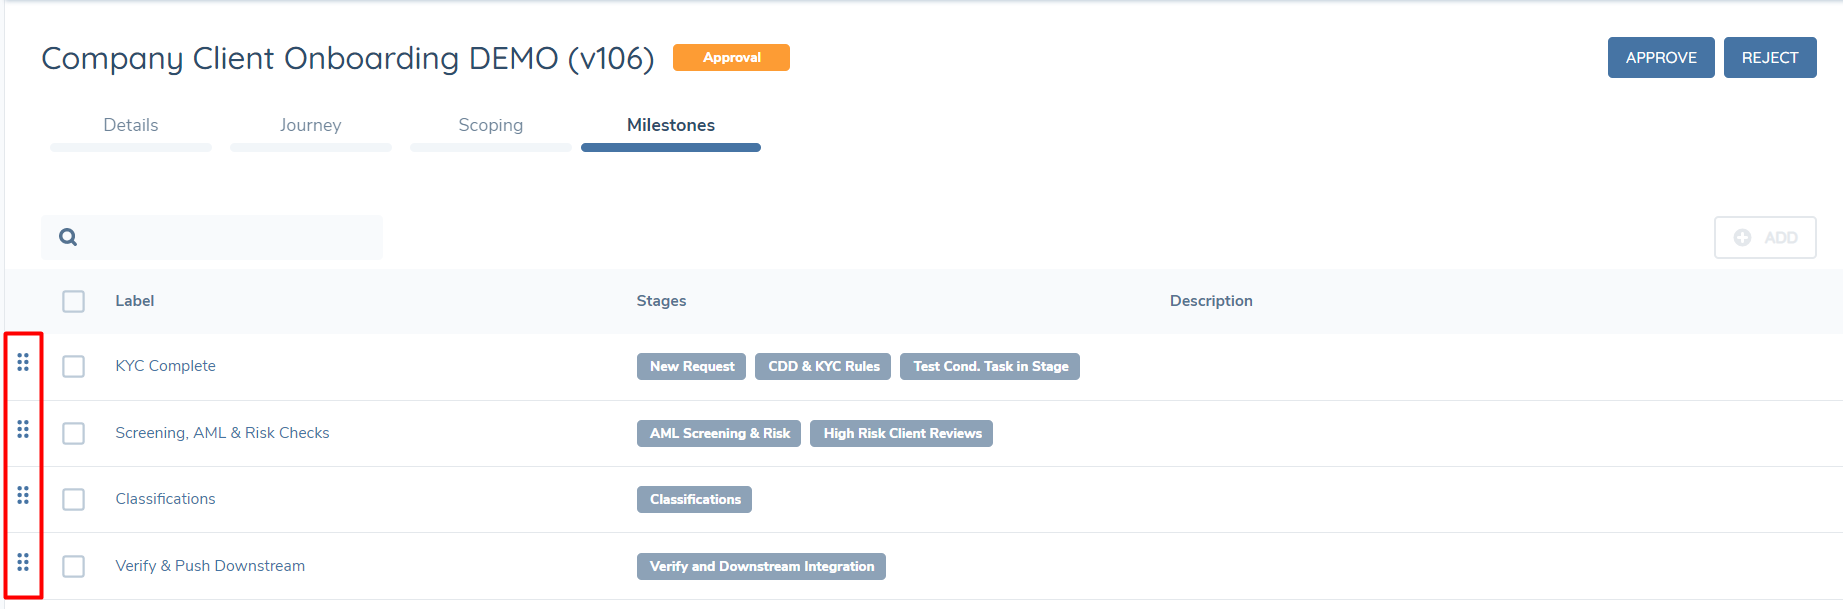
The Configurable Milestones will be presented in the Journey Hub according to the order in which they are presented in the Milestones grid. A User can re-order the Configured Milestones by clicking and dragging on the icon to the left of the checkbox of the selected Configurable Milestone.
Screengrab of Milestones Drag and Drop Capability
Finally, Configurable Milestones are an opt-in functionality. This means that if a Client did not wish to configure the Milestones to be displayed in the Journey Hub context, they can simply ignore the "Milestones" tab in the Journey Builder for their given Journey Schema. When Configured Milestones are not utilised, the default view will be displayed.
Configurable Milestones - Journey Hub
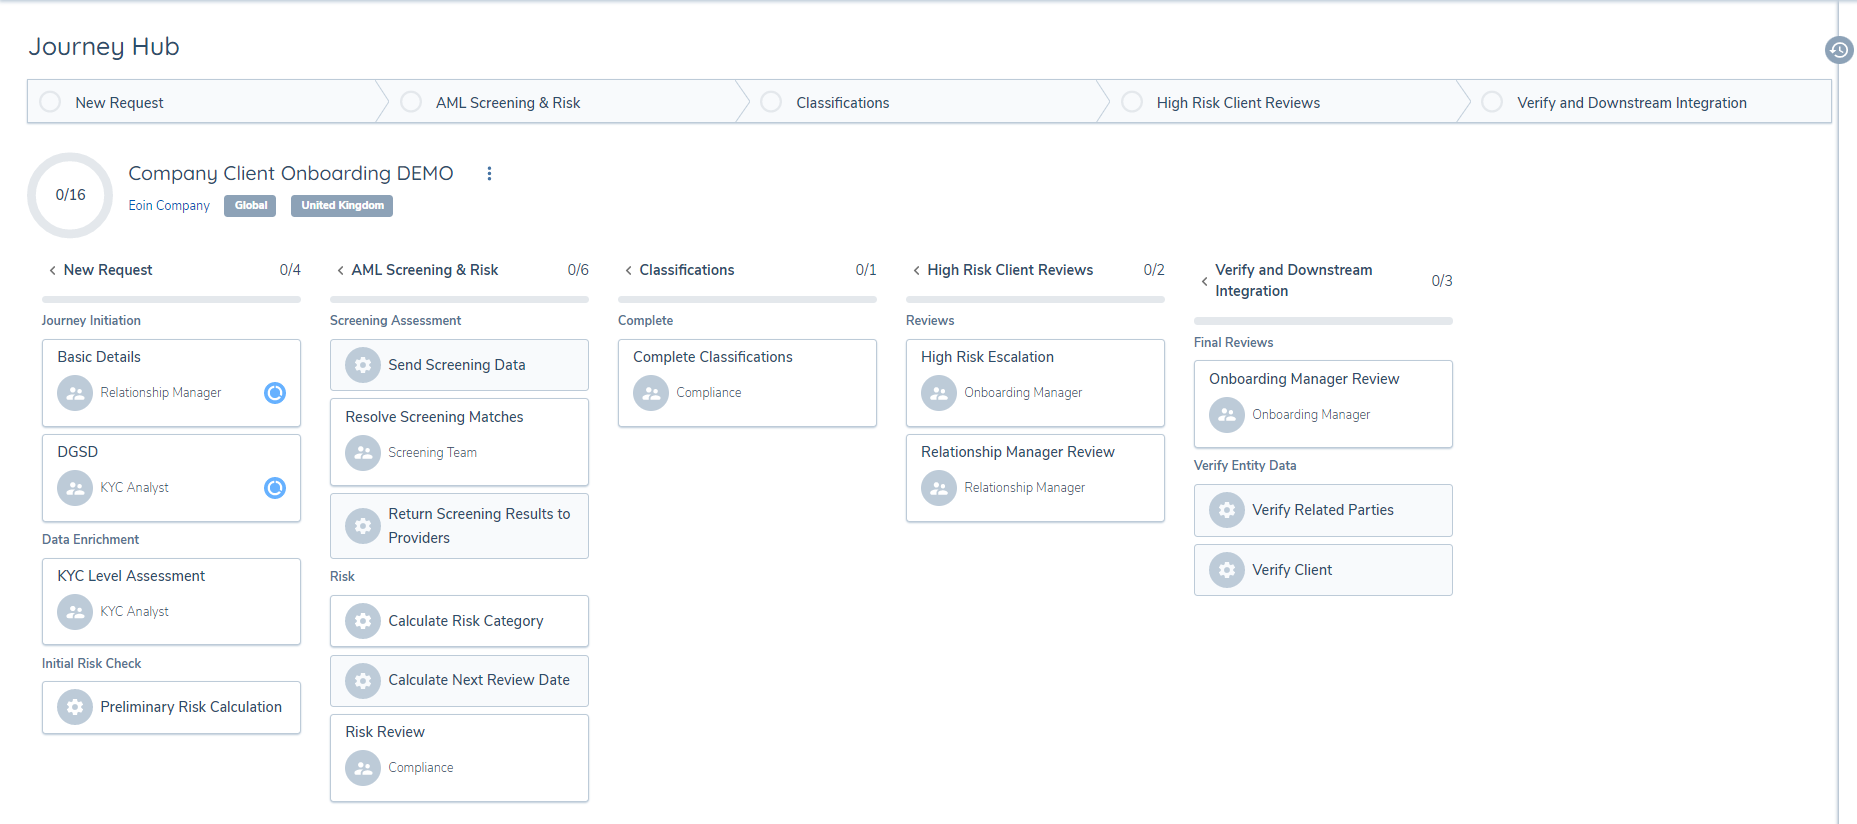
When a User lands in the Journey Hub for a Journey Schema with Configurable Milestones enabled, the Milestones will be presented in their defined order as per the configuration of the "Milestones" tab.
Screengrab of Milestones in Journey Hub
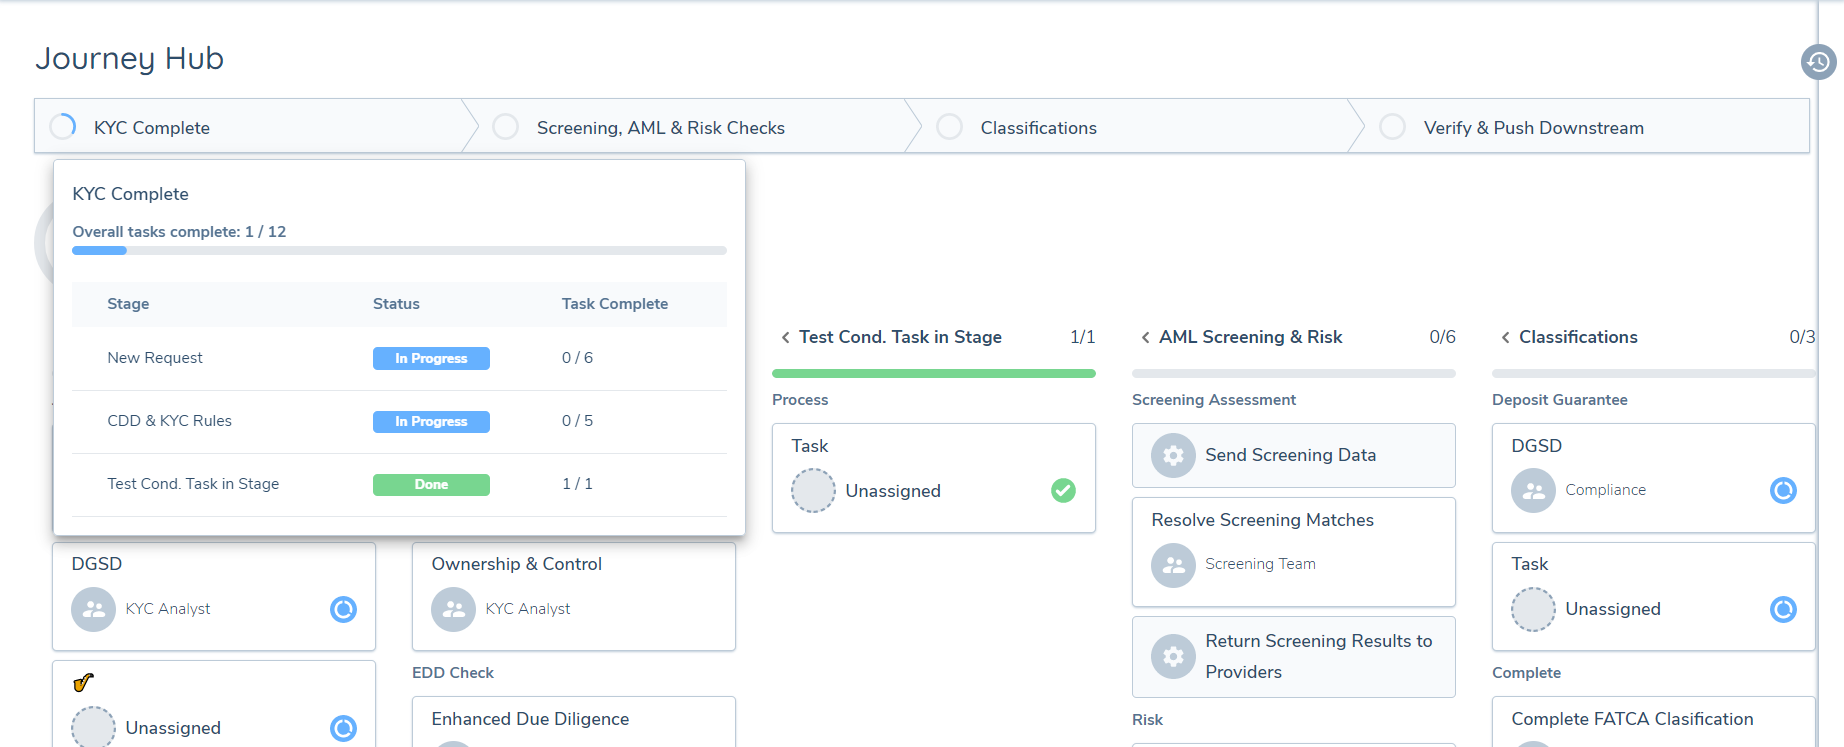
A User can now track the progression of multiple Stages from the Milestone component. If a Configured Milestone is hovered over, a pop-over will be presented that will display all of the Stages that belong to the Milestone, as well as the Task progression of the Tasks belonging to each Stage. This pop-over will provide more granular detail on how many Tasks have been completed across all of the Stages within that Milestone. The progression icon on the Milestone itself will update according to the completion status of the Stages belonging to the Milestone.
Screengrab of Milestones popover
Configuring Parallelism
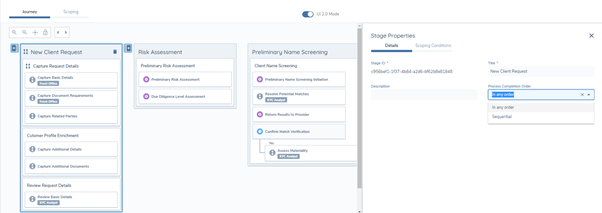
Parallel Processes: To configure Parallelism for Processes, navigate to any Stage in the Journey Builder domain and open a Stage's Properties. Here, there will be a Property field called "Process Completion Order"". Clicking the dropdown arrow on this field will present the User with two options:
- In Any Order (Processes in this Stage can be worked on in a non-sequential format).
- Sequential (Processes in this Stage must be completed in a sequential format, as is the process today)
This will default to "Sequential" to allow Users to opt-in to Parallelism, if desired.
Screengrab of Process Completion Order
Parallel Tasks: To configure Parallelism for Tasks, navigate to any Process in the Journey Builder domain and open a Processes' Properties. Here, there will be a Property field called Tasks Completion Order. Clicking the dropdown arrow on this field will present the User with two options:
- In Any Order (Tasks in this Process can be worked on in a non-sequential format).
- Sequential (Tasks in this Process must be completed in a sequential format, as is the process today)
This too will default to "Sequential" to allow Users to opt-in to Parallelism, if desired.
Parallel Stages: To configure Parallelism for Stages, navigate to any Stage in the Journey Builder domain and open a Stage's Properties. Here, there will be a property field called Initiate in Parallel With. Clicking the dropdown arrow on this field will present the User with all of the previously configured Stages within the Journey Schema. The field will not appear in Stage One (i.e. the first Configured Stage), as there are no previously configured Stages to reference. The "Initiate in Parallel With" dropdown is a multi-select and will allow Users to link multiple Stages together so that when one Stage moves into a state of "In Progress", so too will the other linked Stages.
Screengrab of Initiate in Parallel with field in Stage Properties
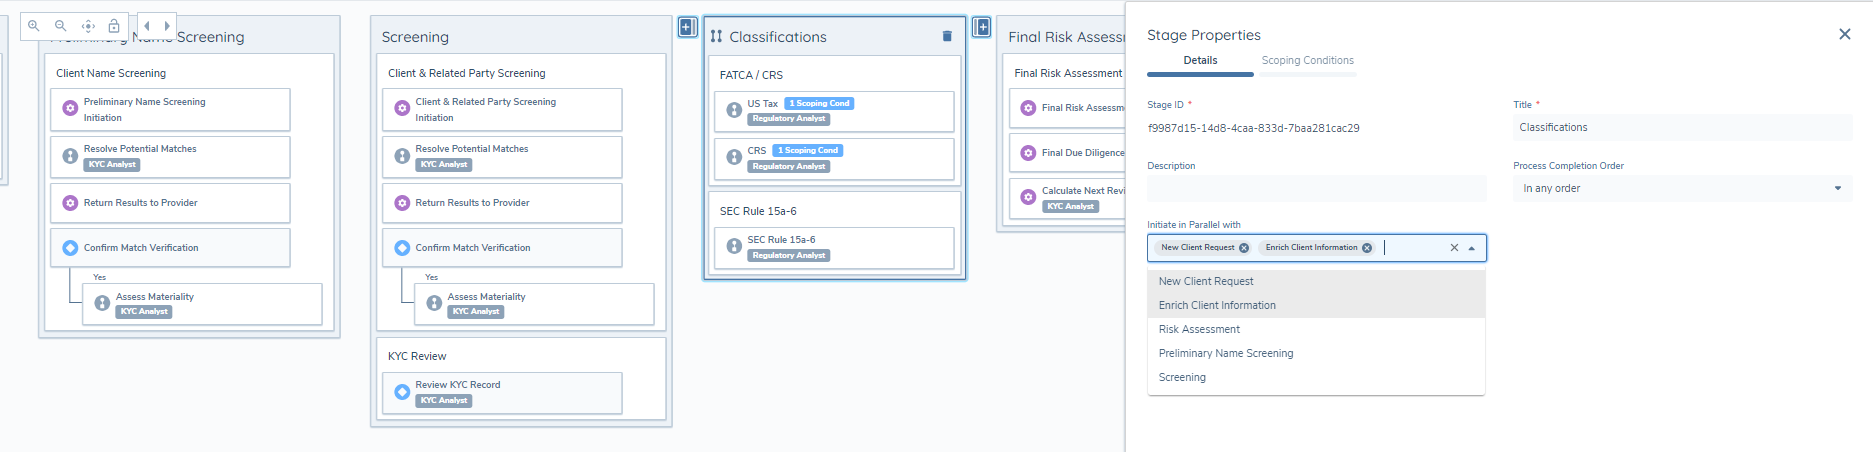
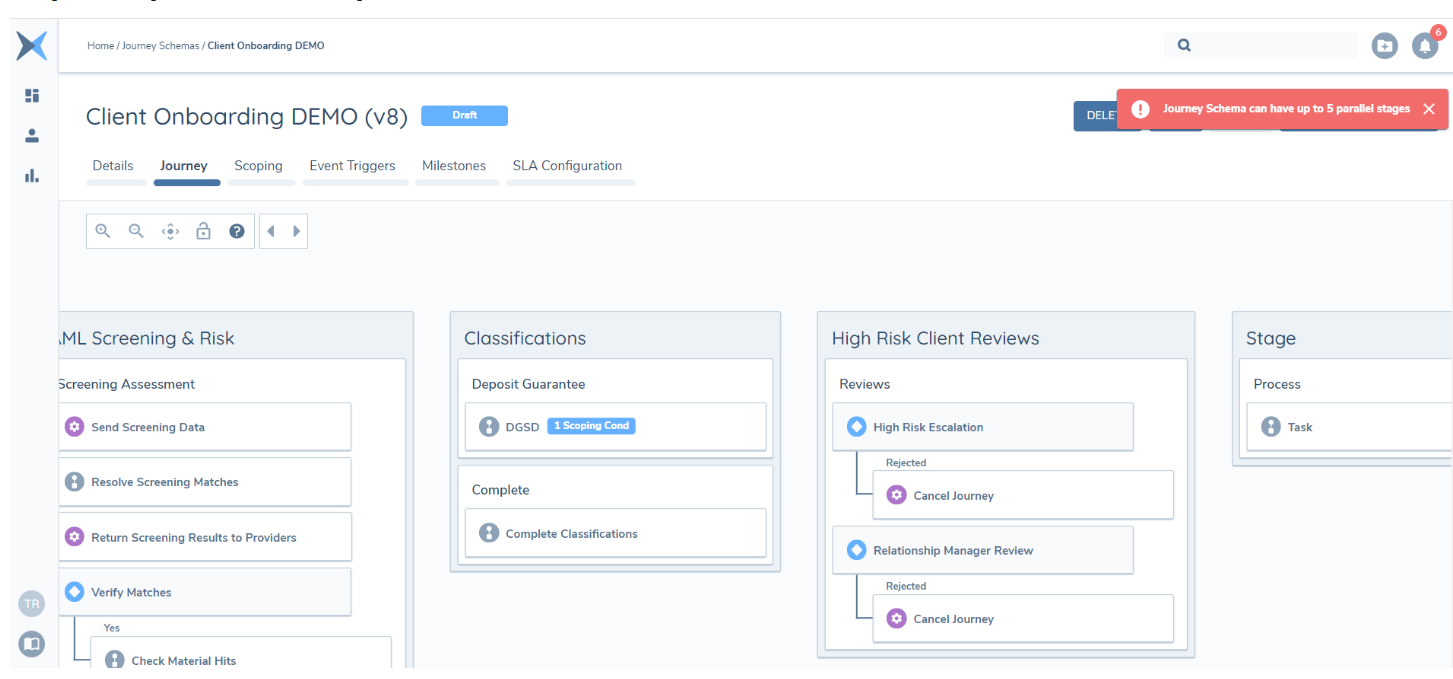
With Parallelism now enabled in all Production tenants, Clients will have the ability to configure multiple Stages to initiate at once. However, this level of evaluation and launching of work items carries the risk of impacting performance in Journeys. With that in mind, the Product team have made the decision to apply a limit of five Stages to be linked in Parallel. The Product team will assess this in the coming months again depending on performance of Journeys that use Parallel Stages as well as Client requests to extend this limit. We also currently have a limitation of five Processes in a Stage which can be support for Parallel Processing and three Stages in which Parallel Process and Tasks can be enabled. Again, this is an intended control as we rolled out this functionality. The Product team will review this limitation in coming months based on user feedback.
Screengrab of five stages In Parallel with Error Message
Based on the defined Completion Order for Processes and Tasks within that Stage, the User can work on that Stage at the same time.
We have introduced some exceptions for Parallel Stages in order to reduce the risk of Configurators accidentally creating a Journey where they lock themselves out or lose their Journey inadvertently:
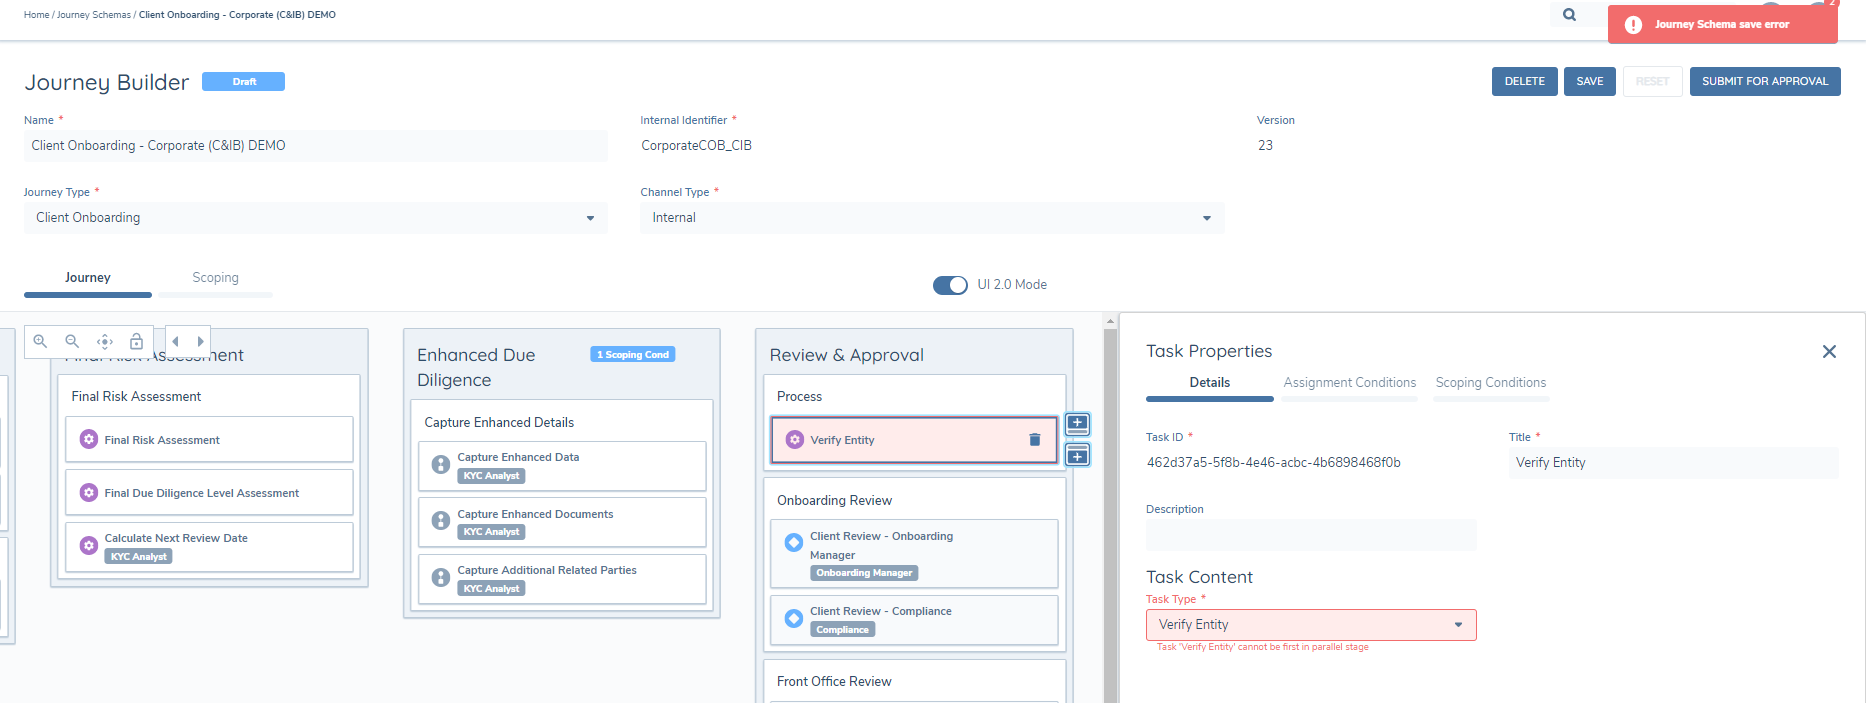
- Verify Entity: If Configurators have included a Verify Entity task as the first task in a Parallel Stage, we will present a Journey Schema Validation Error. The reason for this is what when we create a Journey for an Entity, we create a Draft record for that Entity. When we Verify the Entity, we verify all currently captured changes before saving the Draft so the decision was made to keep this process sequential in a non-Parallelism design:
Screengrab of Journey Schema Validation Error
- Cancel Journey: If Configurators have included a Cancel Journey task as the first task in a Parallel Stage, we will present a Journey Schema Validation Error. The reason for this is similar to Verify in that if we cancel the Journey, we lose the Draft record for the Entity, including and changes made in the Journey.
UI Indication for Parallelism within Journey Builder
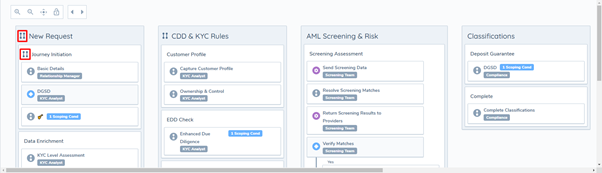
When the Stage or Process has been configured for "In Any Order" completion, the Parallelism icon in the below screenshot will be placed to the left of the Stage or Process name as UI indicator to the Configurator that Parallelism has been enabled.
Screengrab of UI Indication for Parallelism
Important Note: It is important to note that when Processes / Tasks are enabled for Parallelism, all impacted Tasks and Processes will be immediately moved to a state of In Progress when the Stage moves into a state of In Progress. This will have an impact on how we treat Conditional Tasks / Processes in a Journey as in Fenergo SaaS today, Conditional Tasks / Processes will trigger when the conditions are met in previous Completed Tasks / Processes. However, as all Tasks / Processes are triggered to start together, the Conditions for those Conditional Tasks cannot be met, meaning that they are skipped. Configurators must be mindful of this limitation when configuring Parallelism in their Journeys.
One workaround for this is to move the Conditional tasks into their own Stage and have the Process completion order as ‘Sequential’.
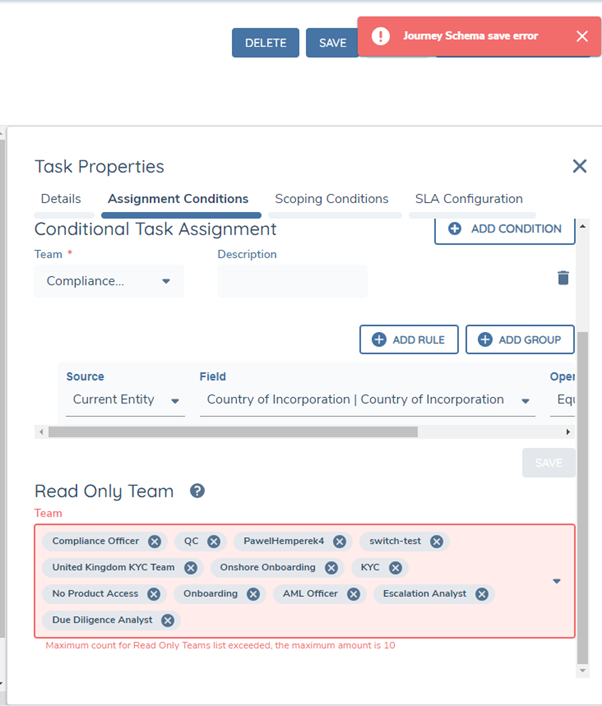
Configuring Read Only Task Assignment in Journey Builder
- Configuring Read Only Team assignments: We have updated the Assignment Conditions panel to include the option to define Read Only Team(s).
- Read Only assignment is non-conditional: This means the default teams that are assigned in Journey Builder will be the read only teams when Journeys are launched. Users have option to manually change this in Journeys.
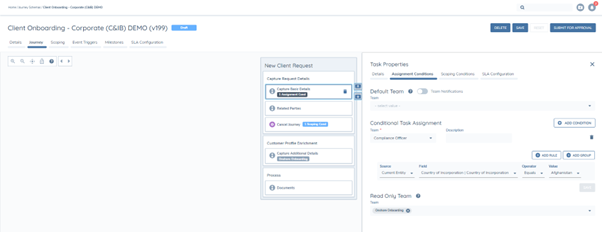
Important Note: Product intended limitation for up to 10 Read Only Teams can be assigned.
Journey Owner Configuration
From the Journey Builder, users can easily assign the Journey Owner. When they navigate to the Assignment Conditions tab of a task, they'll find the option to set the Journey Owner. Fenergo SaaS users now have enhanced flexibility in assigning either a Team or a Journey Owner to a Task. If they opt for 'Team' in the 'Assign to' field, a dropdown menu will allow them to choose the specific Team from all teams available in their tenant.
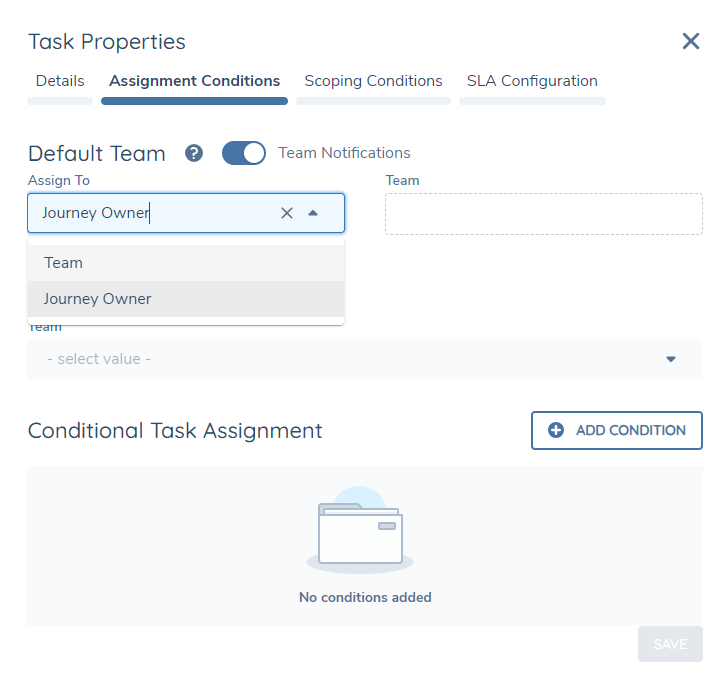
Oppositely, if they select 'Journey Owner' in the 'Assign to' field, the 'Team' dropdown field will be disabled. This is because the Journey Owner value in the Journey Builder isn't tied to a particular team or user on its own. Instead, choosing the Journey Owner value here sets up the eventual assignment of the Journey Owner user, once both the Owner's team and the Journey Owner user have been assigned in the Journey Hub.
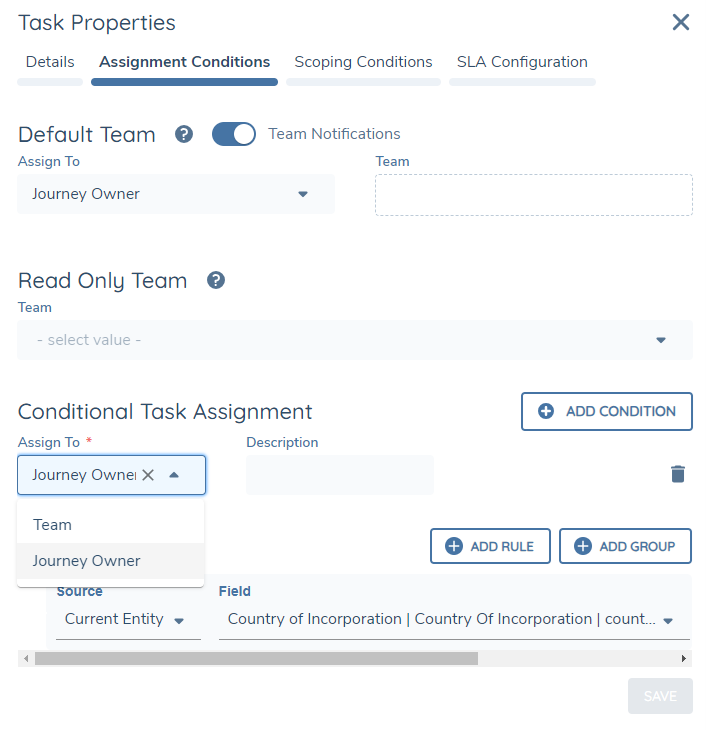
From here, users also have the option to conditionally assign the Journey Owner for a task. Upon selecting the Journey Owner and setting a condition, the task will be assigned to them once the specified condition is met within the Journey Hub.
Configuration of Configurable Journey States
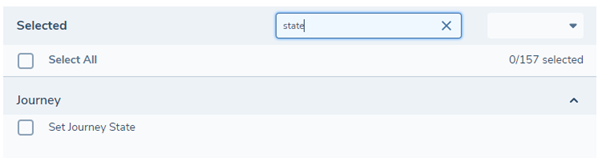
To set up Configurable Journey States, there is minimal configuration work required. Firstly, users will need to configure a ‘Journey States’ lookup in their tenants. Once this lookup has been published, users will then see these as options in the ‘Set Journey State’ modal in Journey Hub.
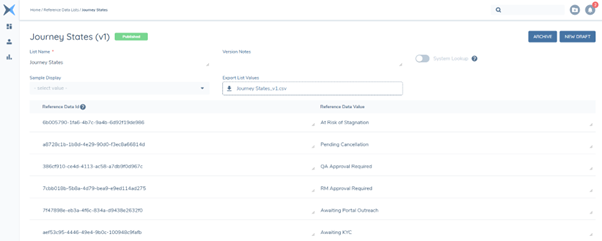
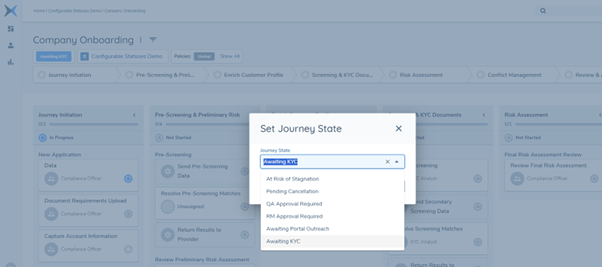
Accessing the ‘Set Journey State’ modal in Journeys and editing States can be managed through the ‘Set Journey State’ permission.