Configuring Journeys
Journey Builder
Now let’s take a look at how this Journey was built.
Journeys can differ based on the Legal Entity Type and on the Journey Type. For example, we have several ‘flavours’ of Client Onboarding Journey based on the Legal Entity Type. Additionally, each Legal Entity Type will need various Journey Types to meet their CLM needs, including:
- Client Onboarding
- Maintenance Events
- Product Journeys
- Periodic Reviews
- Client Offboarding
The Journey Builder tool allows us to configure unique Journeys to accommodate each of these uses cases and Legal Entity Types.

Journeys are versioned, which means that any changes to a Journey are made to a new draft of the existing version. This allows us to safely update a Journey without affecting the ‘live’ version of it. Once we are happy with our changes, we can submit the version for approval, and once approved it becomes the live version.
Within the Journey Schemas screen, we have recently introduced the ability to multi-select the Journey Schemas or Journey Schedules that a Configurator wishes to delete. This allows for the bulk-deletion of multiple Journey Schemas or Journey Schedules in one interaction. Previously, a Configurator would only have been delete a single Journey Schema or Journey Schedule at a time.

To configure Journeys, we access a specific type. In this example, we’re going to configure the Company Onboarding Journey. Note that it is also possible to create a brand-new Journey (which will default to version 1) by clicking the blue + icon in the top right corner.
Firstly, we choose a name, internal ID, type, and Channel.
- Name is what will appear in the Journey Hub
- Journey Type is what is used as the first step of Journey scoping to decide what kind of Journey we want to trigger (e.g., Client Onboarding Journeys from the New Request screen)
- Internal ID is an internal-only value that is an alternative way to track the Journey (otherwise Name can be sued)
- Channel Type basically defines whether the Journey is designed to be leveraged through the Portal or through Fenergo SaaS UI
The "Version" field displays the version of the Journey Schema being displayed, and is auto-calculated by the system.
A recent enhancement made to Journey Builder was the introduction of the "Details" tab. This tab will display all of the aforementioned fields of the Journey Schema. Separating the view of the Journey Schema details and the actual Tasks, Processes and Stages of the Journey Schema gives the User full use of the browser window when configuring a Journey.

When the Journey is net new, the view will default to the Journey "Details" tab. Following the first 'Save' / 'Submit for Approval', and after the user refreshes their browser, they will be taken to the 'Journey' tab. When Users are viewing Published Journey schemas, they will also immediately be brought to the 'Journey' tab showing the user the configured Journey Schema in a larger browser window.
The "Journey Type" field is editable for existing Journey Schemas. This allows Configurators to change the Journey Type of existing Journey Schemas, rather than having to recreate the entire Schema from scratch.

Journey Builder Legend
To understand the purpose of the different icons that may be visible in the configuration of a Journey Schema, a User can hover over the "?" icon in the Journey Builder task bar. Doing so will present a temporary pop-up that will define the Icons visible on a Task cell.

The Icons presented and the accompanying Legend will only be visible from the context of the Journey Builder screen; the Legend will not be presented in the Journey Hub context.
Creating Journeys
The Journey Builder is a visual configuration tool that allows us to build a Journey dynamically using add/delete buttons and drag and drop functionality.
The Journey Builder UI has recently been enhanced to version 2.0. This new view of the Journey Builder uplifts the UX of the Screen, and will allow for the rollout of new functionality like Parallelism, Drag and Drop and Dynamic Task Assignment. The new UI also aligns with the same view as seen in the Journey Hub after the configured Journey has been Published and launched.
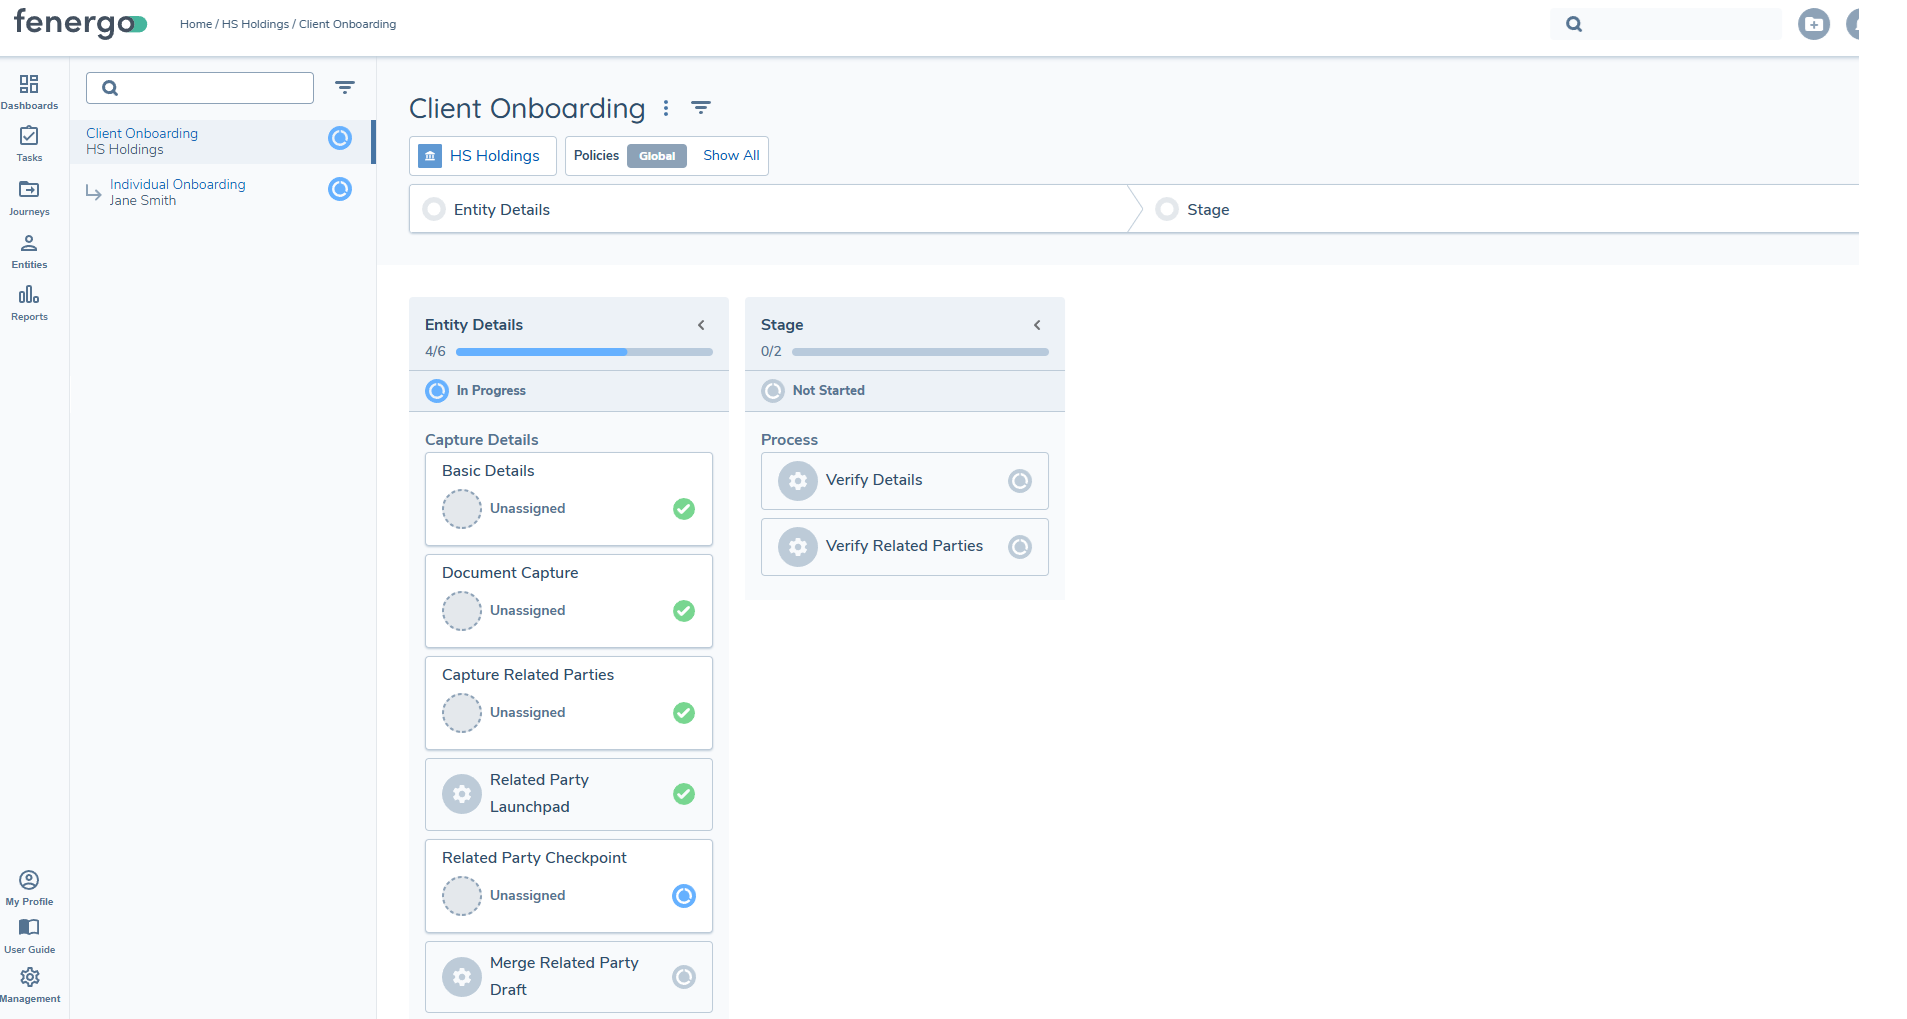
The grid area houses all the stages, processes, and tasks of a Journey.

The Journey is laid out sequentially, with Stages moving from left to right in order of sequence - in other terms, the leftmost Stage will be our first Stage and the rightmost Stage being the final Stage. Stages are comprised of individual Processes, and these Processes are comprised of Tasks. In the example above, New Client Request, Risk Assessment and Preliminary Name Screening are stages. Capture Request Details, Preliminary Risk Assessment and Client Name Screening are Processes. Capture Basic Details, Task, Capture Document Requirements, Capture Related Parties, Preliminary Risk Assessment, Due Diligence Level Assessment, Prelmiminary Name Screening Initiation, Resolve Potential Matches, Return Results to Provider and Confirm Match Verification are tasks.
All of these components are represented in the Journey Hub. However, the user will only ever take action on a task, for example by entering data, reviewing data, uploading a document, reviewing risk, adjudicating screening, completing tax information, etc.
So, in simple terms, tasks are used to take action (either a user or the system), while processes and stages are used to organise tasks.
To add a new Stage, select an existing Stage and use the left and right arrows to insert a new Stage next to it. To add a new Process or Task, select the relevant component and use the left and right arrows to add a new Process or Task, dependent on what you selected.
If you need to reference a stage or a task using a stable ID, you can configure a datakey on the relevant component via these two fields:
- Stage Datakey
- Task Datakey
Use the trashcan icon to delete a Stage, Process, or Task. To reorder components, enable scroll lock using the icon in the left-hand menu, then drag and drop Stages, Processes, and Tasks into the required order.
Scoping Conditions
Scoping Conditions let us create conditional tasks, processes, and stages. This leverages the Logic Engine that you will see across the application, most visibly in Policy Requirements to create conditional fields. We configure conditional tasks in exactly the same way.
We use the Scoping Conditions tab on a task, process, or stage to create scoping conditions around the triggering of that component.
The Scoping Conditions have been moved into the Stage, Process or Task Properties of the given component, presented in a tabular format.
Pagination is a strategy used to divide content into separate pages, resulting in a more manageable and efficient User Interfave (UI) load time. Pagination is used in several instances throughout the Fenergo SaaS application in Policy and Journey.
- It is triggered when there are more than 5 instances of Logic Engine conditions, breaking the material into numerous pages.
- Per Page Default: The default value shows 5 instances per page. By reducing the amount of data loaded at once, this improves UI speed.
- Fenergo SaaS users have the option to increase the number of instances displayed per page. They have the flexibility to select 10,25 or view all instances on a single page.
Recommendation: It is recommended to keep the Per Page default value at 5 instances for an enhaced user experience.


Scoping Conditions can be created based on inputs from the following sources:
- Current Legal Entity: Evaluates Legal Entity Data attributes against a particular value.

Once created and after the User has hit Save, the component will gain a "Scoping Condition" Chip to indicate that it has conditions against it. Each time you update the Scoping Conditions of the component and select Save, this number will increase or decrease to reflect the number of conditions that have been assigned.

Important Note: When assigning Scoping Conditions to a Task, Process or Stage, you must hit the Save button each time. This behaviour is the same between UI 1.0 and UI 2.0 for Journey Builder, so please remember this step or else your conditions will not be added to the Task, Process or Stage.
Current Entity Changes
- Current Legal Entity Changes: Evaluates whether a particular Legal Entity Data attribute has changed by comparing the current draft value at the point of evaluation to the verified value at the point the journey was triggered.

This Data Source now has two Operators:
- Is Changed: assessing whether a datapoint has a changed value between its initial draft state, and at the point of evaluation in the Journey.
- Is Not Changed: assessing whether a datapoint is the same value as it was between its initial draft state, and at the point of evaluation in the Journey.
These two operators mean that a Configurator can base Journey Logic off of a datapoint changing its value or maintaining its value.
This Data Source can now look at all Policies configured in your Tenant. This means that any data requirement configured can be utilised to drive "Is Changed" or "Is Not Changed" logic.
The "Current Entity Changes" data source can be used in Scoping Conditions, SLA Assignment and Team Assignment Logic.
Journey Scoping
We use Journey Scoping rules to target precisely the Journey that we want to use for a given client and context. For example, we may have several Client Onboarding Journeys defined, but one of those Journeys is specifically for Private Companies. The system would firstly return all Client Onboarding Journeys, then use the Journey Scoping rules to decide which of those three to use for our Private Company client. We can access the Journey Scoping Rules by selecting the "Scoping" tab.

Journey Launchpad
The Launchpad task is used to conditionally run additional Journeys after the current one completes. Launchpad uses the Policy Scoping rules to check if there are any more Journeys that the clients should be in scope for.

The best example of a scenario where this would be used is in Portal Journey, where the end customer would apply for a product in an Application Journey, which would in turn trigger a separate, internal Client Onboarding Journey that is processed by a KYC Analyst or RM. The framework is flexible and can be adapted to client requirements. Note that the Launchpad task must occur after the Verify Legal Entity task for reasons of data consistency.
Related Party Journey Launchpad
This should no longer be used, it has been replaced with the Related Party Journey Launchpad v2
The Related Party Journey Launchpad is quite similar to the Journey Launchpad, the difference being that Related Party Launchpad will trigger Journeys for legal entities in the hierarchy as opposed to the client legal entity. There are a few steps to this:

-
Adding Related Parties:
Firstly, the system looks at all legal entities that are in the Related Parties task.
When we add Related Parties or update the Relationship type of an existing Relationship, we create a new draft association between the primary legal entity and the Related Party.
Alongside this, we create a Legal Entity Draft for that Related Party being added, where we can capture any changes made to the Legal Entity Data of the Related Party (e.g., a change in a Data Group or the Legal Entity Name of the Related Party within the Related Party modal).
infoThe system will currently only send unverified draft relationships to the Launchpad. All existing, verified Relationships will be excluded. When the legal entities are updated in some way in the Related Parties task, they are brought into scope for sending to the Launchpad. This can be:
- A newly created legal entity
- A new relationship with an existing related party
- An update to the relationship details of an existing related party
-
Sending Related Parties to the Related Party Journey Launchpad:
Then, we will send these newly created draft Relationships to the Related Party Journey Launchpad task to assess which of these legal entities will have Journeys launched for them.
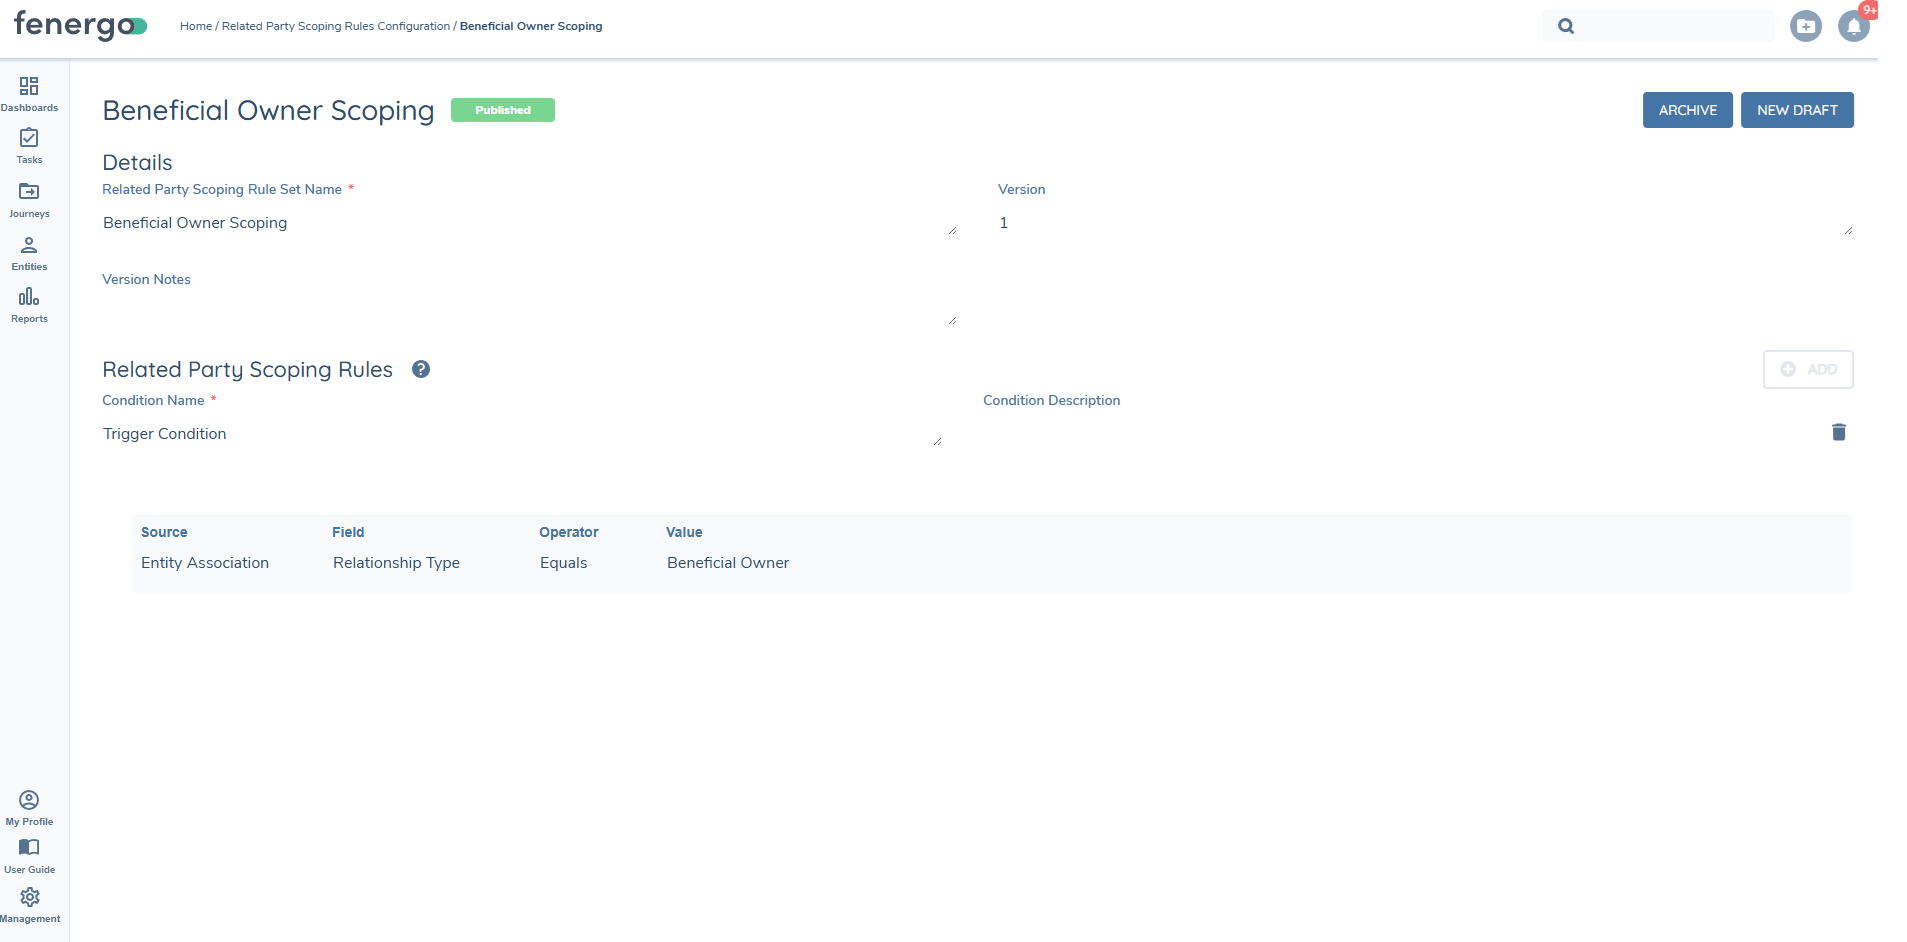
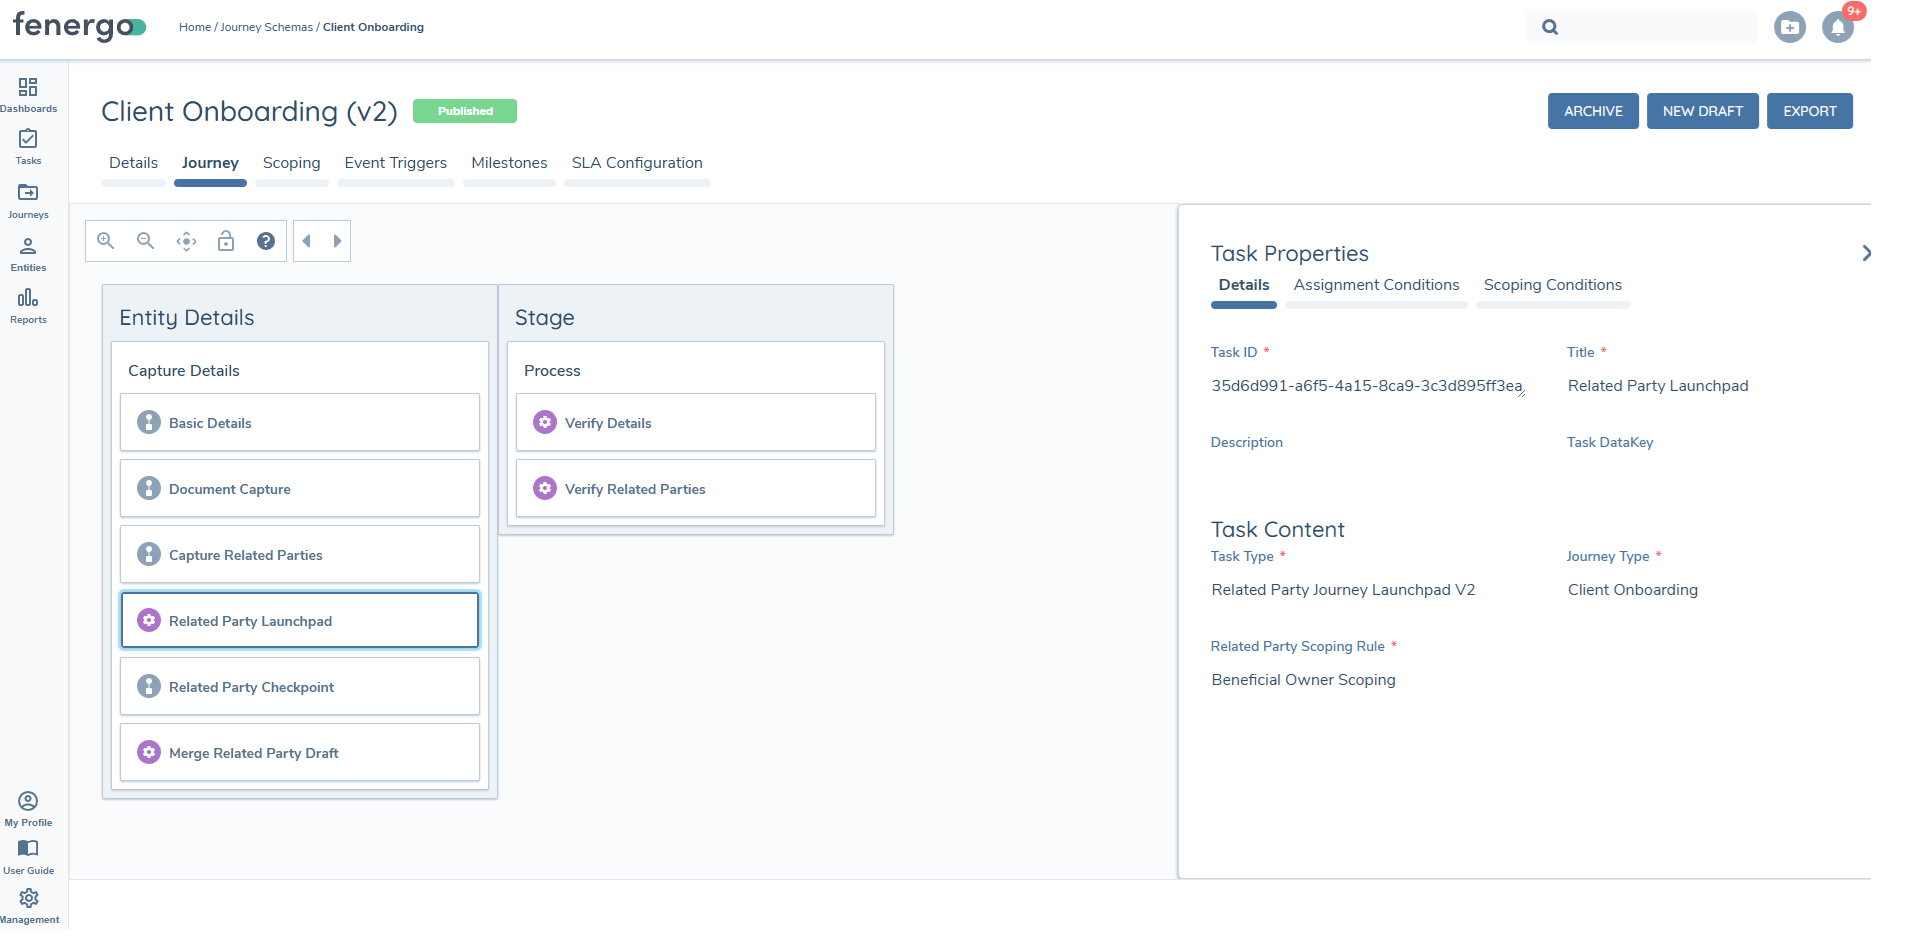
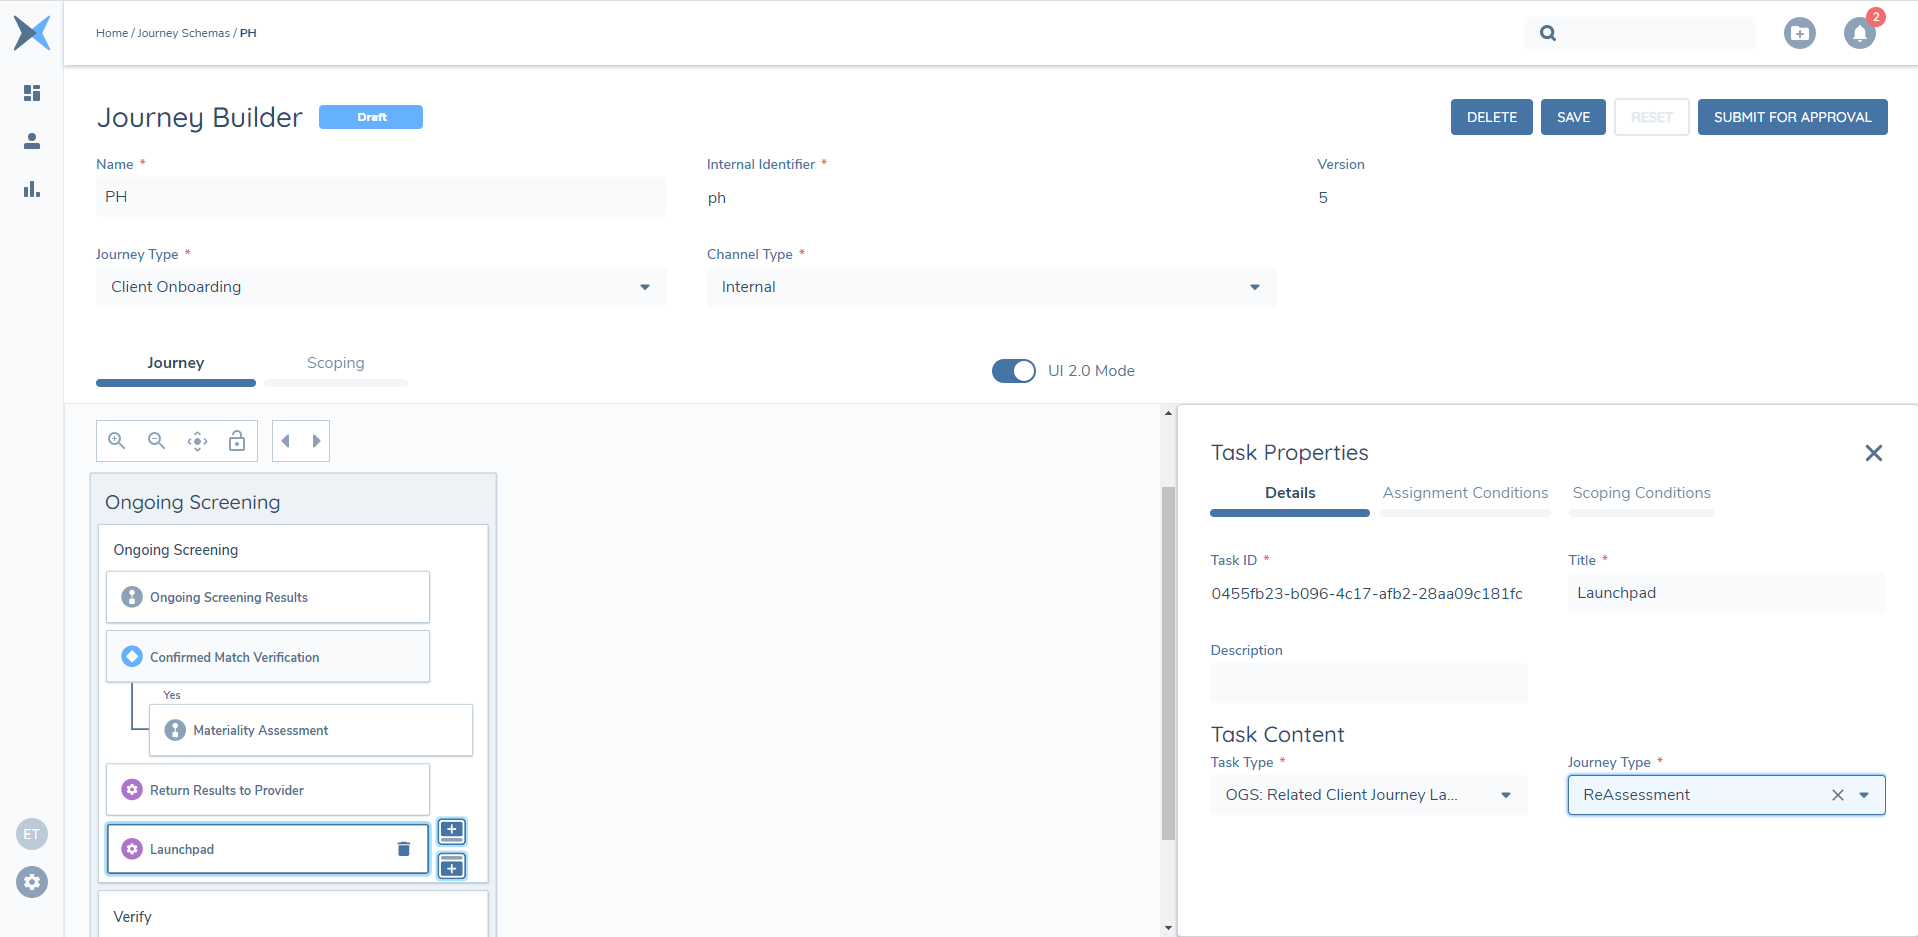
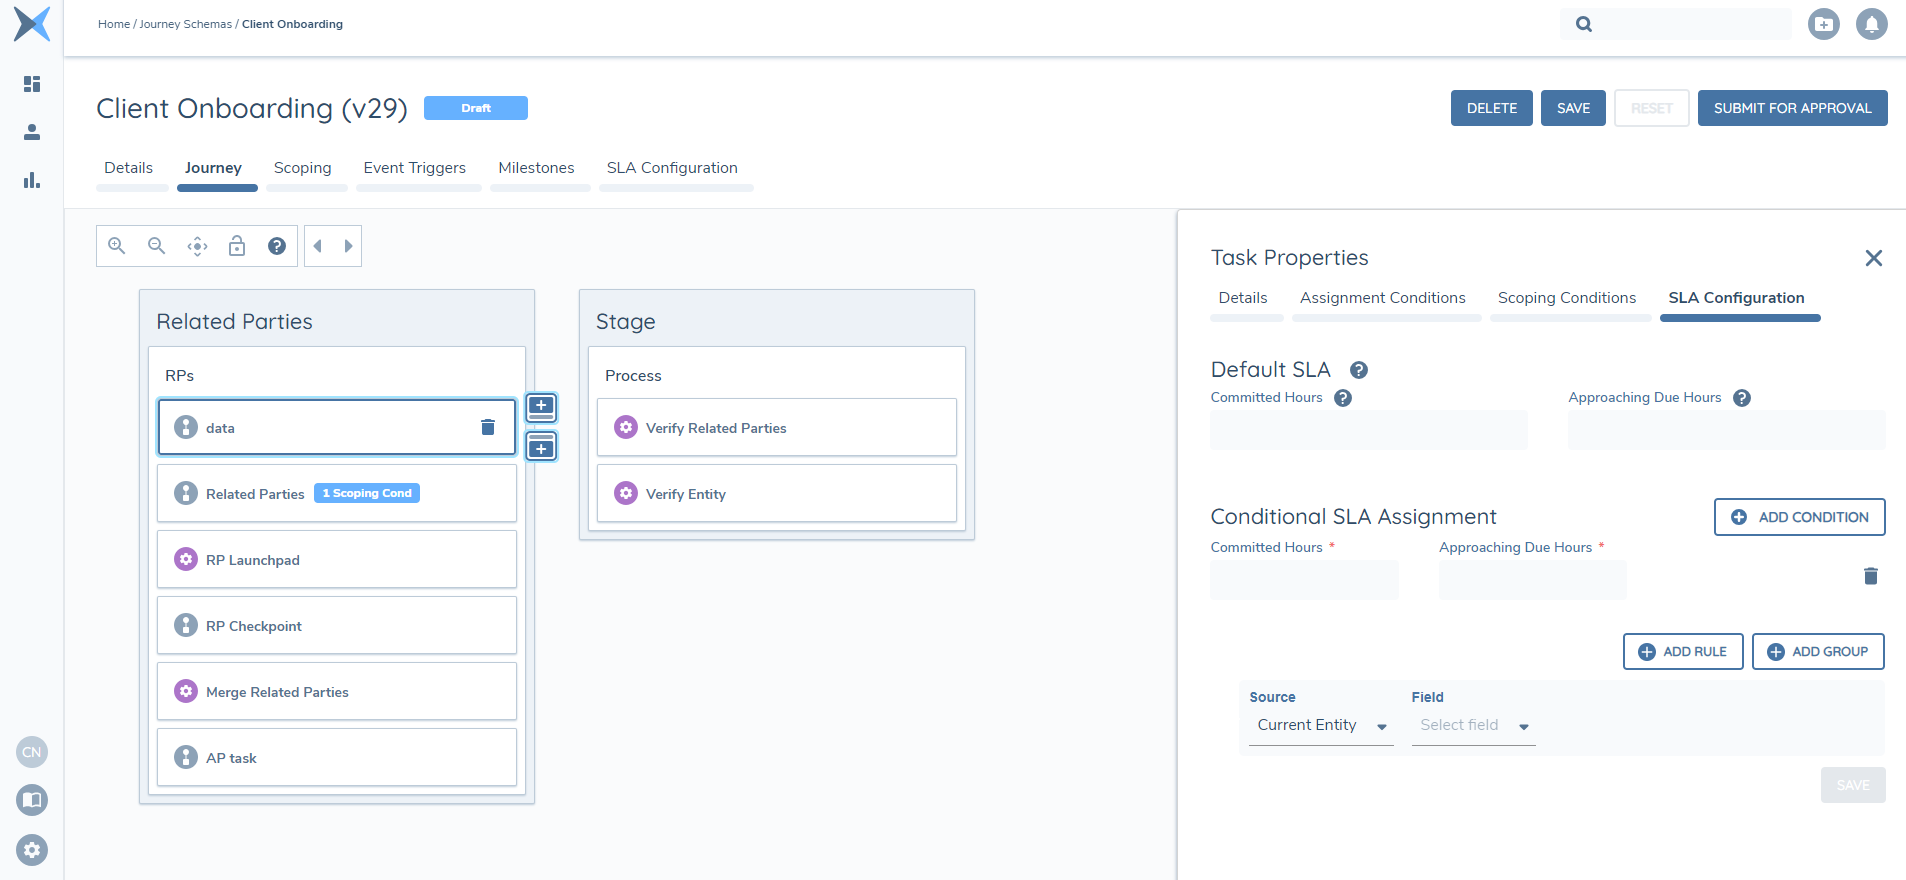
When configuring the Related Party Journey Launchpad task we need to specify which Journey Type that we want to be launched following the completion of this task for each of the Related Parties. This can be selected in the Task Properties section of the Related Party Journey Launchpad task in Journey Builder.

Screengrab of Selecting Journey Type in the Related Party Journey Launchpad Task Following the selection of the Journey Type to be launched in the Task Properties of the Related Party Launchpad, we must then ensure that the Scoping Conditions of our chosen Journey Type match up with the Related Parties we are intending to add.
For example, we plan to add Directors, Beneficial Owners and Authorised Signers and wishes to have individual Journeys launched for each Related Party matching this Association Type, then we must go to the Scoping Conditions in the Journey Schema that uses the selected Journey Type:

Screengrab of Scoping Conditions for selected Related Parties -
Related Party Checkpoint:
Once the Related Party Journey Launchpad task has run successfully and Journeys have been launched, we then navigate to the Related Party Checkpoint task where we can track the status of each Journey Launched. This task also acts as a blocker task in that it only becomes available to complete after all the Related Party Journeys have also been completed.
-
Merge Related Party Drafts:
When the Related Party Journey Launchpad task runs and launches Journeys for each in scope Related Party, it also creates a new legal entity draft of that legal entity to capture the additional changes in the separate Journey.
This means that in the Primary Journey, you will have one draft of the Related Party and in the launched Journey you will have another draft for the same Related Party.
This means that when we capture additional information or indeed change information that was captured for the Related Party in the Primary Journey, these changes are not reflected in the Primary Journey until we merge both drafts.
Previously, this was done in the original Verify Related Party Associations task but following feedback from clients, it was deemed that this was much too late in the process as by this point, these draft associations that were merged, were also verified meaning that users could not view the merged information or change it before verification occured for each association.
The Merge Related Party Drafts task now allows us to merge the information much earlier in the Journey, providing users with the ability to ensure that the information is all correct before verifying everything in the Journey.
warningThe Merge Related Party Drafts task can only merge the original legal entity draft with one other legal entity draft (this being the Legal Entity Draft created via the Related Party Journey). As a part of this, configuration must be set up so that only one Journey is launched per Related Party. More than one Journey being launched for a single Related Party will result in the Merge Related Party Drafts task failing.
-
Verify Related Party Associations V2:
This task type, introduced to replace the original Verify Related Party Associations task now does not include the Merging capability for Related Parties. The orignal version of this task type will still be supported in any inflight Journeys.
However, going forward, any new Journey Schemas created using Related Parties tasks, will require this new task type to also be included. The user will be informed of this when configuring and trying to save their schema if they have not included this task with the below message:

Screengrab of Validation Message for Verify Related Party Associations V2 Task
Sequencing of Related Party Launchpad tasks
When configuring a Journey, using the Related Party Launchpad task, it is important to follow the below sequencing of tasks:
- Related Parties
- Related Party Journey Launchpad
- Related Party Journey Checkpoint
- Merge Related Party Drafts
- Verify Related Party Associations V2 (recently brought in to replace original Verify Related Parties task).
These tasks do not need to be immediately after each other, but they do need to follow this sequence. After the Related Party Checkpoint task which allows the user to confirm all Journeys are complete and the primary Journey can continue, the Merge Related Party Drafts task will run and merge all the information captured in the Related Party Journeys into the Primary Journey draft. This sounds technical, but effectively it means that those related parties that have a child Journey created for them by the launchpad will save the data captured in those underlying Journeys and then this information will be merged back in to the Journey you are working on.
When configuring the Related Party Journey – you should not include a Verify Legal Entity step. The verification of this information will be done in the Verify Related Party Associations V2 task.
The Merge Related Party Drafts task will merge the data captured on the Legal Entity Draft of the Related Party journey back with the original legal entity draft created in the parent journey (i.e., the main onboarding). The data in the Related Party Journey must be captured in Data tasks with a Target Legal Entity = "Related Party". If Data is captured in a Data Task of Target Legal Entity = "Client", this Data cannot be merged back to the Parent journey and as such, this data will not be verified at the conclusion of the Parent journey. Simply put, configurators must ensure that any Data tasks in the Related Party Journey have a Target Legal Entity = "Related Party".
As the duplicate check for related parties is done in the Related Parties task, it is not recommended to re-use the same categories in the underlying Journey. This could open up the risk of the duplicate search fields search as First Name, Last Name, Company Name, etc., being updated in the underlying Journey, even though the duplicate search was completed based on the previous information. In simple terms, this means not using the Related Party Basic Details fields in the underlying child Journeys.
It is important to note that when using the Related Party Journey Launchpad, the functionality assesses the primary associations from the Client (i.e. first level associations). The only exception will be if in the primary association, we have a relationship type of 'Shareholder'. In this instance, the system will assess the next level down to check for candidates to be added to the Launchpad.
A final note on reopen behaviour; if the Journey is referred back to before the Related Party Launchpad task by a Reopen action, then the user will be warned that any open Journeys will be cancelled. They can then be re-triggered as before.
Related Party Journey Launchpad V2
The Related Party Journey Launchpad v2 allows journeys to be triggered for new and existing related parties. This replaces the existing Related Party Journey Launchpad. All related parties can now be in scope for a journey to be triggered. This is controlled by using the Related Party Scoping Rule Configuration, available in the Journey Configuration. The Related Party task must be completed before the Related Party Launchpad task can open. There is no restriction on the number of Related Party Launchpad tasks you can have within a journey.
Steps
1. Complete the Related Parties task Before the Related Party Journey Launchpad can run, you must first complete the Related Parties task. This step ensures that all associations are recorded and ready to be assessed by the launchpad.
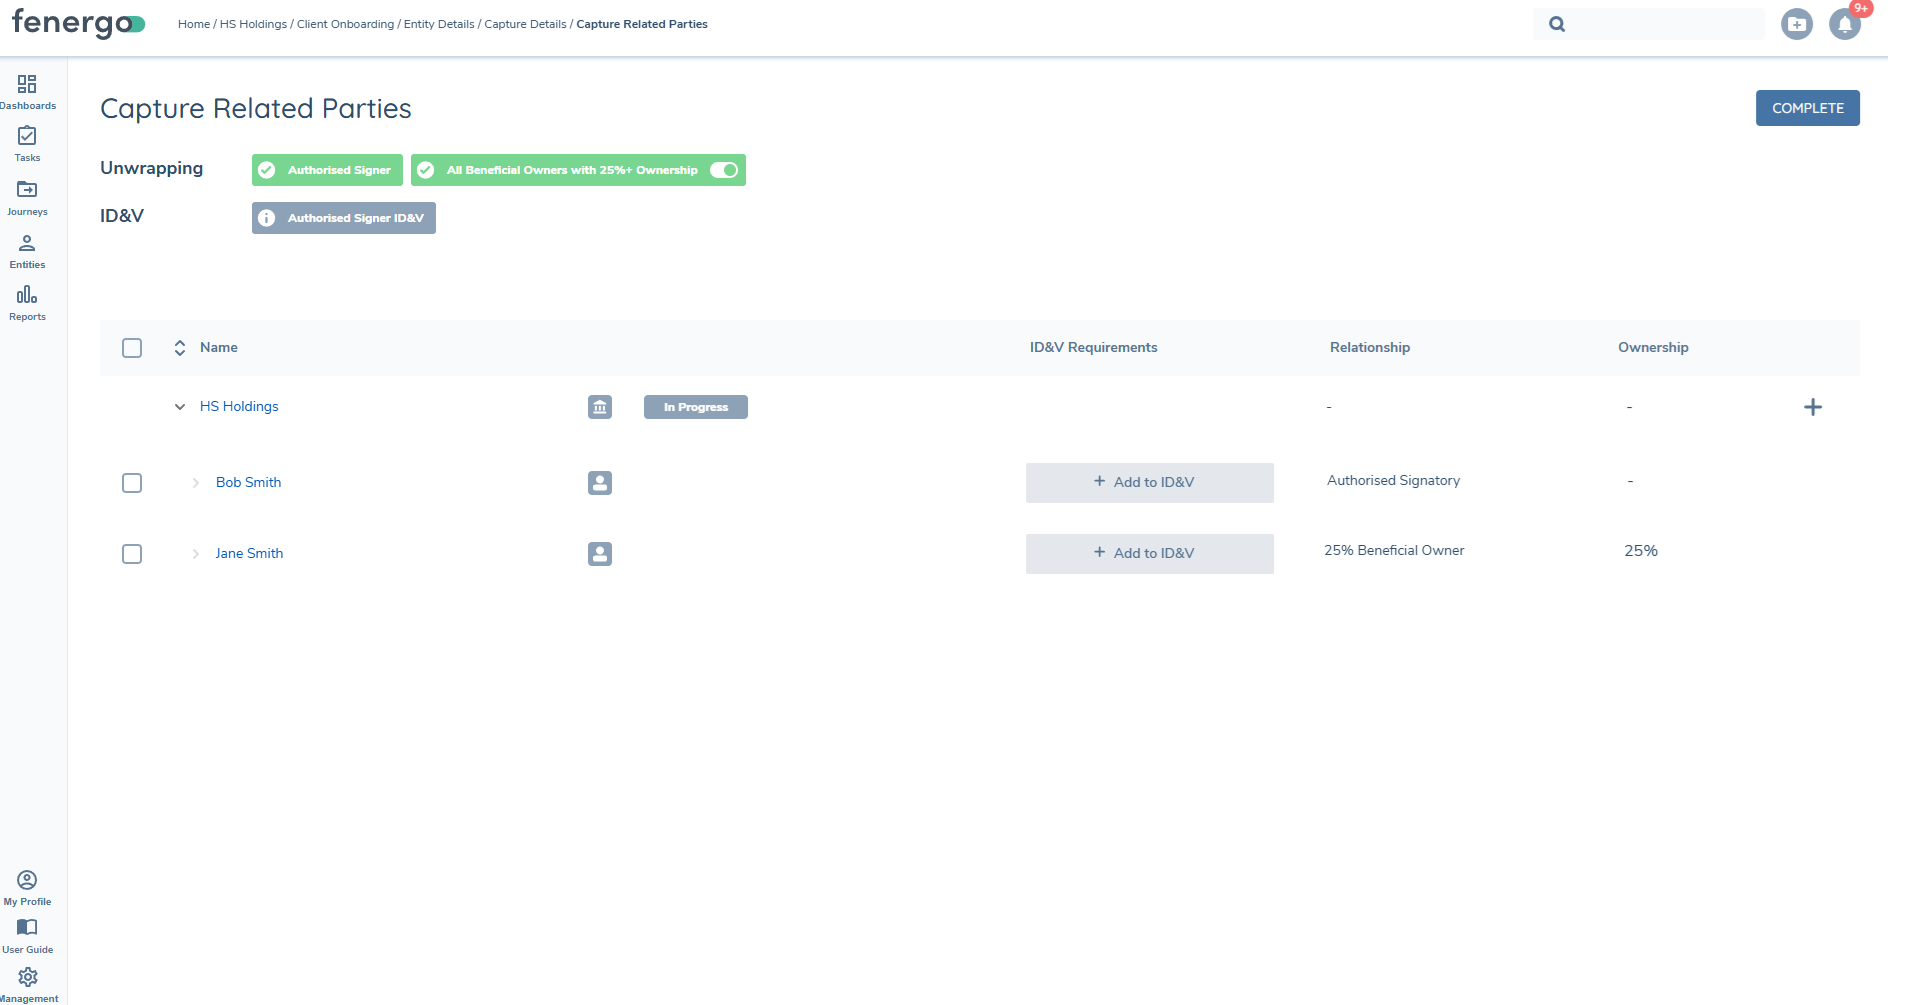
2. Apply scoping rules Once the Related Parties task is complete, the Launchpad uses the configured scoping rules to determine which related parties are in scope. Both new and already verified entities can be included, allowing due diligence to be carried out across the full set of associations.
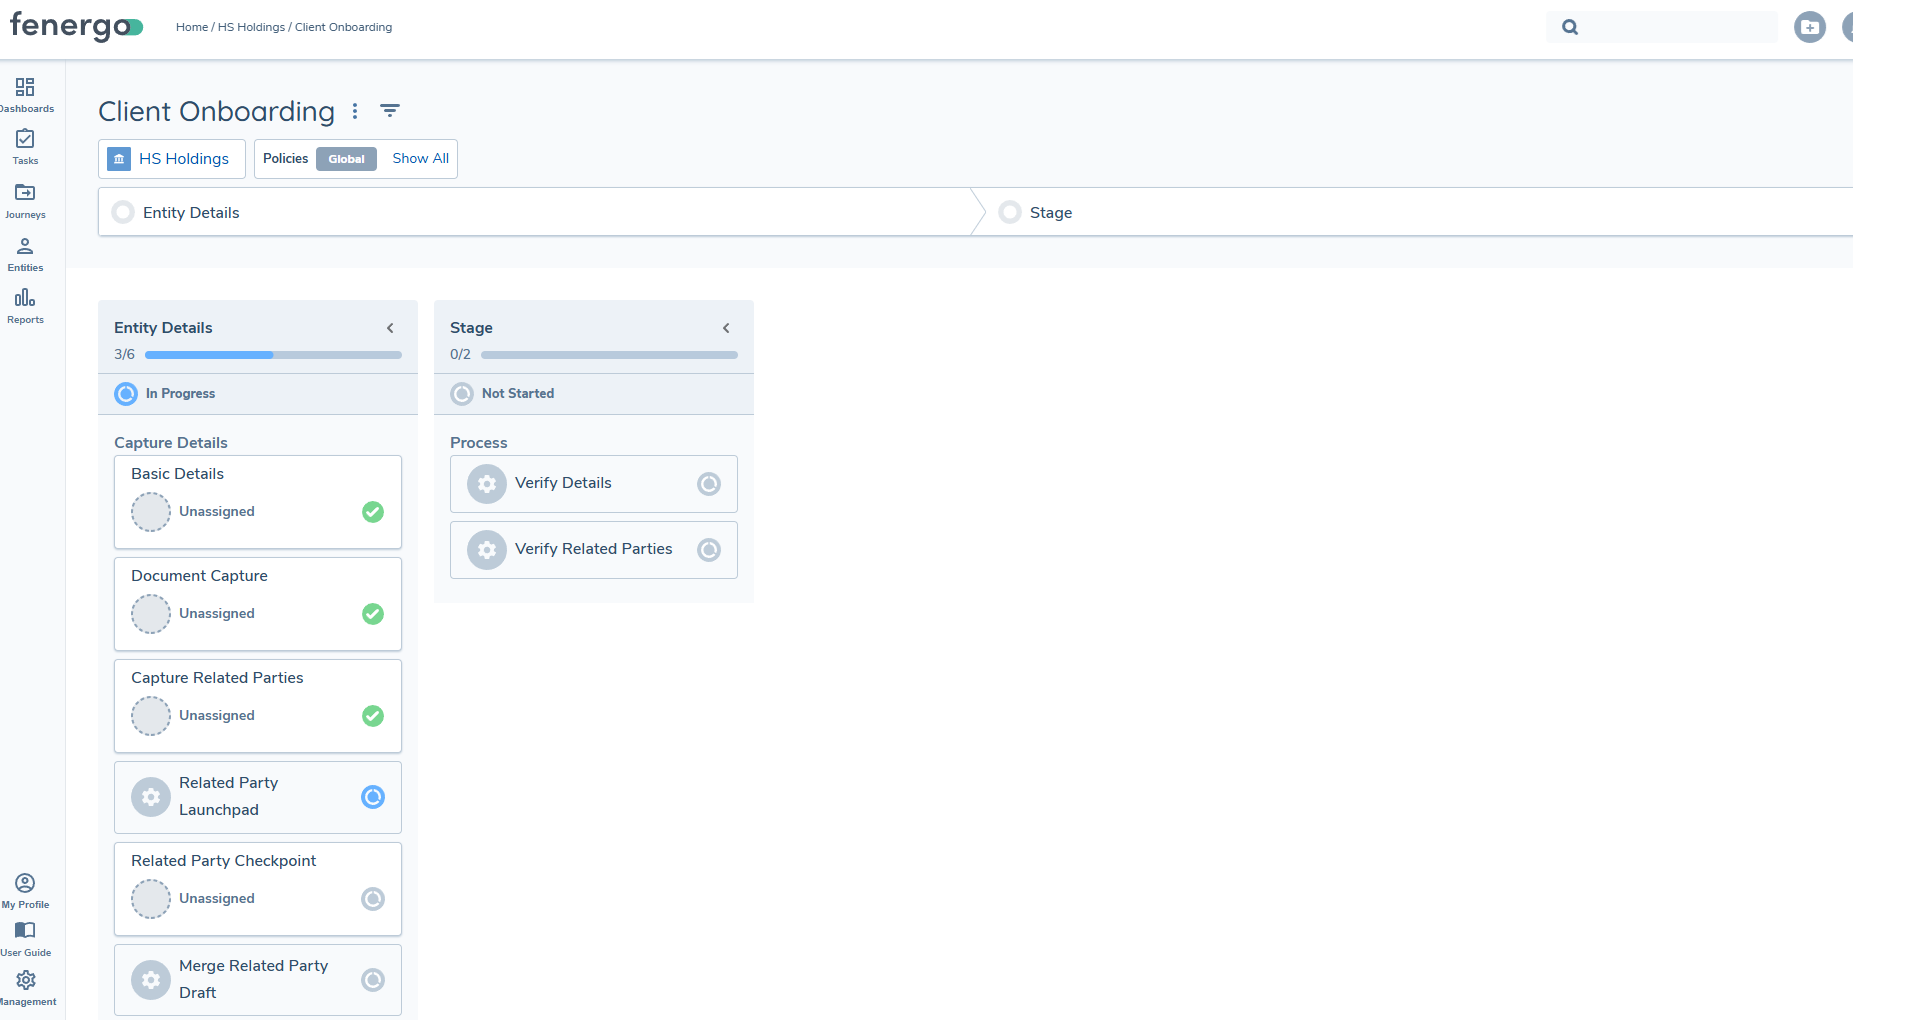
3. Trigger the Related Party Journey Launchpad If Related Parties are identified as in scope, the Linked Journey section appears on the left-hand side of the screen. From here, you can see which journeys are being launched for the related parties.
4. Configure multiple tasks if required You can include multiple Related Party tasks and multiple Related Party Journey Launchpad tasks within a single journey. There are no restrictions on how many of these tasks you use. This flexibility allows onboarding to begin for some entities while additional details are still being captured for others.
Task Sequencing
When configuring a journey that uses the Related Party Launchpad task, it is important to follow the sequence below:
- Related Parties
- Related Party Journey Launchpad
- Related Party Journey Checkpoint
- Merge Related Party Drafts
- Verify Related Party Associations v2
These tasks do not need to be placed immediately after one another, but they must follow this sequence. After the Related Party Checkpoint task is complete (confirming that all related party journeys have been completed), the Merge Related Party Drafts task will run. This merges the information captured in the related party journeys back into the primary journey draft. This ensures that data gathered in the child journeys created by the launchpad is saved and then merged into the primary journey you are working on.
OGS: Related Client Launchpad
The Ongoing Screening Related Client Launchpad is again, similar to both the Journey and Related Party Launchpad tasks, but the difference here is that the Related Client Launchpad task will trigger Journeys for legal entities that are impacted by Ongoing Screening (which includes both the main client legal entity – the legal entity in which the Journey has been launched for – and any related client legal entities to this legal entity). The purpose of this is to identify that if a material screening hit has been identified on a client legal entity, that Fenergo SaaS is able to determine the impact of this hit on any other client legal entities in a hierarchy.
The behaviour of the Related Client Launchpad task mirrors that of the Journey Launchpad and Related Party Launchpad in that the task will decide which legal entities are potentially in scope for Journeys to be launched for them, but the scoping conditions for our configured Journey – the Journey selected to be launched following the Related Client Launchpad task - will determine which of those legal entities will actually have Journeys launched for them.
Screengrab of OGS: Related Party Client Launchpad Task in Journey Builder
Configuration of SLAs
Within the Journey Builder, we have introduced new SLA properties to allow configurators to define how long a user will have to complete individual Journeys, Stages, and/or Tasks.
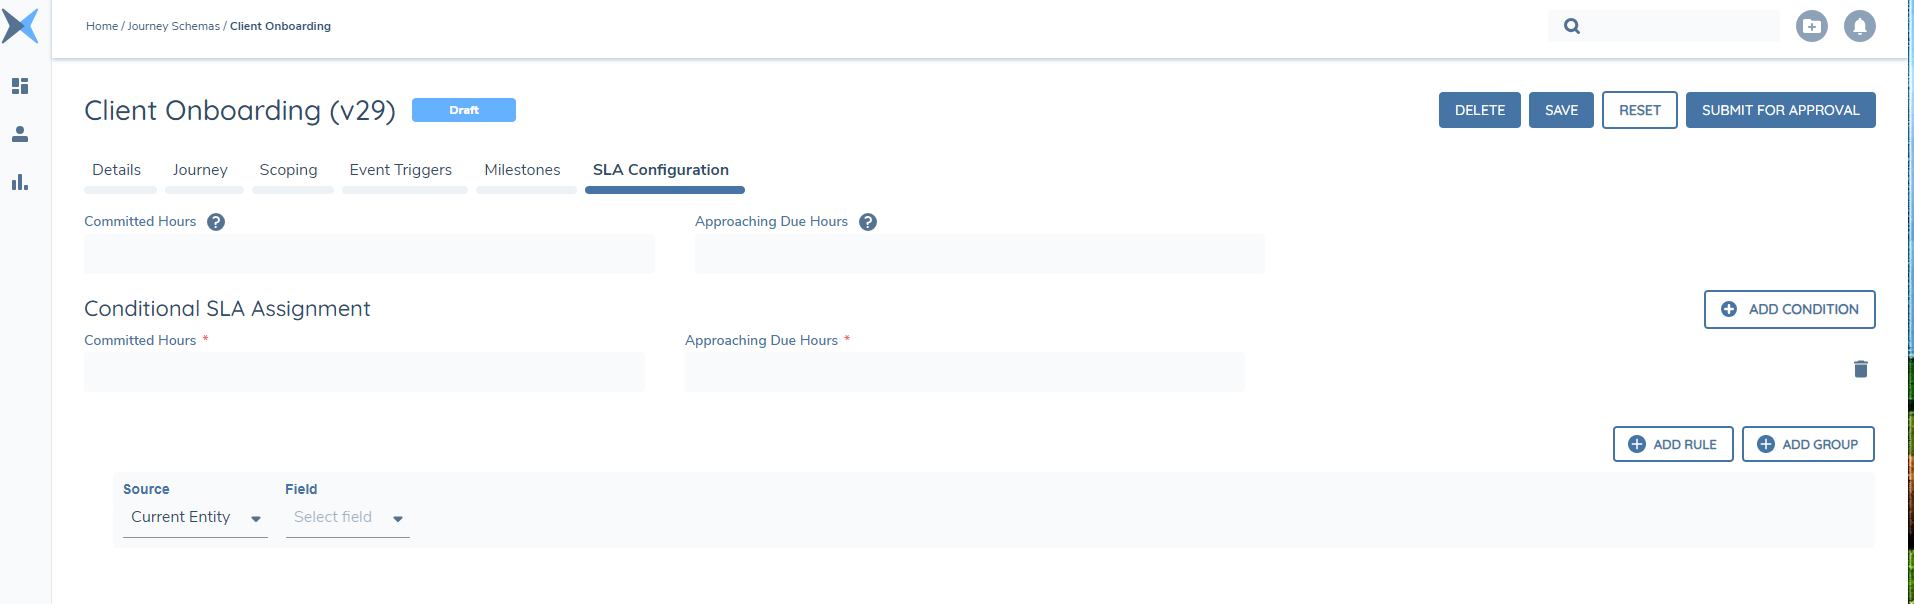
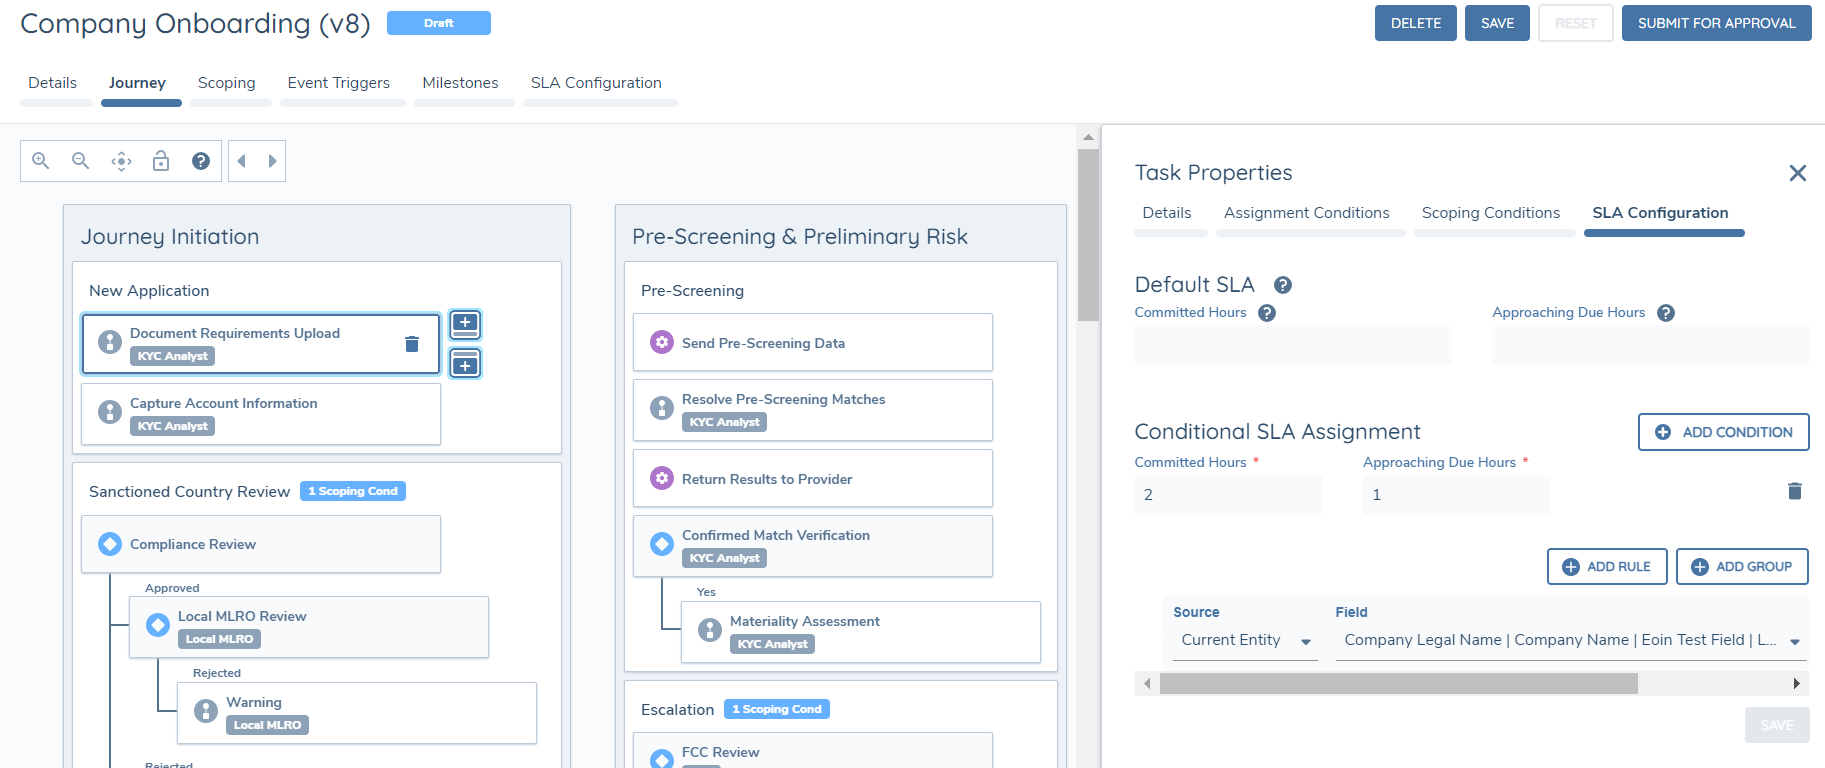
The first change is the SLA Configuration panel on top of the Journey Schema:
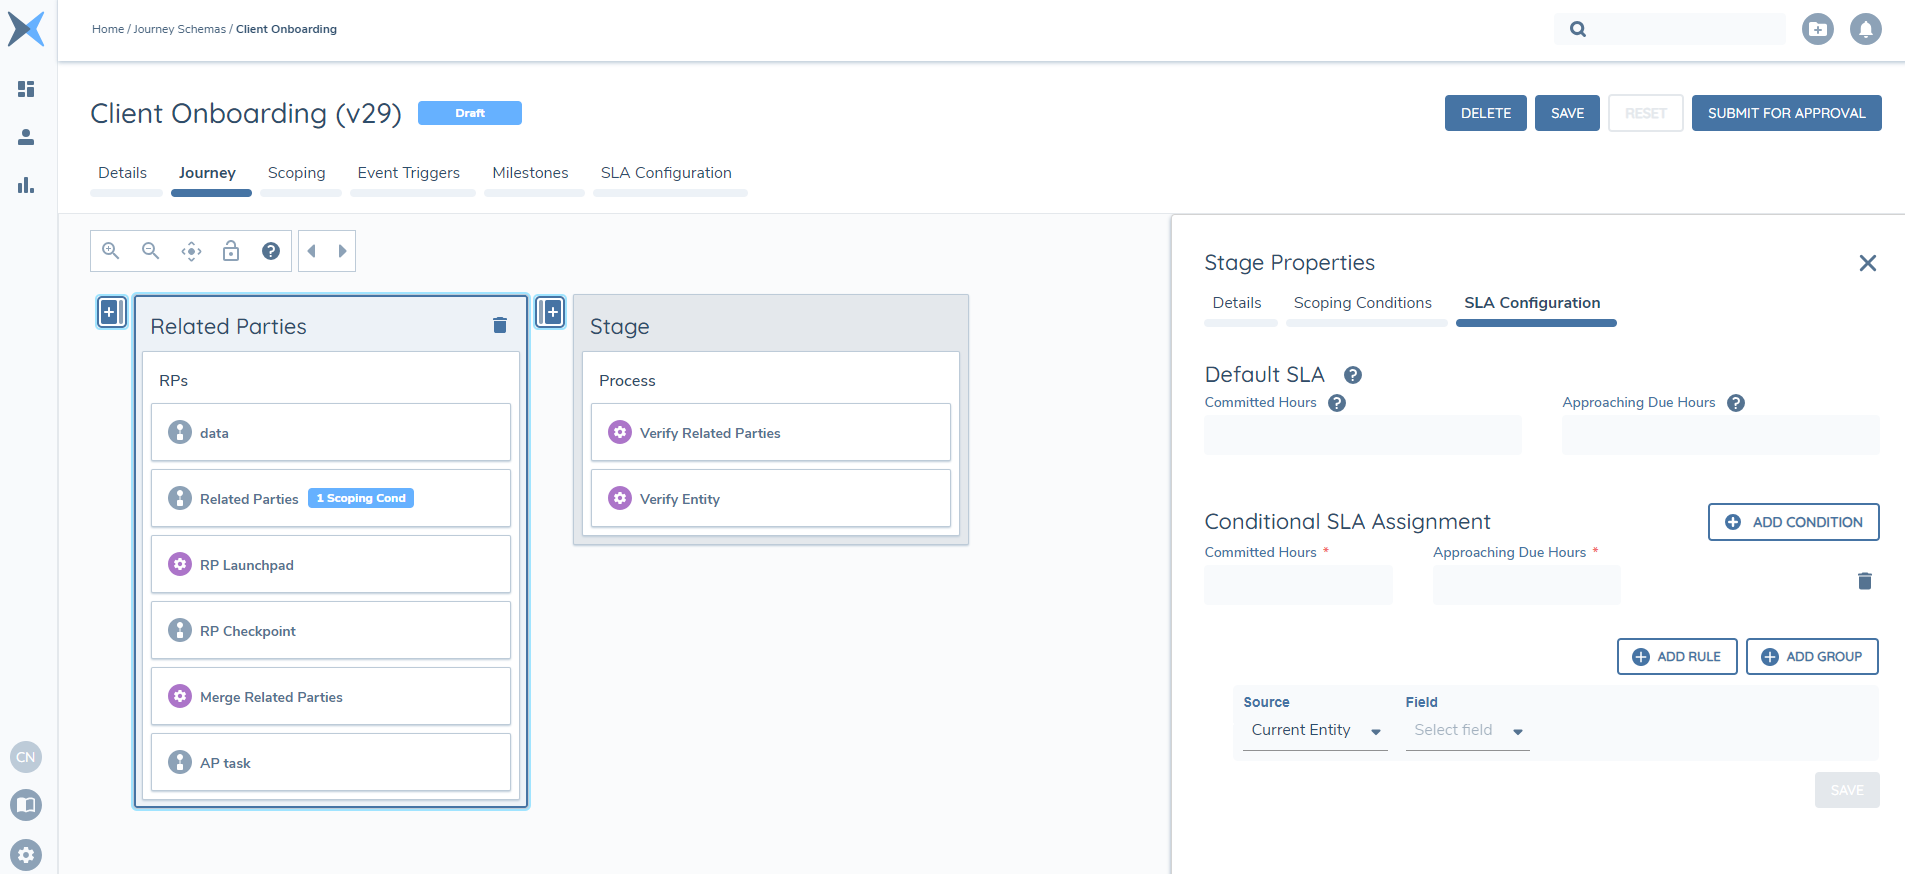
We have also implemented this change in the Stage and Task Properties components respectively:
The second change that we have introduced are two new properties in each SLA section for Journey, Stage and Task. These are:
- Committed Hours (Tooltip: “A Committed Hours property sets the amount of time a user has to complete a task”).
- Approaching Due Hours (Tooltip: “The Approaching Due Hours field allows user to define when an SLA status will change from ‘In Progress’ to ‘Approaching Due’. This will support users in identifying items to work on before they go overdue”.)
The "Committed Hours" field is optional to configure. However, if a value is included in this field, the associated "Approaching Due Hours" field will then become mandatory for the configurator to populate for that item (i.e. the individual Task, Journey or Stage where a value was inputted in the "Committed Hours" field".
Both the "Committed Hours" and "Approaching Due Hours" support positive integers only, between 1 and 5000. Values outside of this range (including decimals) will be rejected. Finally, the "Approaching Due Hours" property must always have a value equal to or less than what has been inputted in the "Committed Hours". This is so that an item cannot have a SLA status of "Approaching Due" without having first calculated the SLA Committed Date.

We have further enhanced the SLA feature to enable dynamic updates for Journeys, Stages and Tasks with defined SLAs, based on the information captured within a Journey itself. This new capability allows users to configure conditional Journey, Stage and Task SLA periods using the Fenergo SaaS Logic Engine.
Within the SLA Configuration tab for each item, users will also be met with a Conditional SLA Configuration section. In this section, users have the ability to add multiple SLAs to the item. Similar to the Default SLA section, the Conditional SLA Assignment section includes two new properties: Committed Hours and Approaching Due Hours. Both of these fields are mandatory. When setting a rule, users can specify the conditions under which the SLA should be applied using the Logic Engine.
Key Considerations:
- Evaluation Order: In scenarios where multiple conditional SLAs are defined, the evaluation will be performed in a top-down manner, similar to Conditional Values or Dynamic Task Assignment. The first conditional SLA that satisfies its associated conditions will be selected.
- Default SLA and Conditional SLAs: If both the default SLA and one of the conditional SLAs are satisfied, the system will prioritize the first-met conditional SLA properties. This ensures that the SLA properties assigned to a specific condition take precedence over the default SLA.
- No Conditional SLAs met: If none of the conditional SLAs are met, the system will automatically use the default SLA. This allows users to leave the default SLA field empty and set up a conditional SLA instead. Consequently, the Task/Stage/Journey will only have an SLA applied under specific conditions, provided that the associated condition is met.
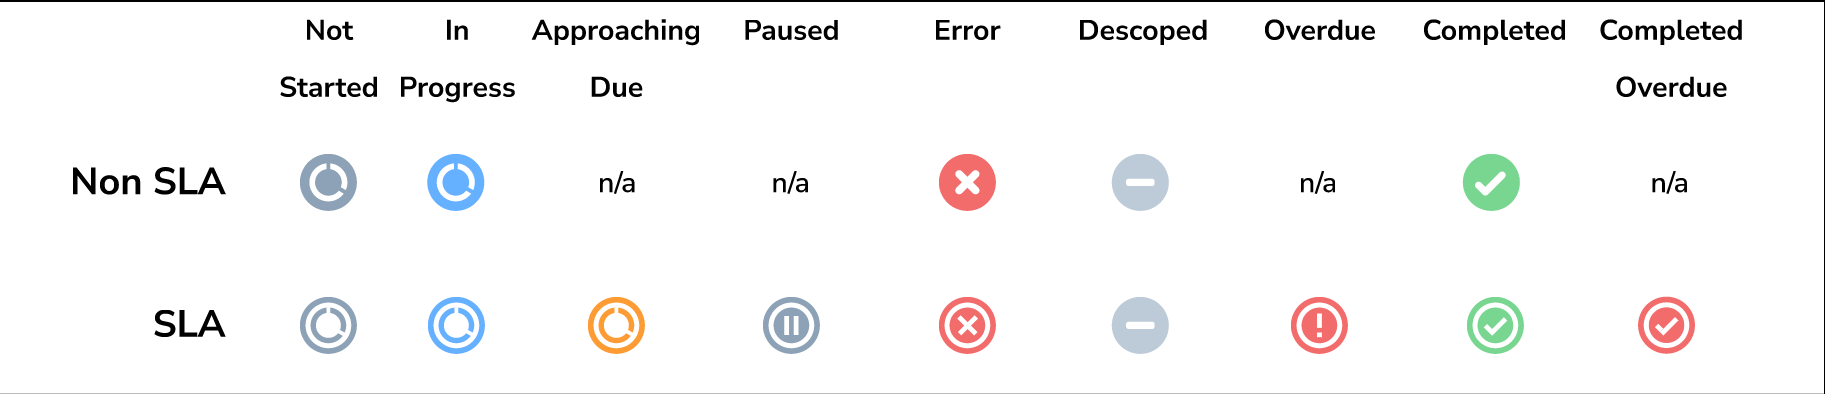
Journey Hub View of Items with SLA Configuration
The UI icons of Tasks, Processes, Stages and Journeys with SLA, and those without SLA, will be different in the Journey Hub UI. This is to ensure that the items that have a time-sensitive SLA against them are picked up first.
The visualisation of these icons are as follows:
Enabling SLA Event Notifications
SLA Event Notifications allow a tenant's integration consumers to react in real-time when SLAs on Tasks, Stages, or Journeys are approaching due, or have breached. Notifications are published via Webhooks (push) or Polling (pull) using the existing Event Notifications mechanics. Two event types are involved:
journey:slaapproachingdue— published when an Approaching Due threshold is reached.journey:slapastdue— published when an SLA Committed Date passes without the work item being completed (i.e. an SLA breach).
Both events are scheduled emissions rather than on-demand. Each is published as a collection event (a single notification carrying one or more items) at a fixed cadence:
- Approaching Due — evaluated every 10 minutes.
- Past Due — evaluated every 5 minutes.
When no items are due to be emitted for a cadence cycle, no event is published.
The per-Journey-Schema opt-in toggle
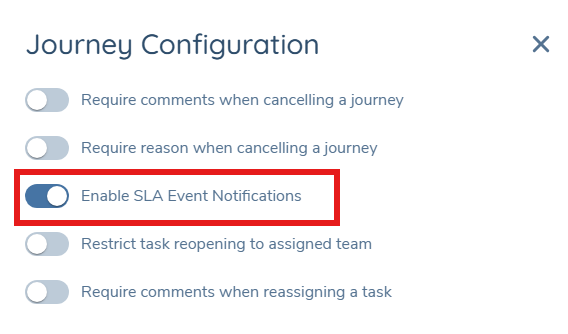
SLA Event Notifications are off by default for each Journey Schema. To enable them for a specific Journey Type, a configurator must opt in via the Journey Configuration modal in Journey Builder.
- Navigate to Journey Builder.
- Open the Journey Configuration modal (cog icon).
- Locate the "Enable SLA Event Notifications" toggle and set it to On.
- Save and publish the schema.
When the toggle is Off:
- No SLA notification schedules will be created or updated for journeys created from this schema.
- No SLA Approaching Due or SLA Past Due events will be published for any Tasks, Stages, or Journeys within instances of this schema, even if events have been previously subscribed to at the Event Registry / Webhook level.
When the toggle is On:
- SLA notification schedules are created and maintained automatically as Tasks, Stages, and Journeys start, restart, recalculate, or terminate.
- Notifications are published per the cadences above, provided the tenant has subscribed to the events via a Webhook or is polling the
journeyfeed.
Changes to the toggle apply to new and in-flight journey instances from the point the change is saved and the schema published. Notifications that would have been suppressed prior to the toggle being enabled are not backfilled.
The toggle is gated by the existing Journey Configuration Edit permission — no new permission is required.
How the toggle interacts with the Event Registry
The Journey Schema toggle is the first of two gates for SLA Event Notifications. The second gate is the tenant's Event Registry subscription (covered in Event Notifications Overview). For an SLA notification to actually reach a consumer:
- The Journey Schema must have Enable SLA Event Notifications set to On, AND
- The tenant must have an active Webhook or polling subscription that includes
journey:slaapproachingdueand/orjourney:slapastdue.
If either gate is off, no notifications will be delivered for that schema / event type combination.
Outreach indicator
For all SLA events, each item in the published collection carries the originating Stage Channel (External - Portal or Internal) and Journey Channel (Internal, External, Internal & External). This allows consumers to handle Outreach-related SLAs (where an external customer is in the loop) differently from internal SLAs.
What the events contain
Detailed payload structures and per-event field references are in the Event Registry. At a high level, each item in an SLA event payload identifies:
- The Journey Instance, and where applicable the Stage and Task that the SLA applies to.
- The committed Due Date-Time and the Approaching Due threshold.
- The current SLA status (
Approaching DueorPast Due). - The Journey and Stage channels.
- For Task-scoped items, the configurator-defined Task DataKey (exposed as
TaskKey), if set.
Mandatory Cancellation Reason on Journey Cancellation
Administrators can configure whether users must provide a cancellation reason when cancelling a journey. This is a tenant-level setting managed within the Journey Configuration panel via the 'Require reason when cancelling a journey' toggle. When enabled, it is not possible to cancel a journey before making a selection in the 'Reason for Cancellation' dropdown in the Journey Cancellation modal.
Mandatory Comment on Journey Cancellation
Administrators can configure whether users must provide a comment when cancelling a journey. This is a tenant-level setting managed within the Journey Configuration panel.
Accessing the Configuration Panel
- Navigate to the Journey page in your environment.
- Click the cog icon on the right-hand side of the page to open the configuration flyout panel.
- Locate the setting labeled "Require comments when cancelling a journey".
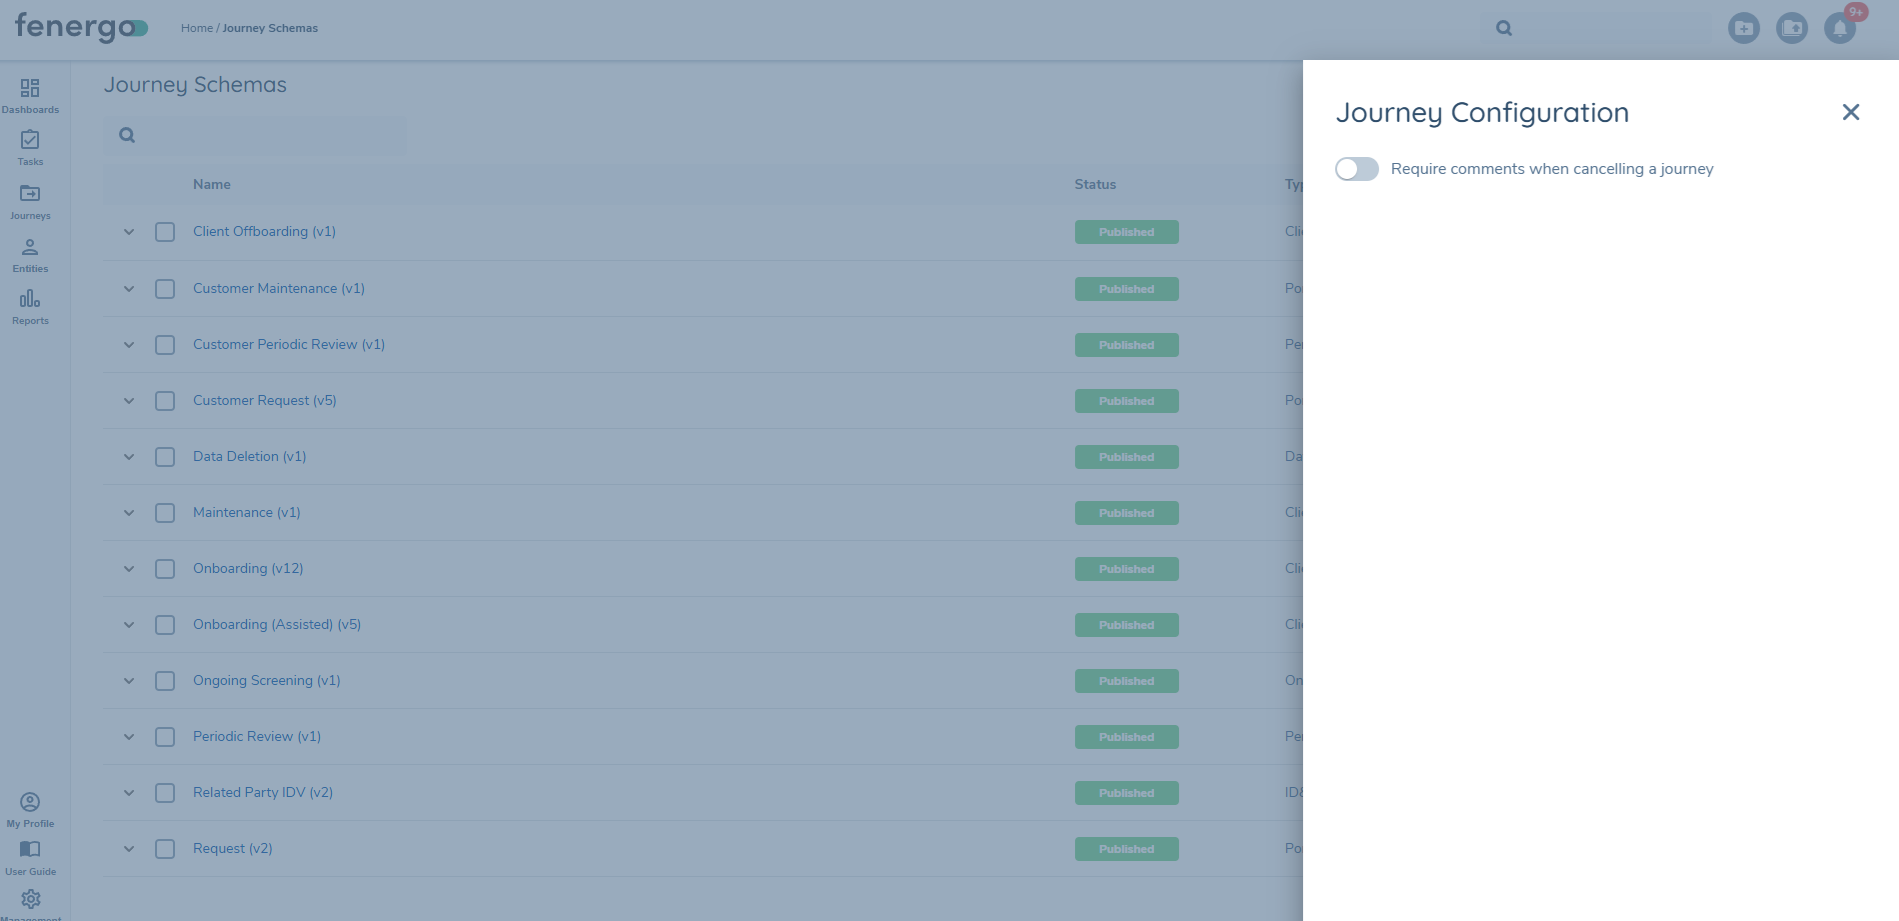
Enabling the Setting
- Toggle "Require comments when cancelling a journey" to On.
- When enabled, users will be required to enter a comment before cancelling any journey.
- The change is automatically applied to all in-flight journeys within the tenant.
- There is no separate save button; changes are saved instantly when the toggle is updated.
- Users will require Journey Configuration Edit permission in order to enable or disable.
When the toggle is disabled, the comment field is optional during journey cancellation.
Mandatory Comment on Task Reassignment
Administrators can configure whether users must provide a comment when reassigning a task. When this setting is active, the user or team receiving the task always has clear context for why it was directed to them.
This is a tenant-level setting managed within the Journey Configuration panel. To enable it, navigate to the Journey page, click the cog icon on the right-hand side to open the configuration panel, and toggle "Require comments when reassigning a task" to On.
When enabled:
- The comment field in the Reassign modal becomes required, with a visual indicator shown to the user.
- A reassignment cannot be submitted without a comment — a validation message will be displayed if the field is left empty.
- This applies to both individual task reassignment and bulk task reassignment, including the Bulk Reassign action in Advanced Dashboards.
When disabled (the default), the comment field remains optional and existing reassignment behaviour is unchanged. Changes take effect immediately with no separate save step. Journey Configuration Edit permission is required to change this setting.
Restrict Task Reopening to Assigned Team
Administrators can configure whether task reopening is restricted to users who belong to the team assigned to that task. When this setting is active, only members of the assigned team can reopen a completed task, ensuring that task governance is maintained and the responsible team retains control over their assigned work.
This is a tenant-level setting managed within the Journey Configuration panel. To enable it, navigate to the Journey page, click the cog icon on the right-hand side to open the configuration panel, and toggle "Restrict task reopening to assigned team" to On.

When enabled:
- Only users who belong to the team assigned to a task can reopen it, even if they hold the Journey Reopen Task permission.
- Users outside the assigned team who attempt to reopen the task will receive a permission error.
- If a task has no team assigned, the restriction does not apply and any user with the appropriate permission can reopen it.

When disabled (the default), existing reopen behaviour is unchanged and any user with the Journey Reopen Task permission can reopen tasks regardless of team assignment. Changes take effect immediately with no separate save step. Journey Configuration Edit permission is required to change this setting.
Exporting Journey Schema Configuration
The Journey Builder provides the ability to export a comprehensive PDF document containing the complete configuration details of any published Journey Schema. This export functionality is particularly valuable for documentation purposes, audit requirements, stakeholder reviews, and maintaining configuration records.
To export a Journey Schema configuration, navigate to the specific Journey Schema you wish to document and click the EXPORT button located in the top-right corner of the screen, alongside the ARCHIVE and NEW DRAFT buttons.

Once clicked, the system will generate a comprehensive PDF document that automatically opens in your browser as soon as it's ready. This document provides a complete technical specification of the Journey Schema configuration.
Journey Configuration PDF Content
The exported PDF contains detailed information organized across multiple sections:
Title Page - Journey identification details including name, identifier, type, version, status, channel type, and generation timestamp.
Table of Contents - Comprehensive navigation guide showing all stages, processes, and tasks with page references.
Journey Overview - High-level summary including:
- Visual journey flow diagram showing stage progression
- Journey statistics (total stages, processes, tasks, conditions, milestones, conditional stages, parallel stages, service tasks)
- Key features list highlighting capabilities such as advanced team assignment, conditional stages, process automation, and multi-jurisdictional support
Detailed Stage Configuration - For each stage in the Journey, the document provides:
- Stage properties including order, process completion order, and conditional status
- Stage conditions (where applicable) with condition names
- Complete process breakdown organized by process within each stage
- Detailed task tables showing order, task name, type, comprehensive configuration details, and team assignments
- Service task configurations including service names, target entities, and specific properties
- Policy task configurations with categories, requirements, and feature toggles
- Specialized task configurations (e.g., Financial Analysis, Credit Assessment, Deal Management) with their specific parameters
Journey Conditions - Documentation of all journey-level scoping conditions including condition names and descriptions that determine when the Journey should be triggered.
Milestones - Section for configured milestones (may be empty if no milestones are defined for the Journey).
The exported PDF serves as a complete technical specification that captures every aspect of the Journey configuration, including complex task properties, conditional logic, team assignments, and service integrations. This comprehensive documentation can be used for compliance requirements, stakeholder communication, configuration backup, and technical reference purposes.