Configuring Policy
To start building and editing policy requirements, navigate to the tool using the Policy Configuration button.

Policy Requirements
Each policy is made up of three requirement types:
- Data Requirements: Customer profile information that is required to be captured about the client. These attributes are presented to the user in a journey.
- Document Requirements: Mandatory documents that must be captured for a client, including acceptable document types that can be used to satisfy each requirement e.g., a passport is an acceptable document for a Photo ID document requirement.
- Ownership and Control Requirements: The minimum set of related parties that must be captured e.g., UBOs, Directors, Authorised Signers. These rules also include data and document requirements against those related parties. These are commonly referred to as ID&V requirements.
These are all created through the requirements page of a policy. Each requirement type can be created, updated, deleted, or cloned from this page.
- To create a new requirement, use the ‘+’ icon on the respective requirement grid.
- To edit a requirement, click on the name of the requirement.
- To delete a requirement, mark the check box of the requirement to remove and then click the delete icon. Only one requirement can be deleted at a time.
- To clone a requirement, mark the checkbox of the requirement to be replicated and then click the clone icon. A duplicate requirement will now appear on the requirement grid.
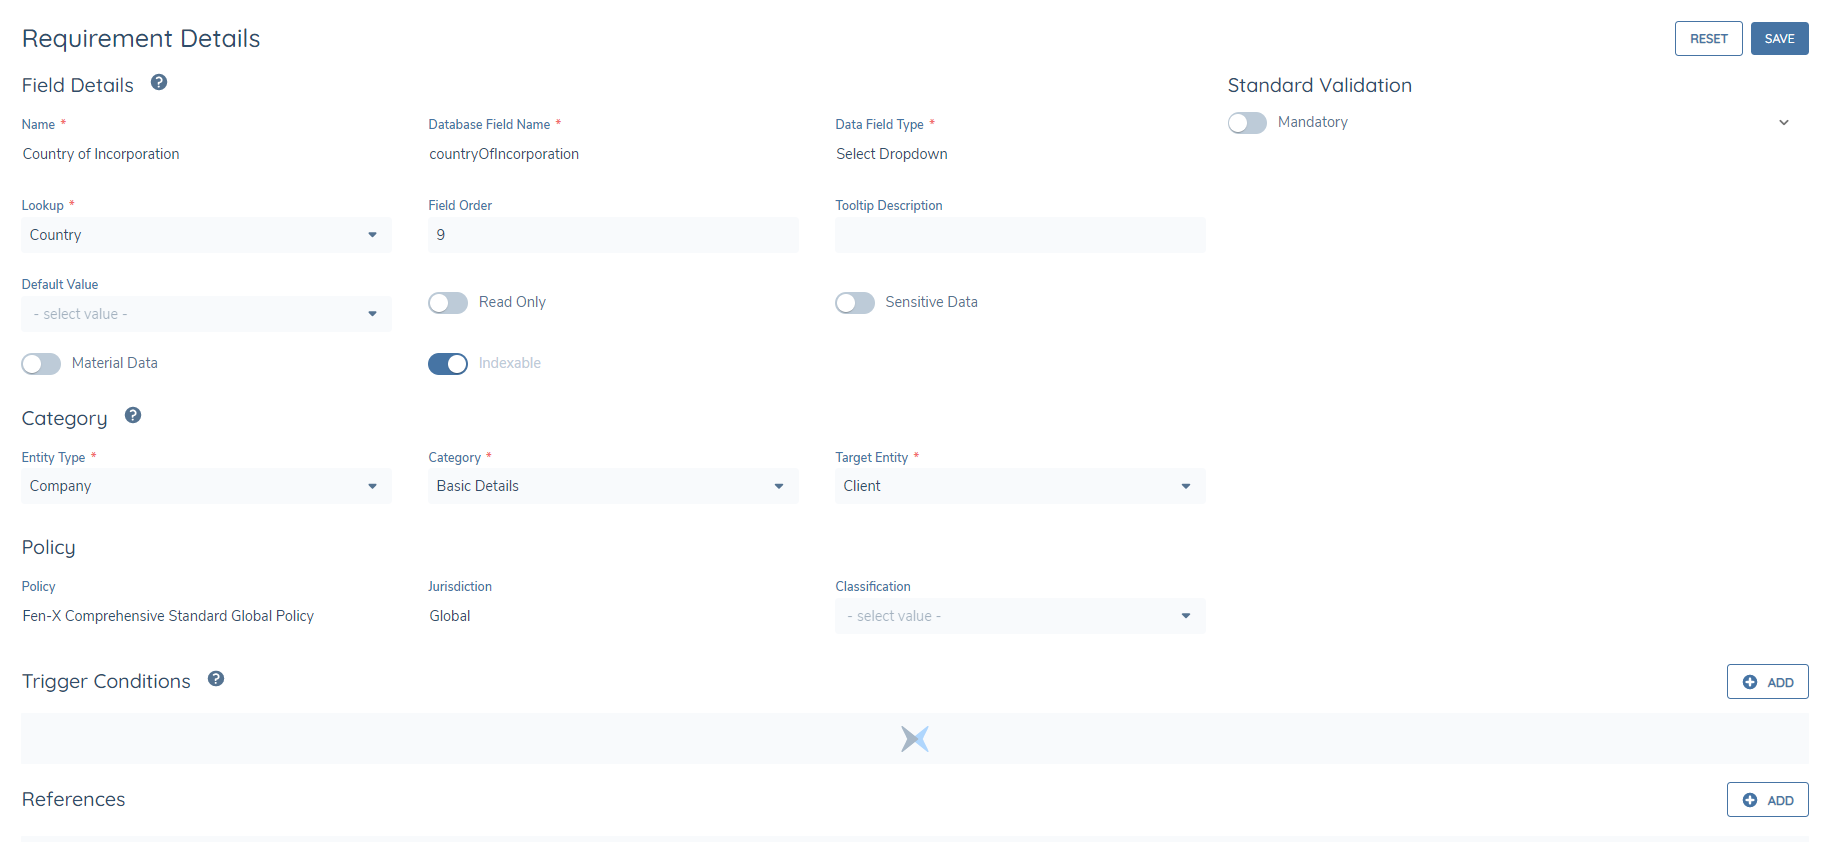
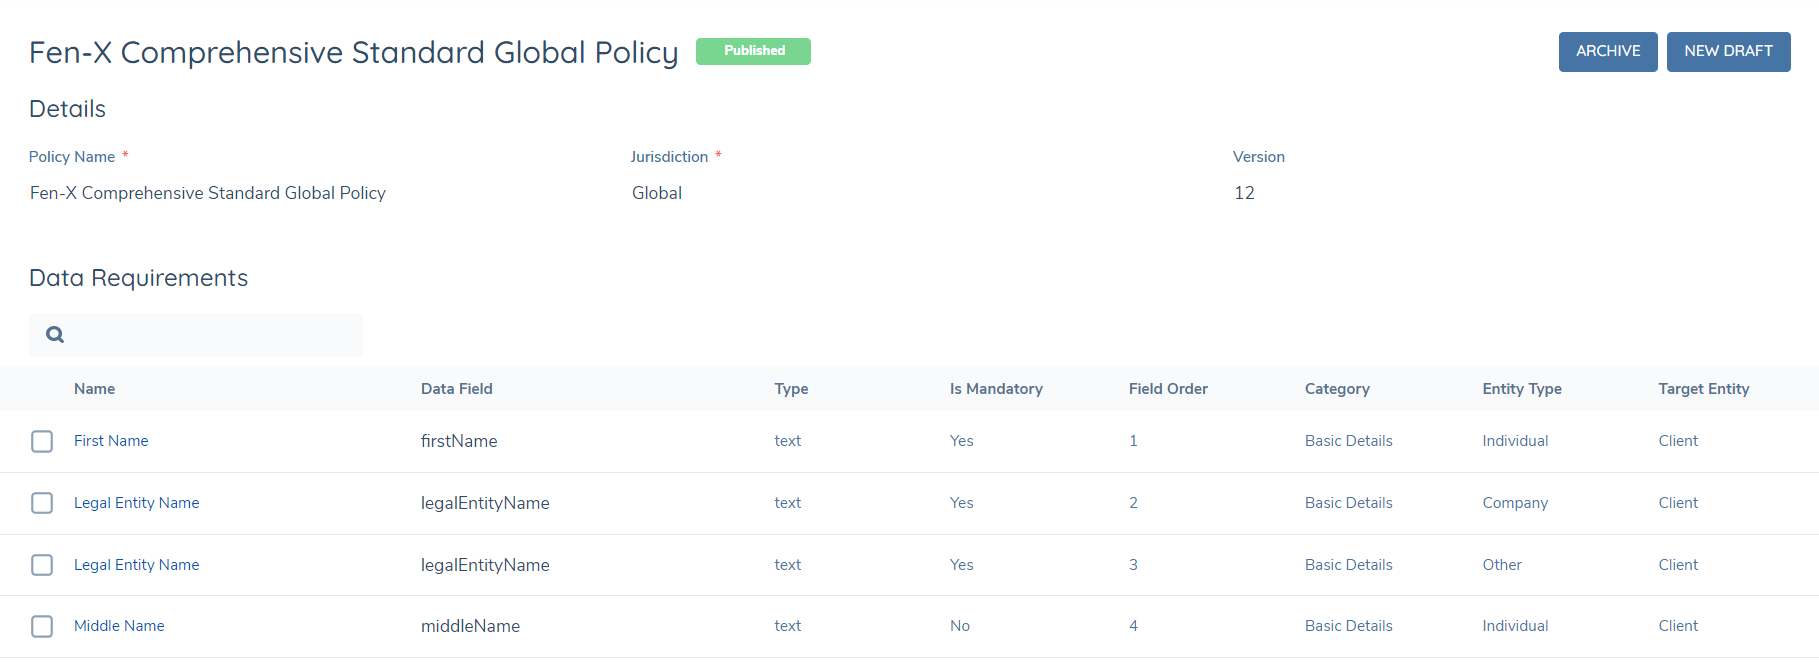
Each requirement that is created requires users to capture a minimum dataset including Field Details , Category and Policy.
This information can be accessed on the Requirement Details page when a user creates or edits a requirement. The information required differs for each type of requirement. Mandatory fields are indicated using a '*'.
-
Field Details: This dataset defines how the fields appear and how the user interacts with these fields. See Field Types below for more information.
- Tooltip Description: - Tooltip descriptions can be added in plain text or URLs can be added in markdown. Only Hyperlink markdown is supported.All other markdown is not currently supported Where hyperlinks are added, tooltips will display while the field is active and will allow a user to select the hyperlink.
-
Category: These values are used to tell the system what area this requirement should appear and define what kind of requirement this field is.
- Entity Type: This defines what entities the requirement is relevant for.
- Category: This is a key reference that links the tasks in Journey to the policy requirements and defines which section in the task the field will appear in, e.g., Basic Details or Financial Information. It is populated by the ‘Requirement Category’ lookup.
- Target Entity: This is used to tell the system whether the requirement is for Clients or for non-client related parties (i.e., Related Party).
-
Policy: This section does not need to be updated; it displays the current policy the requirement is a part of. Classification can be used to define the type of requirement the user is working on, e.g., KYC or Product information. Note that Exclusive Countries is not a live feature.
Once each of the mandatory fields have been completed, click the Save button to confirm the updates.
Datakeys in Policy
The Datakey is a mandatory requirement across all Policy Requirements. It is required for Data Requirements ("Database Field Name"), Document Requirements ("Document DataKey"), Ownership & Control Requirements ("Data Key") and E-Signature Document Requirements ("Document DataKey").A Datakey acts as a single data source and is a reference point in the Fenergo SaaS backend that is used to display data in the application.
Datakeys can be duplicated across multiple Policies, and this is typically done to enforce differing contextual validation. For example, a field of "Is the Entity Regulated?" might be non-mandatory if the Entity has a Country of Incorporation = Ireland, but should be mandatory if Country of Incorporation ≠ Ireland. To achieve this in Fenergo SaaS, the "Is the Entity Regulated?" datakey would be duplicated, with the same datakey of "isTheEntityRegulated" for the two requirements, and the system would then rely on the configured "Trigger Conditions" to correctly display the required validation. Another example of where a datakey might be duplicated is in the scenario where a field should have a different UI label, but should point to the same reference point in the Fenergo SaaS backend.
After evaluating requirements in scope, multiple data requirements with the same data key are sorted and deduplicated using the below criteria:
- Is the requirement editable? (i.e. not read only)
- Is requirement mandatory?
- Sort alphanumerically by Jurisdiction that the requirement belongs to
- Sort alphanumerically by Category that the requirement belongs to
This criteria is sorted with priority from top to bottom. For example if we have only one editable requirement and 3 read-only, then we will return the editable version of the "countryOfIncorporation" datakey without checking their jurisdictions. If for example, we had a datakey that was in the "Global", "A" and "B" jurisdictions, datakey deduplication will return field "A" if all of them are for read only and mandatory.
The configuration mentioned above for "Is the Entity Regulated?" is accepted in Fenergo SaaS, but there are scenarios where this can be an issue, and as such should not be configured. Some examples of this would be:
- Configure multiple requirements using the same datakey but with different field types (e.g. Text field, Number, Select Dropdown).
- Configure multiple requirements using the same datakey but with different Lookups attached to each requirement.
- Configure multiple requirements using the same datakey but trying to use different Casing (e.g. upper / lower casing) ordering to make the same datakey work differently.
A datakey is a single data source which must have a defined structure. This means that no matter how many requirements you configure in your Fenergo SaaS tenant using the same datakey, they will all point back to the same data source, meaning that they should all have the same structure (i.e. the same "Data Field Type" and same "Lookup" value, if Select Dropdown field types are being used). The reason why being aware of this is important is that if a data source has a defined structure, when configuring requirements using different field types or lookups, you are introducing ambiguity into the system as Fenergo SaaS cannot determine which field type should be referenced.
As an example, imagine a Configurator created two data requirements with the same datakey of "businessLine". The first requirement has the UI label of "Business Line 1", belongs to the "Basic Details" category and is a Text field, and the second requirement has a UI label of "Business Line 2", belongs to the "Enrich Details" category and is a select dropdown.
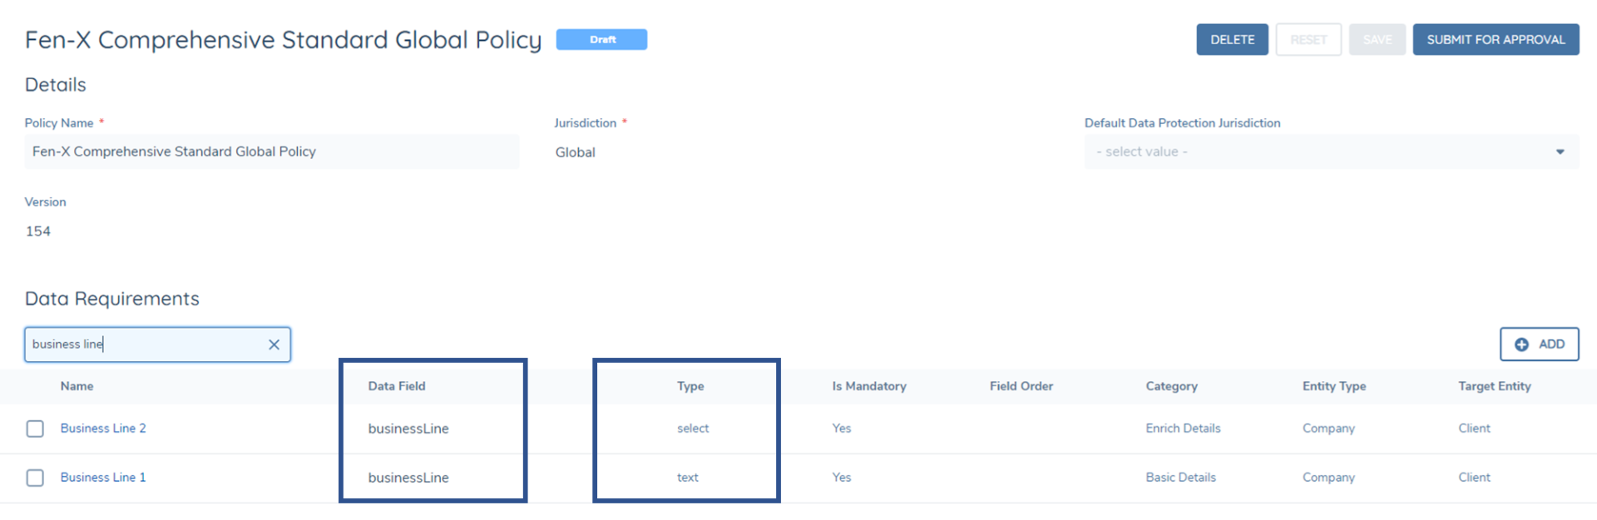
A User could enter a free-text value in the "Basic Details" iteration of the datakey, but then may not see their inputted string value in the list-of-values visible in the "Business Line 2" iteration of the datakey. The end-user could be confused here; why is there a value already captured on a field with a different UI label? Why are my available options different from the last Task? These inconsistencies can lead to a muddling of data being captured in your Fenergo SaaS tenant so this is why it becomes very important to use the same field types.
Similar issues can persist when a Configurator wants to reference different lookups across the same datakey. For example, a "countryOfIncorporation" datakey was configured in two data requirements, where in one instance the "Country" lookup is referenced and in the other, the "European Countries" lookup is referenced. This can potentially lead to inconsistencies in terms of the list-of-values that should be contextually displayed, but a recommended workaround from Product is as follows:
- (When configuring conditionality in Policy) Checks Policy user is in and returns values based on the Categories that the shared fields are in.
- (If fields are not in current Policy) Checks Global Policy and returns values based on Categories that the shared fields are in.
- Checks all other Policies alphabetically and returns values based on Categories that the shared fields are in.
- (If user has multiple fields in same category) Checks all shared fields in Category and returns value based on alphabetical sorting of those fields.
Finally, the configuration for a Data Requirement of field type "Data Group" must be carefully created, with regards to the datakey being used in the Data Requirement. If you have a datakey for a Data Group called "Products", every time you use that datakey across your Data Requirements, it must point to the same Data Group definition (i.e. the same selected value in your "Data Group" field in the Data Requirements). If you happen to configure 2 Data Groups, one called "Products - Company", and one called "Products - Individual", when configuring them in Policy, users need to have different datakeys, as they are pointing to different Data Group definitions. Not doing so will mean that if a User captures some Data Group records on the "products" datakey with Data Group of "Products - Company", they will see an empty collection of Data Groups when they see the "products" datakey with Data Group of "Products - Individual", as they are distinctly different Data Groups.
Datakey Prepopulation Logic
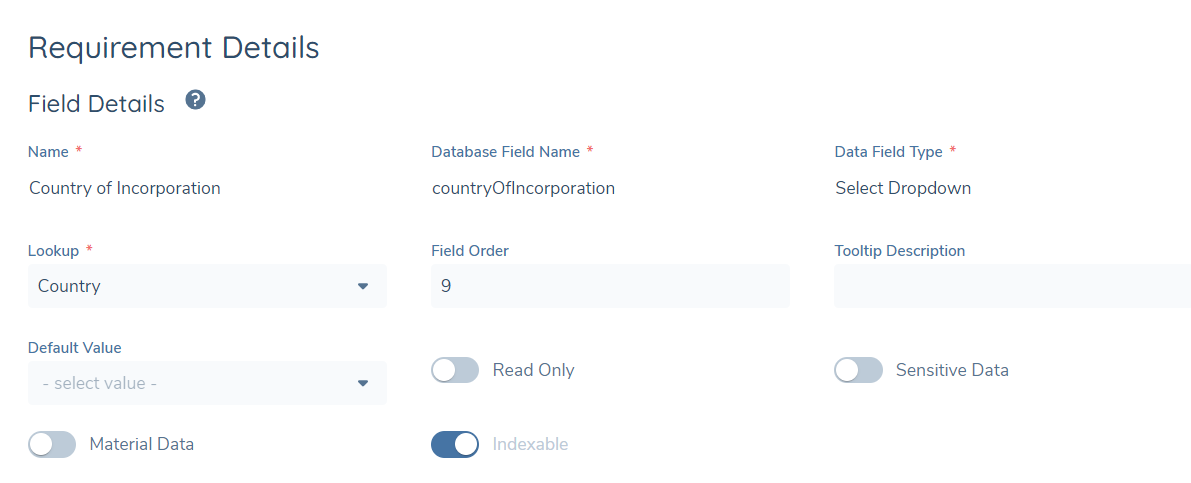
When a new Requirement is created across any of the above four areas of Policy, the Datakey will be automatically populated for a User. The Datakey will prepopulate based off the Requirement Name, and will ignore any special characters and numbers. It will update according to the Requirement Name, inferred from the Requirement Name and displaying in Camel Case format. For example, a Data Requirement with Field Name of "Country of Incorporation" will have an inferred Database Field Name (i.e. a Datakey) of "countryOfIncorporation".
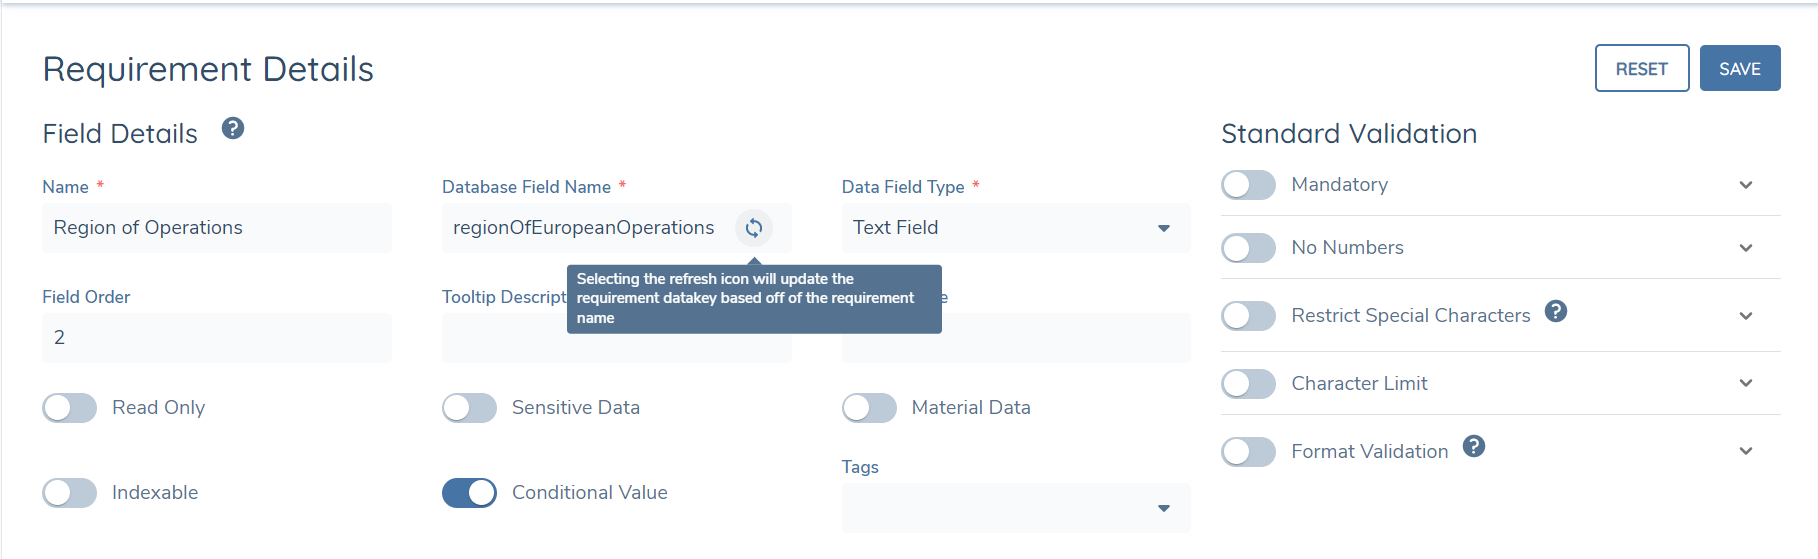
Once the Requirement is saved against a Policy, the prepopulation logic for a Datakey will behave slightly differently. In order to allow a User to manually update the name of an existing Requirement, but maintain the existing Datakey being used, the Datakey will no longer automatically update. Instead, when a User updates a Requirement Name, the system will evaluate if the inferred Datakey of the new Requirement Name still matches the existing Datakey value. This behaviour is intended to help ensure consistency in the Data Model when fields are being relabeled but the intention is to keep the Datakey (which would be used for reporting & downstream integration purposes) the same.
If they do not equal one another, a new "Refresh" icon will appear beside the Datakey value. Selecting this value will update the Datakey in line with what has been entered in the Requirement Name field. If the User wishes to use the new Datakey value (i.e. update the Datakey value according to the Requirement Name), they can select this icon. If they wish to continue to utilise the existing Datakey, they can ignore this icon.
A tooltip message is presented when the User hovers over the "Refresh" icon to provide context of what selecting this button will do to the existing Datakey.
Reset Changes

While editing, if the user is unsure what changes they have made to the original requirement details they can click the Reset button to revert the fields to the original.
Field Types
A Data Requirement can take the form of any one of thirteen field types. The field type is selected from the Data Field Type field.
| Field Type | Field purpose |
|---|---|
| Text | This field type allows users to populate a field including alphanumeric values. |
| Text Area | This field type allows users to populate large volumes of text in a field. |
| Number | This field type allows users to populate a field with numeric values only. |
| Date | This field type allows users to populate a field with a date value only. |
| Data Group | This field type allows users to include a field that acts as a Data Group (i.e. a collection of Data). A good example of this would be 'Addresses' where users will include multiple types of Addresses. |
| Select Dropdown | This field type allows users to include a single, select dropdown field, meaning that they can choose one value from a Lookup list. |
| Multiple Select Dropdown | This field type allows users to include a multiple, select dropdown field, meaning that they can choose more than one value from a Lookup list. |
| Legacy Linked Select Dropdown | This field type allows users to include a single, select Linked Lookup field, meaning that they can use this field to link to another field. Based on selection of the 'Parent' field, will then filter the available options in the 'Child field'. This particular field allows users to configure from the 'Child' and reference back to the 'Parent'. |
| Legacy Linked Multiple Select Dropdown | This field type allows users to include a multiple, select Linked Lookup field, meaning that they can use this field to link to another field. Based on selection of the 'Parent' field, will then filter the available options in the 'Child field'. This particular field allows users to configure from the 'Child' and reference back to the 'Parent'. |
| Legacy Status | This field type allows users to set a Status value on a field. This Status field remains as a Policy field and is not to be confused with the new Status field that will drive Configurable Entity Statuses and 'Chips' on the Entity Profile Page. |
| Search Text Field | This field type allows users to set a value based on an external API adapter. |
| Status | This field type allows users to incldue a field where its value(s) can be included as Entity Statuses. |
| Rich Text Editor | This field type allows allows users to format text, insert links, align text, bullet point and number lists, create tables, insert links, upload files and attach images. |
If a User chooses a select or multiple select dropdown, they are also required to choose a value from the Lookup field. This defines what list is used for the select field, e.g., using the list NAICS Codes for the ‘Select NAICS Code’ field.
The values of the Lookup field correspond to the reference data lists created by the Reference Data Editor (see Reference Data user guide).
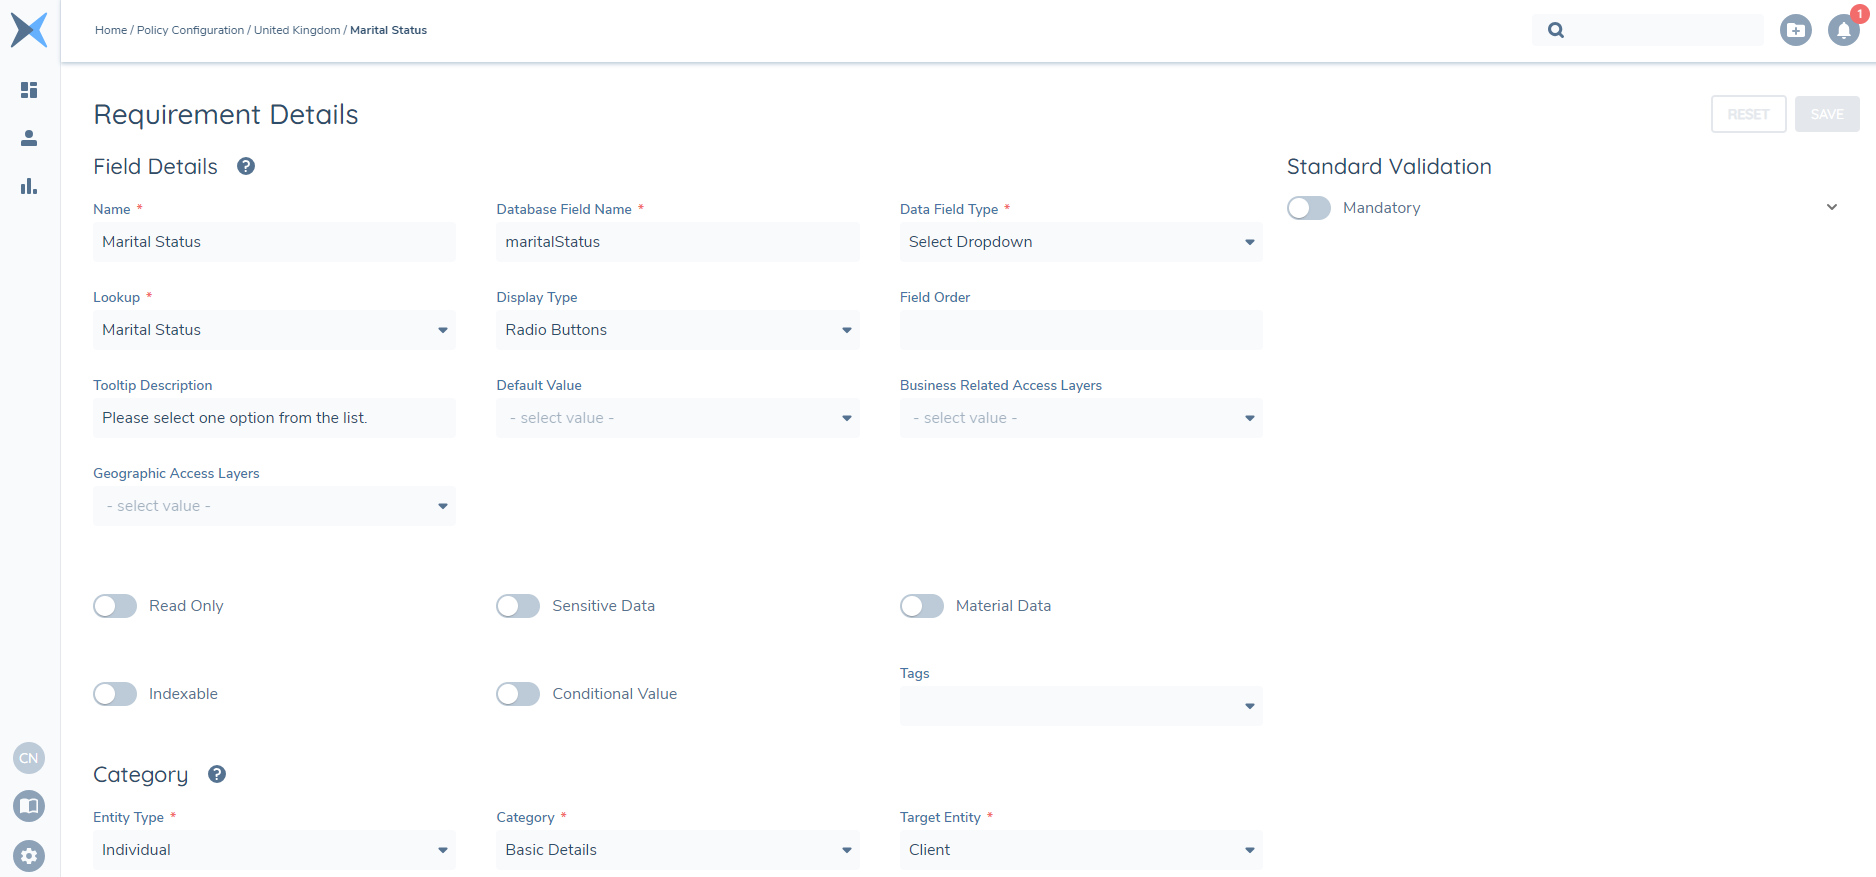
Display Types
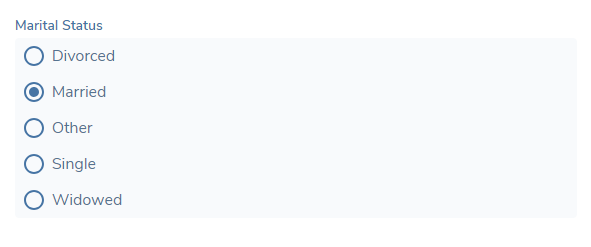
When a user is configuring a Requirement Field and they choose "Select Dropdown" or "Linked Select Dropdown" as there Field Type, a new field called "Display Type" will appear in the Field Details. Initially, the default value for this field will be set to "Dropdown" in order to maintain existing configurations. However, users now have the flexibility to select the new "Radio Buttons" option from the "Display Type" field. Radio buttons are used when there is a list of two or more mutually exclusive options, and the user must select exactly one choice.
Important Notes:
- Once the "Radio Buttons" option is enabled for a field, users navigating to the Journey Hub of an Entity where this Policy is in effect will only be able to select one Radio Button option from the list displayed within a task.
- Selecting a different Radio Button is the only way to deselect a previously selected Radio Button in the same list.
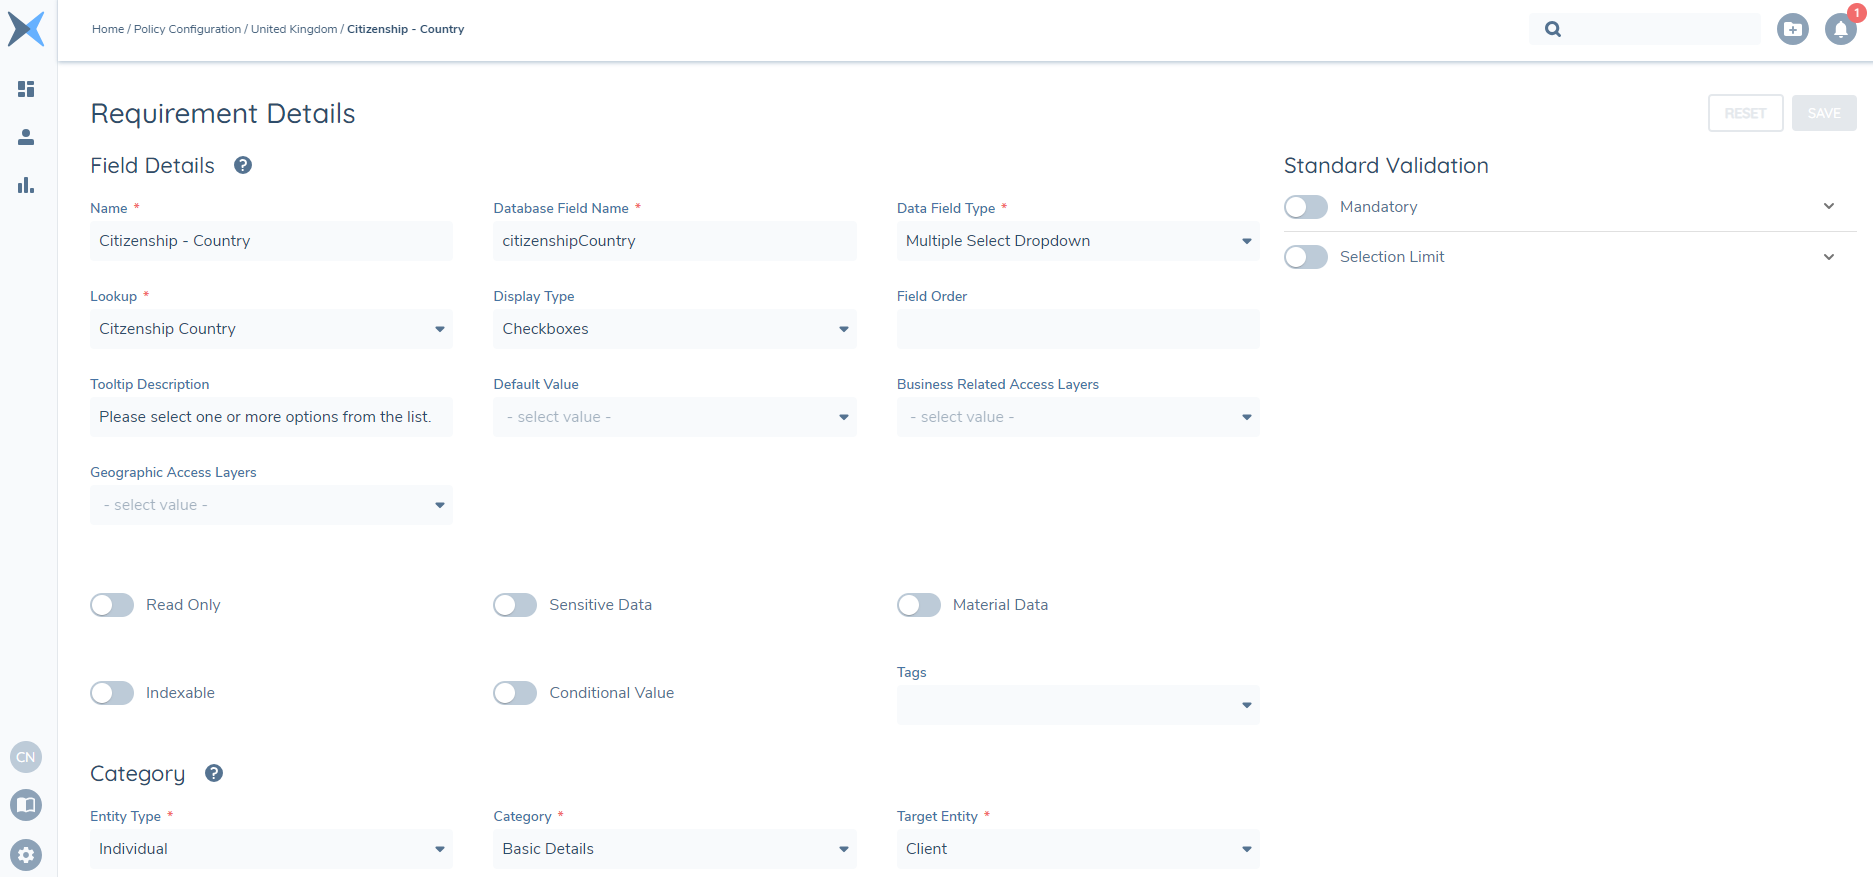
Furthermore, when a user is configuring a Requirement Field and they choose "Multiple Select Dropdown" or "Linked Multiple Select Dropdown" as their Field Type, the new field "Display Type" will also appear in the Field Details. Like Radio Buttons, this default value is set to "Dropdown" but users now have the ability to select "Checkboxes" from the "Display Type" field. With Checkboxes, users can now select one or more options from a list without exclusivity. This means they have the freedom to choose as many options as they need, catering to their specific requirements.
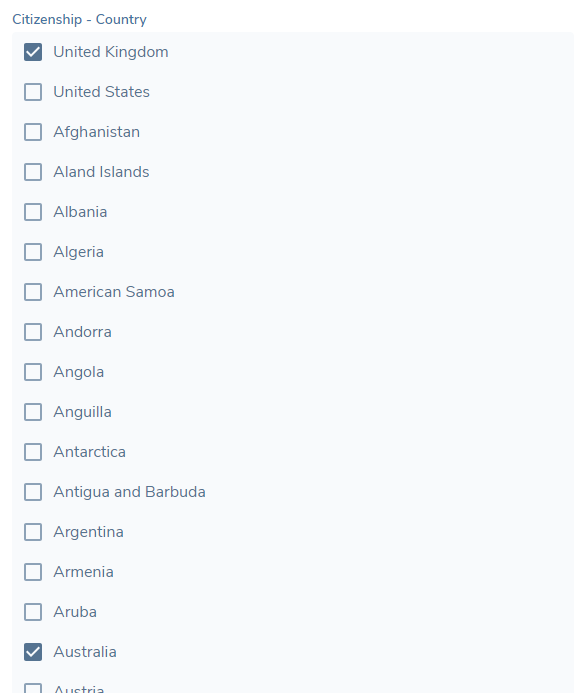
Once the user has enabled "Checkboxes" as the Field Type for a field, when they navigate to the Journey Hub of an Entity where their configured Policy has come into scope, they will be able to select one or more options from the Checkbox list displayed (or as dictated in the Selection Limit configured against the Data Requirement).
If Data group is selected, then the user must select a value from the Data Group field (see Data Groups).
Linked Lookups are covered in the Reference Data User
System Fields
Certain fields in the system are key to the operation of the application, such as Legal Entity Name, Company Type, Sanction Status, etc. These fields cannot be removed, or have their datakeys or field types updated. All other data such as field order, category, and validation can be updated as normal.
New fields can be protected in the same fashion by adding them to the System Fields lookup, which is a list of all critical fields in the system.
Trigger Conditions
Trigger conditions are used to make a requirement appear on a journey under certain conditions rather than being a static field.
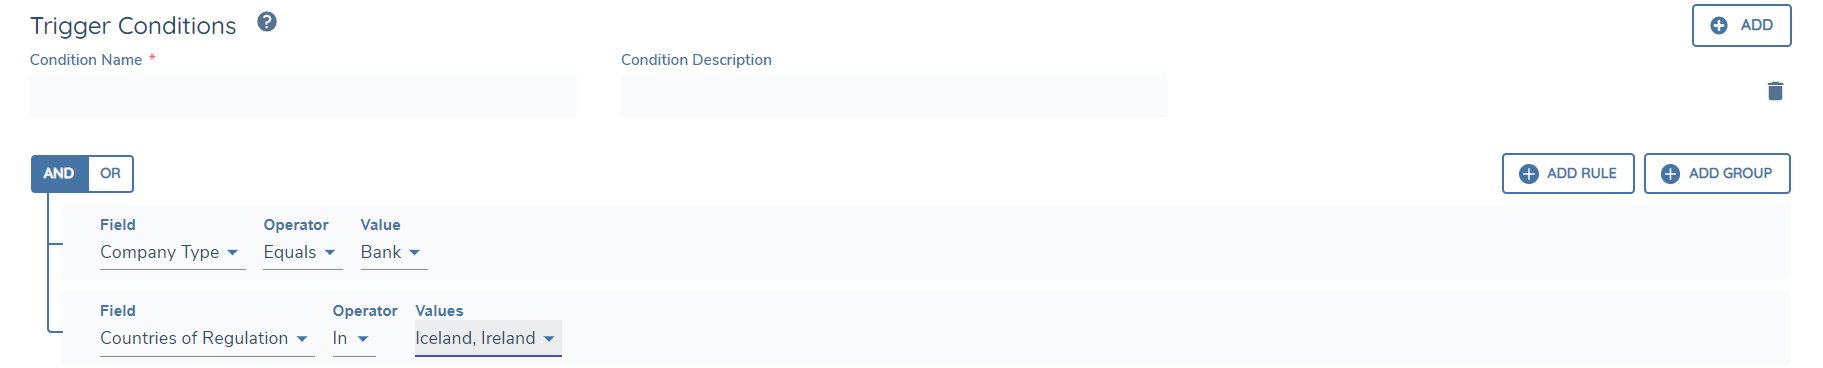
Trigger conditions can be set against Data, Document and Ownership and Control requirement types. There is a selection of operators to choose from and users has the flexibility to use text or single select dropdown field values to drive the trigger conditions. This will be extended to cover data groups, numbers and multiselect fields in the future.
The above example shows a trigger condition created for a Document Requirement.
Note that Trigger Conditions are optional, in which case the requirement is relevant for any client who triggers that policy and matches the Entity Type.
Policy Scoping vs. Trigger Conditions
Policy Scoping and Trigger Conditions use the same query builder component to build their rules, but they have different purposes.
Policy Scoping is used to define when an entire set of data, document, and related party rules should be applied. For example, a Singapore-incorporated client should have the Singapore policy applied.
Trigger Conditions are used to define when specific data, document, or related party requirements within a policy should be applied, using more granular rules. For example, within the Singapore policy, the National Government field should only be requested when the client Category = Government Body.
In short, the Policy is the superset of all requirements that can be requested, and we use Policy Scoping to bring that entire policy into scope. The requirements within that policy are applied or not according to the Trigger Conditions against each requirement.
Policy Scoping
Source's that can be used to trigger a policy are: Current Entity, Related Product.
Current Entity will use data collected on the entity being evaluated. Related Product will look at all products tied to the entity being evaluated.
Data Validation
Each data requirement has its own set of data validation rules. These rules can be managed from the Requirement Details screen of the requirement.
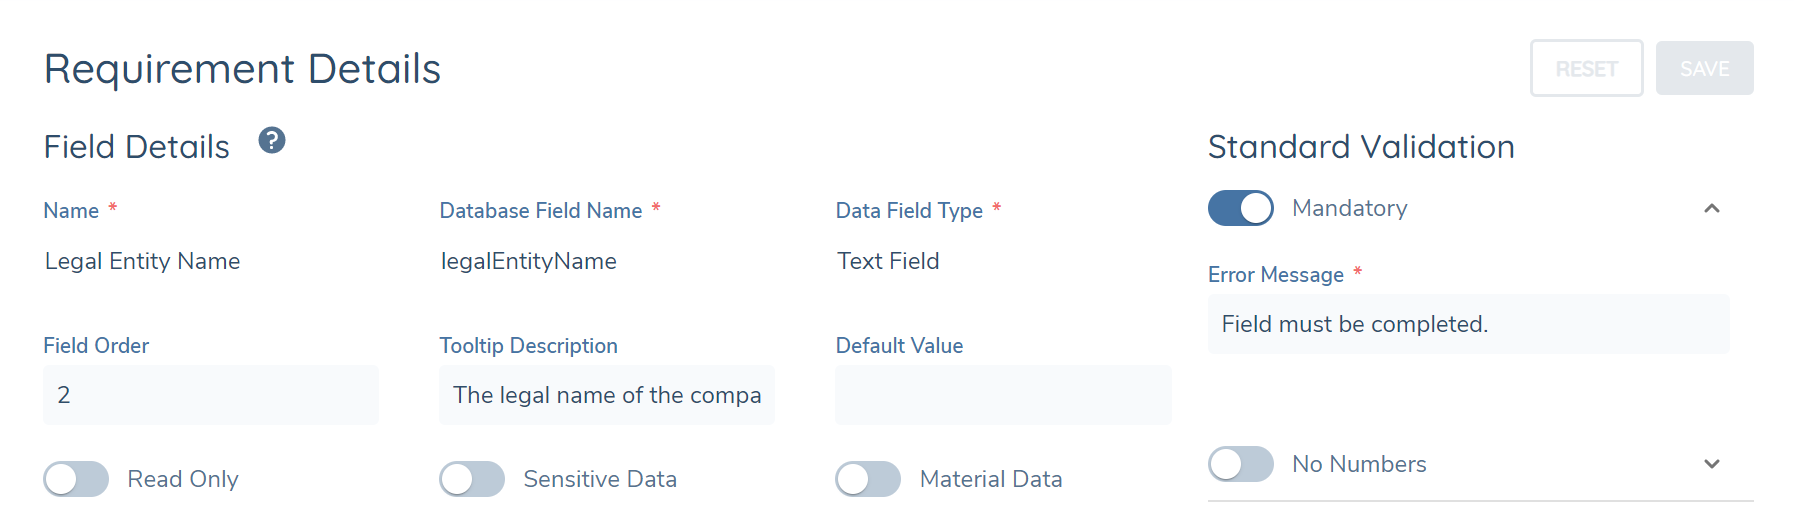
Once the ‘Data Field Type’ of the data requirement has been set, a group of validation options will appear in under the ‘Standard Validation’ section.
The options of data validation available differ for each field type but they all are turned on by toggling the switch to the active position.
Field error messages can be customised per validation. This message will appear when a user breaks the validation rules for the field on a task. The message box can be found by expanding the row for the validation in use.
A ‘Format Validation’ option is available for Text field types. This validation allows users to create custom data validation rules using regular expressions. Examples are available on the line fields of the Address data group, and in email fields.
When using Read Only validation for Policy fields in Journeys, it is important to note that users cannot update this value (either through the UI or via API).
The value is hard set at point of Entity creation. It is only editable when either populated on the New Request page in the UI or when the field is included in the Entity Create API Command.
Timezone Validation
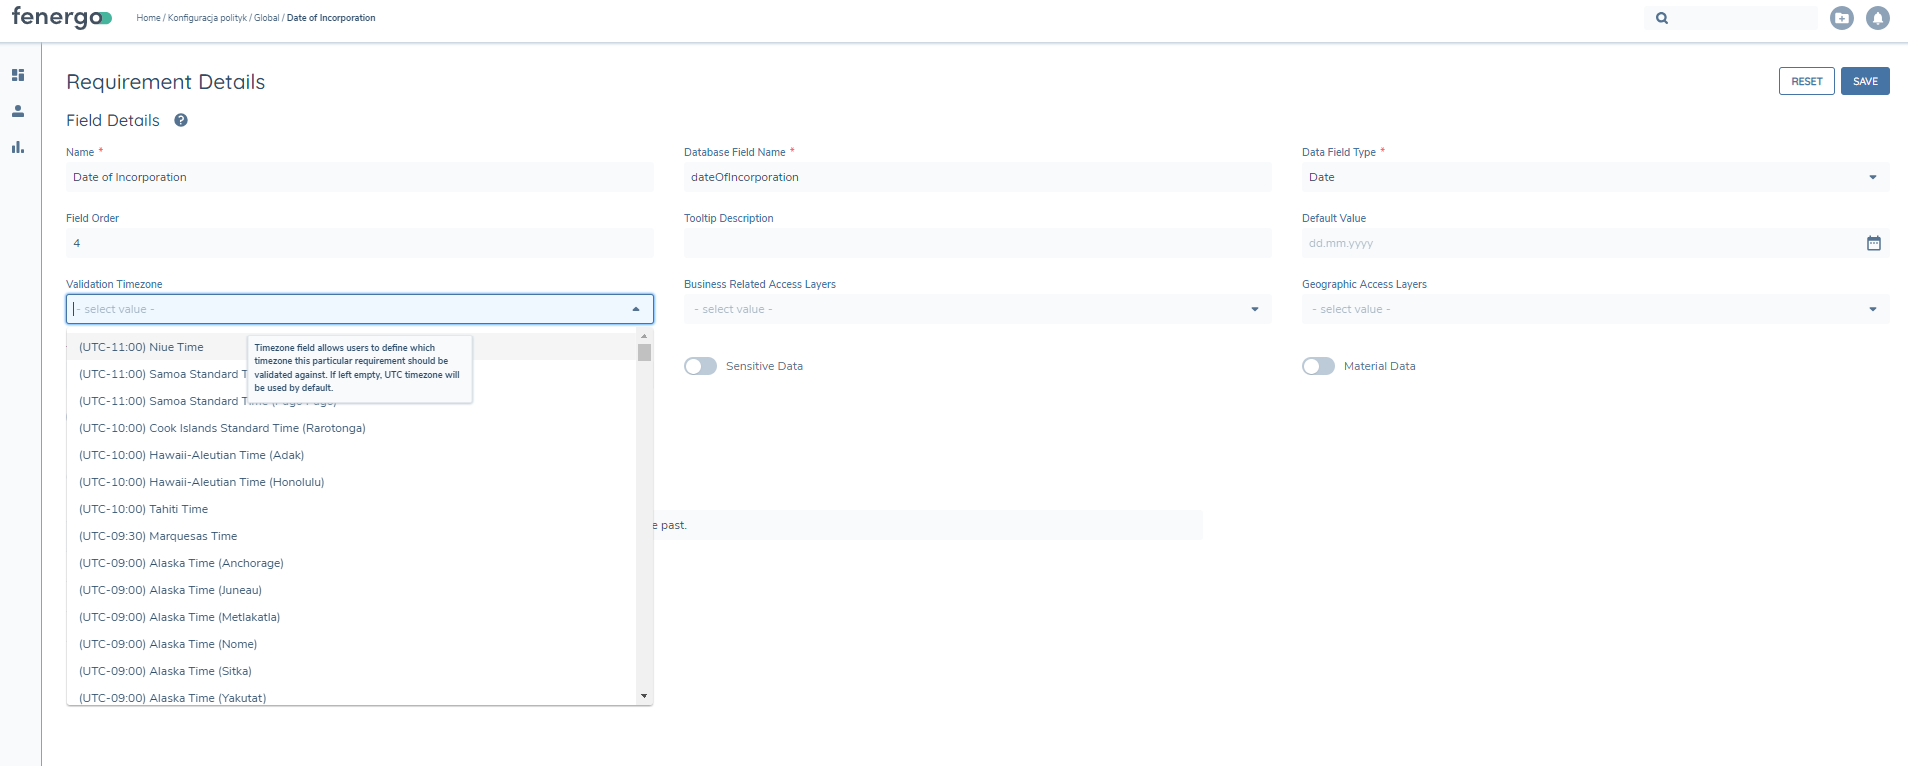
In the Policy Requirements screen, we have introduced a new conditional field that is displayed when 'Field Type' is set as 'Date' called "Validation Timezone". This feature enables users from various time zones to precisely set up Date field validations within Policy Requirements. By utilising the Validation Timezone feature, Fenergo SaaS users gain the flexibility to select a particular timezone for the implementation of Date validations, such as No Future Dates and No Past Dates. This enhancement guarantees precise configuration capabilities across multiple time zones. It is worth noting that this feature is also available in Data Groups.
Users in different time zones may encounter validation errors when dealing with Date fields. The Validation Timezone feature addresses this issue by introducing a select dropdown field in the Field Details, allowing users to specify the timezone for Date Validations (No Future Dates & No Past Dates).
Configuring the timezone for Date field validations involves the following process:
- Navigate to the Fields Details section of a Date field within a Policy Requirement.
- Locate the “Validation Timezone” dropdown field.
- Select the desired time zone from the dropdown, which will serve as the reference if the No Future Dates or No Past Dates validations are applied.
If you do not select a timezone, the validation will default to UTC. This ensures consistency and prevents any ambiguity when a specific timezone is not applied.
The selected time zone will govern how enabled validations will function, For example, if a user in Ireland (UTC +00:00) selects UTC +05:30, the validations will operate based on UTC +5:30.
Configuring Conditional Validation on Policy Fields
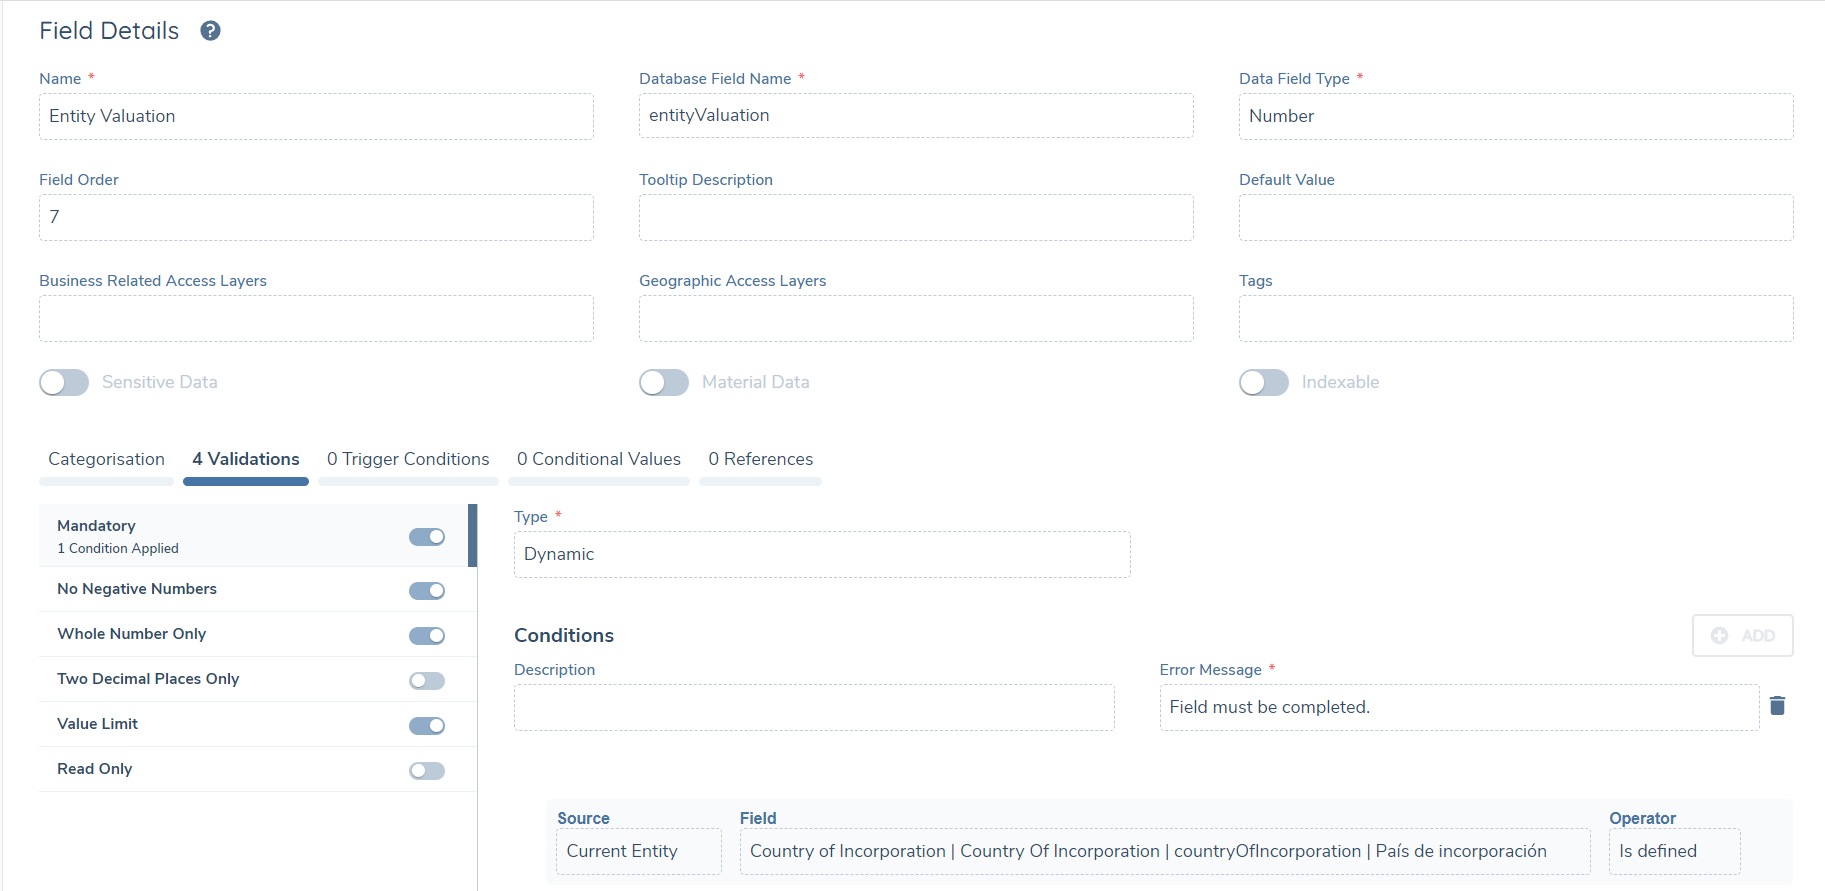
Policy fields can now have conditional validation applied. This allows configurators to create scenarios whereby a Policy field may be conditionally mandatory, based on an associated logic engine condition being satisfied. In the below example, the "Entity Valuation" field only becomes mandatory to capture, if "Country of Incorporation" is defined.
The ability to set conditional validation on policy fields is unique to certain types of validation. These are:
| Validation | Supported Field Types |
|---|---|
| Mandatory | All Field Types |
| Format Validation (Regular Expression) | Text Field, Text Area, Search Text Field |
| Selection Limit | Multiple Select Dropdown, Linked Multiple Select Dropdown |
| Date Range | Date Field |
| Read Only | All Field Types |
All other validation may only be applied statically (i.e., that validation will always be applied if configured).
To configure Conditional Validation, a User will see a "Type" property that will only display for the above mentioned validation types. If a User wishes for a validation to always be applied, they may leave this property as the default "Static" option.
If the validation should be conditionally applied, the User can change this property to "Dynamic". Doing so will move all properties tied to the selected validation, to now be associated with an individual logic engine condition. This means that in the below scenario, the specific Regular Expression, Case Sensitivity and Error Message to be applied are all determined based on their associated Logic Engine Condition being satisfied.
This Conditional Validation, per Validation Type, is evaluated hierarchically, meaning that the first condition / rule that is met will be the specific validation assigned against the Field, in the scenario where multiple Conditional Validation rules have been created. Users should configure their Conditional Validations appropriately in terms of the highest priority to be set. If none of the Conditions on a Conditional Validation are satisfied, then that specific Validation will not be applied on the Data Group Field.
Users can configure up to fifty conditions per validation type to satisfy the varying conditional validation required per Field. The count of Conditions that have been configured per Validation Type is reflected on the left-hand panel, when the respective Validation Type has had conditionality defined:

Conditional Value Configuration
When the "Conditional Value" toggle is selected, the "Conditional Values" panel will be displayed between the Policy panel and the Trigger Conditions panel:
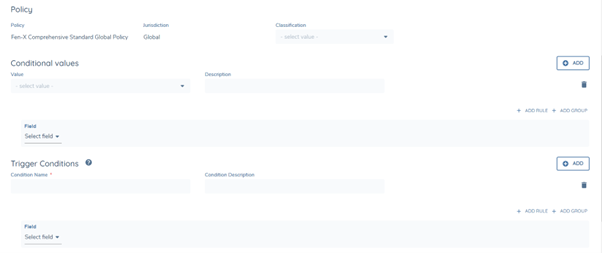
Within this panel, Users will be presented with the option to define a value for the Data Requirement and govern the conditions in which the value will be set. The field is non-mandatory, allowing Users to set the value to be empty / blank.
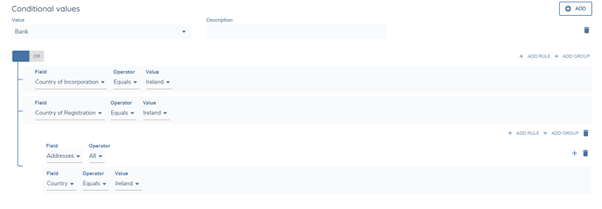
Conditional Values are hierarchial, meaning the first rule that is met will be the value assigned against the Data Requirement, when multiple Conditional Value rules are created. Users should configure the Conditional Values appropriately in terms of the highest priority value to be set.
To define the Conditions in which a Value will be set for a Requirement, Users will be able to leverage the existing Conditions framework:
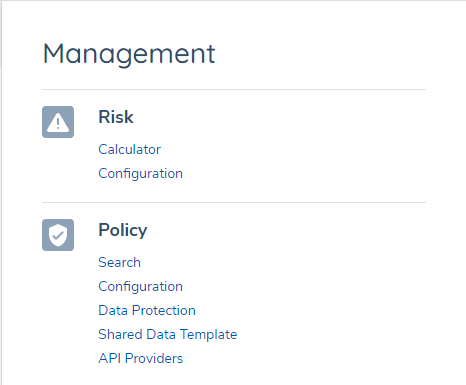
API Providers
If a User opens the Management taskbar, they will see a new option in the Policy section of "API Providers". Here, a Configurator can create a Custom Search Provider, a Custom Data Group Search Provider or Custom Validation Provider.
Custom Search Providers and the Search Text Field
This will allow a Client to configure custom search providers. This will be a technical implementation that will allow a Client to integrate an external API, for the purposes of returning a defined set of results based on a string value a User has entered. This can be used for the purposes of returning a suggested value or set of values from a pre-established external API, for example a Client-specific reference number used to identify an Entity for 3rd party systems, or returning a list of selectable Booking Entities specific to a Client's region in which they operate. The filtering of the values returned will be based on what has been decided in the external API.
To configure a new Custom Search Provider, the Configurator will select the "+ADD" button next to the Customer Search Provider grid. Here, they will be prompted with five mandatory fields:
- Name
- URL
- Type (Search, in this context)
- Authentication Key
- Encryption Key
Once at least one Custom Search Provider has been Published with Type = Search, a Configurator can now use this Custom Search Provider in their desired Policy. The Configuration of a field type of "Search Text Field" will be the same process as any other Data Requirement, with one exception. When the Field Type of "Search" is selected, a new mandatory field of "Custom Search Provider" will be shown to the Configurator. This allows the Configurator to select the specific Custom Search Provider that the Data Requirement should be mapped against.

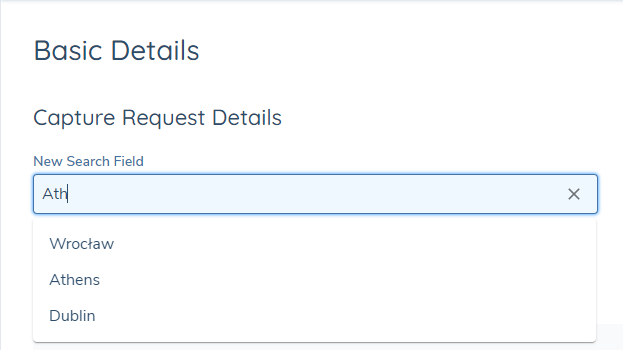
In a Data Task, the Search Text Field type will look the same as a standard text field in the Fenergo SaaS UI. When the User enters some values in this field, it will query the external API and return a suggested set of selectable values, based on the configuration of the external API.
To learn more about the technical aspect of this feature, refer to Single Field External Search API Walkthrough.
Data Group Search Provider
This will allow a Client to configure a search field within a Data Group, which will return a set of mapped values into defined Data Group Fields. This will be a technical implementation that will allow a Client to integrate an external adapter, for the purposes of returning a defined set of results based on a string value a User has entered into the search field. This will allow for the creation of something akin to an auto-fill field, whereby a User can query against a single Search field, and when selecting their desired value returned, have this value mapped into X amount of Data Group Fields defined. The filtering of the values returned will be based on what has been decided in the external adapter.
For example, a User will be able to query against a Search field an entry of "Castleforbes House..." and when this value is selected, have the following results mapped:
- addressLine1: Castleforbes House,
- addressLine2: Mayor Street, North Dock,
- postcode: Dublin 1,
- Country: Ireland
The Client can define the Data Group Fields that should be mapped from the returned search value. This can be a single field, multiple or all of the Data Group Fields.
To configure a new Custom Search Provider, the Configurator will select the "+ADD" button next to the Customer Search Provider grid. Here, they will be prompted with five mandatory fields:
- Name
- URL (this URL is being used to query the set of results from the Search field request.)
- Type (Data Group Search, in this context)
- Authentication Key
- Encryption Key
There will be additional properties requested when the User selects "Type" of "Data Group Search":
- Data Group (this will be the mapped Data Group that will contain the Search field, from which results can be mapped into the appropriate Data Group Fields.)
- Field Name (this is the property that is being sent in the request to return the results.)
- Label Name (in the UI, this is what the Search field will be labelled as. The label can be changed to whatever is appropriate for the Client.)
- Details URL (this differs slightly from the above URL field. This Details URL is pointing to the endpoint that is being used to push the data to the mapped data group fields.)
- Results Fields (this is the transfer sheet component, which will allow a User to select the Data Group Fields that should be mapped against the external adapter.)
Once the configurator has provided their credentials, and performed the necessary configuration, they can hit "Save". A Success toast message will confirm that their API Provider has been saved successfully.
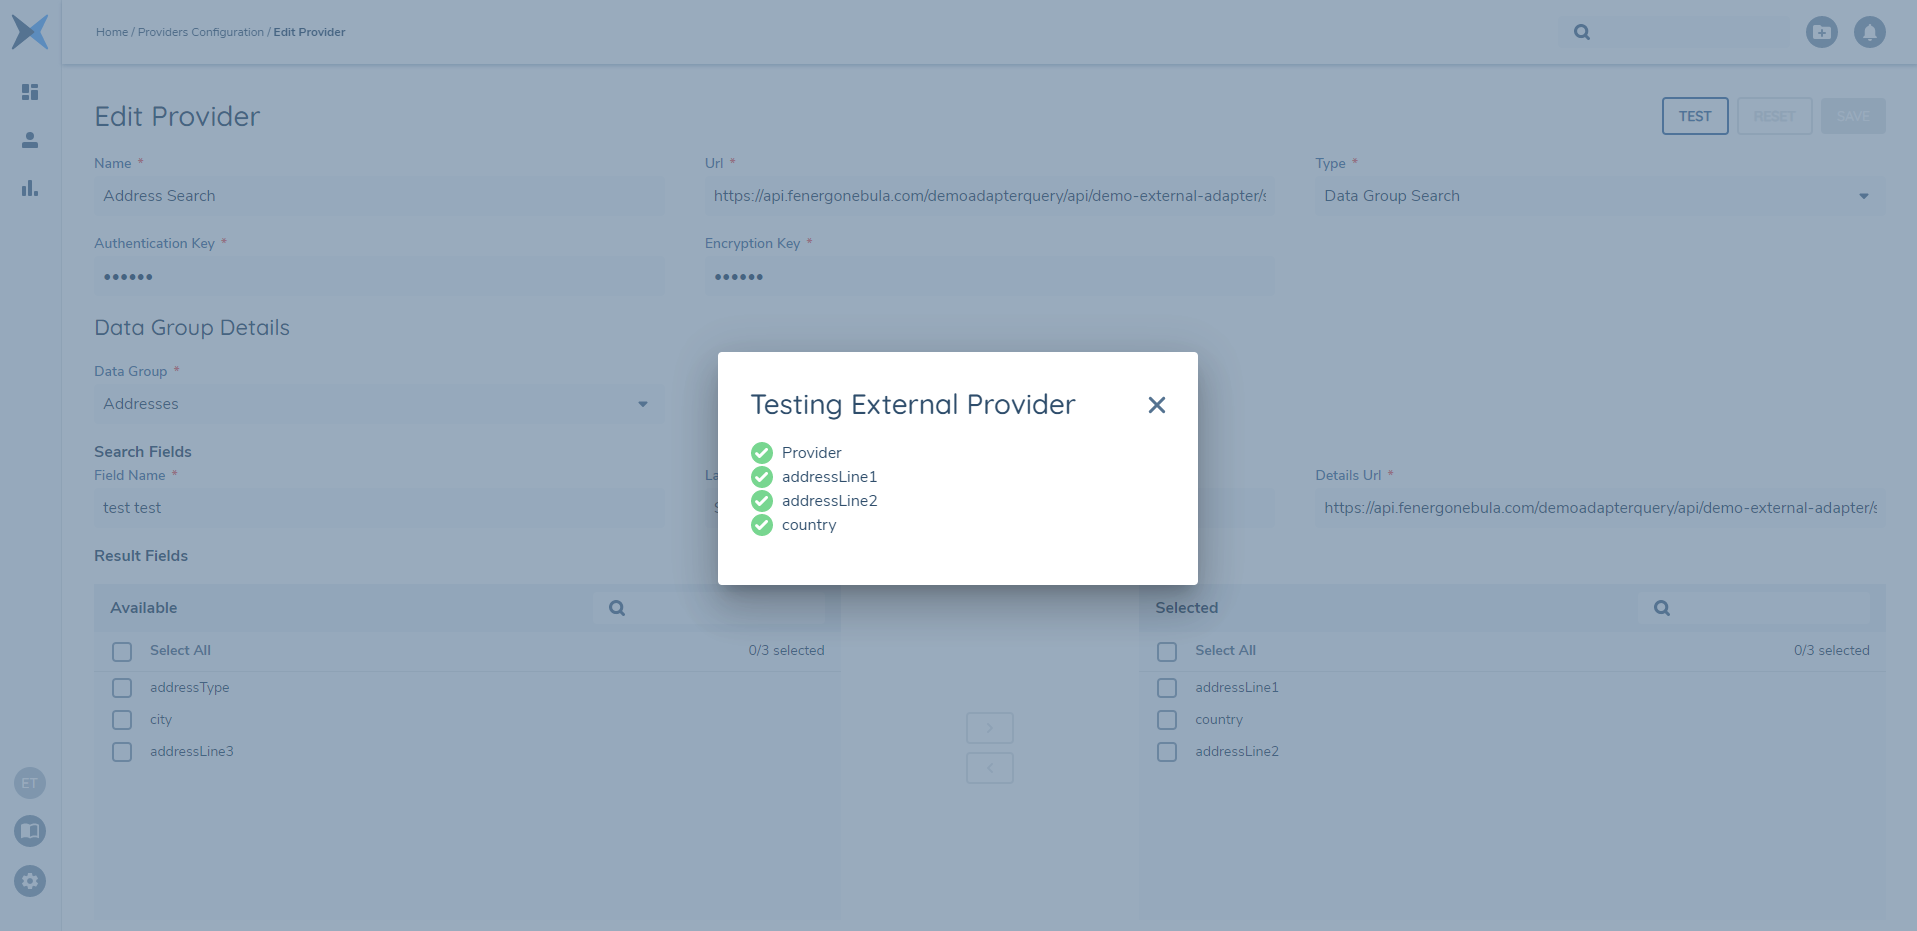
In order to verify that the External Adapter and the Data Group within Fenergo SaaS have been integrated successfully, the User can select the "TEST" button to validate their integration. The Provider will be tested first, and then the Data Group Fields in the "Selected" Transfer Sheet. Here, Fenergo SaaS is testing that the integration with the External Adapter is successful, including the alignment of the datakeys of the Data Group Fields selected and the corresponding properties of the External Adapter. The Data Group Search Provider must be saved, and no further changes made, for the "TEST" button to be interactable.
If the Provider and Data Group Fields are valid and working, they will be indicated as such with a green tick as below:
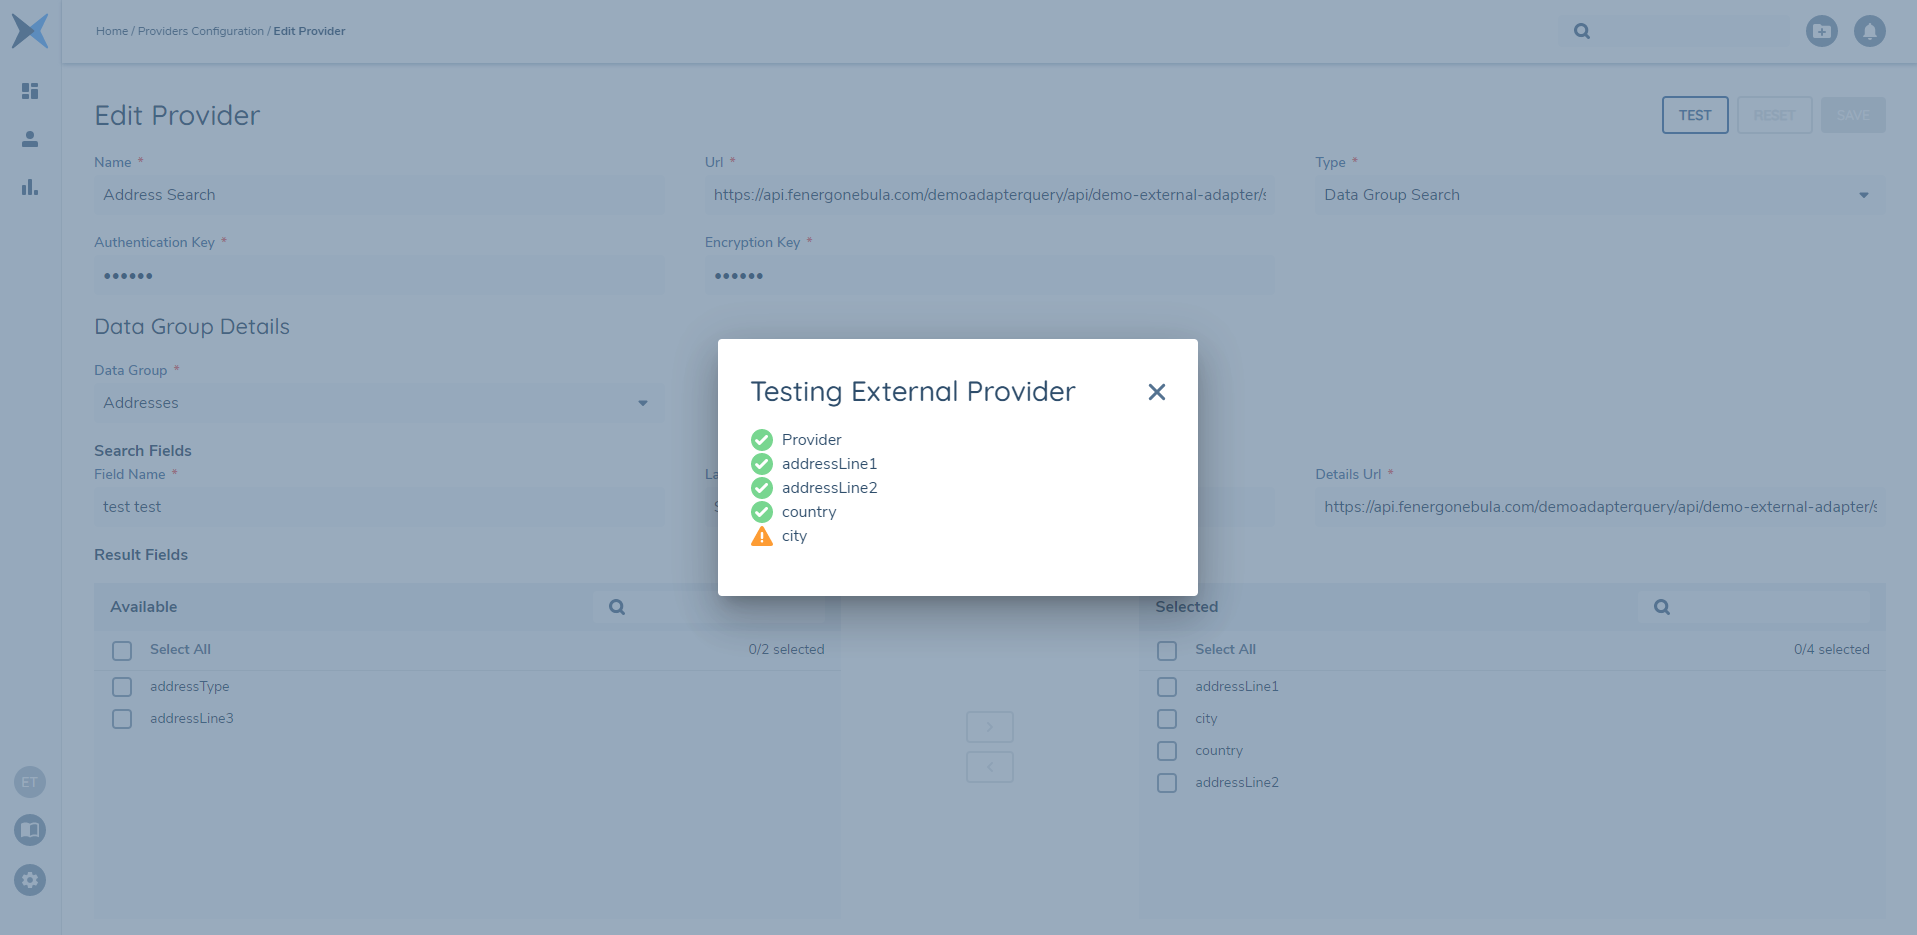
It is possible that there may be an error detected during this test. This could be because the URL provided was invalid, the encryption key was rejected or a Data Group Field was sent for mapping that does not have a corresponding property at the external adapter level. In events where a failure has occurred, a warning icon will be presented beside the faulty property:
Once the configuration has been successfully tested and verified as working, the Data Group Search provider can now be used within the referenced Data Group. A note here, is that the Search field will be applicable for all instances of the selected Data Group. So in our example, whereby we mapped against the "Addresses" Data Group, this Search field and auto-fill capability will appear within all instances of the "Addresses" Data Group, when in an editable state. There is no further configuration required by a Client to avail of this functionality.
Once the mapped Data Group is called upon in a Journey, the defined Search field will appear in the Data Group modal once in an editable state. A User can then search against the external adapter, and have their results returned to them. Once they are happy with their selection, they can select a returned value and this will be pushed to the relevant Data Group Fields mapped, as per the configuration. In the below example, the Data Group Fields of "Address Line 1", "Address Line 2" and "Country" have been mapped:
Finally, the Data Group Search Provider can write to read-only fields. This means that it is possible to configure a Data Group, whereby a specific field[s] can only be captured via the Data Group Search provider.
To learn more about the technical aspect of this feature, refer to Multi Field External Search and Details API.
Custom Validation Providers
This will allow a Client to configure custom validation providers. This will be a technical implementation that will allow a Client to integrate an external API, for the purposes of enforcing a validation type on the string value entered. This will allow for more robust and complex validation applied on a text field, beyond the standard validation options available in Policy such as Mandatory, character limits and special character allowances. For example, a Custom Validation Provider could be created to apply validation on a Text Field so that an 11 digit value entered is a valid Australian Business Number.
To configure a new Custom Search Provider, the Configurator will select the "+ADD" button next to the Customer Validation Providers grid. Here, they will be prompted with five mandatory fields:
- Name
- URL
- Type (Validation, determined from the Configurator selecting the "+ADD" button next to the Custom Validation Provider grid)
- Authentication Key
- Encryption Key
Once at least one Custom Validation Provider has been Published with Type = Validation, a Configurator can now use this Custom Validation Provider in their desired Policy. The Custom Validation Provider can only be applied on fields of a text-string type. This means the Custom Validation Provider can be applied on the Data Field Types of "Text Field", "Text Area" and "Search Text Field".
When one of the three above Data Field Types is selected, a new Validation option will be visible of "External Provider". Selecting this option will disable all other Standard Validation options, with the exception of "Mandatory". When a Configurator has selected this External Provider toggle, the "Provider" dropdown then becomes mandatory. This dropdown will reference all of the Published Custom Validation Providers configured in the API Providers domain. The validation against the data requirement (bar "Mandatory") will come from the configuration of the external API being referenced in the selected Custom Validation Provider.
In a Data Task, the Data Requirement type with External Provider validation applied will look the same as a standard text field in the Fenergo SaaS UI. When the User enters some values in this field, it will then query the external API and enforce the validation as per the configuration of the API being used in the selected External Provider of the data requirement.

To learn more about the technical aspect of this feature, refer to Single Field External Validate API Walkthrough.
Policy Versions
All configuration elements in Fenergo SaaS are versioned to protect the integrity of legacy data and to ensure configuration updates are made safely. When a policy is in scope for a journey or search, it calls the relevant active version of the policy and data groups.
When a new policy is created or a user wishes to update an existing policy, a draft version will first be created. Once all changes have been made this version is then submitted for approval and must be approved before it becomes “Published”. Only one version of a policy or data group can be active at any one time.
All previously published, draft, and archived versions are recorded through the policy configuration screen by clicking the arrow next to the policy name.
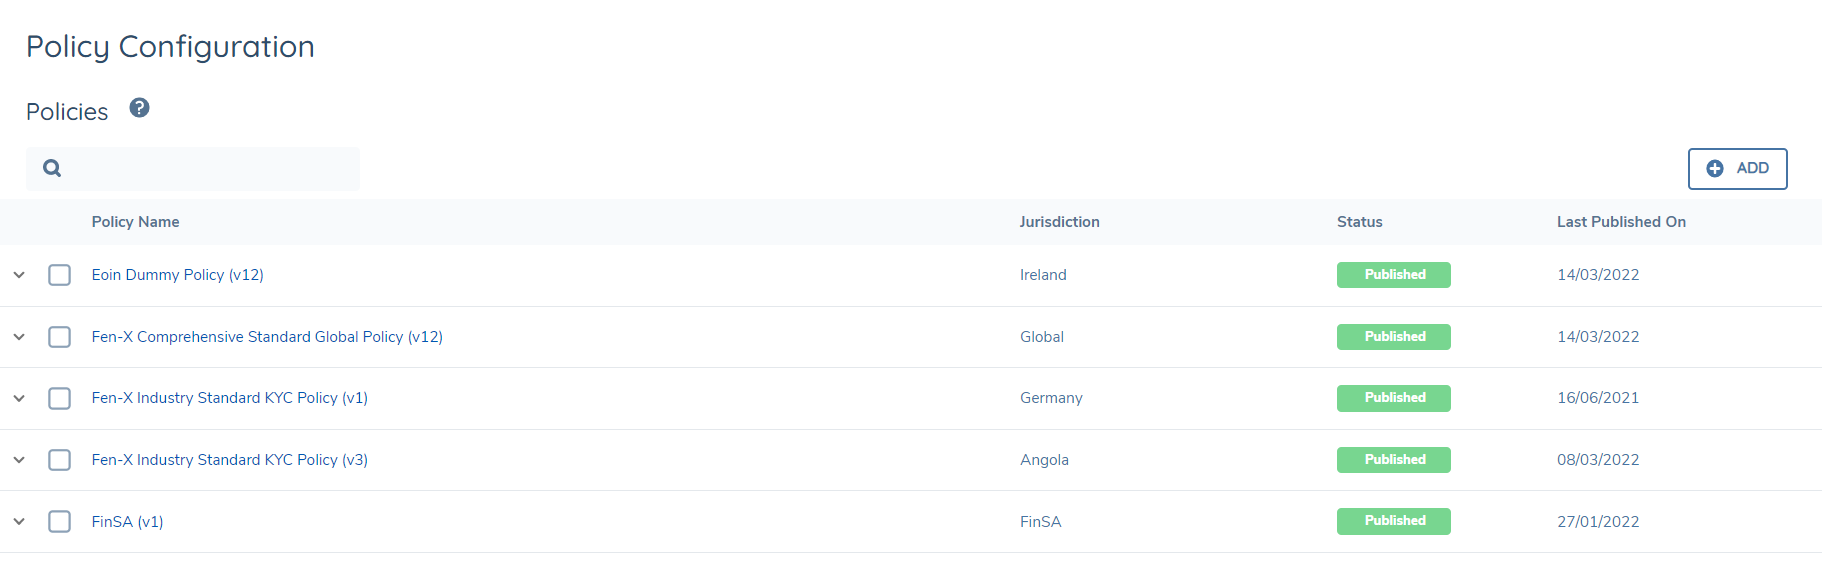
Once a user selects a version of a policy or data group, they will see options to archive or create a new draft.
Note that Policy supports one active Draft version of a policy at one time, i.e., you cannot have two drafts open at once. This is to minimise redundant drafts and increase performance. Additionally, it prevents wasted work because one draft will overwrite the other anyway; the changes in all but one of them would be lost if we allowed multiple drafts.
Finally all versions of policy are retained, the UI displays only the most recent 500 versions.
Exporting Policy Version
The Policy Configuration tool provides the ability to export a comprehensive PDF document containing the complete configuration details of any published Policy version. This export functionality is particularly valuable for documentation purposes, audit requirements, regulatory compliance, stakeholder reviews, and maintaining detailed configuration records.
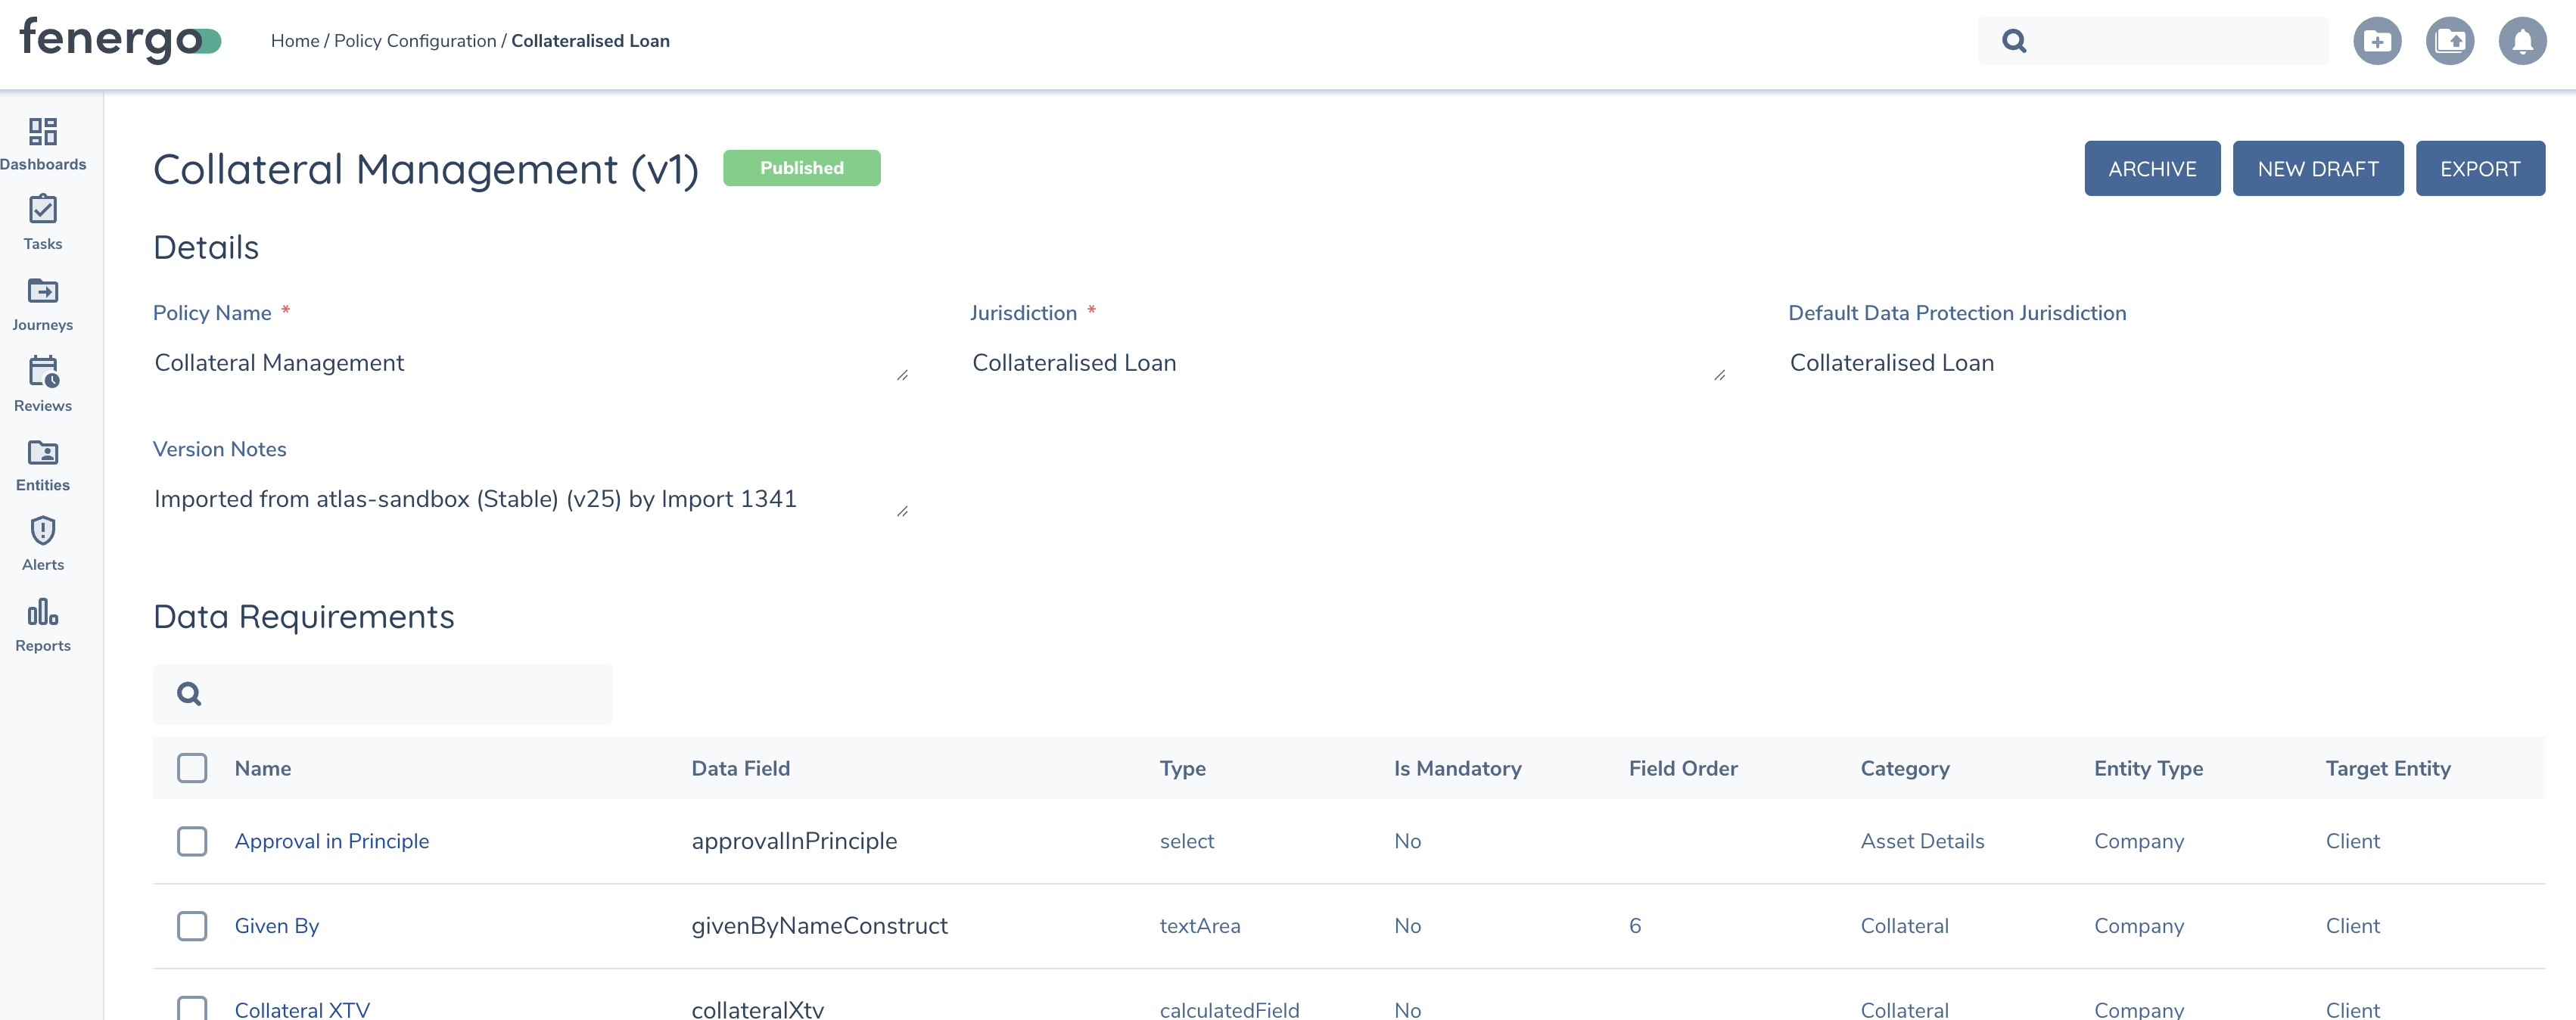
To export a Policy Configuration, navigate to the specific Policy you wish to document within the Policy Configuration screen and click the EXPORT button (typically located in the top-right area of the policy management interface).
Screengrab of Export Button in Policy Configuration
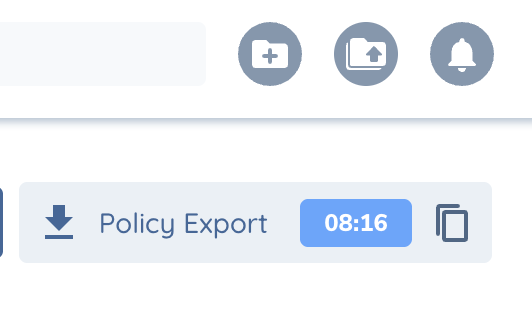
Once clicked, the system will begin generating a comprehensive PDF document. As this is an asynchronous process, the document will be available to open and/or download from the export notification once the generation is complete. You will see a notification appear showing "Policy Export" with a timer indicating the remaining time until expiration, along with options to download or copy the document. The generated artifact will remain available for 10 minutes from the time of completion, after which it will expire and need to be regenerated if required.
Screengrab of Policy Export Notification
Policy Configuration PDF Content
The exported PDF contains detailed information organized across multiple sections:
Title Page - Policy identification details including policy name, jurisdiction, version, status, effective dates, publication date, and generation timestamp.
Table of Contents - Comprehensive navigation guide showing all sections including policy overview, requirements by category, policy conditions, data groups, and data model summary with page references.
Policy Overview - High-level summary including:
- Policy information (jurisdiction, data protection jurisdiction, status, creation date)
- Requirements statistics (total requirements broken down by type, mandatory requirements, sensitive data fields, total categories, policy conditions)
- Categories overview showing requirement counts per category
- Key features highlighting policy capabilities such as multi-entity support, data validation, document acceptance criteria, and conditional requirement evaluation
Requirements by Category - Detailed breakdown for each business category including:
- Category statistics (total requirements by type, conditional vs. static requirements)
- Comprehensive requirement tables showing:
- Requirement number, name, type, entity type, target entity, and conditional status
- Detailed configuration including field type, datakey, validation rules, default values, and descriptions
- Special configuration properties for different field types (select dropdowns, data groups, calculated fields, etc.)
Policy Conditions - Documentation of all policy-level scoping conditions including condition names and descriptions that determine when the Policy should be applied.
Data Groups - Complete data group specifications including:
- Data groups overview with statistics (total groups, cardinality breakdown, total fields)
- Individual data group definitions showing:
- Description, template, cardinality, version, status, and primary field
- Detailed field tables with field names, types, and complete configuration including properties, order, defaults, and descriptions
Data Model Summary - Comprehensive analysis including:
- Field types distribution showing counts for each field type used across the policy
- Entity types distribution showing requirement counts per entity type
- Requirements summary explaining the policy's purpose and scope
- Overview of data requirements, document requirements, eSignature requirements, and ownership requirements
- Description of validation rules, access controls, and conditional logic capabilities
The exported PDF serves as a complete technical specification that captures every aspect of the Policy configuration, including field definitions, validation rules, conditional logic, data groups, acceptance criteria, and business categorization. This comprehensive documentation can be used for regulatory compliance, audit purposes, stakeholder communication, configuration backup, policy validation, implementation guidance, and technical reference.
This export functionality ensures that all Policy configuration details are preserved in a professional, readable format that can be easily shared with stakeholders, auditors, regulators, and implementation teams who may not have direct access to the Policy Configuration interface.