Configuring Portal Dashboards
With the correct permission users can create dashboards to be shown in the portal, a configured dashboard can be specified per role. By default, all users will see the Portal Default Dashboard. The Portal Default Dashboard is not configurable. This section will provide configuration guidance for the different types of dashboard in the Fenergo Portal.
Default Dashboard
The Default Dashboard is automatically available to all Portal users and cannot be configured. It displays a list of linked legal entities and their associated journey statuses.
Configuration Options:
- None. This dashboard is fixed and provided by default.
- It will always be visible to users unless another dashboard is assigned via Portal Role Configuration.
Portal Dashboard
Users with the correct permissions can add or edit portal dashboards from the Dashboards area in the Portal section of Fenergo configuration.
Note: There is currently a limit of 1000 LEs that can be linked and displayed on the configurable dashboards page.
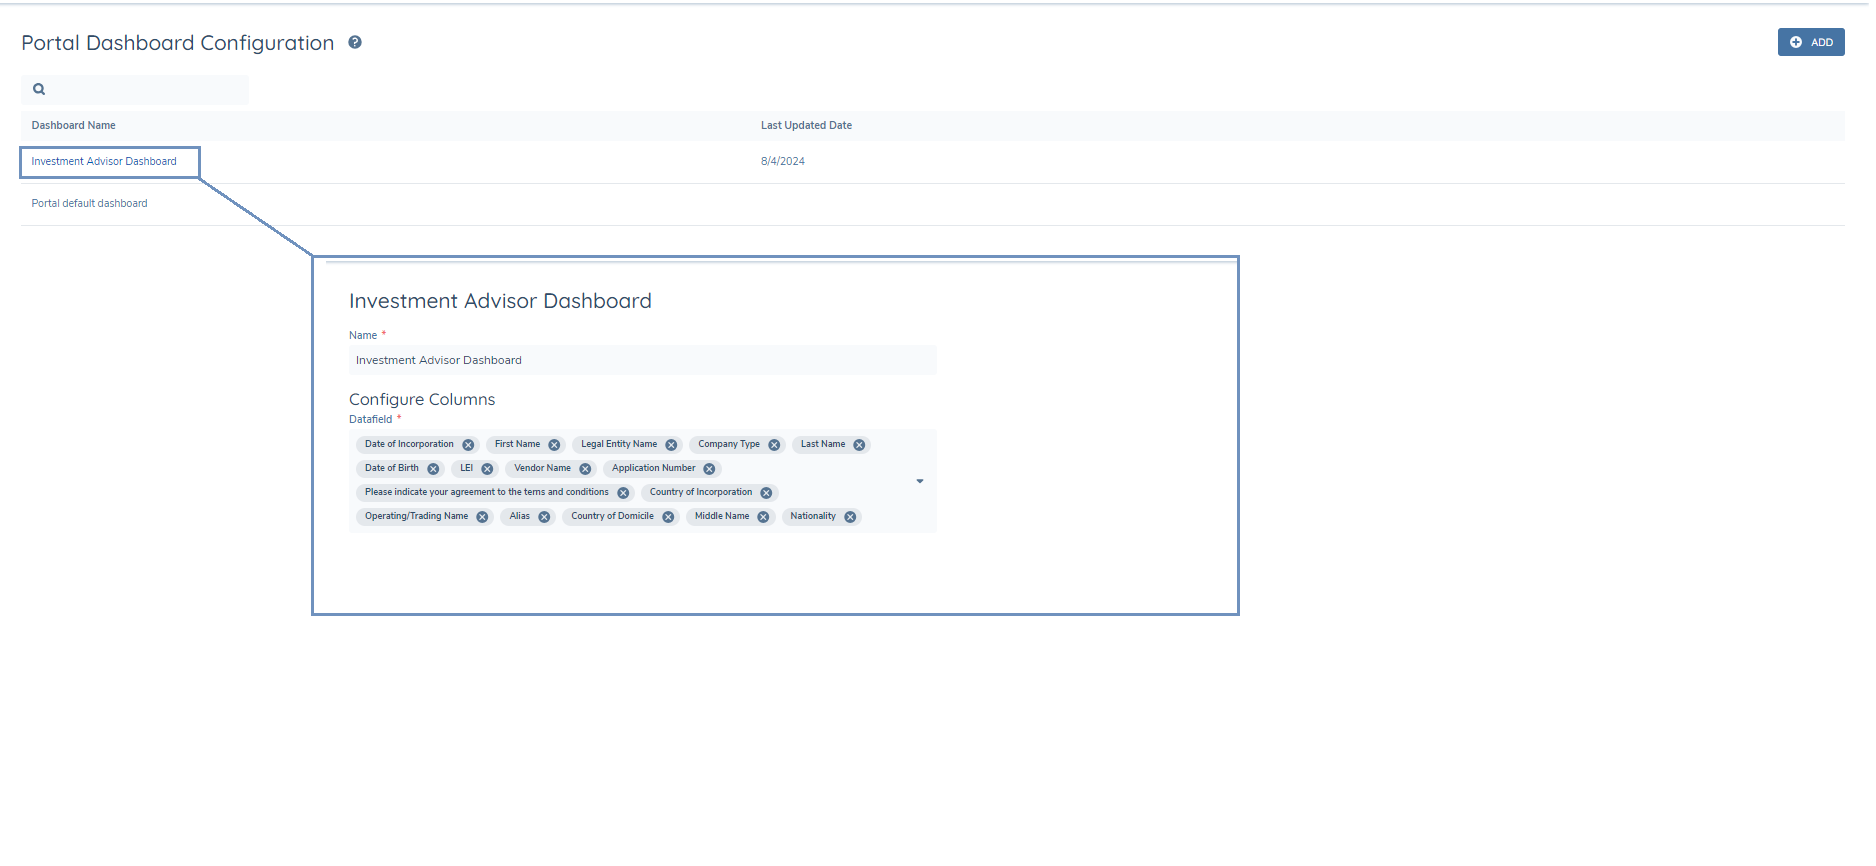
Configuring the Portal Dashboard
- Navigate to Portal > Dashboards.
- Click Add to create a new dashboard, or click into an existing one to edit.
- Enter a dashboard name.
- Add fields for both Individuals and Companies.
- Only indexed fields from global policy can be added.
- A maximum of 20 fields can be indexed and displayed.
- Different fields can be selected for Individuals and Companies.
- Reorder the fields as required. The dashboard will scroll horizontally if more than the visible fields are added.
- Save the dashboard and assign it to roles via Portal User Roles.

Portal Advanced Search Dashboard
The Advanced Search Dashboard enables Portal users to search for Company and Individual entities using configurable filters.
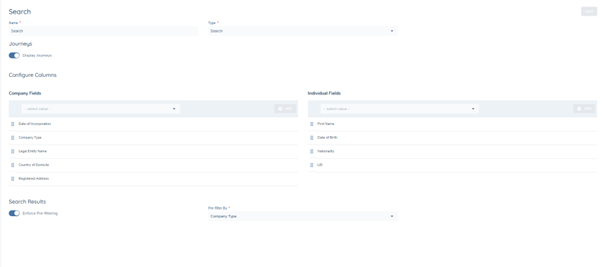
Configuring the Portal Advanced Search Dashboard
- Navigate to the Portal Dashboards section in FenX.
- Add a new dashboard and choose Type: Search from the dropdown menu.
- Under the Journeys heading, enable or disable the Display Journeys toggle.
- Enabled: Expanding rows beneath each entity show journeys.
- Disabled: Journeys remain hidden.
Configuring Columns
- Admins can configure separate sets of fields for Company and Individual entities.
- Only indexed fields can be selected.
Pre-Filtering Search Results
This feature restricts access to entity data based on pre-configured filters linked to a user’s profile.
Example: If the Search Dashboard is configured to filter by Country of Incorporation, and a users profile is set to Ireland then:
- The user will only see results for entities incorporated in Ireland.
- The user will not be able to see results for any other countries.
Steps to enable pre-filtering:
- Navigate to Portal Dashboards.
- Select the Search Dashboard.
- Go to Search Results and enable the Enforce Pre-filtering toggle.
- Select a field from the Pre-Filter By dropdown.
- Must be an indexed field from Global Policy.
- Save the dashboard and assign it to roles via Portal User Roles.
Users without a pre filter value set in their portal profile will see an empty state and will not be able to view any search results.
Pre-filtering is disabled by default.
Enforce Pre-Filtering Toggle:
-
When Enabled:
- Portal users must have filter criteria set in their profile to access search results.
- A new dropdown field conditionally displays, Pre-Filter By.
-
When Disabled:
- No pre-filtering is enforced.
- Portal users can search without restriction and see all available search results.
Note: This toggle is disabled by default.
Pre-Filter By Dropdown:
-
A mandatory dropdown field that defines the attribute by which all search results will be filtered.
-
Only indexed fields from Global Policy can be selected.
-
Portal Admin can select a single field from this dropdown to apply pre-filtering.
-
If a pre-filter is set and a user’s profile has no filter value set, an empty state with no search results will display to the user.
-
If disabled, there is no pre-filter enforced, allowing Portal users to search without restriction and see all available search results.
This field only displays if:
- The Search Dashboard has “Enforce Pre-filtering” enabled.
- The user’s assigned Portal Role has a Search Dashboard attached.
Setting the Filter on the User Profile Each Portal user must have a corresponding value set in their profile to view results:
- Go to the Portal User Management section in FenX.
- Search for the user.
- Navigate to the Filter Search Results By dropdown.
- Select the corresponding value from the dropdown.
Users can now navigate to an entity via the Search Results on the Search Dashboard without needing to be linked.
Another planned feature includes Entity Access Layers which will restrict access to entities based on defined access rules.
Funds Dashboards
Funds Dashboards allow fund managers to view investors associated with funds they manage.
Configuring Funds Dashboards
- Navigate to Portal > Dashboards.
- Add a new dashboard and set Dashboard Type to Funds.
- Select additional company and individual fields to display for investors.
- Save the dashboard and assign it to roles via Portal User Roles.
Linking Fund Managers
- Link fund manager portal users to each fund via Portal User Management or a Quick Link task during onboarding.
- Once linked, fund managers will automatically see all active investors with onboarded investment accounts.
Notes:
- Only Onboarded accounts are displayed. Onboarding and Offboarded accounts do not display.
- Limit: 1000 investors per fund.
Note: An active investment account is an investment account that has a status of Onboarded. Onboarding and Offboarded investment accounts are not displayed to the Portal User. Investors with only Onboarding or Offboarded investment accounts will not be visible when viewing investors in a fund.
Display Additional Investment Account Data To display investment account data points to the portal user within the funds dashboard:
- These data points need to be added to the global policy under the Investment Account Summary Details requirement category.
- The Investment Account Name will be displayed by default.
Display Control for Journeys Tab To configure visibility for journeys:
- Enable or disable the Journeys Toggle in Display Options to control journey visibility for fund managers.
- When enabled, the Journeys tab will appear with relevant journey details; if disabled, the tab is hidden.
Assign Dashboard to User Role To assign the Funds Dashboard to a user:
- Navigate to Portal > User Roles and select the relevant User Role.
- Select the Fund Dashboard you have configured from the Dashboard dropdown and Save.
- For all users with this user role, the funds dashboard will display when they log into the portal.
By following these setup instructions, the Fund Dashboard and Investor Linking features will be fully configured for fund managers, allowing them comprehensive and controlled access to investor information.
Account Related Fund Trigger Conditions:
Support for account related fund trigger conditions is now available for data, documents, and Ownership and Control rules. This functionality allows for the triggering of certain actions based on the related party (fund) associated with an investment.
- Note: Account related fund is not supported as a trigger condition for a policy.
- However, a policy can be triggered based on a policy field that has a conditional value set by an account related trigger condition.
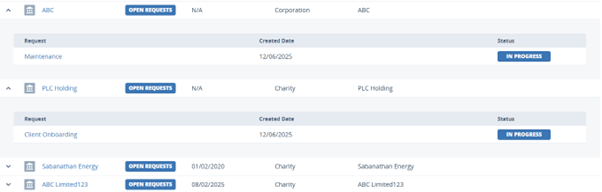
Outreach Requests Dashboard
The Outreach Requests Dashboard is designed to allow Portal users to focus only on entities that have open requests. The key column in the dashboard is the Entity Name, the other columns are configurable so can because adjusted based on user requirements.
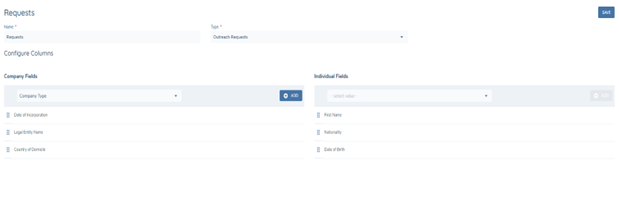
Configuring the Outreach Requests Dashboard
- Navigate to Portal > Dashboards.
- Select or add a new dashboard and set Type: Outreach Requests.
- Configure columns:
- Select values from the Company Fields dropdown and Individual Fields dropdown.
- Save the dashboard and assign it to roles via Portal User Roles.
Linking a Portal User to a Journey
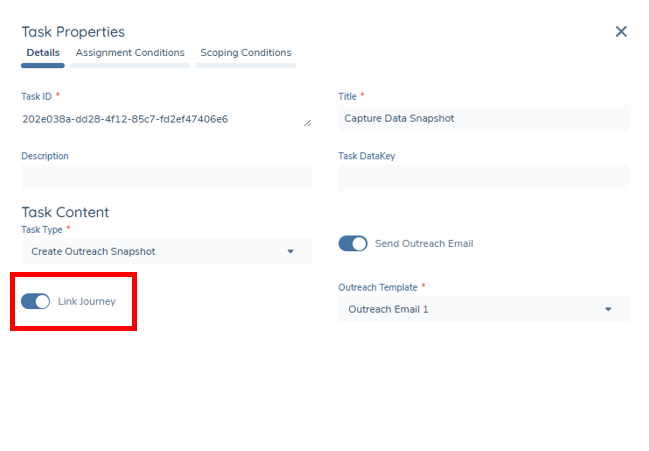
- Navigate to the Create Outreach Snapshot task in Journey Builder.
- Enable the Link Journey toggle.
- If enabled, the journey is assigned to all Portal users associated with the Legal Entity and have the assigned role for the outreach stage. If no role is assigned to the outreach stage, no journeys are linked to any user.
- The journey will automatically link to the portal user's entity, allowing them to view the outreach requests.
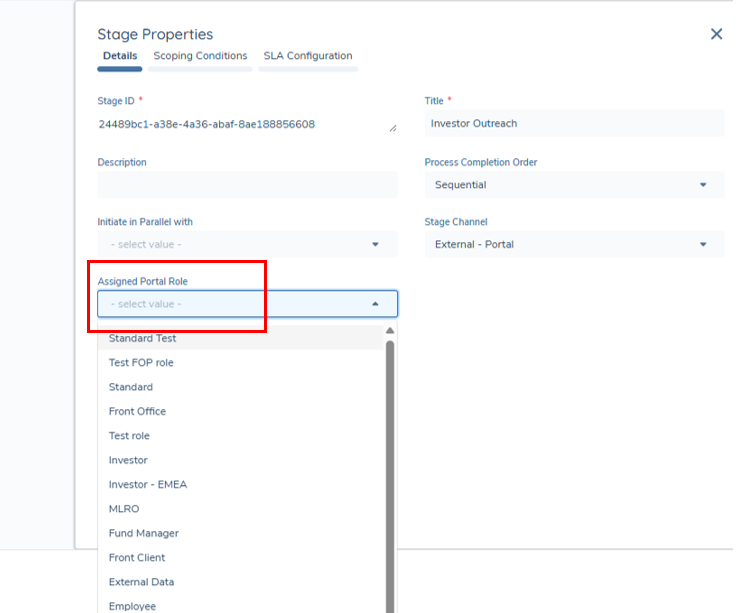
Note: Assigning an Outreach Stage to a role can be done via clicking on the Portal stage in Journey Builder and selected a role from the Assigned Portal Role dropdown.
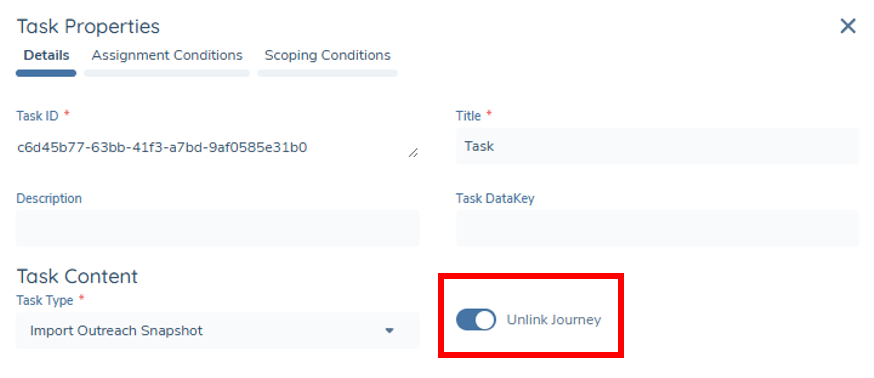
Unlinking a Portal User from the journey
- Navigate to the Import Outreach Snapshot task.
- Enable the Unlink Journey toggle.
- The journey is removed from the Requests Dashboard and the outreach tasks will no longer visible to the portal user.
Note: These toggles are disabled by default.
Once a portal user is linked to an entity, they will retain access to it - even if the entity no longer appears on the Requests Dashboard.
This eliminates the need to re-link the entity in the future, but it also means that the user can continue to access the entity’s profile directly, even when it’s no longer actively displayed on the Outreach Requests page.
Trader Portal:
When using the Trader Portal:
- The Link Journey toggle will not re-link an already linked journey.
- The Unlink Journey toggle will remove the journey for the portal user and will not be visible in the Standard portal and Trader portal.
Cancellation and Referral Scenarios
- Outreach request links when journeys are cancelled or are older than 365 days will be automatically removed.
- If a journey has been referred to a previous stage, the portal user will be presented with an information screen indicating that the request is no longer valid and will be removed from their dashboard.
Trader Requests Dashboard
The Trader Requests Dashboard is the default dashboard for the Trader Portal. The columns cannot be configured and is automatically available once the Trader Portal is enabled for a tenant.
Configuration Options:
- Displays trader requests (both active and completed) automatically to the Trader role.
- Assign a Trader Role to a portal user and the Trader Requests Dashboard will be visible by Default
Functional Details:
- Columns include: Client, Journey Progress, Status, Submitted Date, and Last Updated Date.
- Requests can be expanded to show additional details, including:
- Products: Product Type and secondary identifiers from the Global requirement set.
- Journey-Level Metadata: Data from the Portal New Request Details in Global Policy.
- First-time users see an empty state until their first request is submitted.
- Updates occur automatically as requests progress through journeys.
For more information on enabling and configuring the Trader Portal, please see the Trader Request guide.
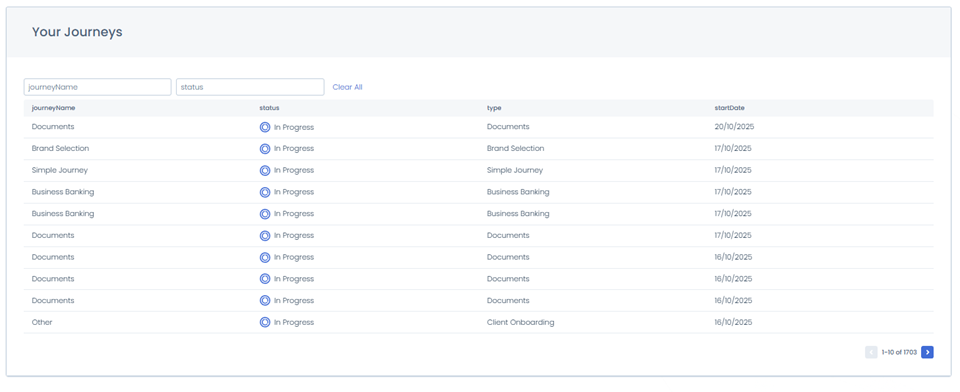
Journeys Dashboard
The Portal introduces a new dashboard type, the Journeys Dashboard.
This dashboard allows users to view journey information and track their progress.
This functionality extends existing Journey Views from Fenergo, allowing configurators to manage which views are visible to Portal users through Portal Configuration.
Configuring the Journeys Dashboard
-
Navigate to Portal Configuration > Dashboards.
-
Click Add Dashboard.
-
From the Dashboard Type dropdown, select Journeys.
-
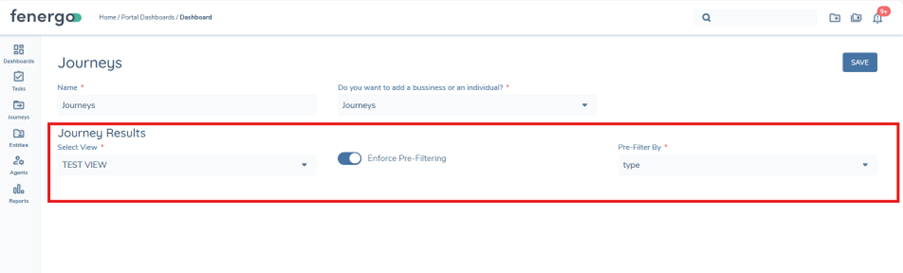
When Journeys is selected, a new Journey Results area displays.
- A mandatory field appears: Select View.
- Select View: This is a dropdown menu of available journey views that have been configured in Fenergo.
Note: For more information on configuring Journey Views in Journey Dashboard Configuration, please visit
Configuring Journeys | Fenergo Document Portal -
Choose the desired Journey View to display to the Portal user.
This dashboard can be assigned to Portal Roles the same way other dashboard are assigned in Portal Role Configuration
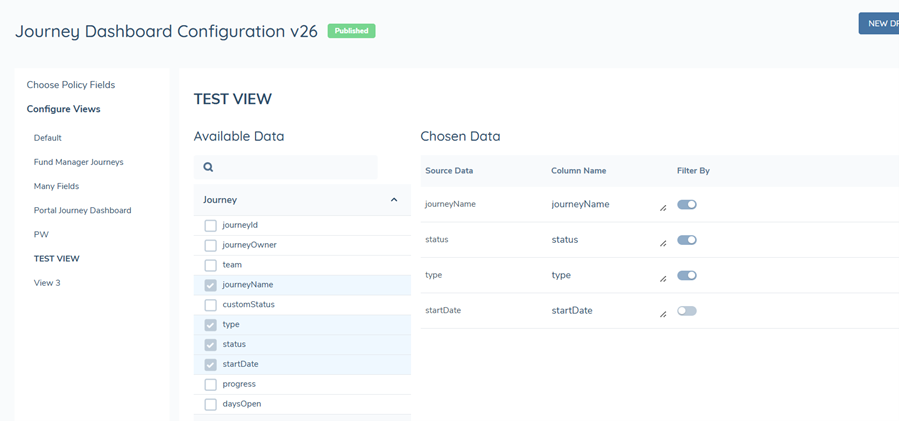
Column Configuration
-
Journey Dashboard column configurations are managed within Journey Dashboard Configuration, not Portal Configuration.
-
In Journey Dashboard Configuration, when a configurator is configuring a view, they can decide which values will display as columns in that view.
They can also toggle on the Portal user’s ability to filter by those values.
Deleting Journey Views
If the selected Journey View is deleted in Fenergo, the Portal user will see:
“You do not have access to this information.”
- The system does not revert to a default dashboard view automatically.
If the selected Journey View is deleted in Fenergo, the configurator will see:
“The Pre-Filter By field was removed from Policy” in the Portal Journey Dashboard section.
Filtering on the Journeys Dashboard
The filtering functionality for the Journeys Dashboard allows configurators to define pre-filtering rules that control what journeys are displayed to Portal users.
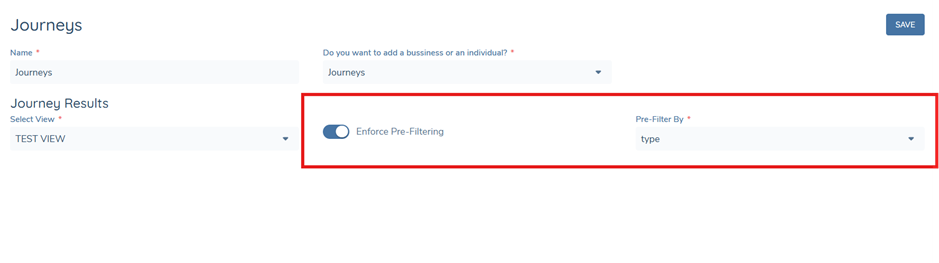
Enforce Pre-Filtering Toggle
- When enabled, Portal users will only see journeys that match their assigned filter value.
Pre-Filter By Dropdown
- This mandatory dropdown conditionally appears when Pre-Filtering has been enabled.
- Options in this dropdown are based on available attributes from the Journey Dashboard Configuration section.
Assigning Filters to User Profiles
Filters are assigned at the Portal User Management level:
- Navigate to Portal User Management.
- Select a user profile.
- Assign this user to a Role with a configured Journeys Dashboard.
- Under Filter Journey Results By, select the value relevant to that user (e.g., Journey Type = Client Onboarding).
Note:
-
The Filter Journey Results By dropdown only appears when the user’s assigned role has a Journeys Dashboard configured.
-
The dropdown list is dynamically populated based on the Pre-Filter By attribute defined in the Dashboard Configuration.
Additional Notes
-
Only journeys matching the user’s filter criteria are displayed to them in the Portal.
-
Removing the filter or disabling pre-filtering reverts the dashboard to display all journeys in the selected view.
Example:
If Pre-Filter By = Journey Type and the configurator selects Client Onboarding for a user, that user will only see Client Onboarding journeys in the Portal.
If the toggle is disabled, all journeys from the selected view will be visible.
Displaying Journey Information
The configuration for the Journey Details Page and associated tabs (Data, Documents, Investment Accounts, Products) mirrors the Profile Page V2 Configuration as its uses the same configuration settings in the Portal User Roles section of Fenergo.
Assigning Multiple Roles/Dashboards to a Portal User
Configurators can now assign multiple roles to a single Portal user, in order to provide them with access to multiple dashboards. This provides greater flexibility in tailoring the Portal experience to meet different business requirements while ensuring permissions remain secure and consistent.
Assigning Multiple Roles
- Navigate to Portal User Management in Fenergo.
- Open the profile of the Portal user you want to update.
- In the Role field, select one or more roles.
- Up to five roles can be assigned to a single user.
- Attempting to assign more than five roles produces a validation error.
This functionality is also available for the Trader Request.