Configuring User Guidance in the Portal
This guide explains how to configure User Guidance across different areas of the Portal. User Guidance provides contextual help to external users, ensuring they understand what is required at each step without being overwhelmed.
Well-designed guidance helps:
- Unblock users who may be unsure of what to do.
- Increase completion rates by clarifying expectations.
- Reduce rework and support queries.
- Deliver instructions at the right time without cluttering the user interface.
Task-Level Guidance
Task-level guidance provides contextual help at the top of each task screen within the Portal. This enables users to understand the purpose of the task before completing fields or uploading documents.
Configuration
- Navigate to Journey Builder.
- Select the task within the journey that you want to apply guidance to.
- In the Description field, add your guidance text.
Notes
- Text supports Markdown formatting (headers, lists, links, emphasis).
- If no guidance is configured, nothing will display in the Portal.
- Guidance does not display on Completed or Read-only tasks.
Example:
- Title field → Configures the Task Name.
- Description field → Configures the Guidance text displayed at the top of the task.
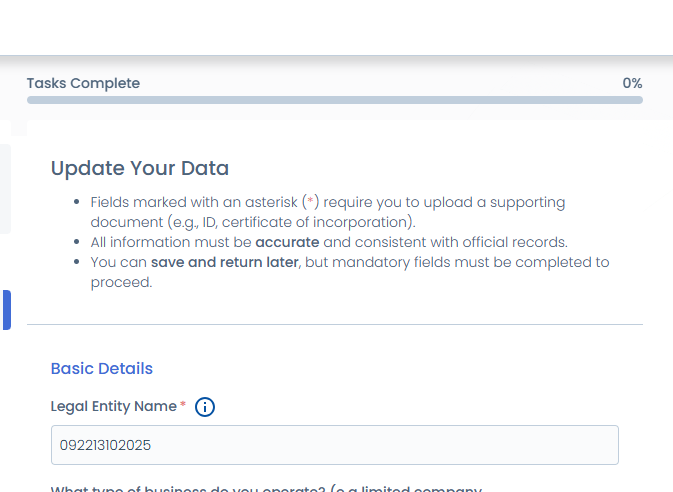
- Fields marked with an asterisk (:error-color[*]) require you to upload a supporting document (e.g., ID, certificate of incorporation).:br
- All information must be **accurate** and consistent with official records.:br
- You can **save and return later**, but mandatory fields must be completed to proceed.:br
Example in the Portal:
Document Requirement Guidance
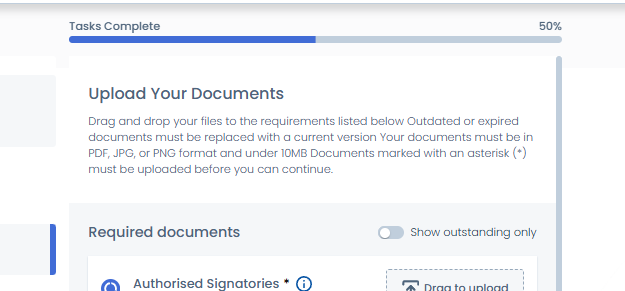
To provide Portal users with a better experience when using the Documents Task, additional content can be displayed to guide them through the process of completing document requirements. This is achieved using inline descriptions and tooltips.
Document Inline Description
The inline description is designed to give users a brief summary of what the document requirement is.
Careful consideration should be given to the content provided - keep a consistent number of characters and lines across requirements to ensure a uniform experience within the Documents Task.
For more detailed information, configurators can configure tooltips to supplement the inline description.
-
Available only on Document Requirements tasks.
-
Provide a brief, always-visible summary of the document’s purpose.
-
Best practice:
- Keep to under 2 lines.
- Keep descriptions consistent in length for a clean UI.
- Describe why the document is required, not the action (avoid “upload” or “attach”).
-
Notes
-
Multiline text with “Show more/less” is displayed after four lines of inline text.
-
Displayed only in pre-upload state (hidden once a document is uploaded).
Configuration:
- Navigate to Policy Configuration.
- Open the relevant Document Requirement.
- Add text in the Tooltip Description field.
Example:
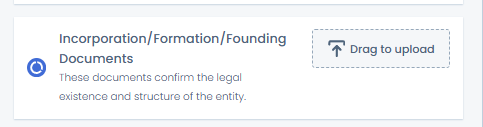
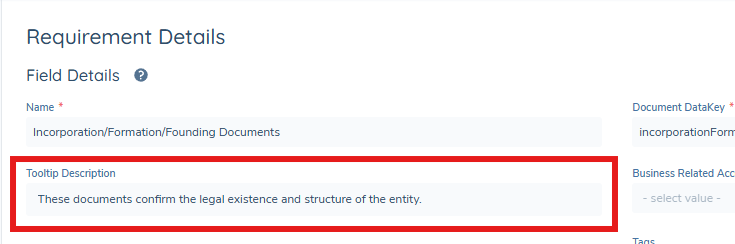
These documents confirm the legal existence and structure of the entity.
Document Tooltips
- Provide additional guidance beyond the inline description.
- Ideal for detailing accepted document types, expiry rules, or jurisdiction-specific instructions.
Recommendation:
Use tooltips only when strictly necessary. From a UX perspective, it is best practice to avoid applying tooltips to every field, as excessive use can create visual clutter and reduce overall clarity.
Configuration:
- Navigate to Policy Configuration.
- Open the relevant Document Requirement.
- Enter text in the Tooltip Description field.
To add the tooltip icon and text within that tooltip, use the format below.
Any markdown-formatted text added below the line '[--tooltip--]' will display when the tooltip icon is activated.
[--tooltip--]

This is a tooltip with Markdown
Supported Content
- Markdown syntax (bold, italics, underline, links, linebreaks, red text, bullet points and chips).
Example:

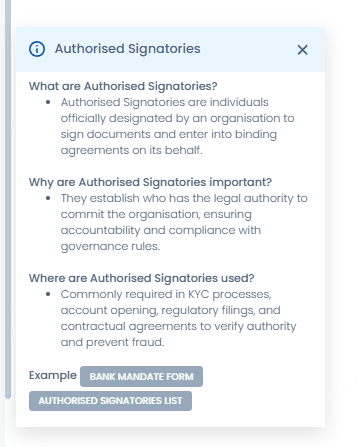
[--tooltip--]
 **What are Authorised Signatories?**:br
Authorised Signatories are individuals officially designated by an organisation to sign documents and enter into binding agreements on its behalf.:br :br

**Why are Authorised Signatories important?**:br
They establish who has the legal authority to commit the organisation, ensuring accountability and compliance with governance rules.:br :br

**Where are Authorised Signatories used?**:br
Commonly required in KYC processes, account opening, regulatory filings, and contractual agreements to verify authority and prevent fraud.:br :br

**Example** :chip{text="Bank Mandate Form"}:br
:chip{text="Authorised Signatories List"}:br
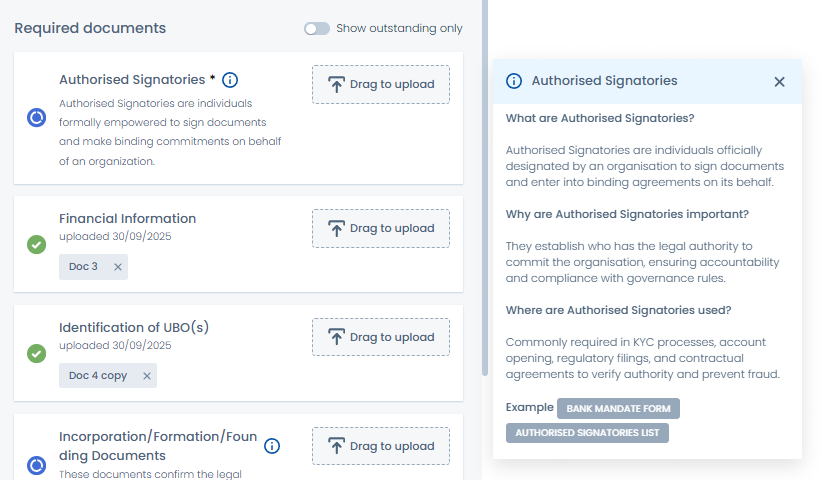
Inline + Tooltip Combined
The inline text goes on the first line, followed by the [--tooltip--] marker, and then the Markdown text that the configurator wants to display within that tooltip.
Authorised Signatories are individuals formally empowered to sign documents and make binding commitments on behalf of an organization.

[--tooltip--]
 **What are Authorised Signatories?**:br
Authorised Signatories are individuals officially designated by an organisation to sign documents and enter into binding agreements on its behalf.:br :br

**Why are Authorised Signatories important?**:br
They establish who has the legal authority to commit the organisation, ensuring accountability and compliance with governance rules.:br :br

**Where are Authorised Signatories used?**:br
Commonly required in KYC processes, account opening, regulatory filings, and contractual agreements to verify authority and prevent fraud.:br :br

**Example** :chip{text="Bank Mandate Form"}:br
:chip{text="Authorised Signatories List"}:br
Example in the Portal:
Tooltips: Data Task
Tooltips on Data Tasks provide contextual guidance to users when completing data fields in the Portal. They are configured in Policy Configuration and can display a tooltip icon with Markdown-formatted content.
Recommendation:
Use tooltips only when strictly necessary. From a UX perspective, it is best practice to avoid applying tooltips to every field, as excessive use can create visual clutter and reduce overall clarity.
Configuration:
- Navigate to Policy Configuration.
- Select/Add the Data Requirement you wish to have a tooltip.
- Find the Tooltip Description field and populate it with Markdown text.
For example, adding a tooltip for LEI:
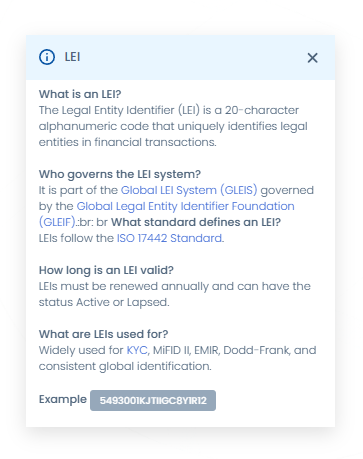
Markdown sample:
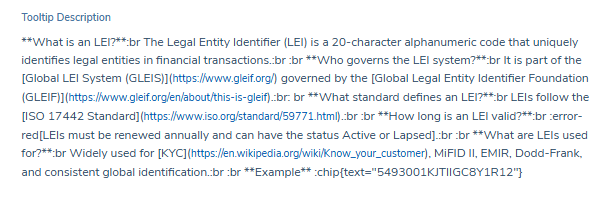
**What is an LEI?**:br
The Legal Entity Identifier (LEI) is a 20-character alphanumeric code that uniquely identifies legal entities in financial transactions.:br :br
**Who governs the LEI system?**:br It is part of the [Global LEI System (GLEIS)](https://www.gleif.org/) governed by the [Global Legal Entity Identifier Foundation (GLEIF)](https://www.gleif.org/en/about/this-is-gleif).:br: br
**What standard defines an LEI?**:br LEIs follow the [ISO 17442 Standard](https://www.iso.org/standard/59771.html).:br :br
**How long is an LEI valid?**:br :error-red[LEIs must be renewed annually and can have the status Active or Lapsed].:br :br
**What are LEIs used for?**:br Widely used for [KYC](https://en.wikipedia.org/wiki/Know_your_customer), MiFID II, EMIR, Dodd-Frank, and consistent global identification.:br :br
**Example** :chip{text="5493001KJTIIGC8Y1R12"}
Policy and Category-Level User Guidance
This guide covers how to configure Policy Field Guidance, Category-Level Guidance, Rich Text Editor messages, and Ownership & Control Guidance in the Portal. These guidance types allow configurators to provide contextual help that is rich, structured, and always aligned to the user journey.
Policy Field Guidance
The Portal User Guidance field type is available in Policy Field Configuration. This allows configurators to provide rich, contextual guidance within data tasks.
Configuration:
- Navigate to Policy Configuration.
- Add a new field.
- Select Portal User Guidance as the field type.
- Add content using Markdown.
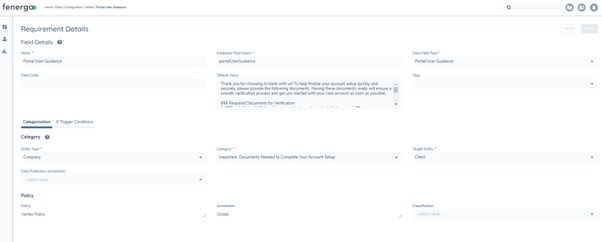
Supported Markdown
- Headers (H1–H3)
- Bold, Italics, and Underline
- Bullet and numbered lists
- Hyperlinks
Example Usage of Portal User Guidance Field
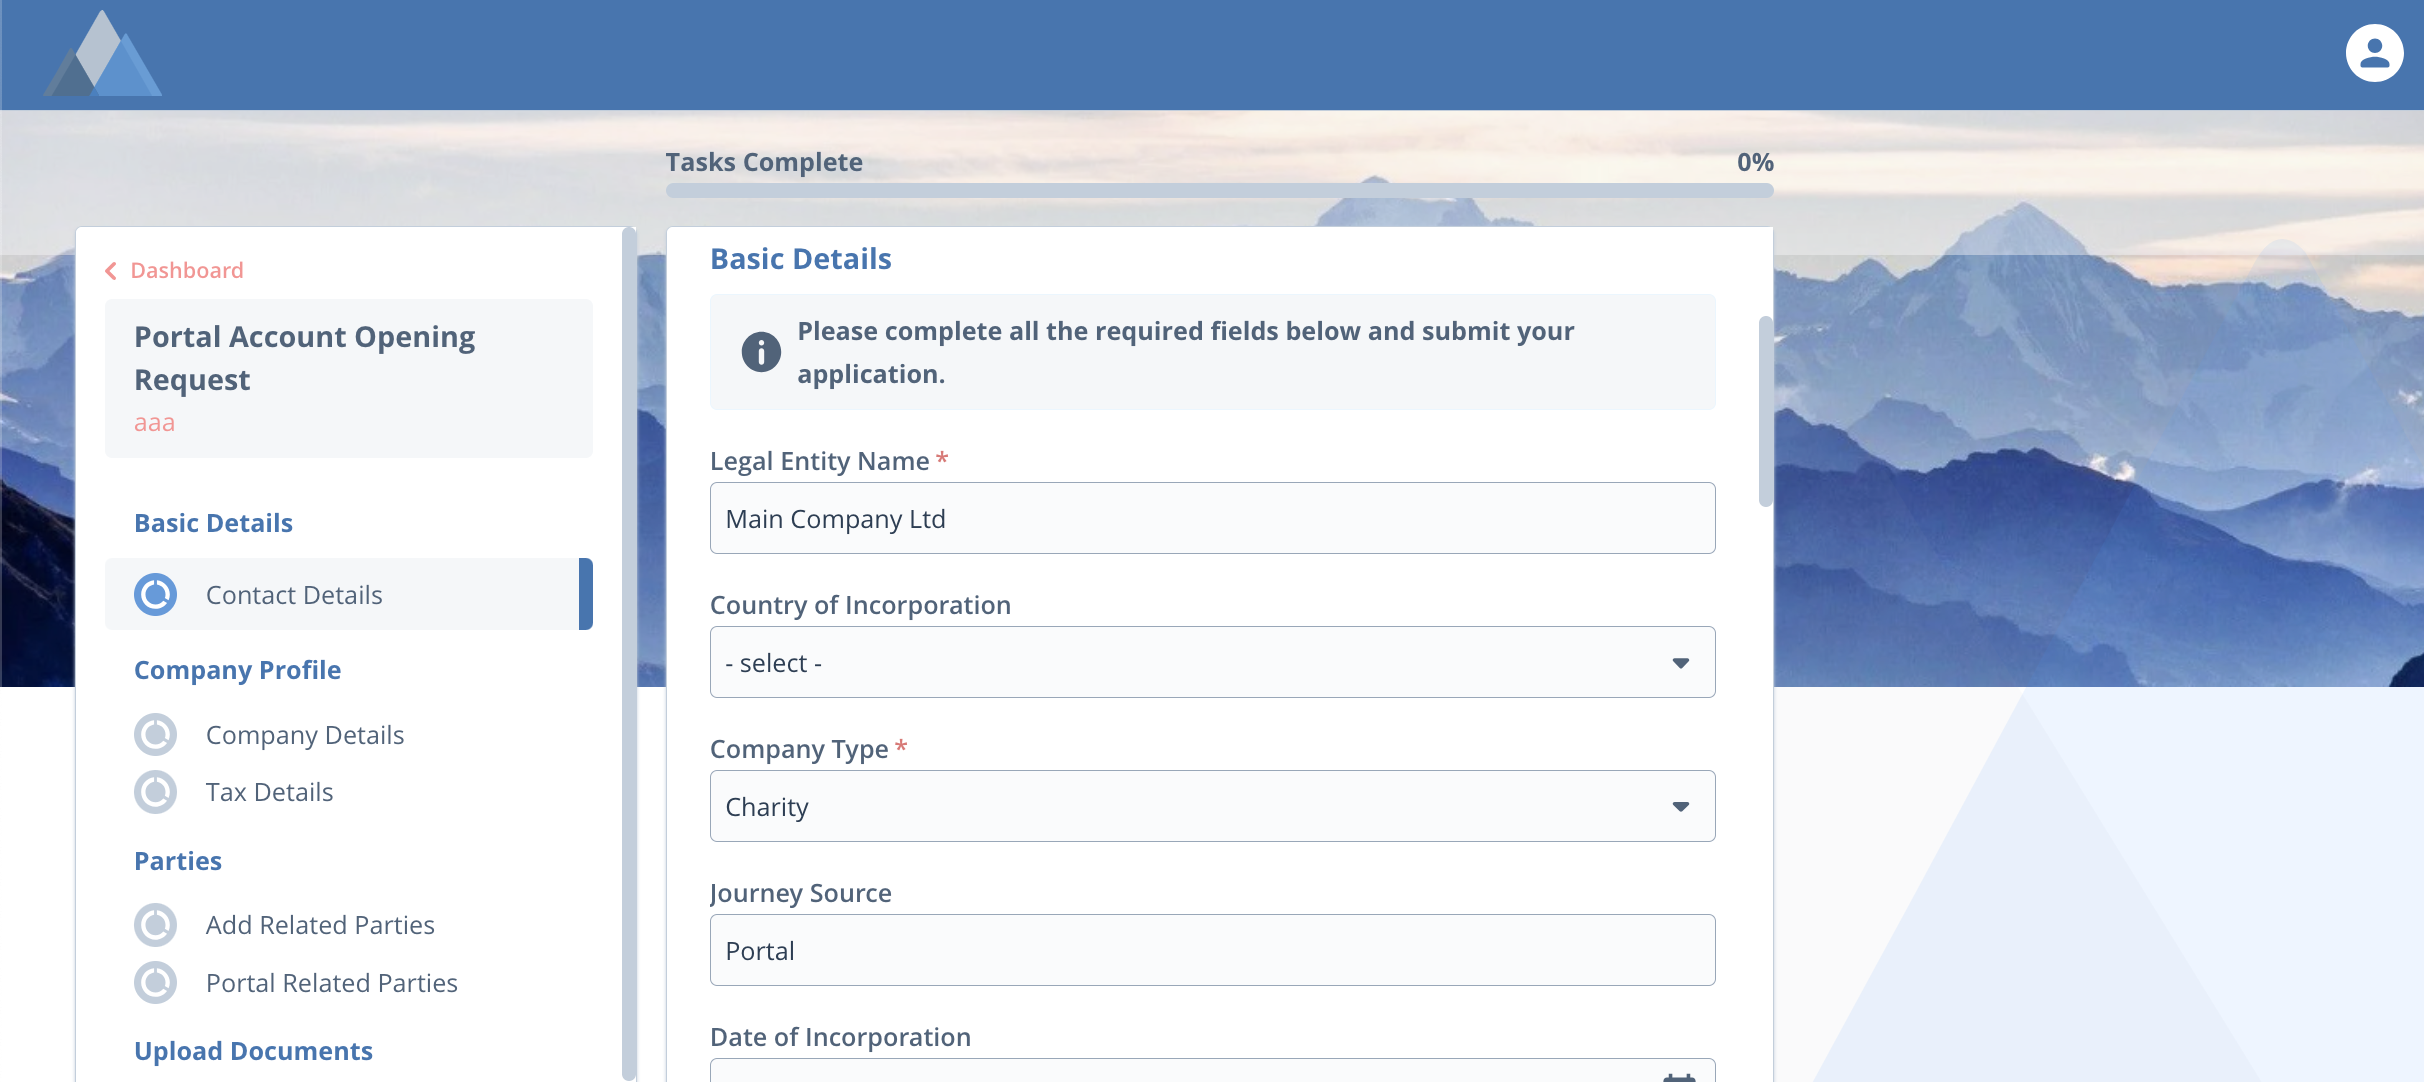
Thank you for choosing to bank with us! To help finalize your account setup quickly and securely, please provide the following documents. Having these documents ready will ensure a smooth verification process and get you started with your new account as soon as possible.

#### Required Documents for Verification

1. **[Proof of Identity](https://www.yourbank.com/accepted-id-documents)**
   Please submit one of the following:
   - Government-issued ID (passport, driver’s license, national ID)
   - Birth certificate or social security card

2. **[Proof of Address](https://www.yourbank.com/address-proof-requirements)**
   To verify your residence, submit a recent (within the last 3 months) copy of:
   - Utility bill (water, electricity, etc.)
   - Bank statement or credit card statement
   - Lease agreement or mortgage statement

3. **[Income Verification (if applicable)](https://www.yourbank.com/income-verification)**
   If required, please provide one of the following documents:
   - Recent pay stubs or employment letter
   - Tax returns or bank statements showing regular deposits

4. **[Additional Documentation](https://www.yourbank.com/extra-documents)**
   Depending on your account type, other documents may be necessary. Our team will reach out if anything specific is needed.

## How to Upload Your Documents

Please log in to the [Secure Upload Portal](https://www.yourbank.com/upload-documents) to submit your documents. If you have any questions about the documents listed, [contact us](https://www.yourbank.com/contact) for assistance.

We appreciate your cooperation and look forward to completing your account setup soon!
Category-Level Guidance
Category-level guidance can be added to Data tasks so that entire requirement categories display instructional text. This helps guide users through a group of fields without overwhelming them with field-level detail.
Configuration:
- Navigate to Reference Data > Editor > Requirement Category.
- Add a column called Portal Guidance.
- Populate text for each requirement category.
Configure Hyperlinks
To configure a hyperlink to display on an editable task, add a new read-only text field to Policy and add the hyperlink as a default value. This will render as below to the Portal user.

When a hyperlink is entered in a textfield or text area by a user in portal, when this task is complete, this will render as a URL on the completed task and review task screens.

Rich Text Editor (Read-Only)
Fenergo users can also use the Rich Text Editor to provide clear instructions or summarised feedback to Portal users. This content is always displayed in read-only mode when accessed via the Portal.
Key Notes
- The Rich Text Editor will always render as read-only in the Portal.
- Supports formatted text: headings, emphasis, lists, hyperlinks.
- Can be used to render structured instructions or internal feedback.
Example Use Cases
- Feedback from a KYC analyst on what has been validated or rejected.
- Guidance on corrective actions required.
- Clarification notes to explain what is valid, invalid, or still outstanding.
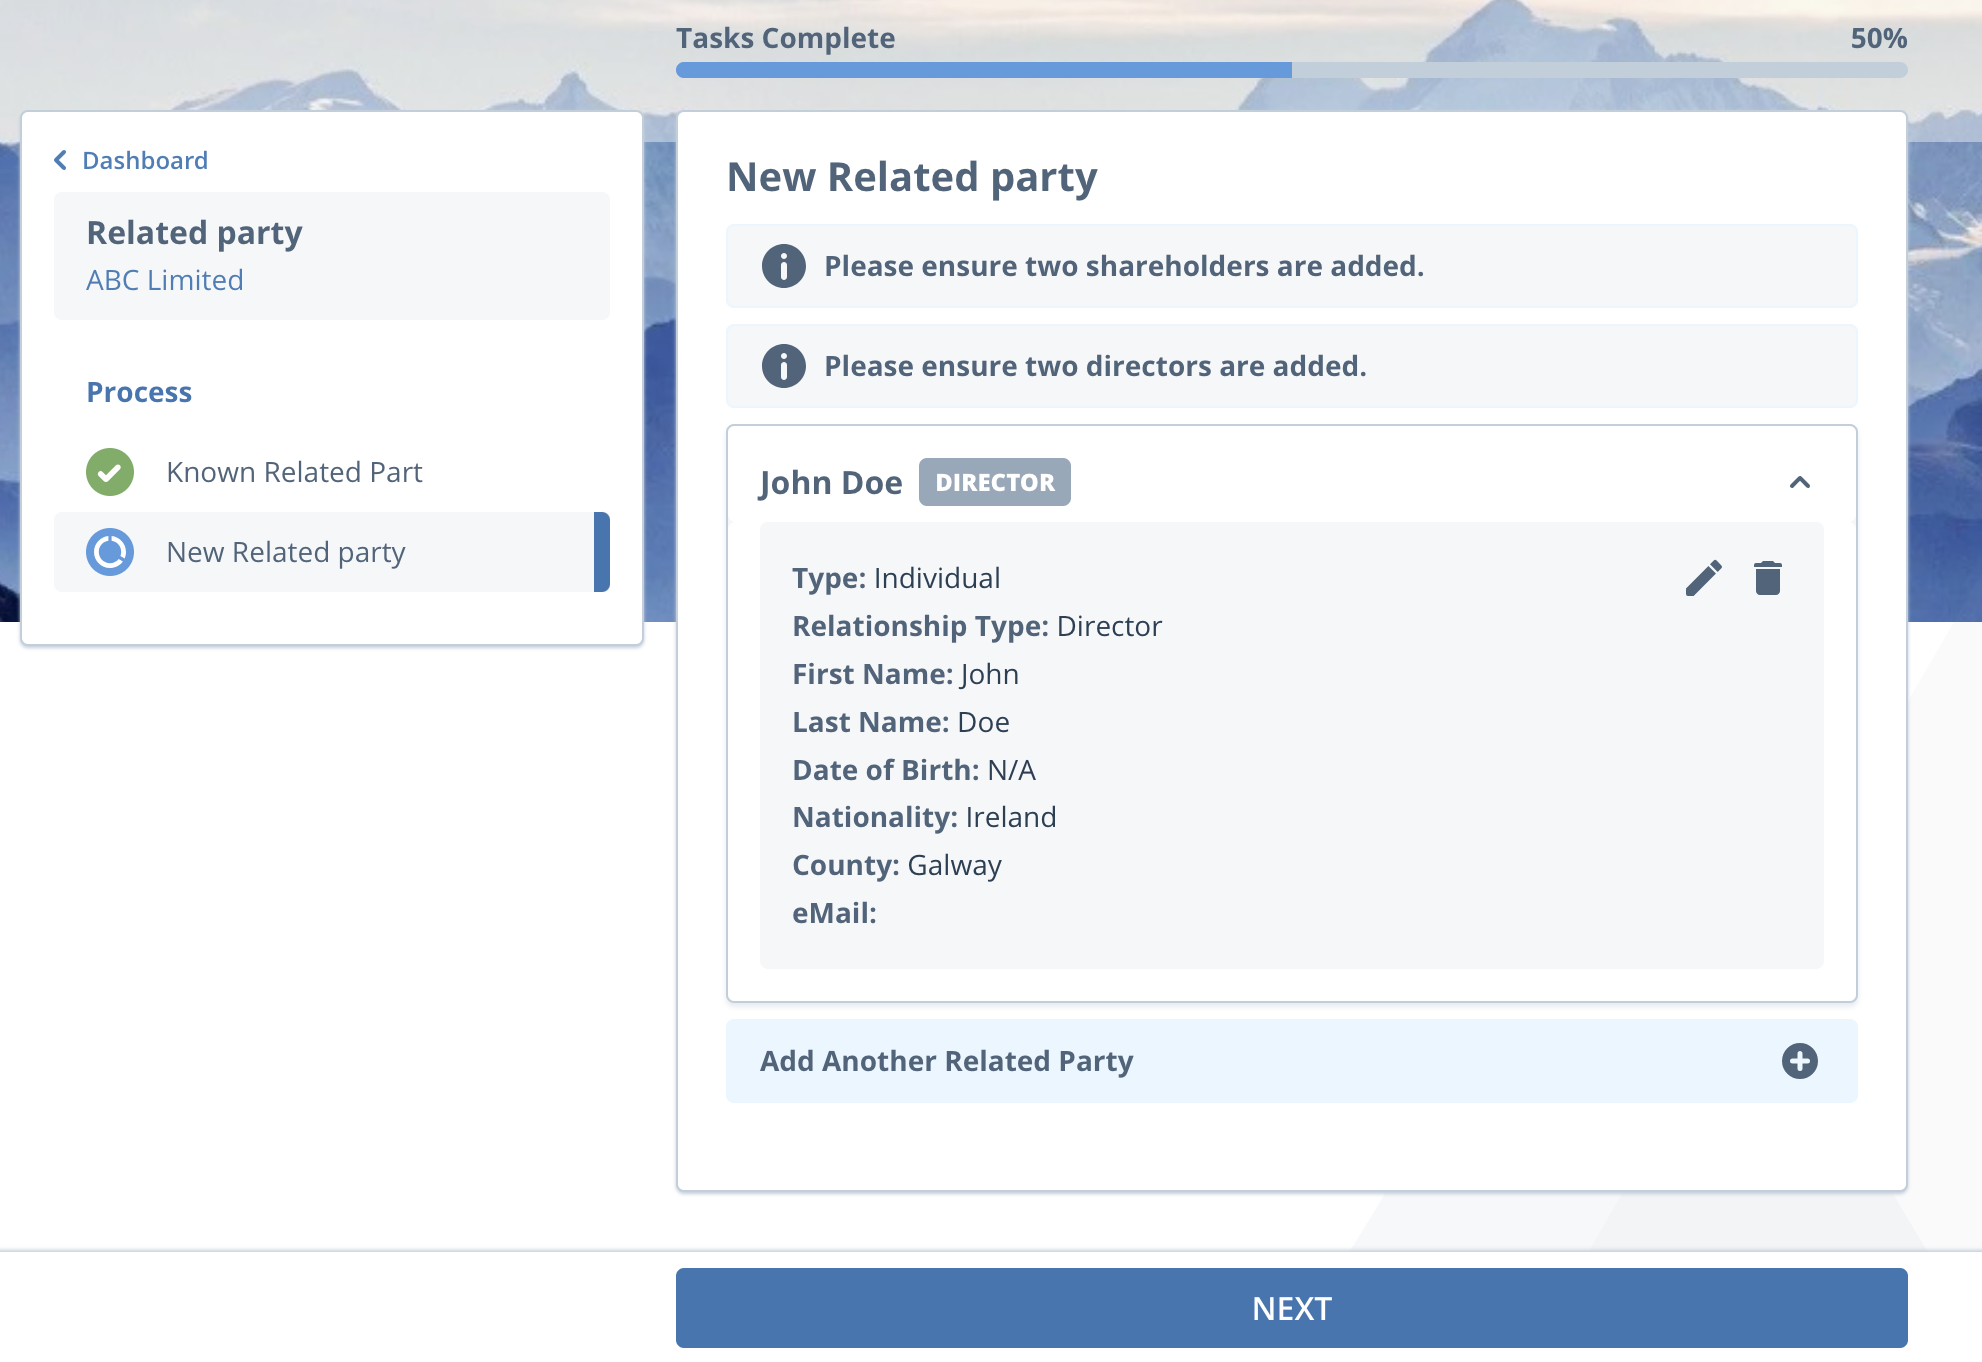
Ownership and Control Guidance
Ownership and Control guidance can be configured to display on the Add New Related Party outreach task. This will allow information messages be configured to guide Portal users through the process of adding new related parties during an outreach stage. This will serve as guidance only and will not block the portal user if any
mandatory rules are configured.
- Standard Related Party Tasks: Rules may be mandatory (blocking progression) or advisory only.
- Outreach Related Party Tasks: Rules are advisory only, so users are not blocked if they lack information.
Configuration:
- Navigate to Ownership and Control Configuration.
- Add text in the Portal Guidance field.
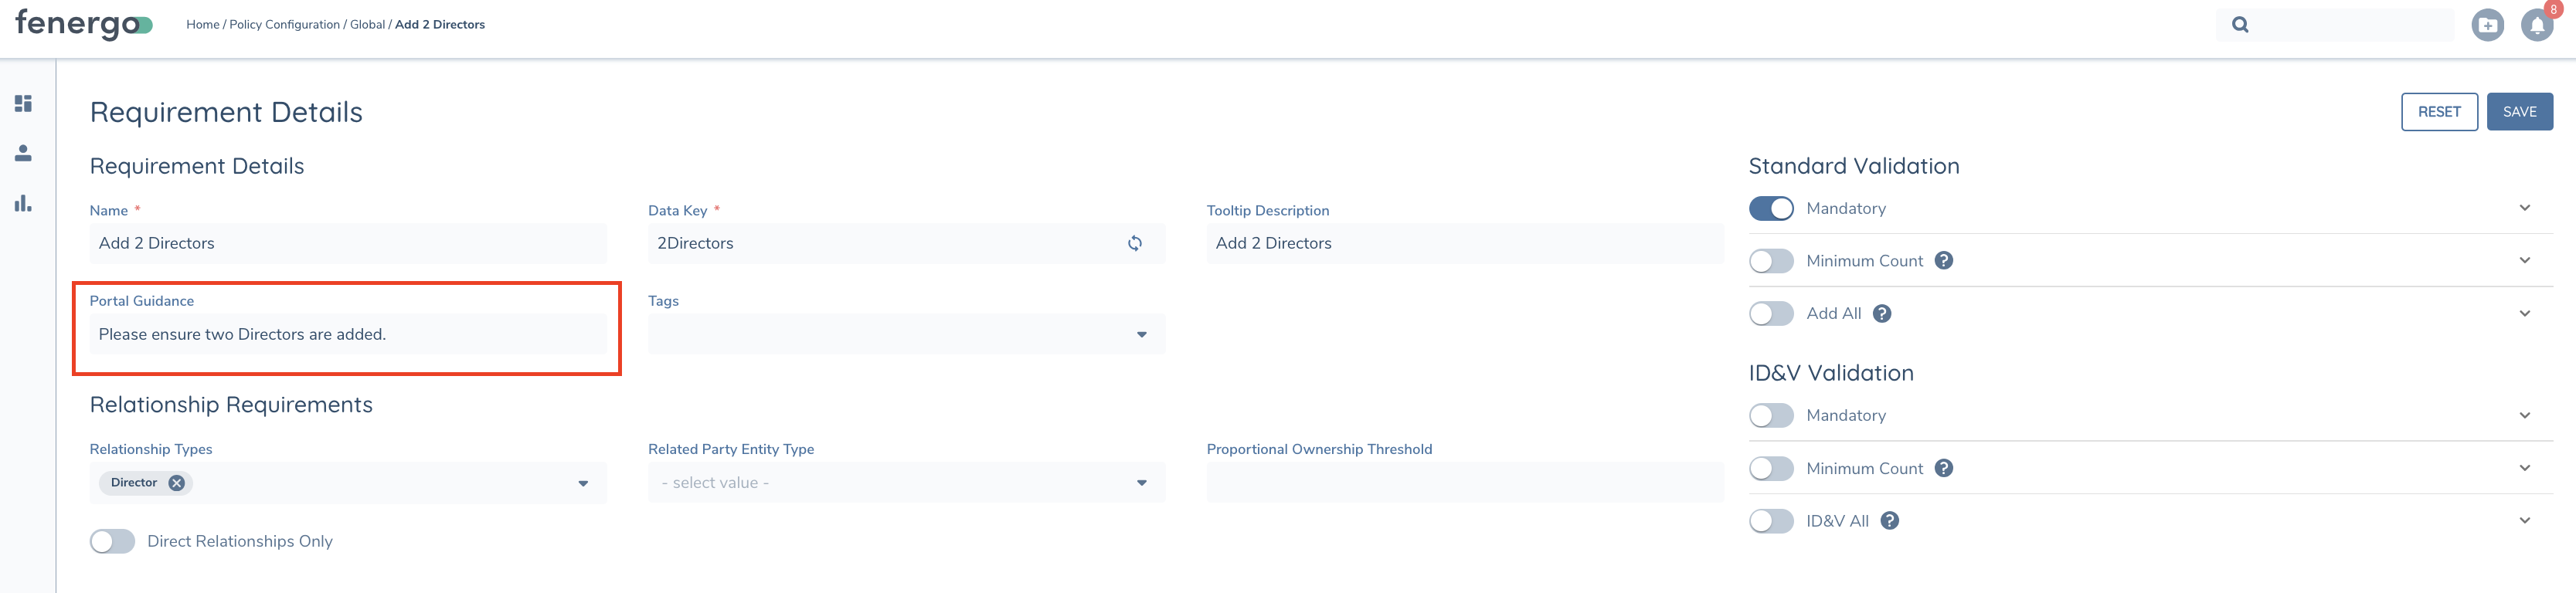
This ensures O&C rules are clearly explained without overwhelming users.
Quick Reference - Guidance Types
| Guidance Type | Where It Applies | Purpose | Best Practice |
|---|---|---|---|
| Task-Level Guidance | Top of tasks (Data, Docs, Related Parties, etc.) | Set context before users start | Keep short; no duplication of field labels |
| Field Tooltips | Input fields in Data & Documents tasks | Explain complex fields on hover/focus | Concise; optional detail only |
| Inline Descriptions | Document Requirements tasks only | Brief summary of document purpose | Max 2 lines; consistent length; avoid “upload” |
| Document Tooltips | Document Requirements tasks | Provide extra details (valid types, expiry, rules) | Use Markdown; suitable for detailed notes |
| Portal User Guidance Field | Policy-configured guidance fields | Context-rich instructions within Data tasks | Use Markdown for clarity and structure |
| Category-Level Guidance | Requirement Categories in Data tasks | Add instructional text across a group of fields | Keep general; avoid field-level repetition |
| Rich Text Editor | Read-only messages in Portal | Summarised analyst feedback or structured instructions | Always read-only; use clear plain language |
| O&C Guidance | Related Party tasks (Standard/Outreach) | Explain Ownership & Control rules | Advisory for Outreach; mandatory optional |