Using External Data Sources
The External Data feature in Fenergo SaaS allows a user to enrich a client record with data from different data providers.
While the framework is configurable to support integrating with any data external or internal data provider, Fenergo SaaS supports OOTB integrations with Moodys (Orbis & Kompany) and Dun & Bradstreet.
Supported Versions
Moodys (Kompany)
- API V1 Only
- Search, Data, Documents & Hierarchy support for all Live Jurisdictions (Hierarchy not supported for IE Jurisdiction)
- Ongoing Monitoring for Client Details only
- Mapping File. Fenergo supports a subset of all available Company and Related Party Data.
Fenergo does not support kompany 'Concierge' service.
Moodys (Orbis)
Search, Data and Hierarchy support through the below api endpoints
- api/Orbis/Companies/Data
- api/Orbis/Ownership/OwnershipExplorer
- api/Orbis/Contacts/Data
- Mapping File. Fenergo supports a subset of all available Company and Related Party Data.
Fenergo does not support Ongoing Monitoring or Document retrieval from Orbis (not available at time of Integration)
Dun & Bradstreet
- Product = Direct+
- Search: Cleanse Match
- Data: CompanyInfo Level 1 & 2 only
- Hierarchy: CMPCOS api only
- Ongoing Monitoring: CMPBOL api
- Mapping File. Fenergo supports a subset of all available Company and Related Party Data.
D&B does not support document retrieval
Note: Fenergo does not certify the accuracy of data from any third-party sources. For further information contact the Provider.
Selecting the Match
Initial Search Results
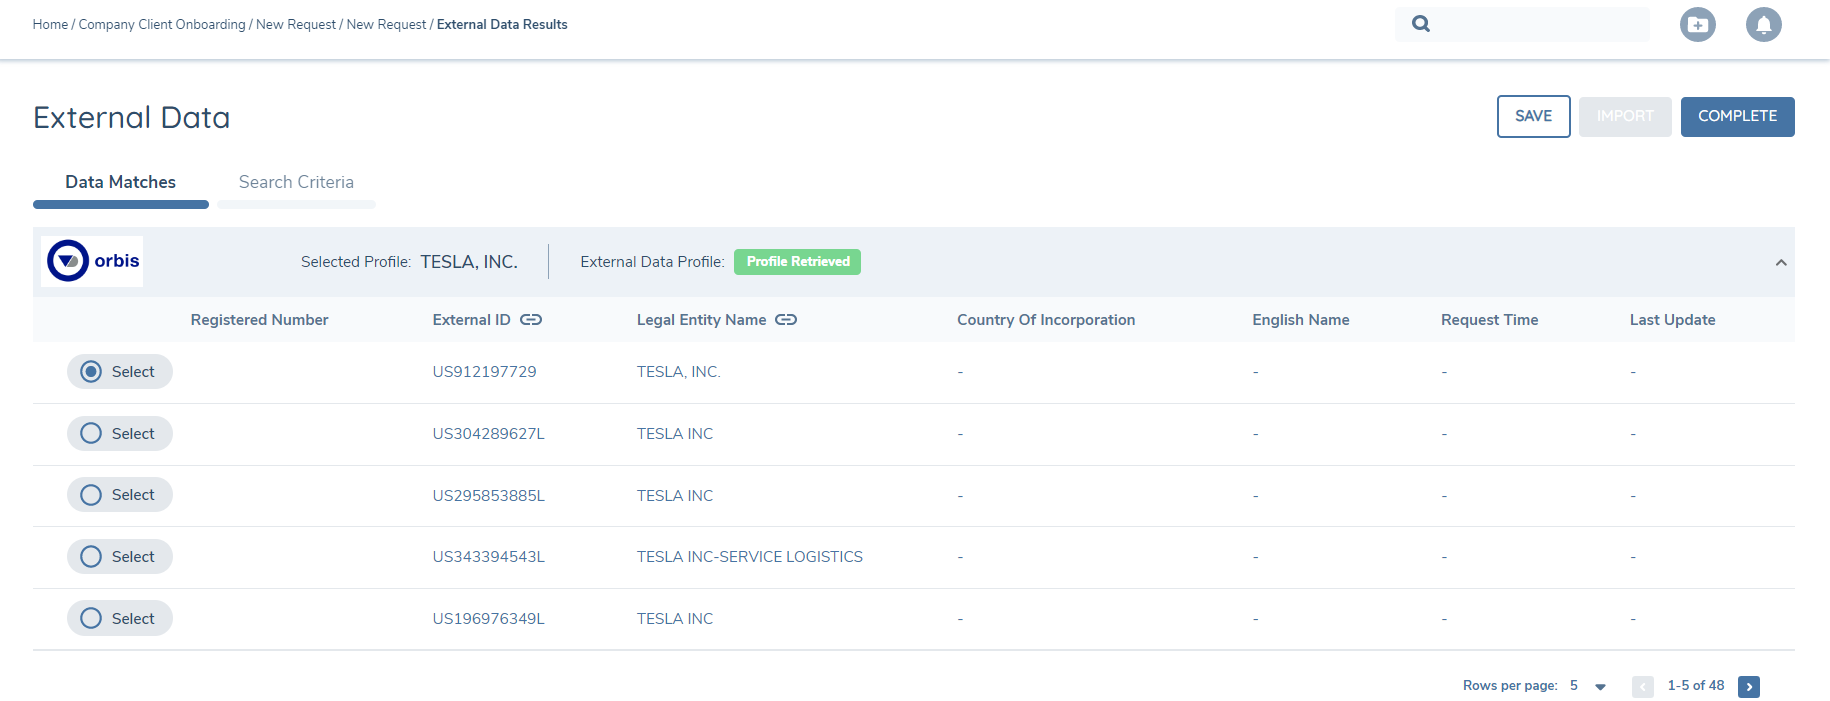
On completion of the External Data Combined task the user can see the list of entities that have been retrieved from the enabled External Data Providers and the Search Criteria used for the match. The UI status indicator indicates the status of the External Data process and will update from Search in Progress to Search Complete once results are ready.
In the default configuration, the Search Criteria includes the following attributes:
- Legal Name
- Country of Incorporation
Users can also search by
- LEI
- Registered Number
- National ID (Orbis Only)
The Search Criteria can be modified by a client through the Mapping Tool with the only constraint being that the attributes to be included must be supported by the APIs (for example, the Search APIs support the attribute "Date of Incorporation" but do not support the attribute "SIC Code").
The fields returned to the grid on the UI are driven by the policy fields in the External Data Search Criteria policy category. If the Fenergo SaaS field has been linked to a Orbis field, then you will see the link icon appear beside it as in the below screenshot.
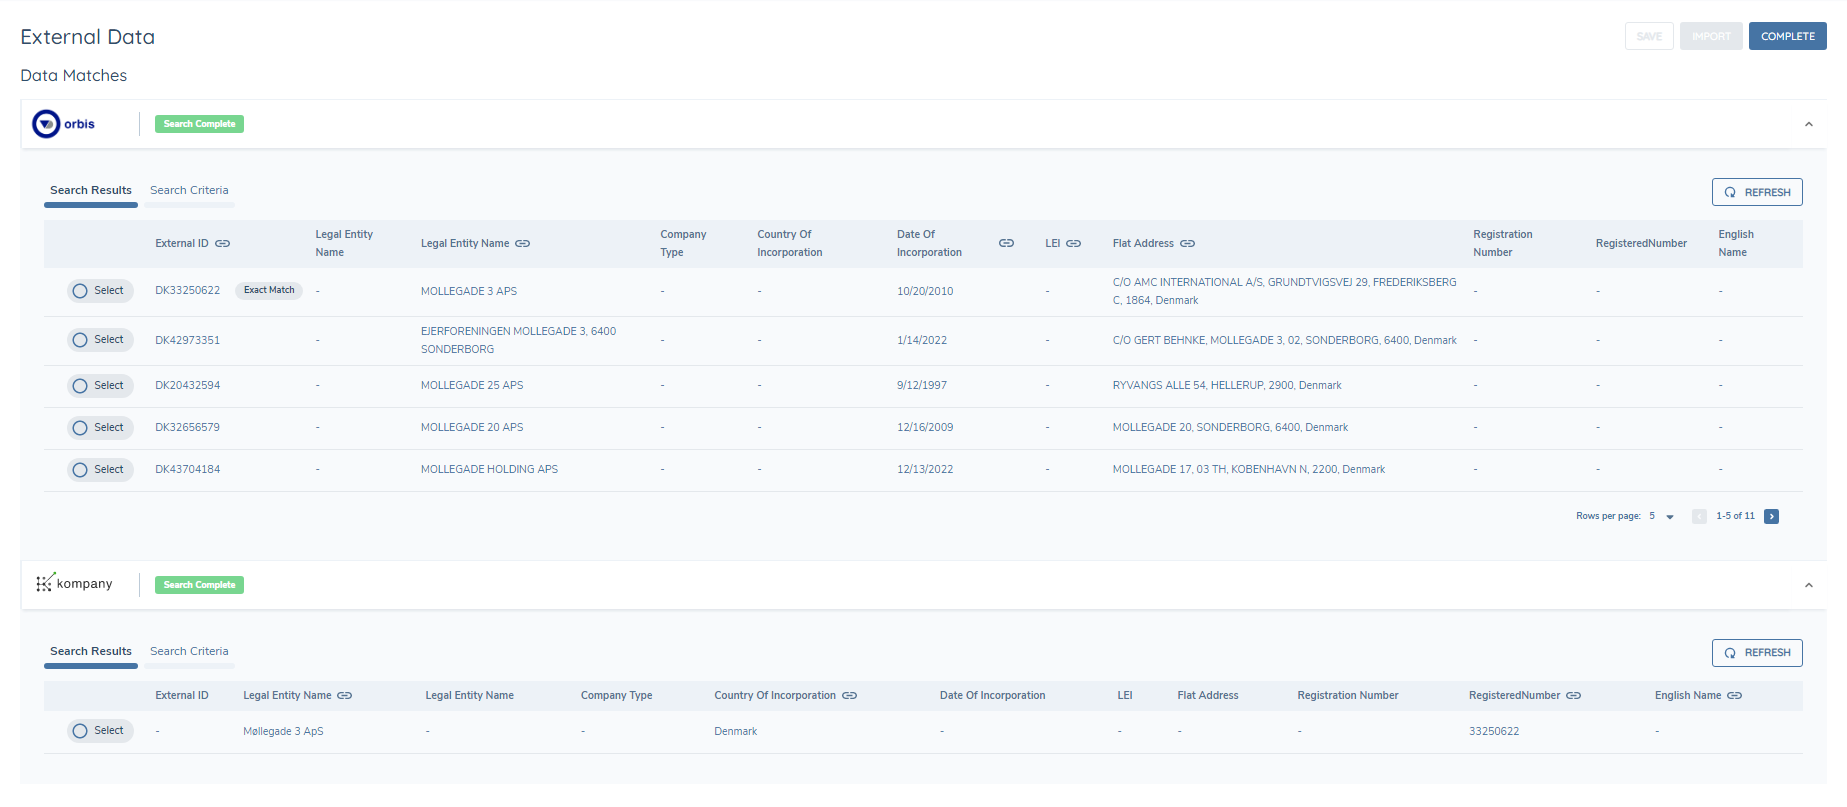
Within the Data Matches section of the page, the user can see the Data Provider record matches per the Search Criteria and organized by Data Provider. The example image below shows Orbis, which sorts results by match closeness:
Retrieving the Profile
The user selects the record they want to retrieve the data from by pressing the "Select" radio button to the left of the Legal Name.
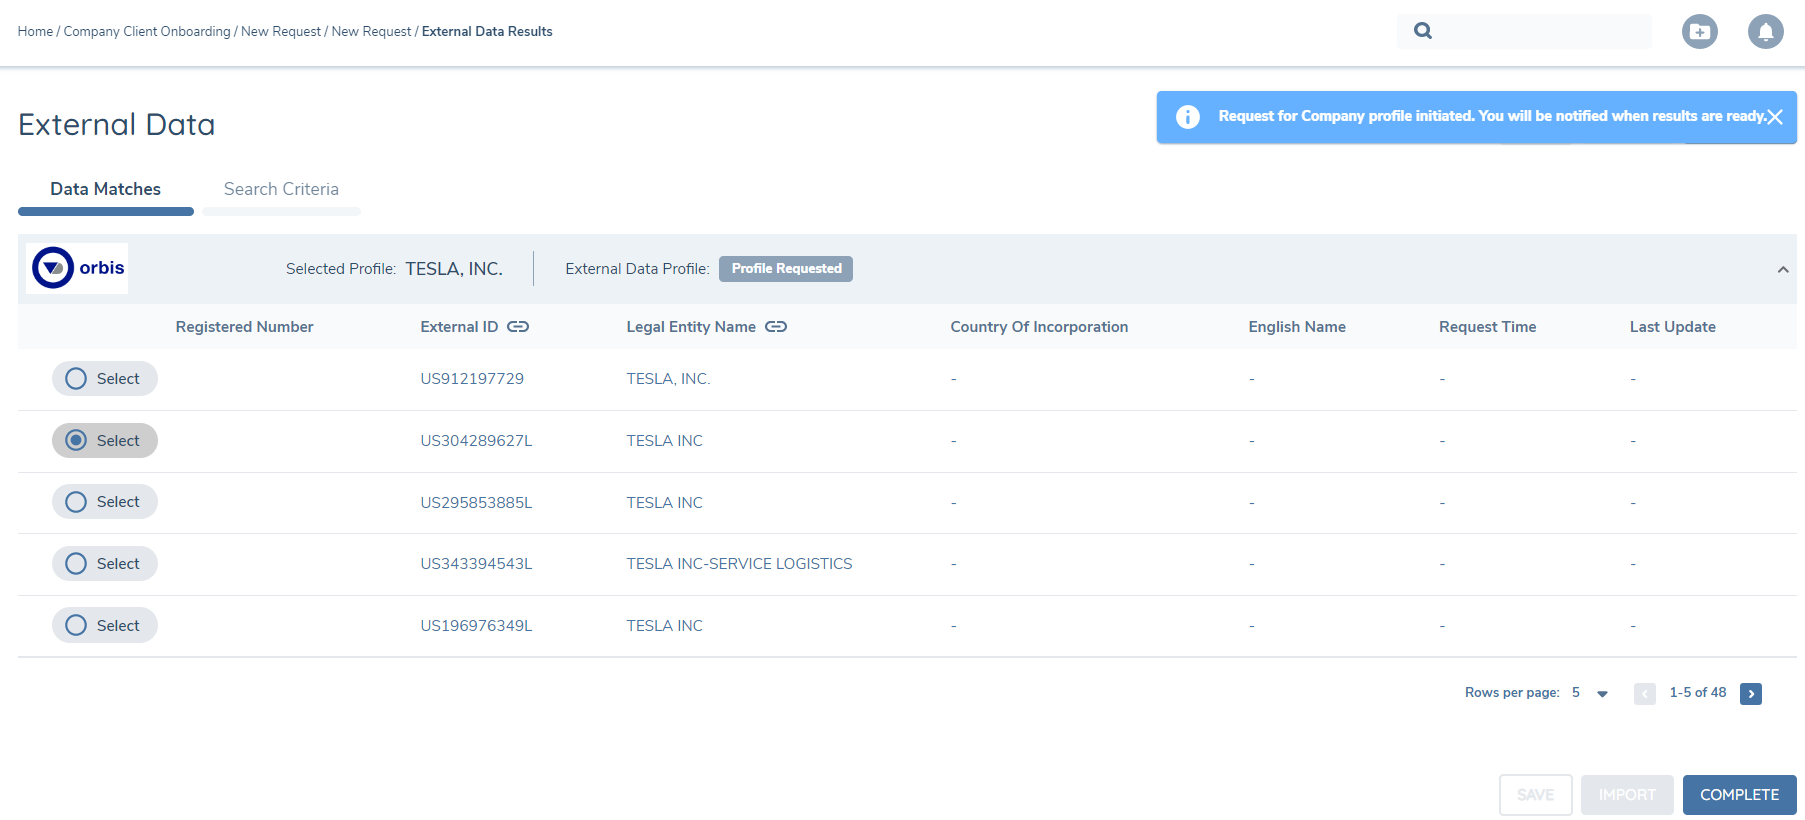
By pressing the "Select" radio button, Fenergo SaaS will request the more detailed customer profile for that record and the user will be presented with an Information Response in the UI (referred to as a Snackbar ) to inform the user that the request to retrieve the company profile has been initiated and that the user will be notified when the results are ready. The UI status indicator will also transition to Profile Requested.
Depending on the size and complexity of the customer profile, it may take up to 90 seconds to retrieve it from the data provider. While the user is waiting for the profile to be retrieved, the user can navigate away from the page and proceed with other work in the system, take bio break, grab a coffee, or answer a time sensitive email. The user is not required to stay on the page while they wait for the response from the data provider. The Notifications Bell located in the top right corner of Fenergo SaaS indicates the number of unread notifications for a Fenergo SaaS user. Once the customer profile has been retrieved from the data provider, a system notification is published, and the user sees the unread notification reflected in the bell icon:

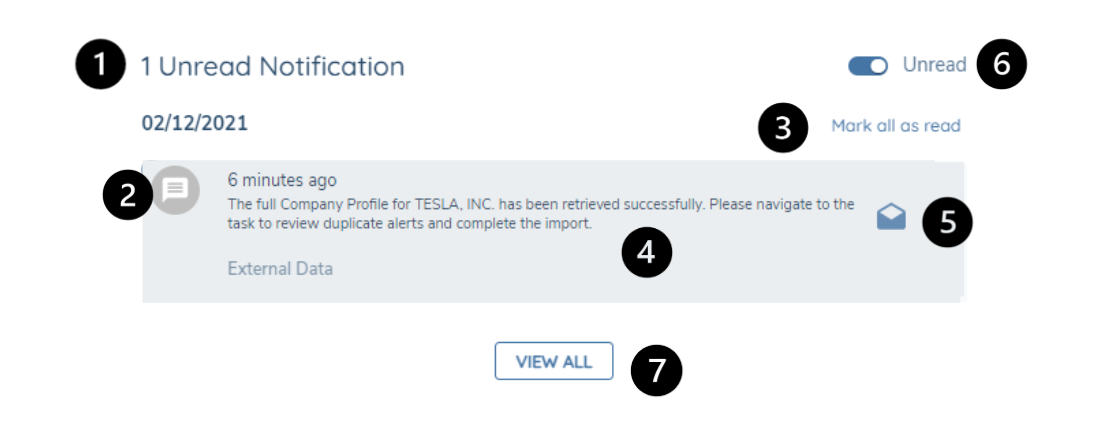
By clicking the bell, the user will expand the Notifications Popover which will display the notifications available to the user with the most recent presented at the top:
-
The header indicates the number of unread notifications in the user's notification inbox.
-
The "Blue Dot" icon indicates that the notification is 'Unread'.
-
Clicking this will set each notification in the inbox as 'Read'.
-
Clicking anywhere in the body of the notification navigates the user to the relevant journey and sets the notification to 'Read'.
-
This envelope icon allows the user to mark the specific notification as 'Read' if the message is unread and as 'Unread' if the message is already 'Read'.
-
This toggle allows the user to filter to show only 'Unread' or 'Read' notifications
-
Clicking this will navigate the user to their Notification Centre maintained on their user profile where they can see all their user notifications in a table view.
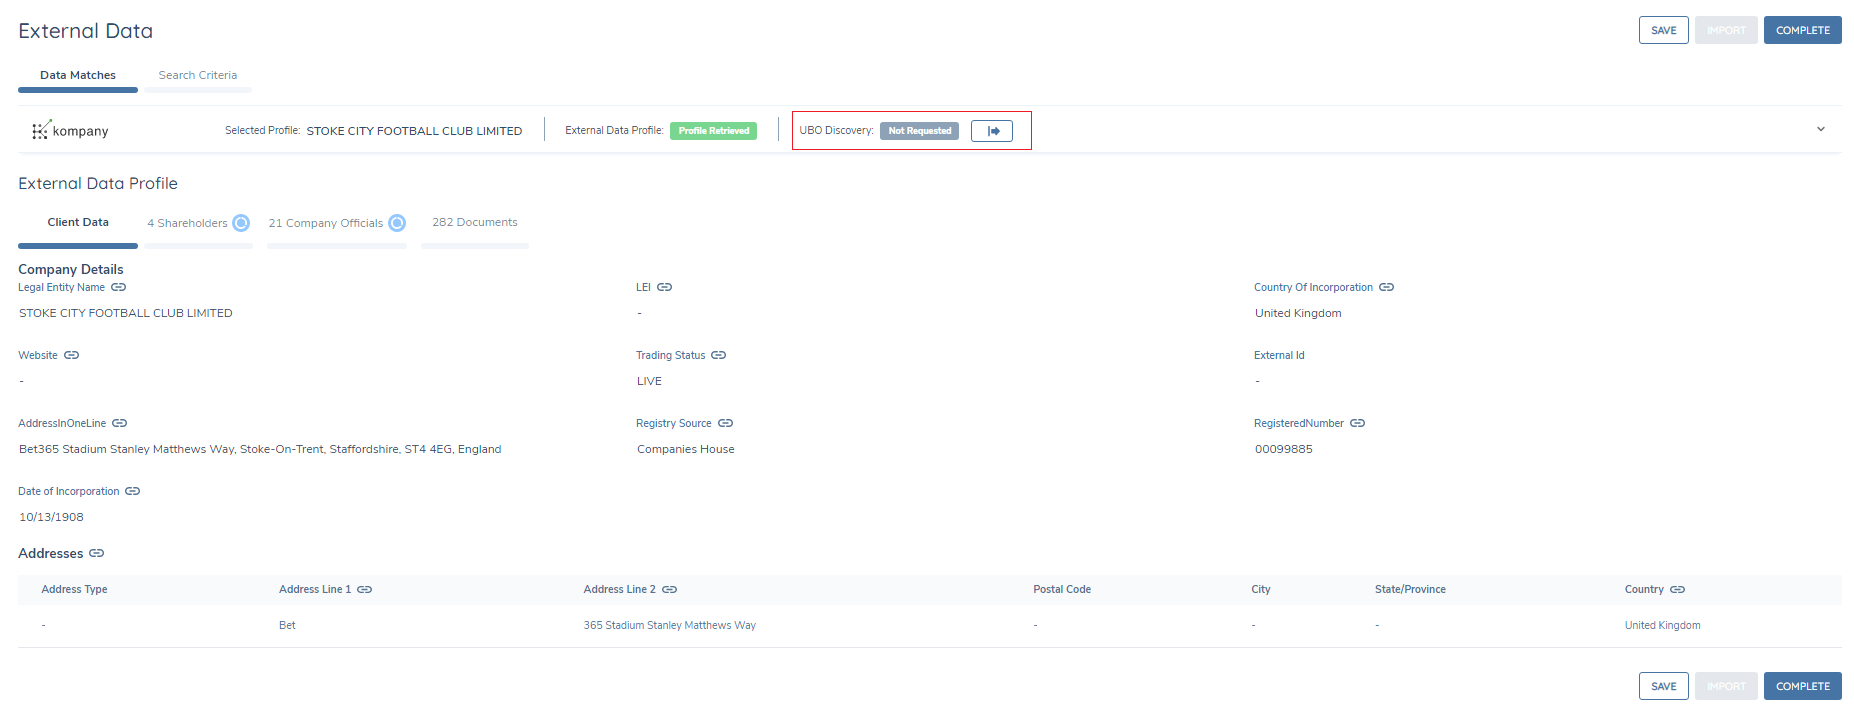
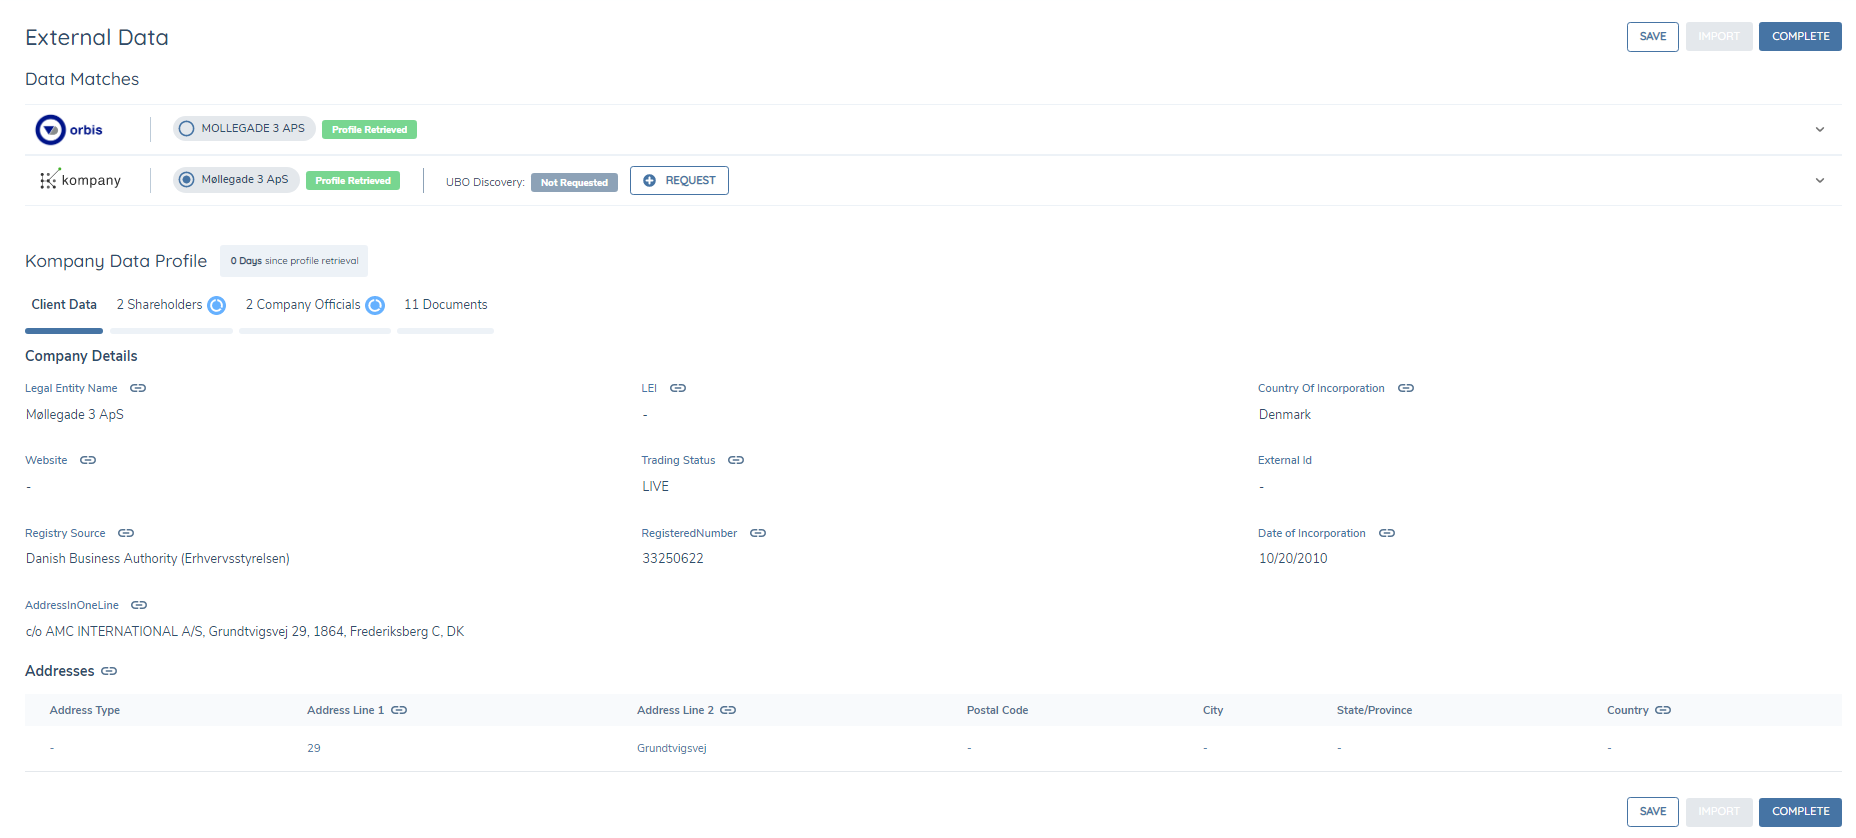
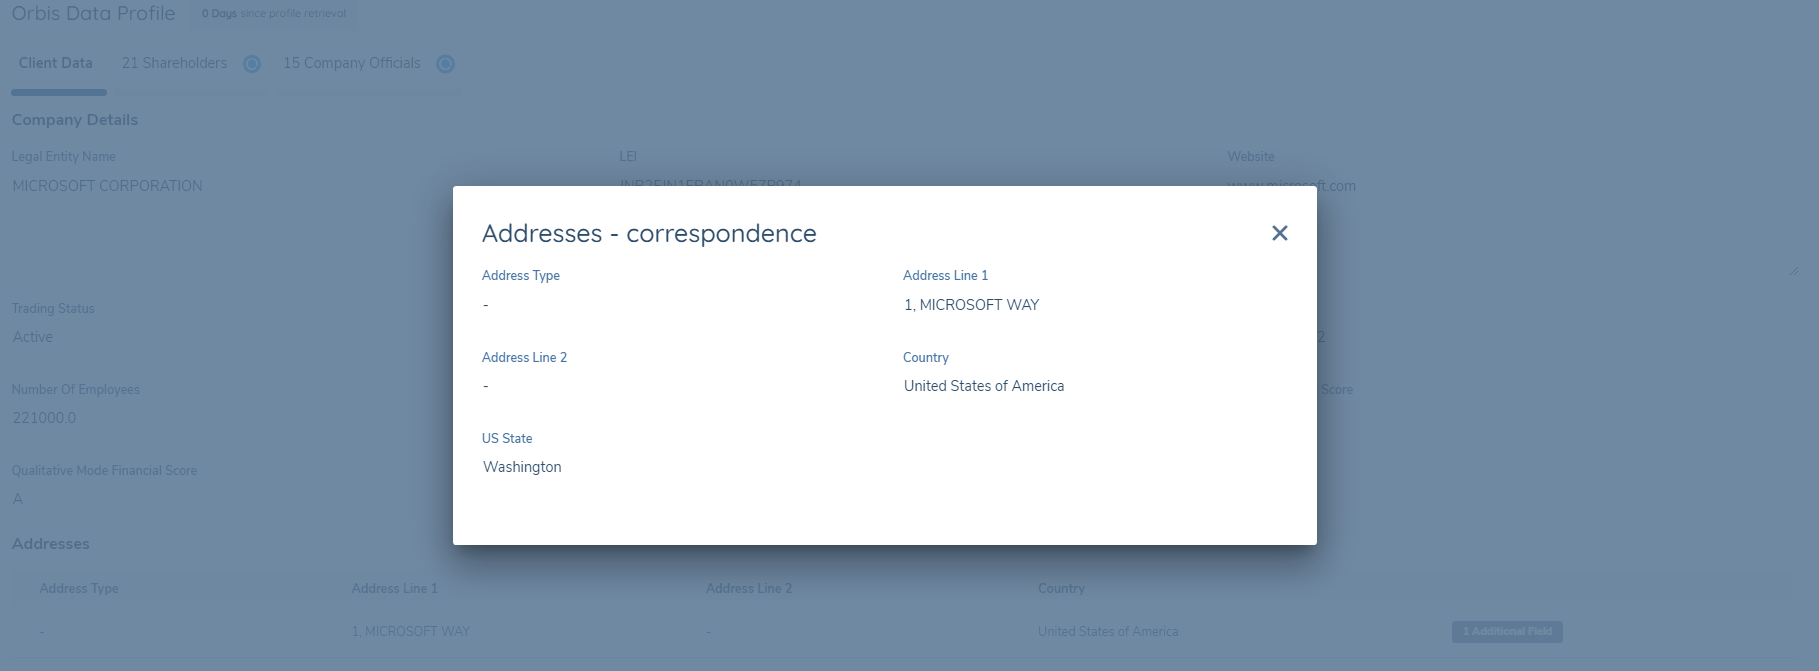
Once the profile is retrieved, the user is presented with tabs for the Shareholders and Company Officials and Documents (if applicable) that are available decisioning & import. The UI status tracker displays Profile Retrieved to indicate the successful retrieval of the full external data set.
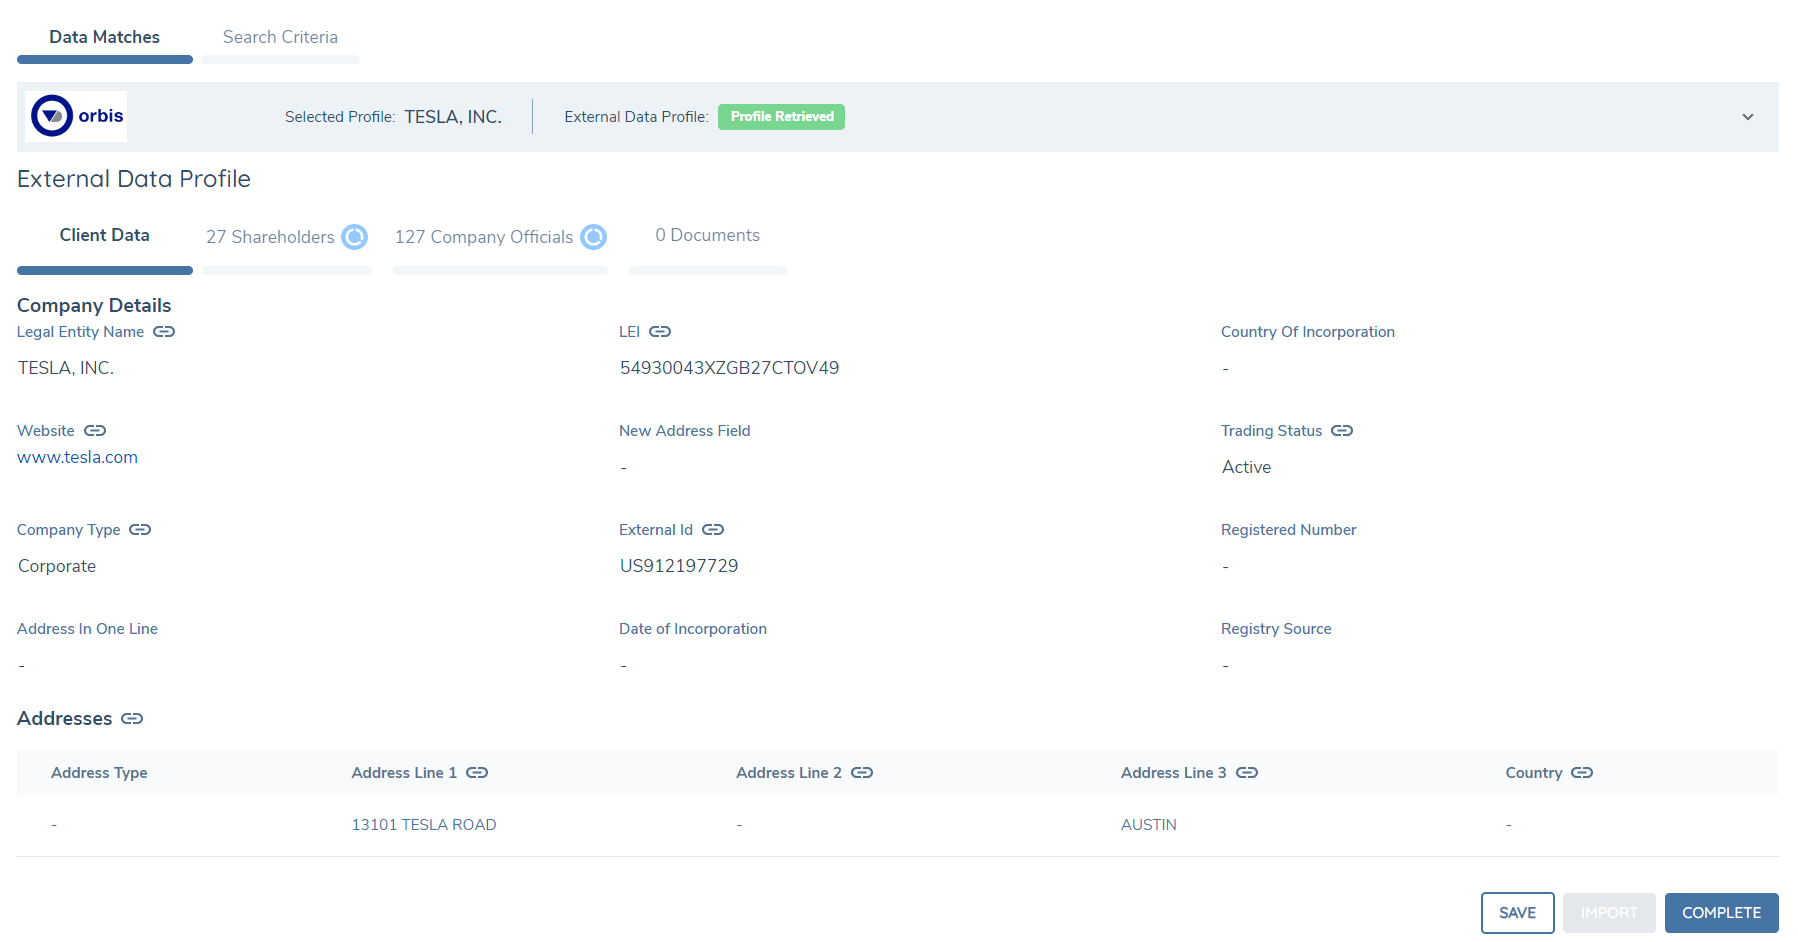
The fields that are displayed in the company details can be configured by using the policy category of External Data Results. Any field you add to that category will be displayed on this screen. If the Fenergo SaaS field has been linked to a Orbis field, then you will see the link icon appear beside it as in the above screenshot.
Related Party Duplicate Check and Resolution
When retrieving the Shareholders and Company Officials from the external data provider, Fenergo SaaS conducts a duplicate check to determine if any of the entities or individuals already exist inside the Fenergo SaaS Tenant.
Where an entity has no probable matches in Fenergo SaaS, Fenergo SaaS tags the entity in the UI with a New Entity badge to indicate that upon import a new entity shall be created:

Where an entity has probable matches in Fenergo SaaS, Fenergo SaaS tags the entity in the UI with a Review Matches badge to indicate to the user that action is required:

The user expands the record to see the list of Fenergo SaaS existing entities that represent probable matches for the entity:
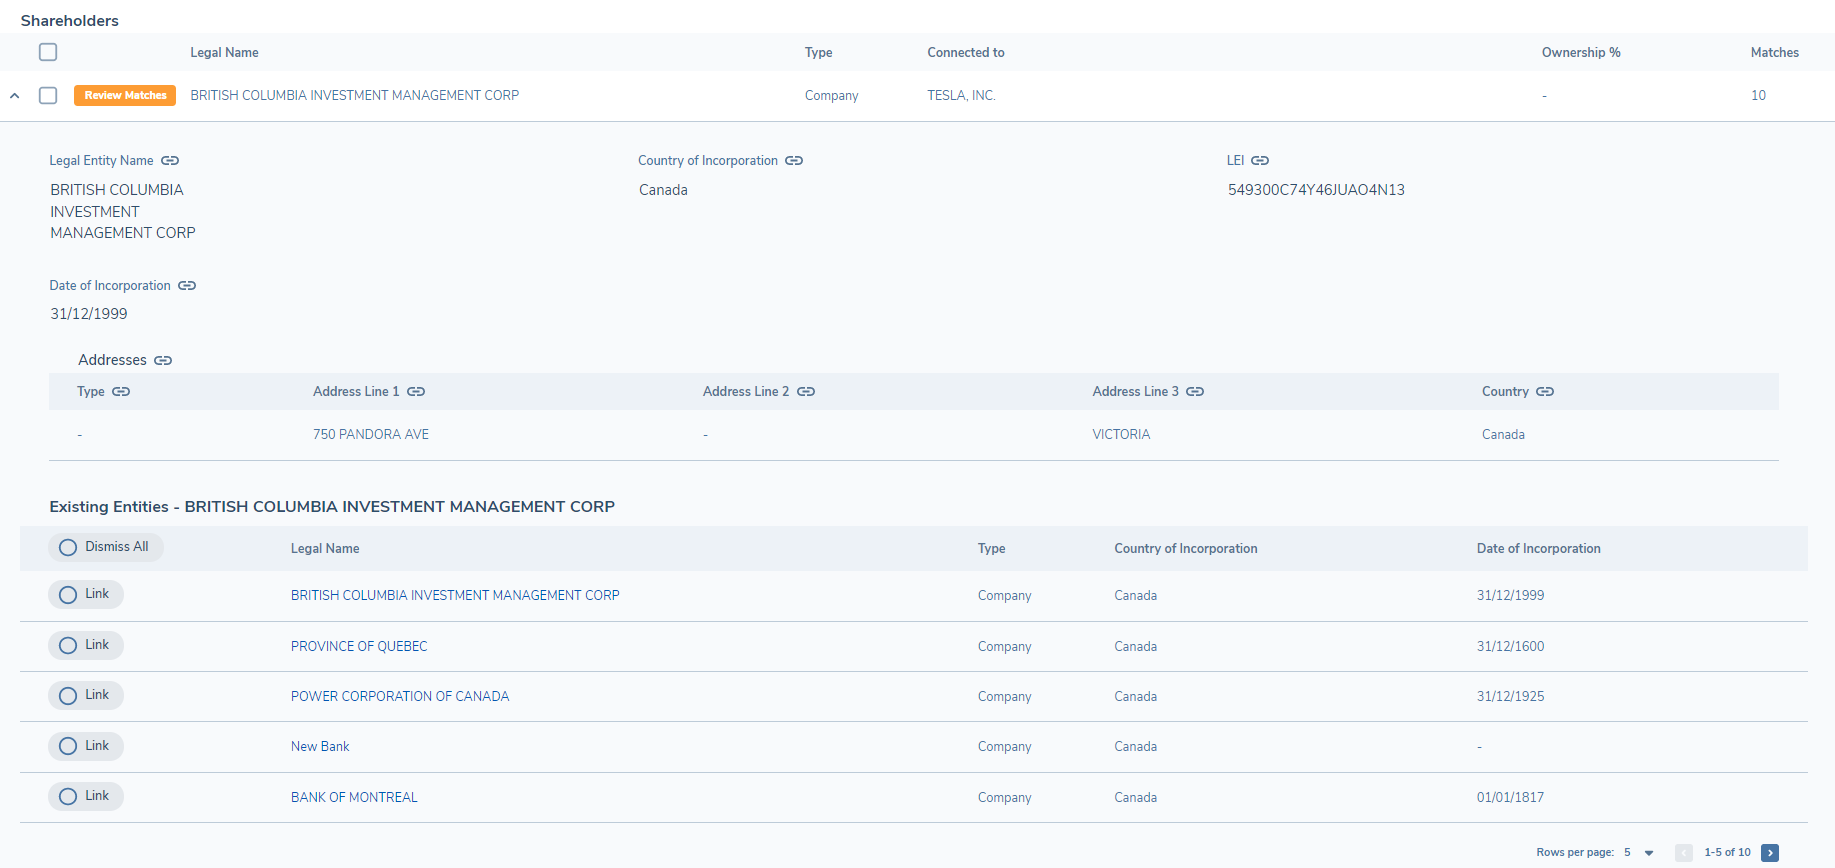
Where the Related Party is tagged as Review Matches the user is required to decision whether a new entity should be created ( Dismiss All ) or whether an existing entity should be used ( Link ).
In the above screenshot the Company or Individual Related Parties fields are configurable based off the External Data Related Parties Details policy category. If the Fenergo SaaS field has been linked to a Orbis field, then you will see the link icon appear beside it as in the above screenshot.
Dismiss All
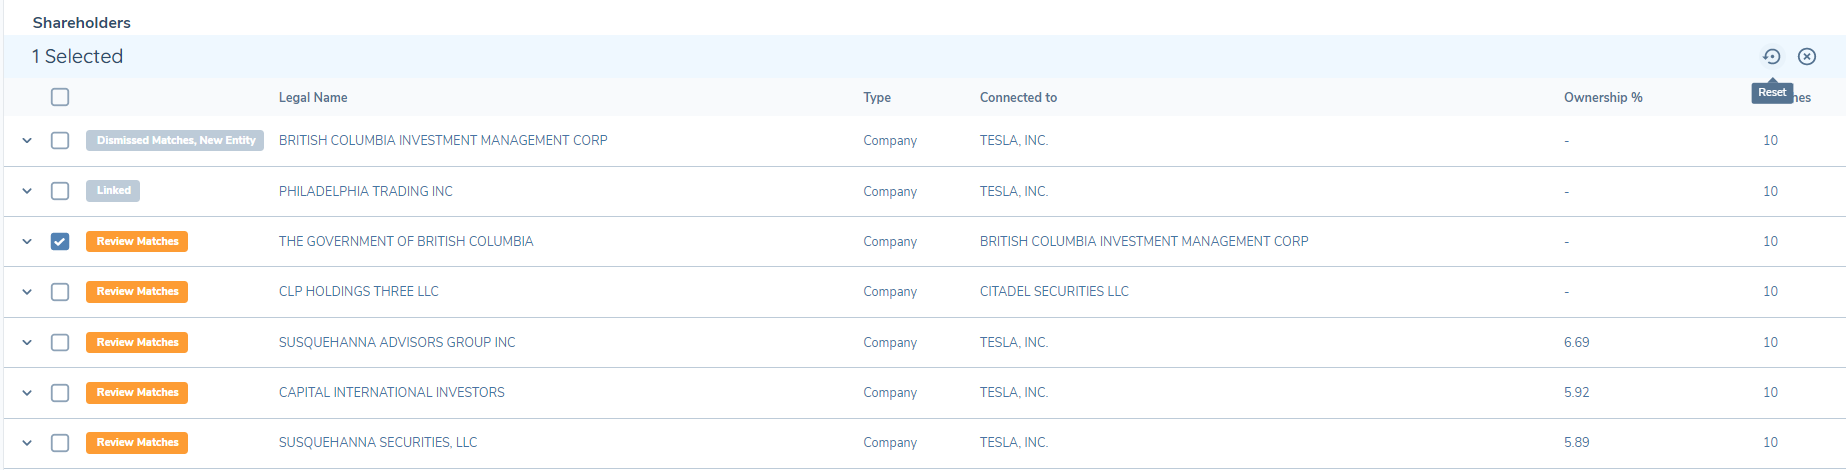
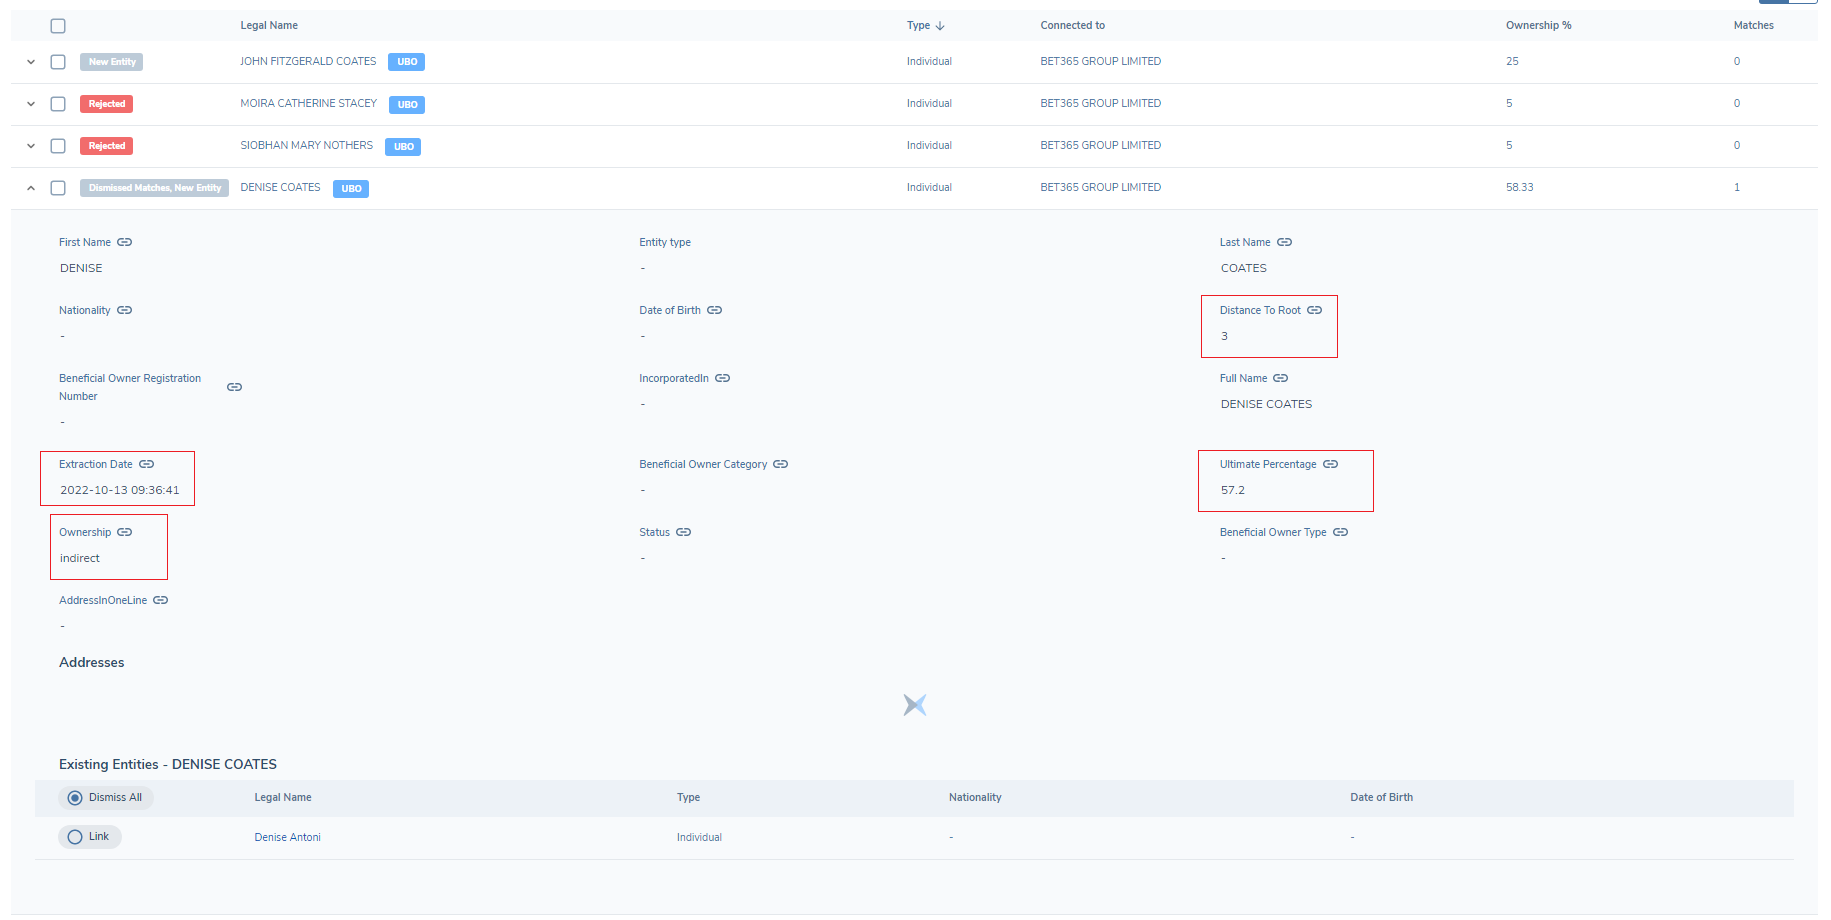
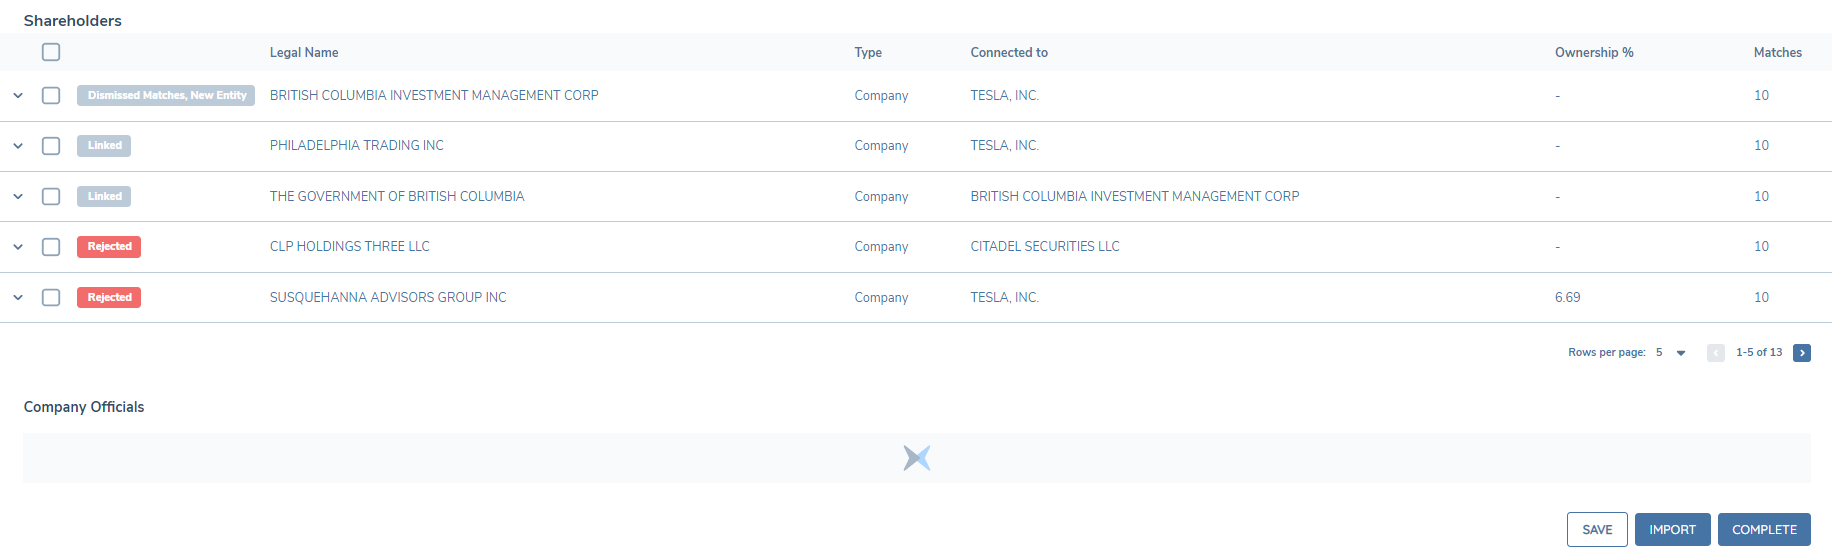
When "Dismiss All" is selected in the UI, the badge is automatically updated to Dismissed Matches, New Entity to indicate that all probable matches were discounted and that a new entity shall be created upon import:

Link
When "Link" is selected in the UI, the badge is automatically updated to Linked to indicate that no new entities will be created and instead the selected existing record shall be connected to the customer as the applicable related party:
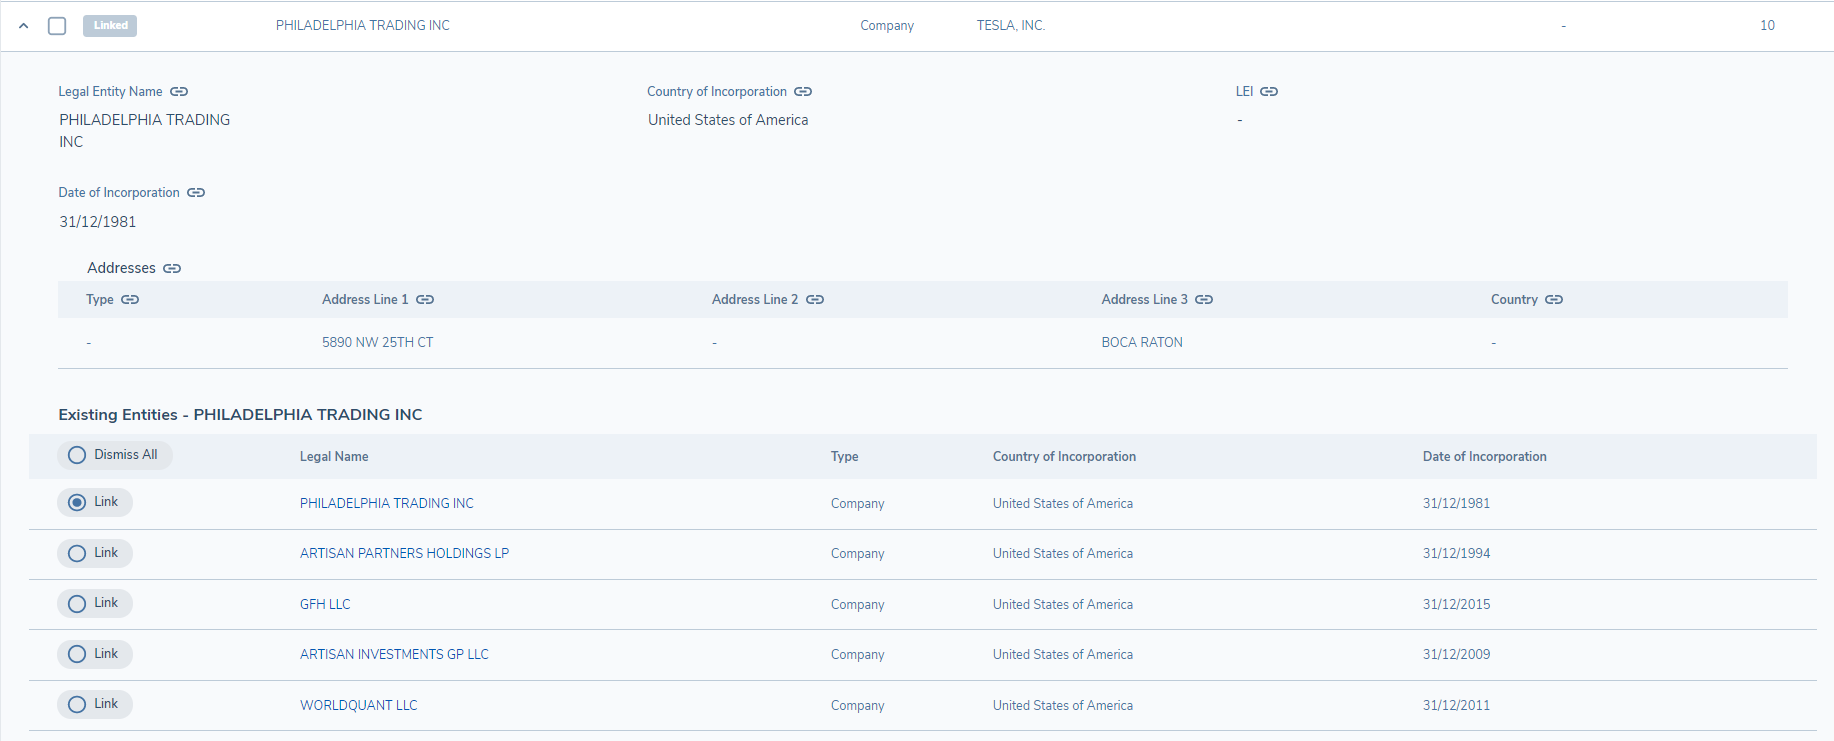
Furthermore, the existing selected record shall not have its entity data updated by the External Data Provider, upon the completion of the journey's verification process. Updates to the existing records entity data, should be done in the context of a new journey for that record.
Reject Related Party
Should the user not want to import a record (e.g., the External Data Provider has incorrect data OR the number of entities available exceeds the client's internal policy requirements for data capture), then the user may reject a record by selecting the record and pressing the "Reject" button.
A rejected entities' badge is automatically updated to Rejected to indicate that the entity shall not be imported to Fenergo SaaS. Furthermore, any other entity from the data provider that is exclusively connected to the rejected entity (e.g., subsidiaries or owners) shall also be set to Rejected by Association and shall not be imported to Fenergo SaaS:

Reset Related Party
If the user wants to revert a reject decision they have made on a record (e.g., revert from Rejected back to initial state), then the user may reset a record by selecting the record and pressing the "Reset" button.
A reset entities' badge is automatically updated to its original state. Furthermore, any other connected entity that was automatically rejected shall also be reverted to its initial state:
Resolving Unknown Entities
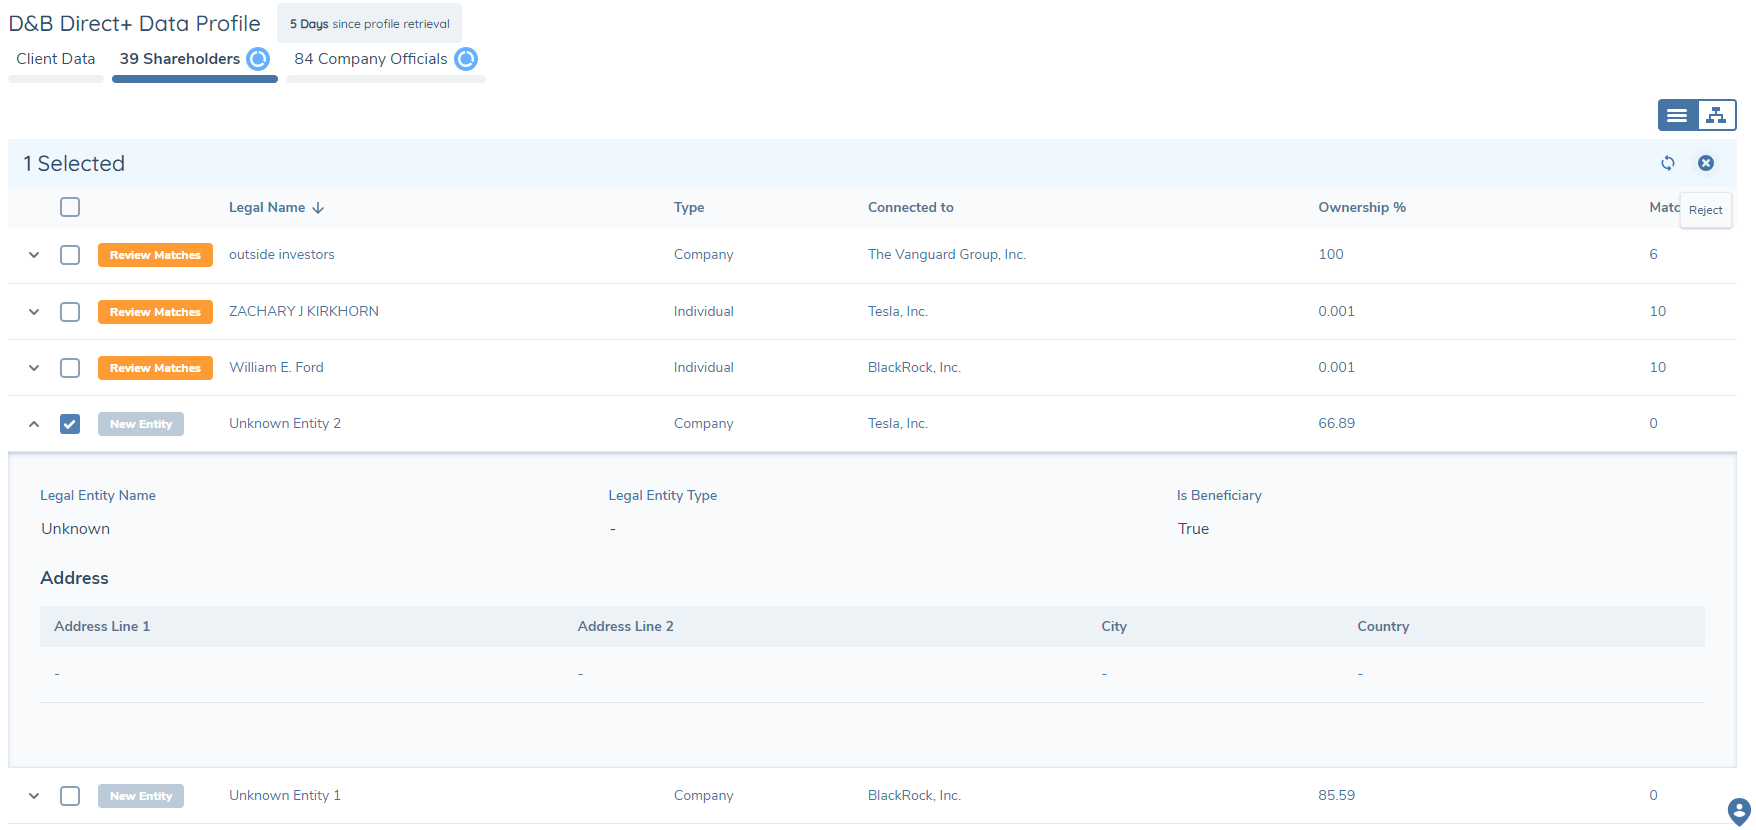
Dun & Bradstreet provides support for including or excluding unknown entity associations in the retrieved profile. An "Unknown Entity" represents a placeholder for missing ownership information. This typically occurs when the total ownership percentages for a company do not sum up to 100%. To account for this discrepancy, a pseudo-entity named "Unknown Entity" is added within the ownership hierarchy. This entity is non-material and has no data other than an implied share percentage.
If the retrieval of unknown entities is enabled in the D&B provider configuration, these entities will be included in the retrieved profile (if present).
Users can see these unknown entities within the Shareholders tab:
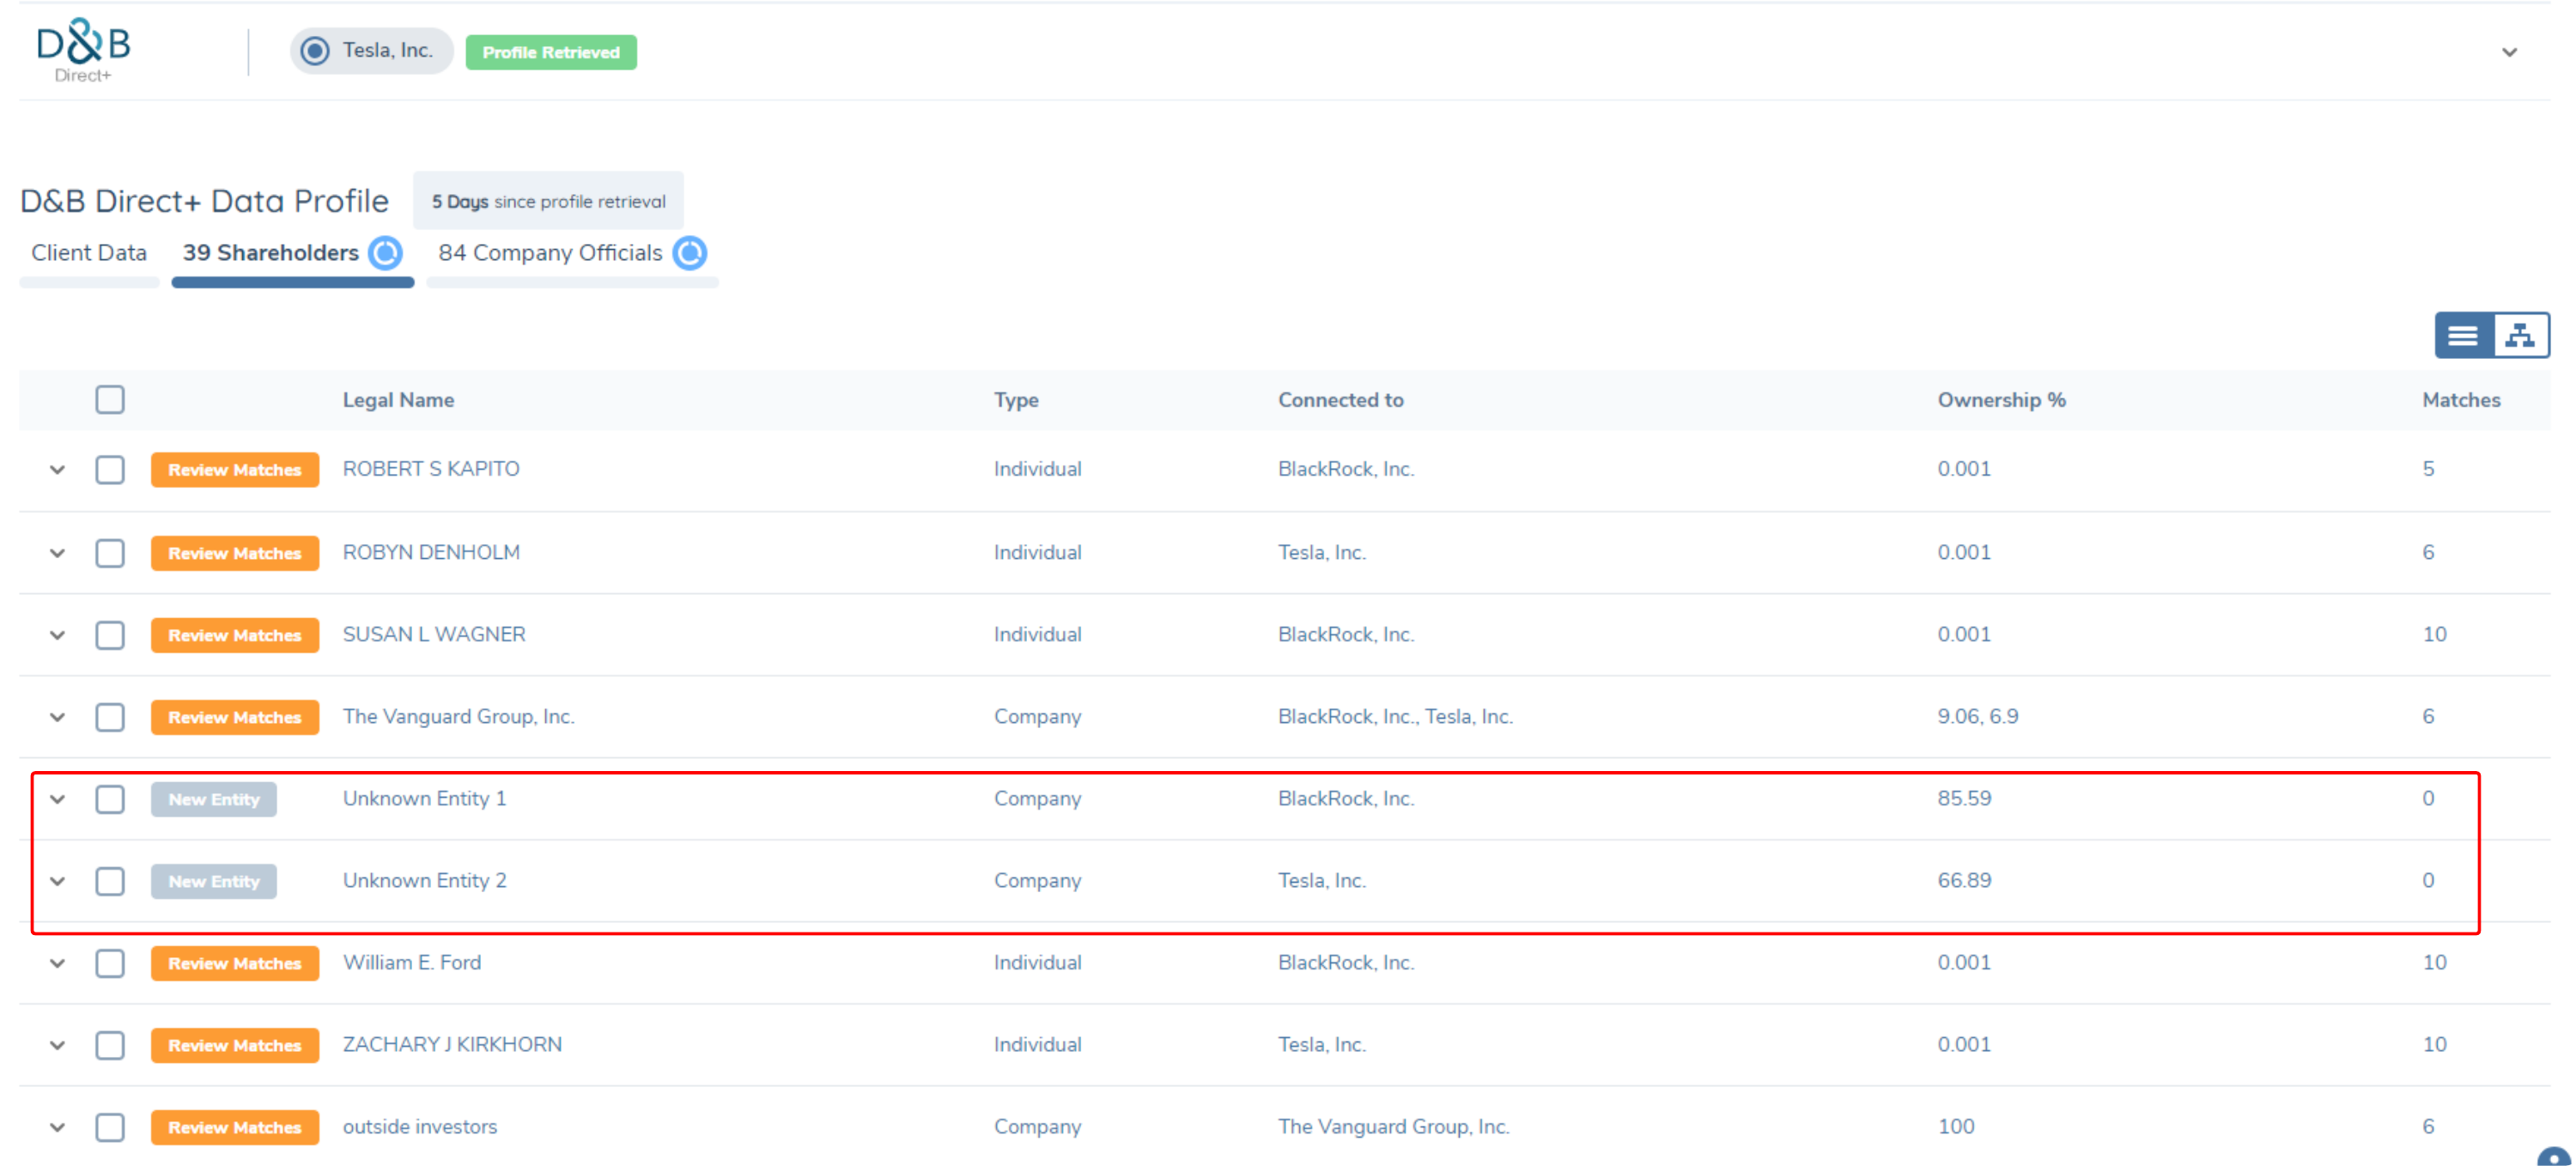
In cases where unknown entities are included, users must review and manually reject these entities if they do not wish to import them into the related parties. This ensures that only relevant and verified data is imported into Fen-X:
Hierarchy Viewer (BETA Version)
A BETA version alternative view of the Hierarchy is available to view in Organogram format.
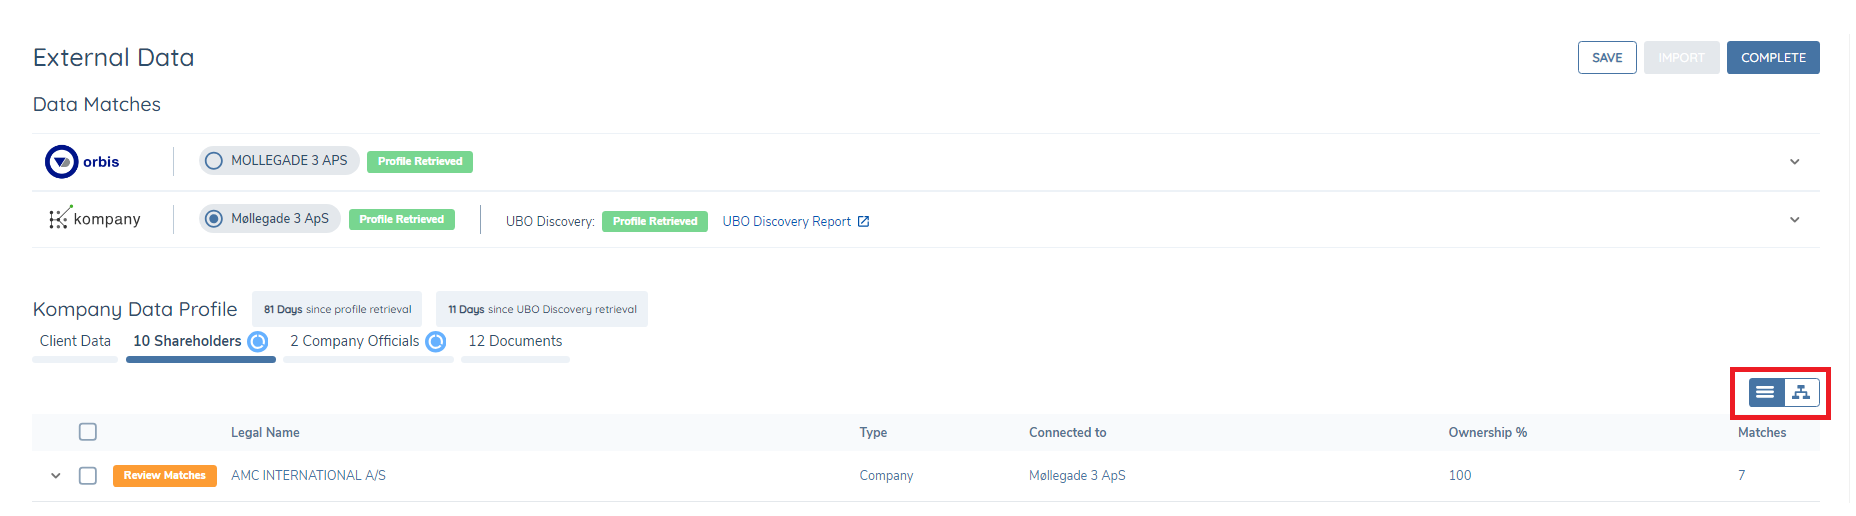
To display the Hierarchy in Organogram format the user must first click on the Shareholders Tab and once inside the tab, click on the Organogram Icon button on the right hand side of the screen.
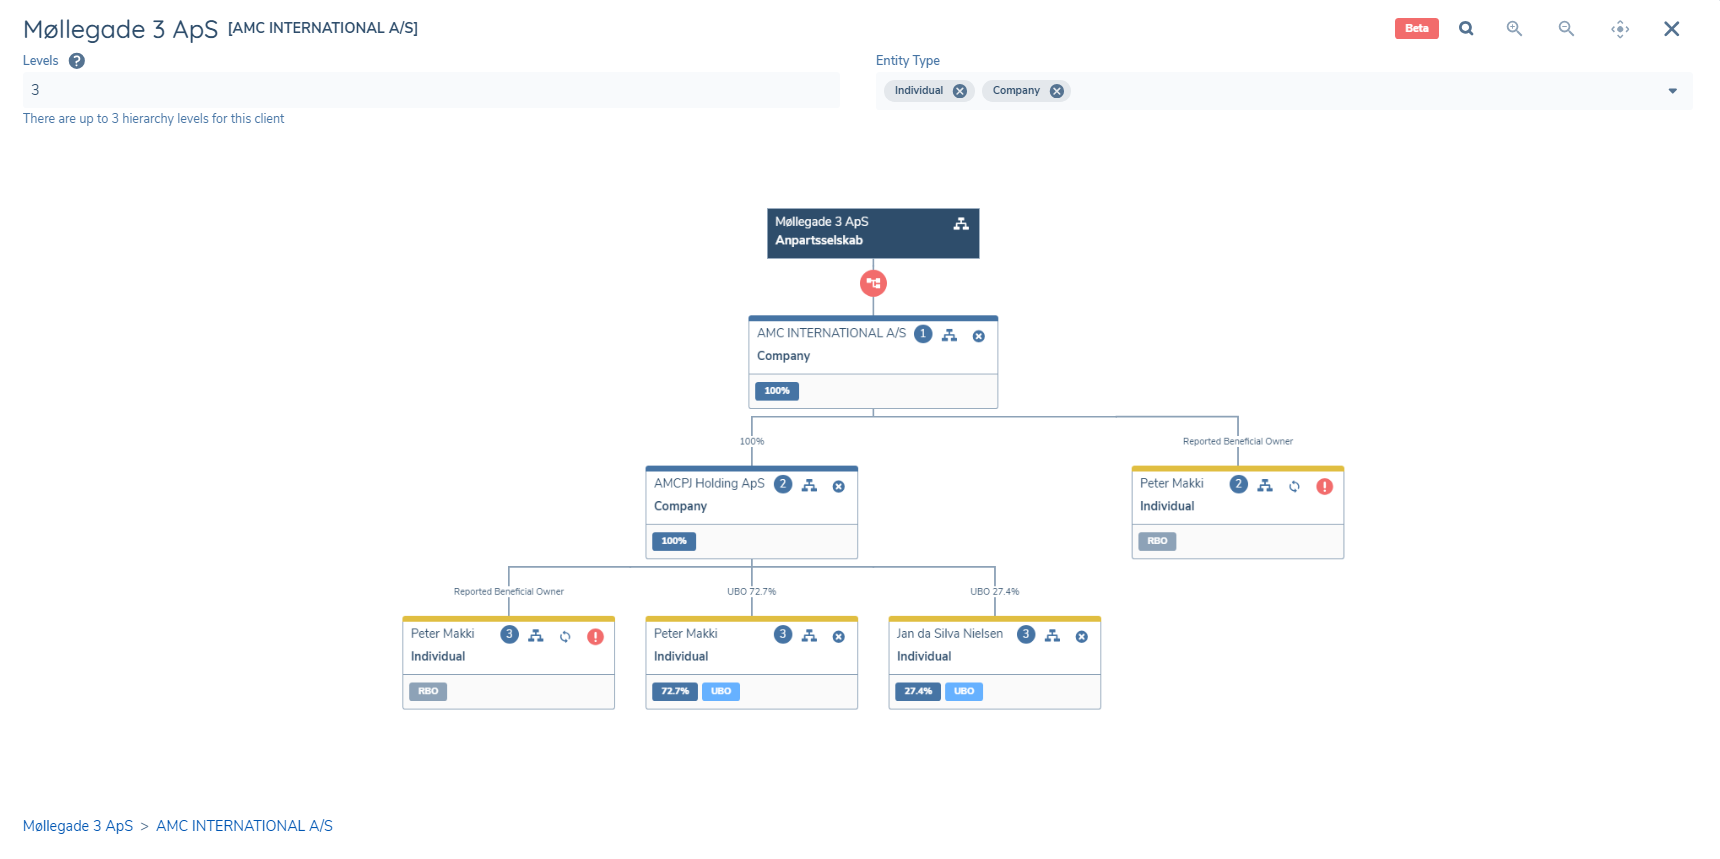
The Hierarchy Viewer Modal will open and display the Hierarchy.
The modal contains a number of features for controlling how the user views the Hierarchy. The user can select the Entity Type from the multi-select dropdown. Individual and Company types are supported. The user can also select the number of Levels they would like to view in the Hierarchy (Default is 3 levels). Standard controls also exist to Zoom in or out, and also to centre the Hierarchy in the Modal.
When a selection has been made the user must click the Search Icon button to refresh the search results.
There are a number of contols available from inside the Nodes in the Hierarchy also which replicate the behaviour from the standard tabular view.
- Reject: The x icon inside the node allows the user to reject that entity.
- Reset: The reset icon inside the node allows the user to reset the entity.
- Move to Top: The organogram icon inside the node allows the user to move this node and its children, to the top of the hierarchy.
The user can exit the modal by clicking the X icon.
Note: The Hierarchy viewer is restricted to 200 Nodes for the current version. Larger Hierarchies will show a user message on the screen to inform the user.
Connected To Column in Shareholders and Company Officials Tabs
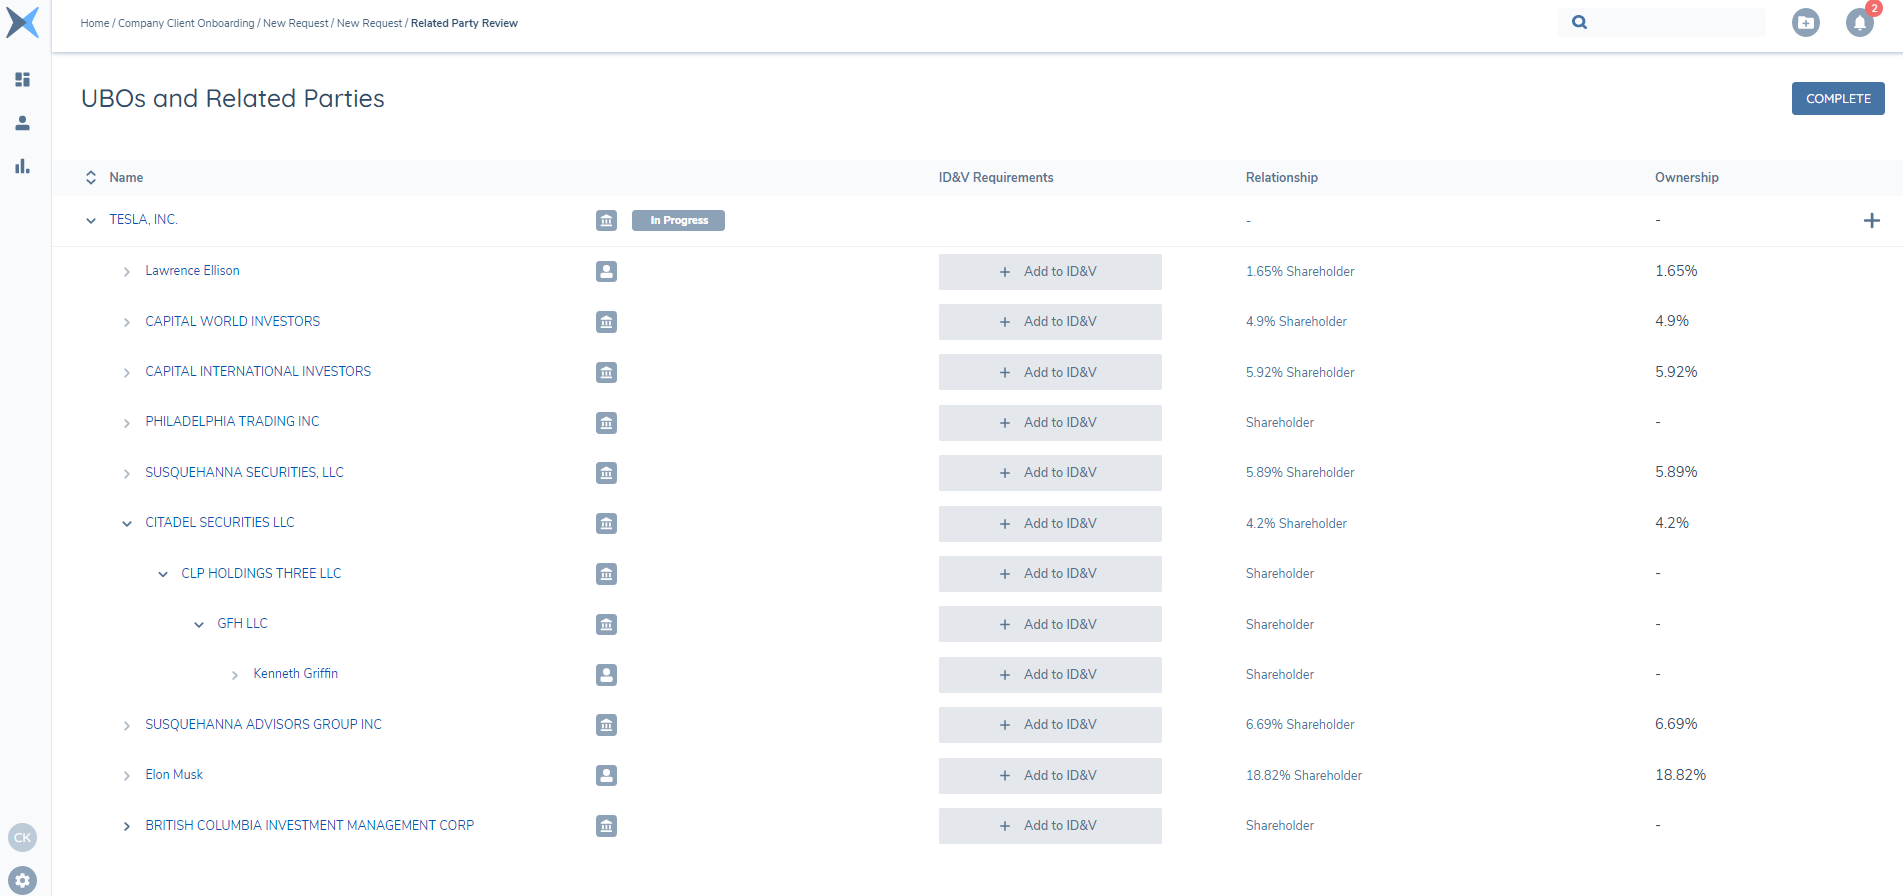
The "Connected To" column helps users understand the ownership structure by indicating which entity owns which. This is important for visualizing the hierarchical ownership and identifying the parent entities of the retrieved profile.
This column has previously been available only in the Shareholders tab:
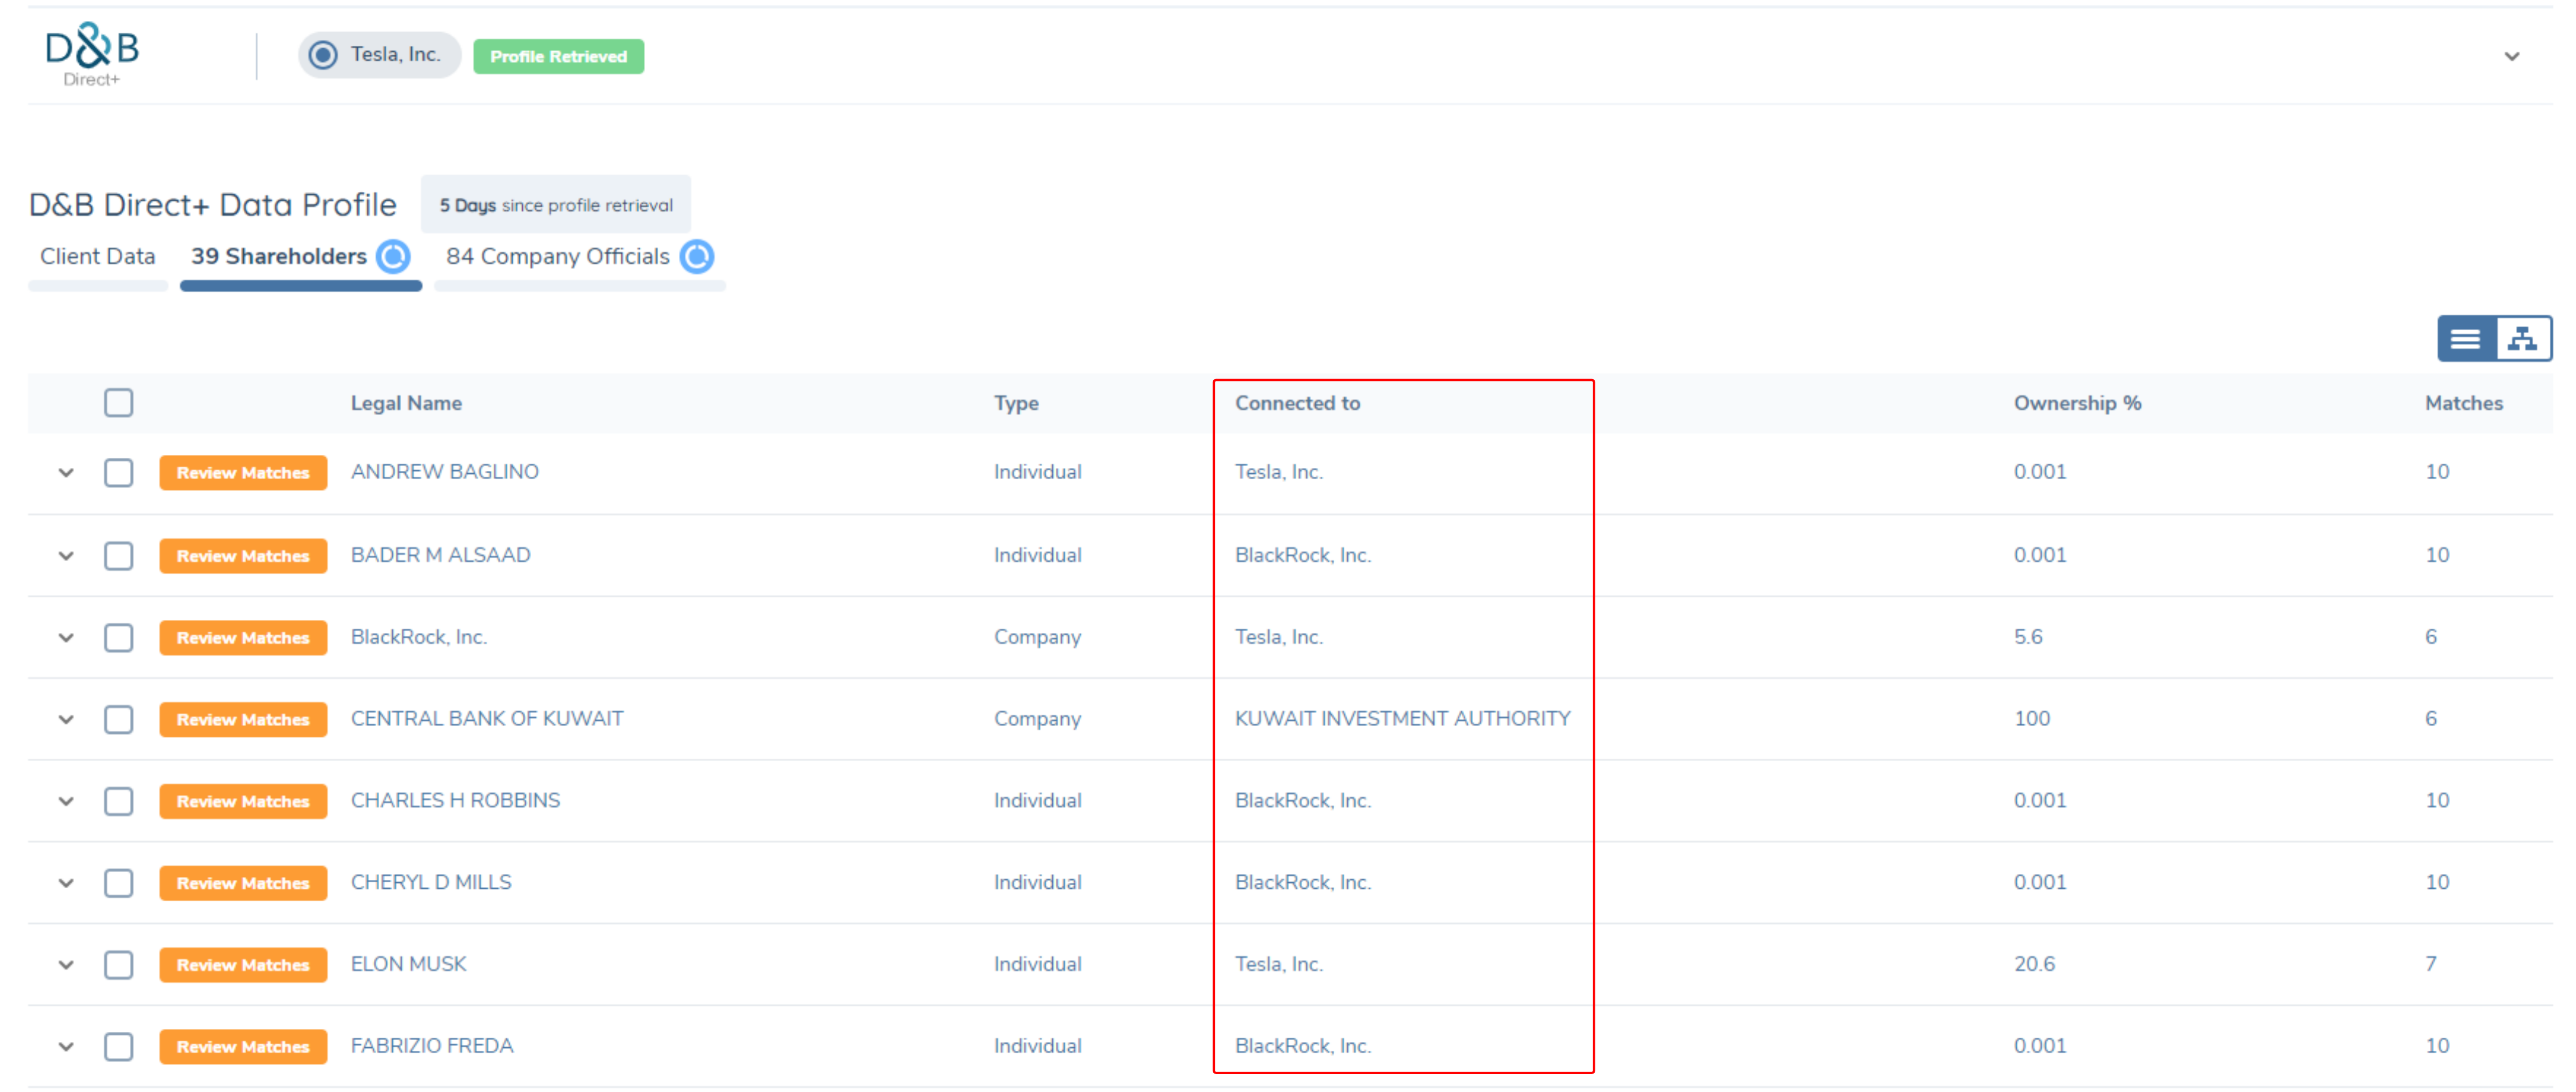
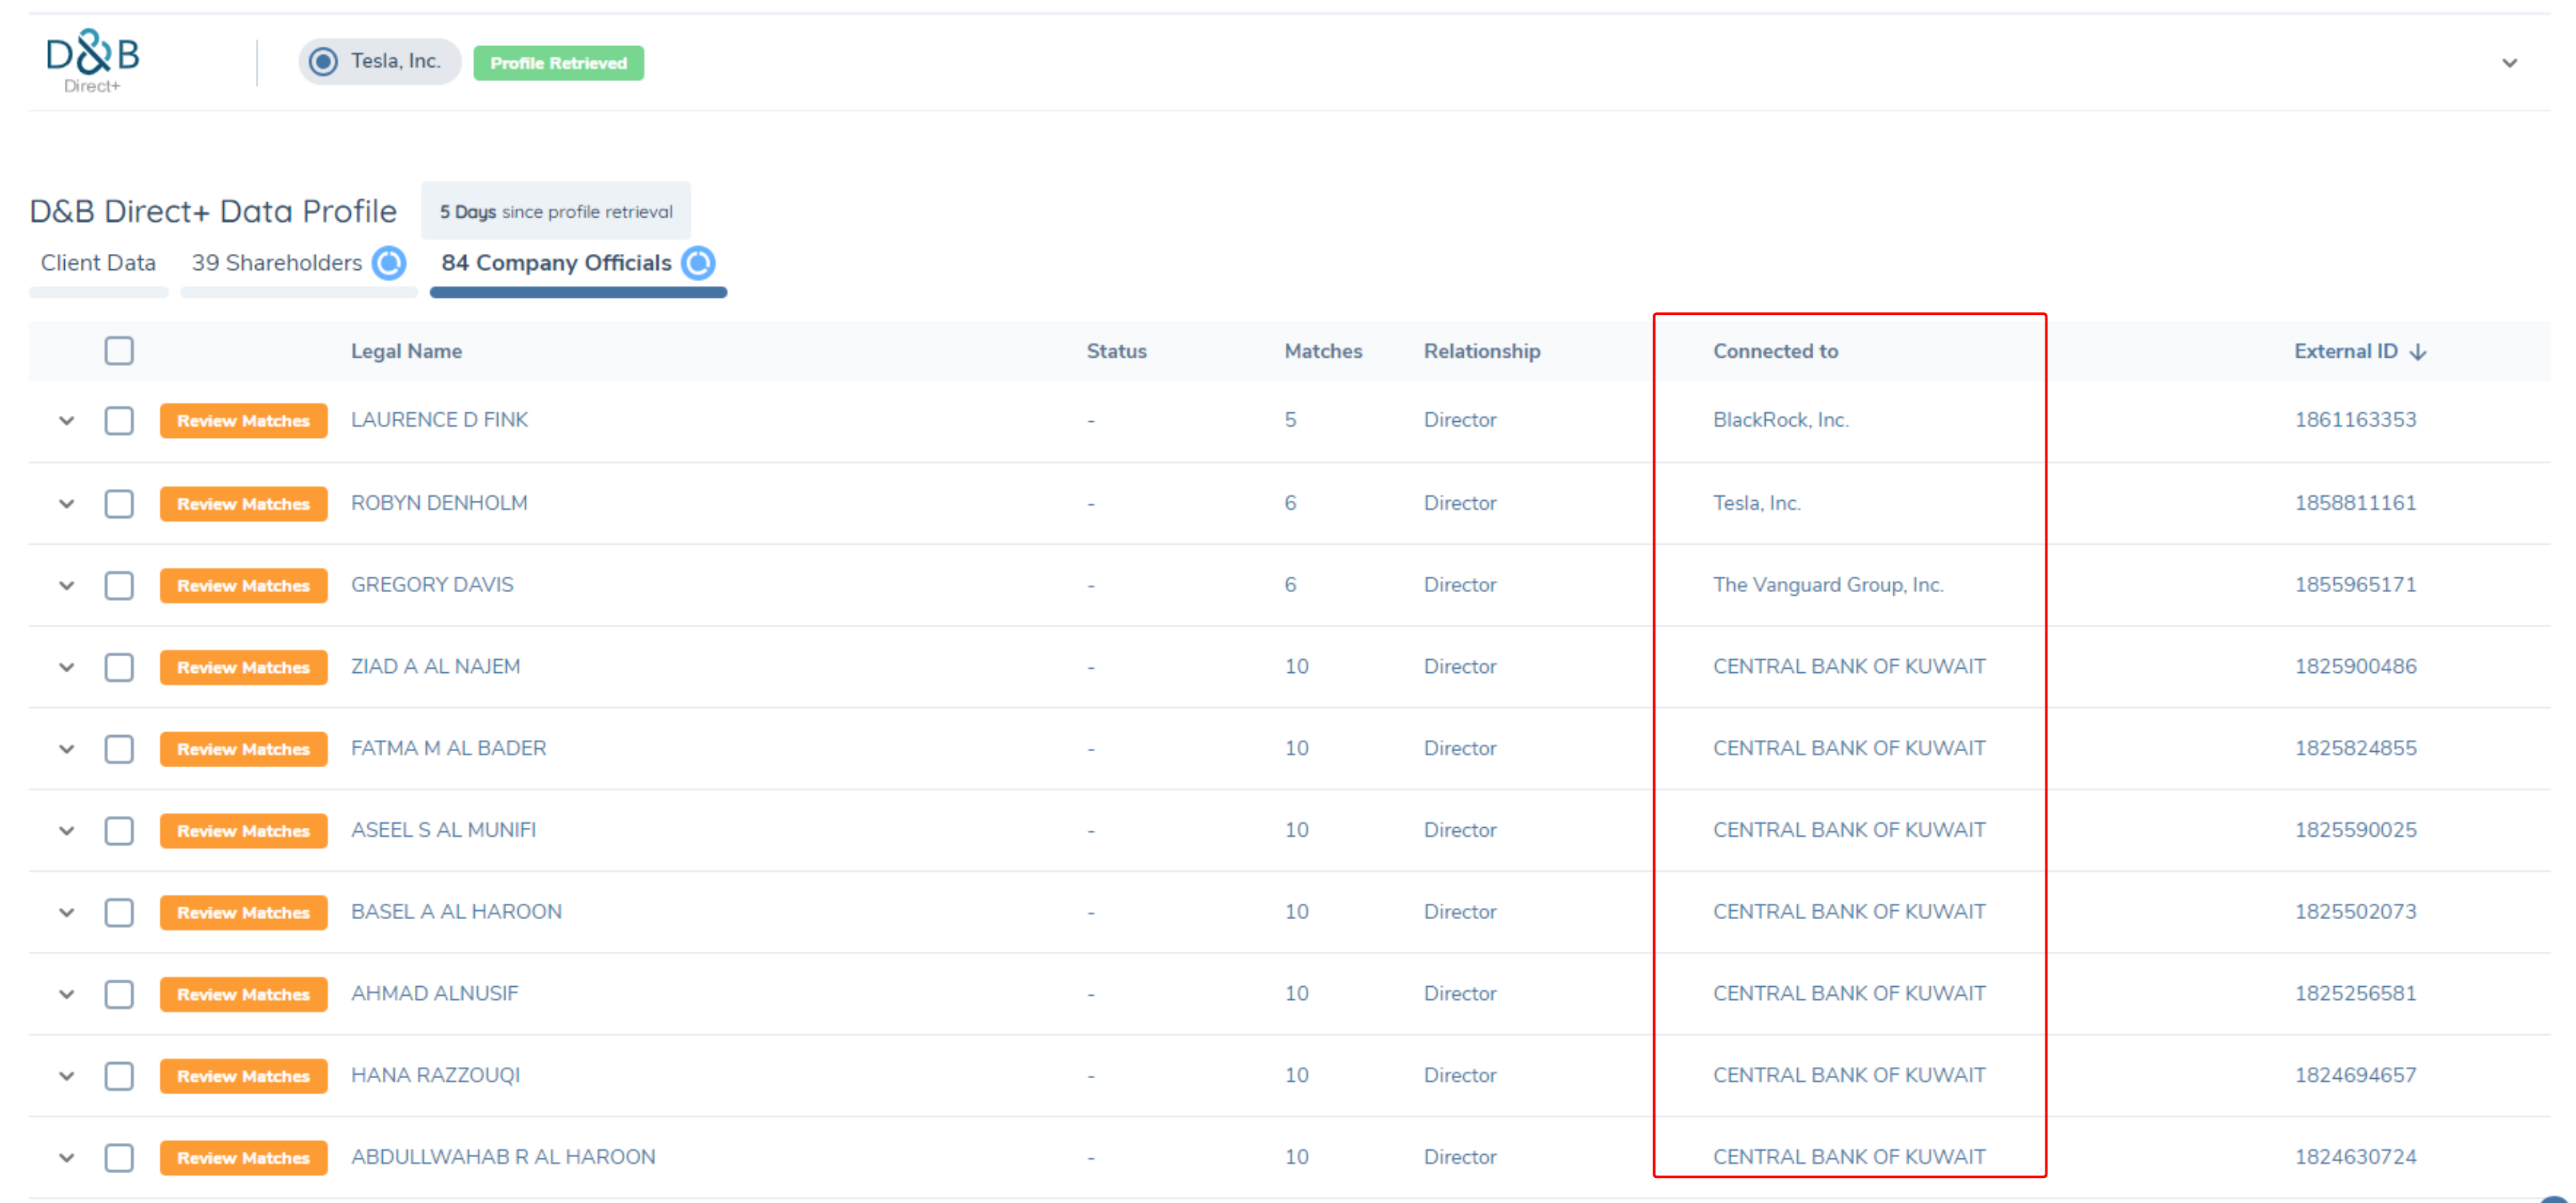
The "Connected To" column has now been extended to the Company Officials tab. This provides users with a comprehensive view of company officials, including the directors of the retrieved entity and the company officials of associated entities, such as directors of companies that own the entity. The update allows users to understand the relationships between the company officials and the entities they are associated with, giving a clearer picture of the governance and control structures within the retrieved profile.
The updated UI, as shown in the image below, shows Dun & Bradstreet returning company officials of associated entities:
Documents
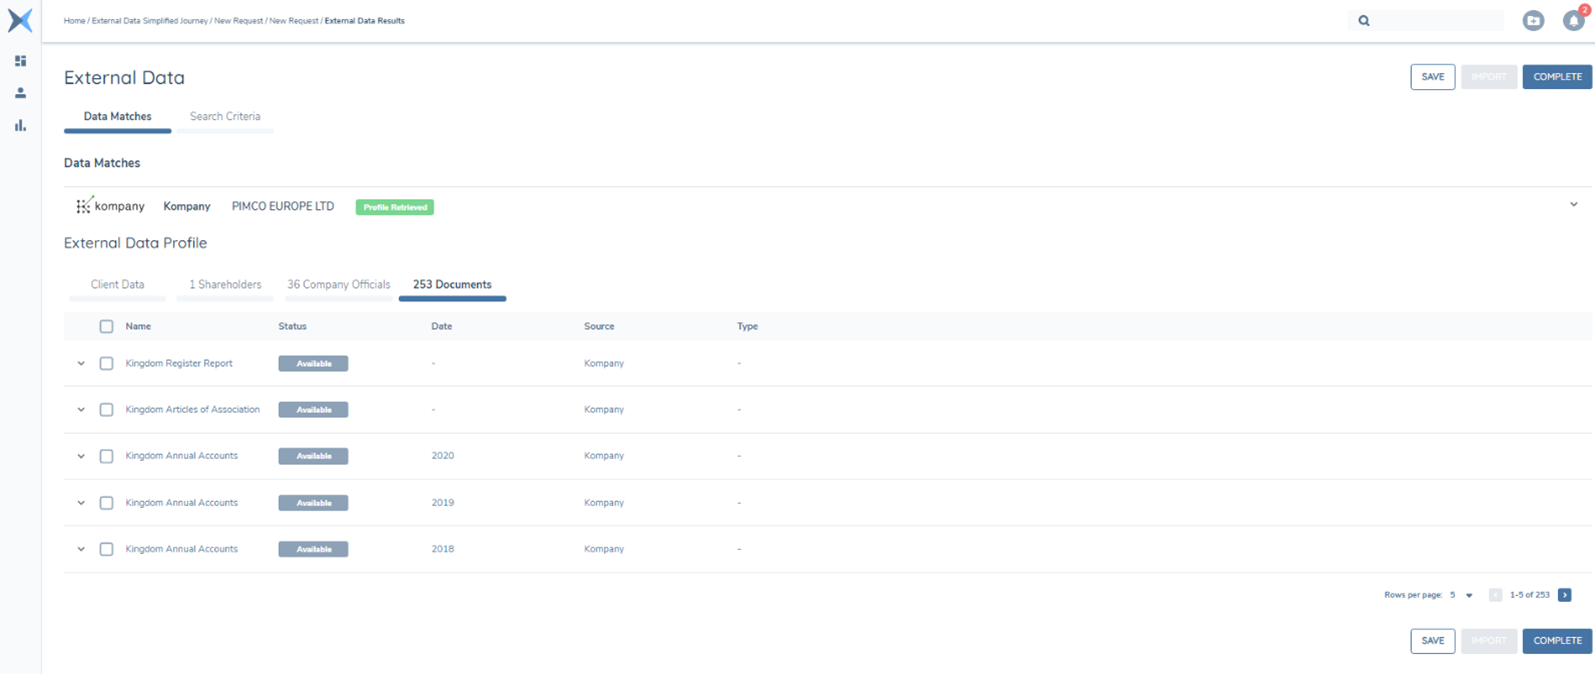
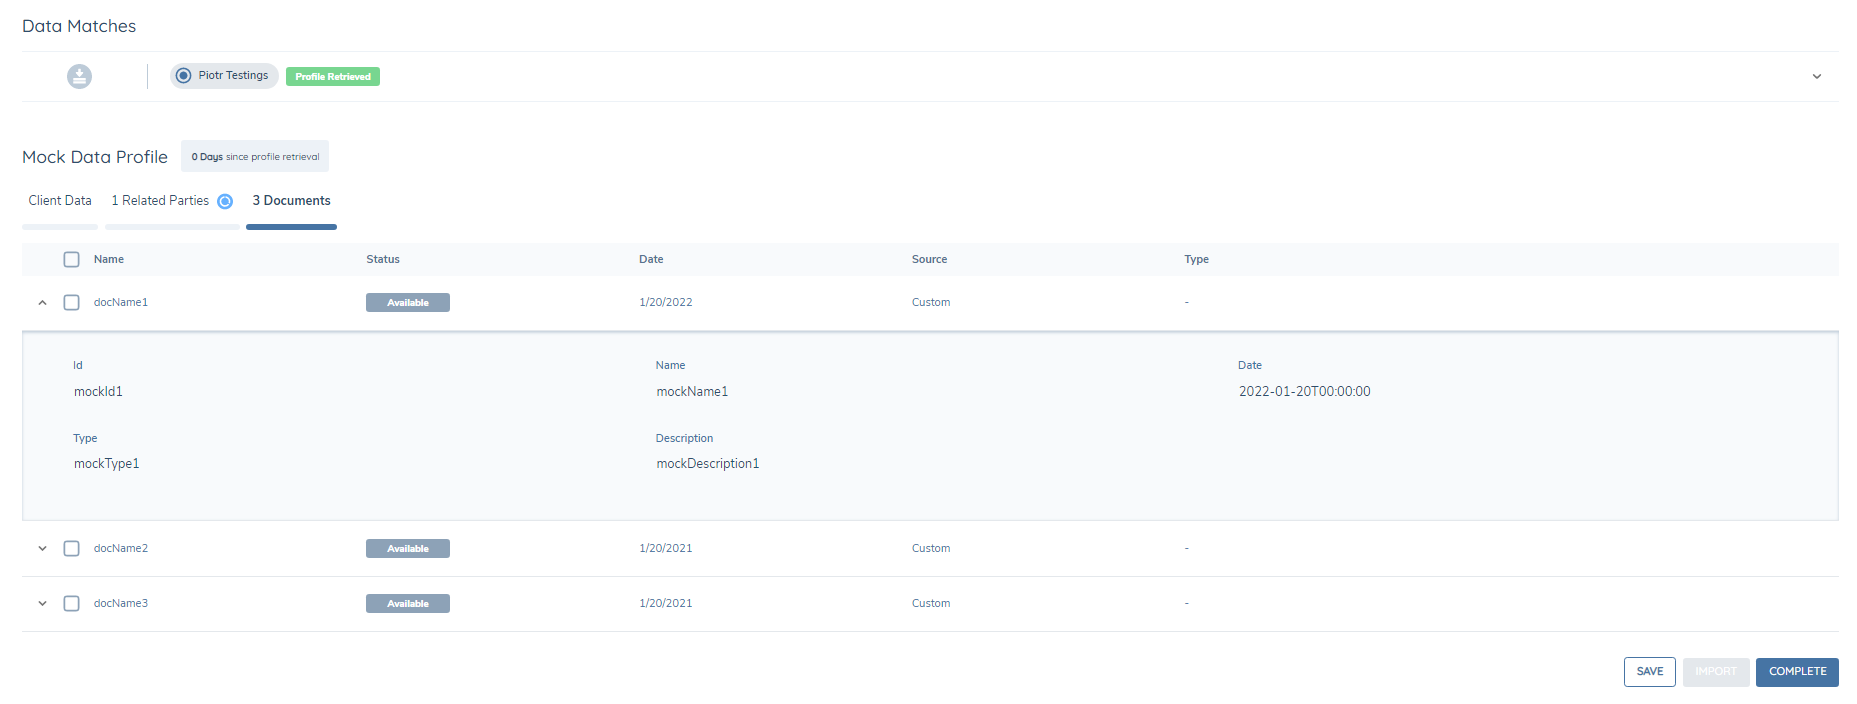
Not all Data providers provide support for Documents. Kompany does. When the Entity Profile call is made, Kompany will return a list of all available Documents for the chosen Company.Not all Data providers provide support for Documents. While the Orbis and Dun & Bradstreet providers do not, Kompany does. When the Entity Profile call is made, Kompany will return a list of all available Documents for the chosen Company. If there are any documents available for the chosen Company, the list of documents becomes available when the Documents Tab is clicked:
Requesting Documents (Kompany)
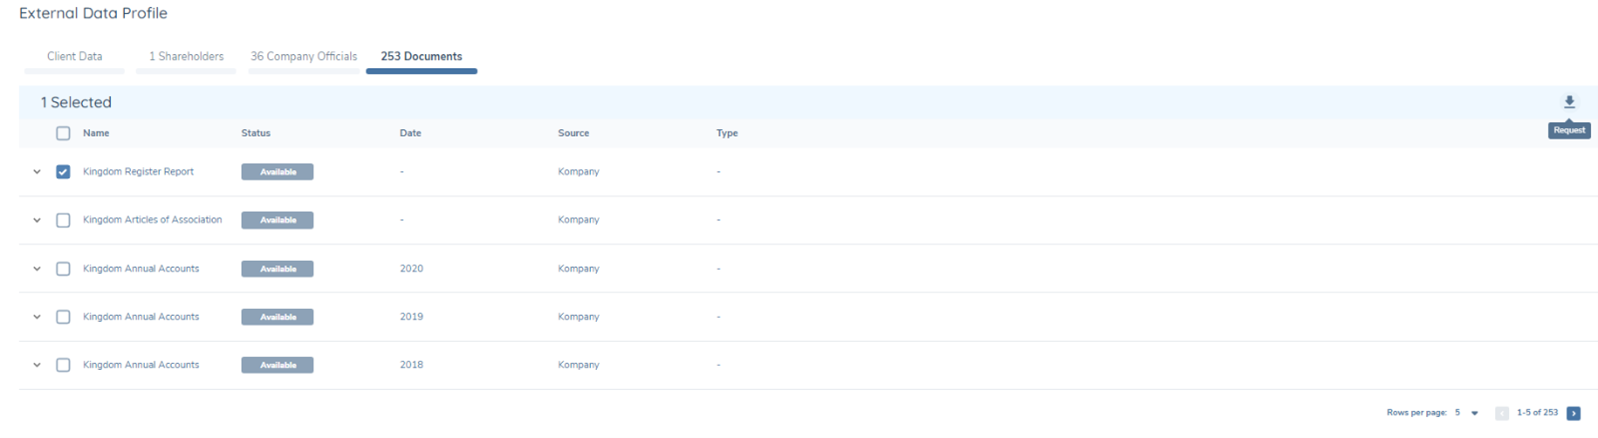
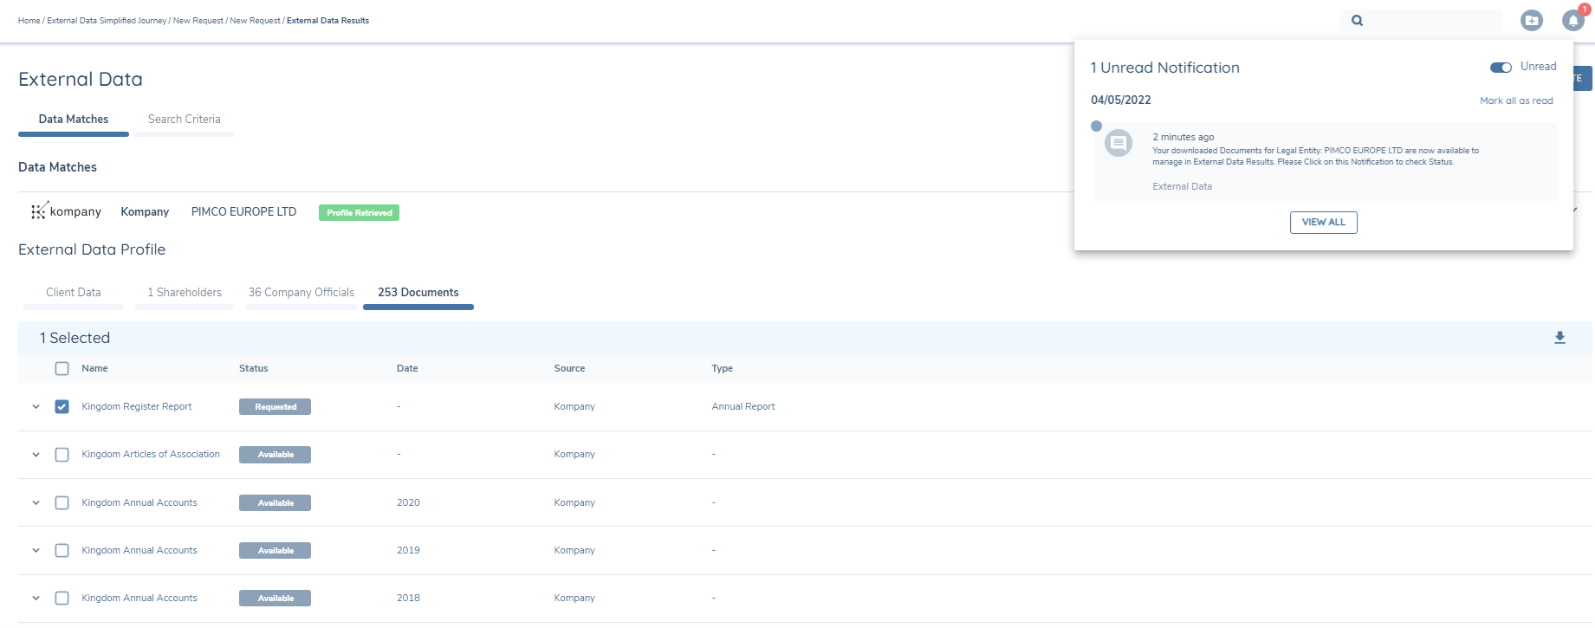
The user can select a document or multiple documents by clicking the checkbox beside the document name and pressing the Request icon that becomes available on the right side of the screen:
When the request is made, the user gets a onetime warned that if proceeding from this point, then costs may apply for the downloading of the documents from Kompany:
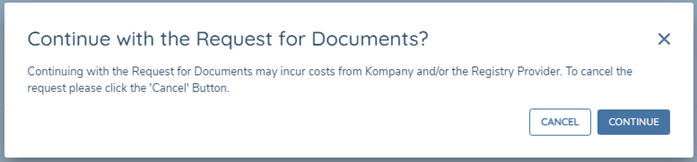
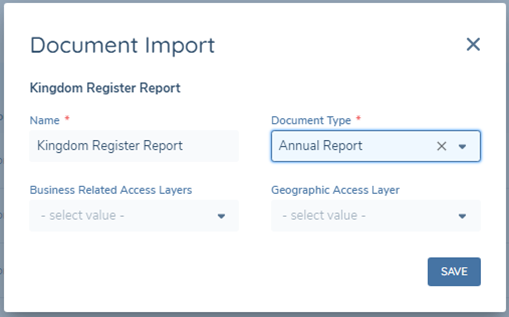
Clicking the Continue button opens the document metadata Modal and allows the user to capture specific document metadata used to store the document in Fenergo SaaS:
Note: It may take hours or even days to retrieve a document depending on the type and general ease of availability for the data provider.
When the documents have been retrieved, the user will receive a notification informing the user that the documents have been retrieved. Clicking the specific notification refreshes the page and the status of the document reflects Retrieved:
The document name becomes hyper-linked and the user can click on the hyperlink to view the document in .pdf format:

Once the documents have been Retrieved, they are ready to be imported into Fenergo SaaS. There is an option to reject a document that the user does not want to import (e.g. a document that does not provide value to the KYC/AML of the customer).
Rejecting Imported Documents
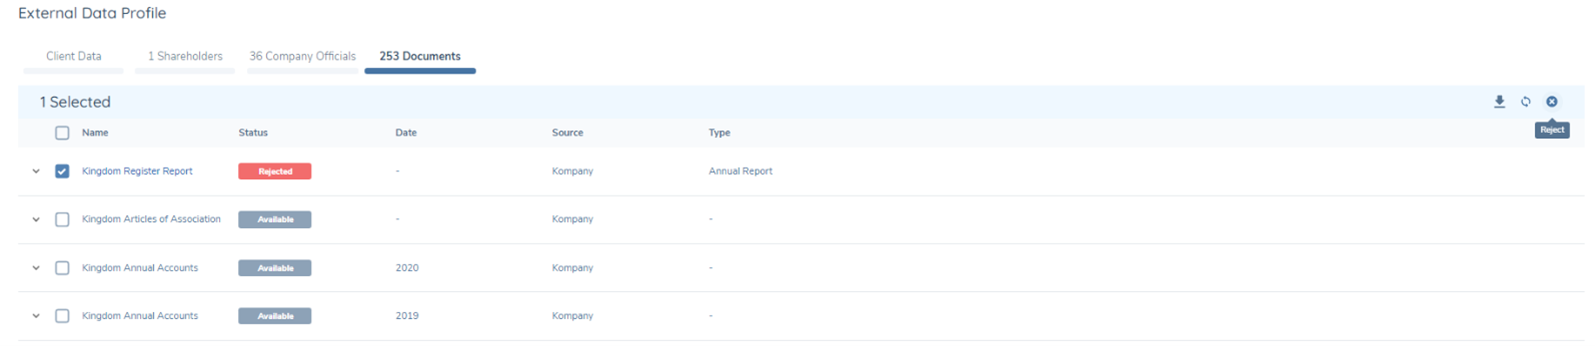
When the checkbox beside the document is clicked, the Reset and Reject Icons become available on the right side of the screen. The user may click Reject, which will change the status to Rejected and that document will not be imported to Fenergo SaaS. Reset may be selected by the user to revert it’s state from Rejected back to Retrieved.
UBO Discovery
When UBO Discovery is toggled on and the parameters have been set, the user has the option to make the UBO Discovery request from the External Data Results screen once the profile for the selected entity has been returned from kompany.
A message, describing the UBO Service, and giving the user the option to proceed is displayed. Clicking the Continue button will start the UBO Discovery process, clicking the Cancel button will halt the process and the message will disappear.
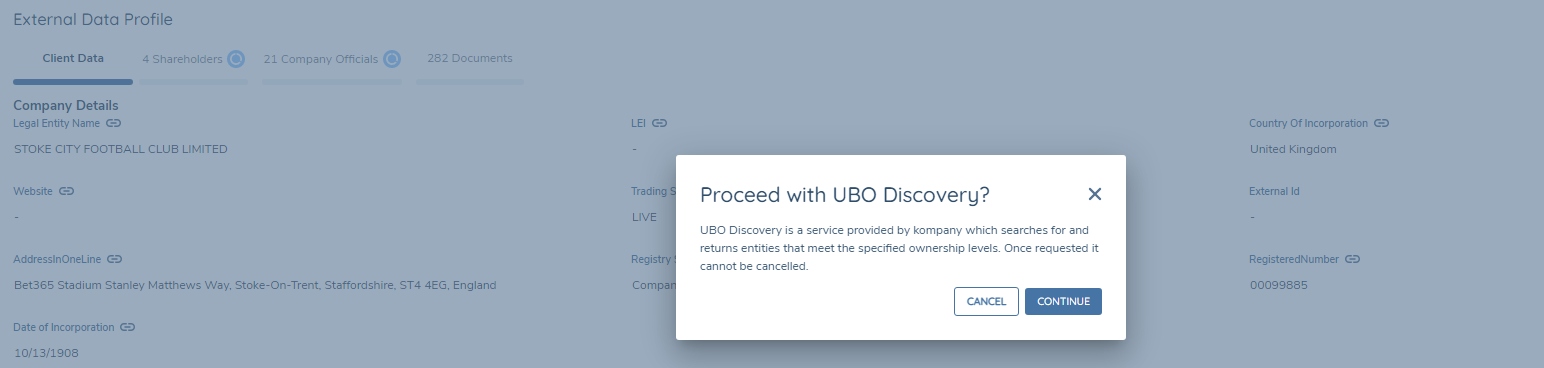
When the Continue button is clicked, the Chip next to the UBO Discovery text will switch to Requested state and a Snack-bar message will be displayed, indicating that the process has started and that the user will be notified upon completion.

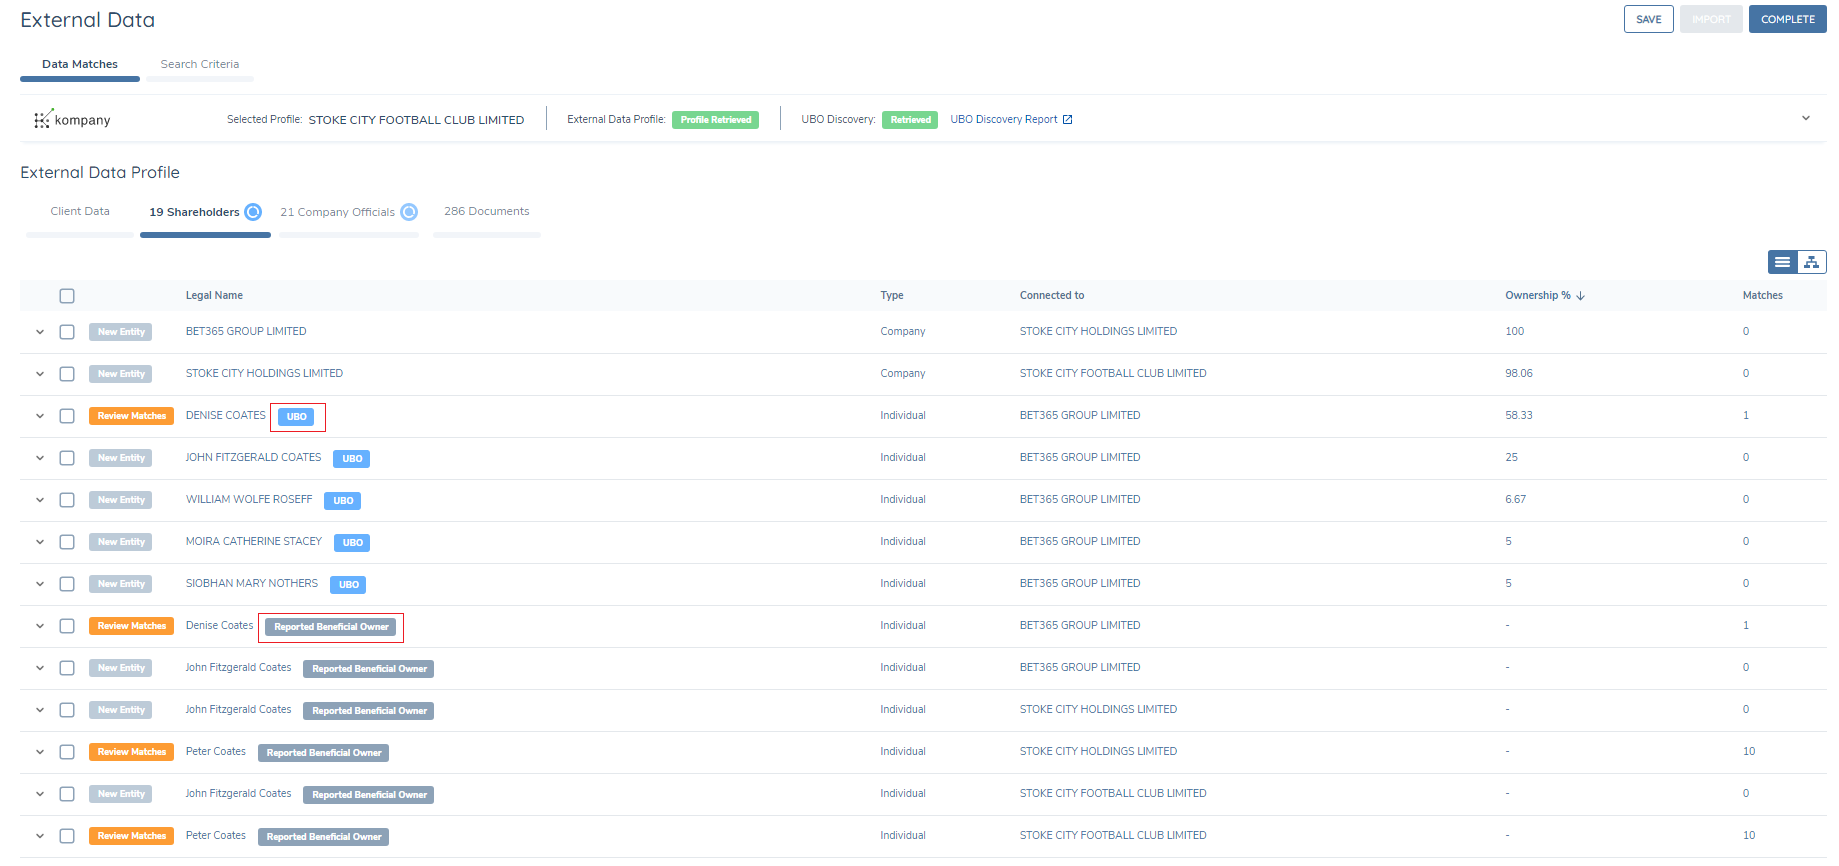
When the UBO Discovery has completed the Crawl based on the configured parameters, and the results are ready to be displayed, a notification will appear in the Notification Centre to confirm. The user can then click the notification to refresh the Results page and view the UBO Discovered Data and Documents.

Where a UBO has been discovered, a blue Chip containing the text UBO will be displayed beside the uncovered UBO. Only Individuals will be labelled in this way. By definition a Company can not be identified as a UBO.
Beneficial Owners are also identified by a grey Chip labelled Reported Beneficial Owners. These are company self reported Beneficial Owners which have been returned as part of the self reported commercial registry datasets.
Company Shareholders can also be uncovered as part of the UBO Discovery call. These are listed without any chip identification beside them.
The User can click into any of the uncovered UBO's or Shareholders to uncover further related data returned by the UBO Discovery crawl. Specific data such as Ultimate Percentage, Ownership status, Distance To Root and the Extraction Date of the data, when mapped, can be made visible here, and become available for import into Fenergo SaaS.
Any documents uncovered during the UBO Discovery process are returned to Fenergo SaaS and are available for import under the Documents tab
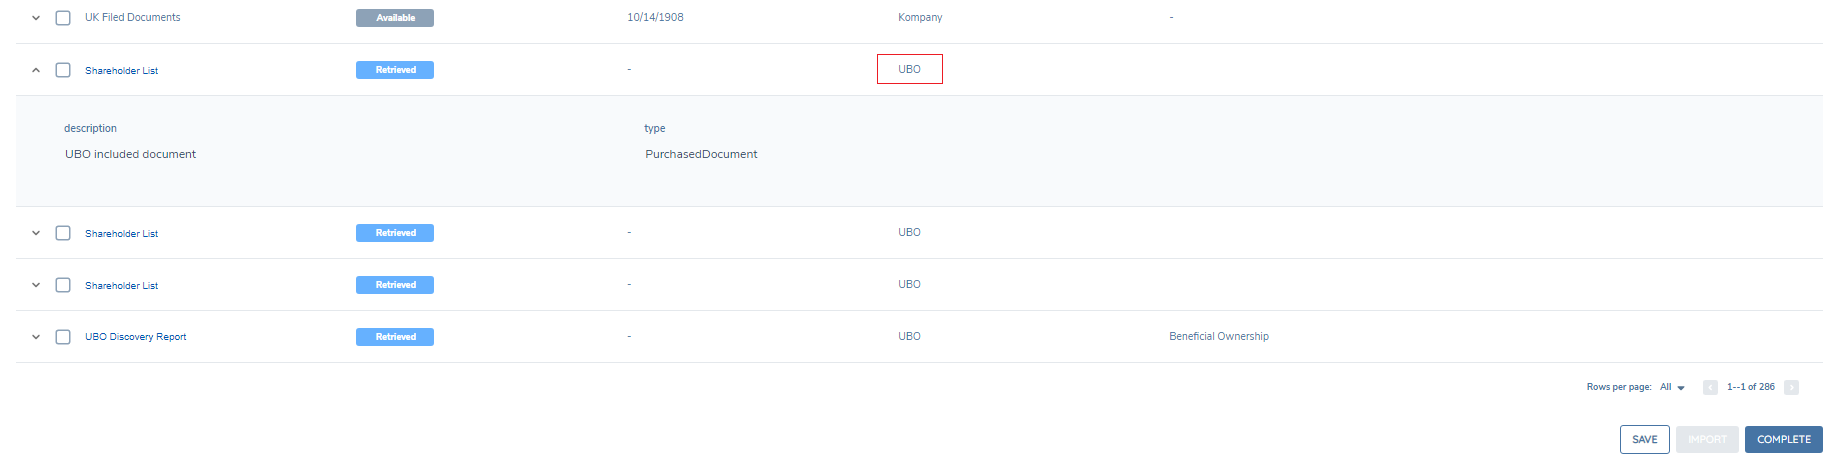
Once the Shareholder conditions have been satisfied, the Data and Documents can be imported into Fenergo SaaS in the same way as any other Data and is outlined in the following section.
Import
Once deduplication activities are complete and there are no Review Matches alerts outstanding in the Shareholders and Company Officials grid, the Import button becomes available to the user.
Hitting the Import button initiates the publication process; the UI status tracker will update to Import in Progress and entity data will be imported as described below.
Fenergo SaaS uses a Service Account to run the Import process. The account, nebula.admin@fenergox.com has been added to all client tenants with External Data enabled. This Service Account requires specific permissions to run the import process:
- Entity Data Access & Search
- Entity Data Edit
- Entity Data Approve
In addition to permissions, the Service Account should be configured to include all Access Layers that have been configured on the tenant to ensure the account will have sufficient permissions to access & edit the various entities subject to the import process.
Importing Data
The first step in the sequence of bulk activities initiated by the Import is the write of mapped External Data attributes to the draft entity record.
If a data attribute is included in the provider Adapter, returned from the data provider for the record in question and correctly mapped to an equivalent field in an in-scope Policy , it will be written to the Entity Draft record for the target entity and displayed in the UI. However, this draft data is not Verified until the end of the journey and therefore is not saved to the Entity Profile until the journey is approved and completed.
Importing Hierarchy
Following the completion of the data write, the Import will progress to the creation of net-new entity records for any Associated Parties with a status of New Entity or Dismissed Matches, New Entity. These entities are created as 'skinny' records, with only First Name , Last Name, Date of Birth and Nationality saved to the entity profile as Verified. Any other attributes are maintained as Draft and are saved to the entity profile upon completion of the journey.
The system then proceeds to create the association linkages between entities as defined in the deduplicated hierarchy from the External Data provider. Again, these are stored in draft version until the journey is Verified. They are viewable and accessible from the related parties' screen.
An Association object includes the Parent Entity , Child Entity , Relationship Type and Ownership % if known.
Importing Documents
The final step in the sequence of bulk activities initiated by the Import is to associate and commit the retrieved Documents to the draft entity record. Any document that has been retrieved from the provider, once the Import button has been clicked, will now be saved on the Entity Record and will be visible on the Entity Profile Page. The document can also be accessed by clicking the document link on the Entity Profile page, or by clicking the Document hyperlink in the External Data task. This process is unrelated to IDP.
Multi-Provider Support
The system supports the use of two providers in the External Data Combined task which can be configured from the Journey builder. The two selected providers can be OOTB Providers, Custom Providers or a combination of both. Refer to the External Data configuration guide for information on how to configure more than one provider.
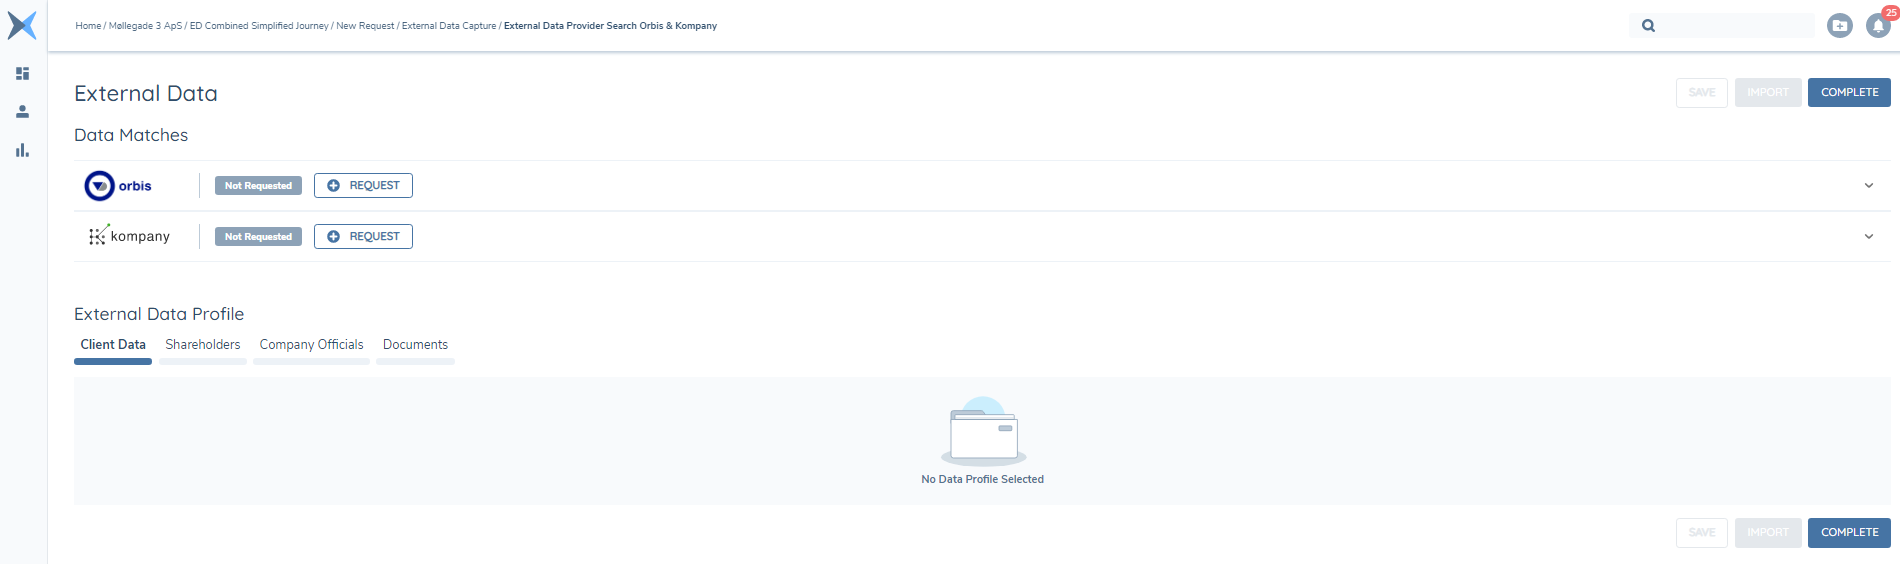
After enabling more than one provider, when the user lands in the External Data Combined task in the journey, the enabled providers will be visible inside the task and the Request button will be enabled for each provider. Clicking the Request button will start the search of the chosen provider.
When the search is complete the indicator chip will change to green and the status will change to Search Complete. If a match, or list of potential matches, have been identified, they will be displayed to the user.
A Refresh button allows the user to carry out the search again, if they have have been away from the task for a period of time, or in order to recover from a possible error in the initial search.
The user can now select a profile from the search results from one or both of the providers. The indicator chip will notify the user when the Profile has been retrieved. When the profiles have been retrieved from more than one provider the user has the option to select between both providers to view the profile results for that provider.
Similar to Search, the Profile can be refreshed by hovering over the Days since profile retrieval message and clicking on the refresh icon that appears.
There are no changes in the Deduplication process of Related Parties from the Single Provider task and Documents and UBO Discovery retrieval (where applicable), function as they do in the Single Provider task also.
Import (Multi-Provider)
The Import process also functions as it does in the Single Provider task, however it is now possible to carry out multiple imports.
It must be noted that the most recent import will be the import that updates the Entity Draft record, and therefore previous imported data could be overwritten with the data from the latest import. If a field from the latest import is empty, the empty field will not overwrite a field populated from the previous import.
Search for Individuals (Custom Providers)
The system allows the user to search a Custom Provider for Individuals as well as Companies.
To achieve this, the user can enter search criteria by selecting the Individuals Tab at the New Request screen or from inside a Basic Details task.
When the External Data Results Task is opened the user will see the Search Results
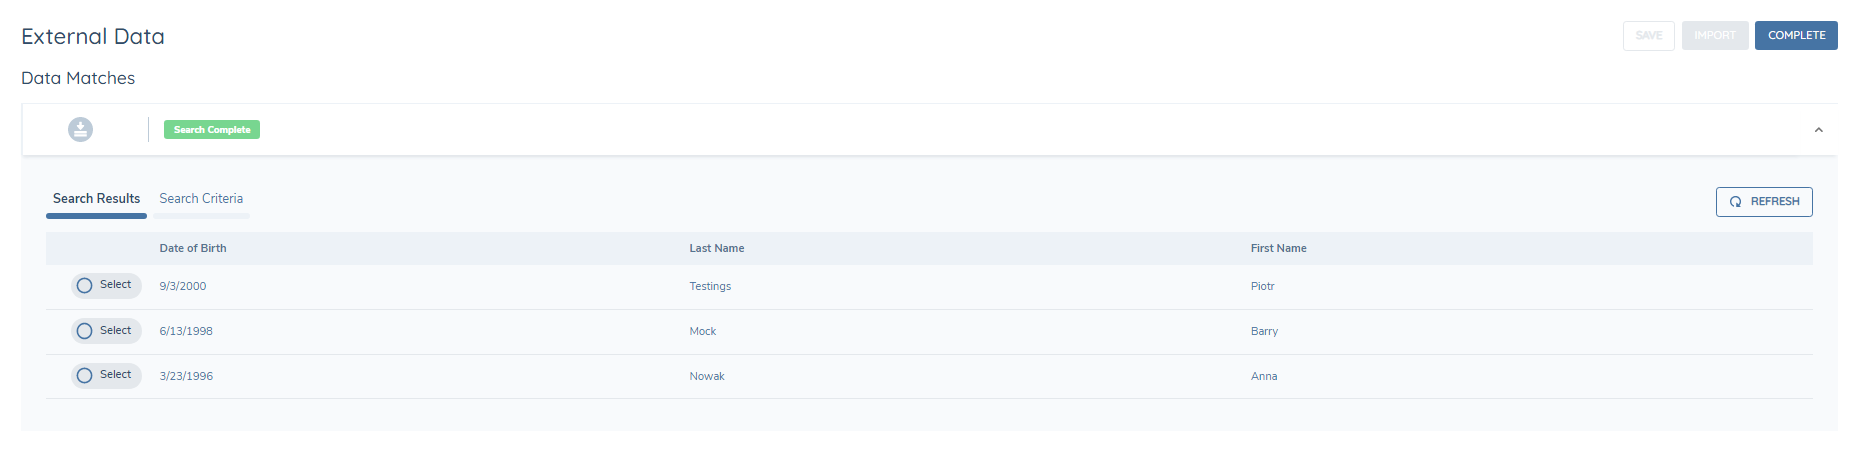
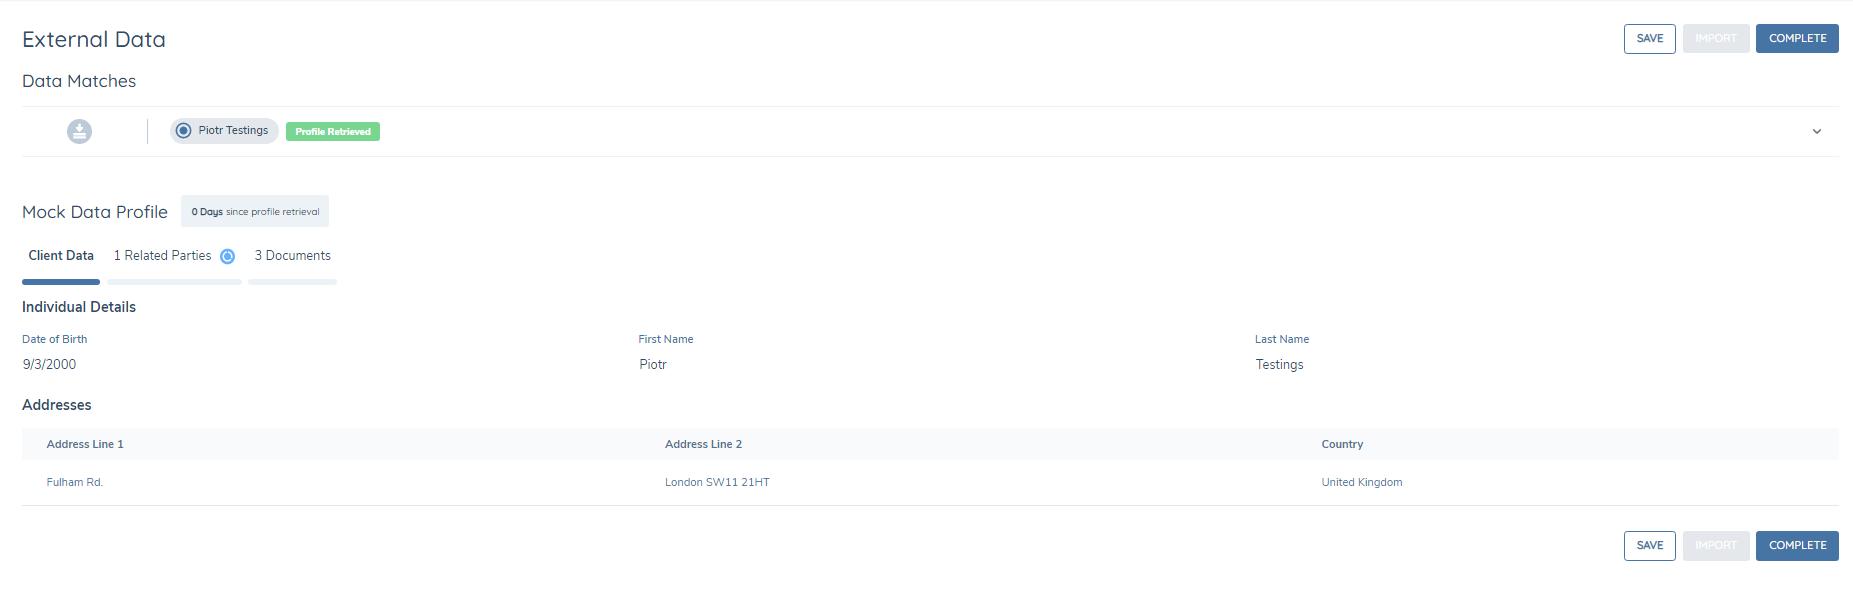
To view and import the Individuals Profile, the user can select a profile from the search results.
Client Data is returned under the Client Data tab and any Related Parties that are associated with the searched Individual can be viewed in the Related Parties Tab.
If Documents are enabled from the configuration screen, any available documents can be viewed under the Documents Tab.

De-duplication of Related Parties can then be perfomed, and importing of the Individuals data into Fenergo SaaS is performed by clicking the Import button after all required conditions have been actioned.
Conditional Fields
External Data supports the use of Trigger Conditions on Standard Data fields and DataGroups.
When a trigger condition is configured on a field in Policy, and an External Data Category is configured, when the data for that field is downloaded from the provider the trigger condition is evaluated and the display of the data is determined by the trigger condition.
This gives clients the ability to limit the amount of data displayed in the UI, specific to their chosen trigger condition.
For Datagroups, where a field is hidden, it will be accesible by clicking the Additional Field button beside the Datagroup results.
Ongoing Data Monitoring
Ongoing Data Monitoring allows users to subscribe for updates to an entity record as part of the External Data process. When an update event is consumed from the External Data provider, a journey can automatically be triggered to process the event (see Ongoing Monitoring: Data & Screening section).
Of the OOTB External Data integrations, kompany and D&B are the only providers that Fenergo supports for Ongoing Monitoring.
Subscribe to Ongoing Monitoring
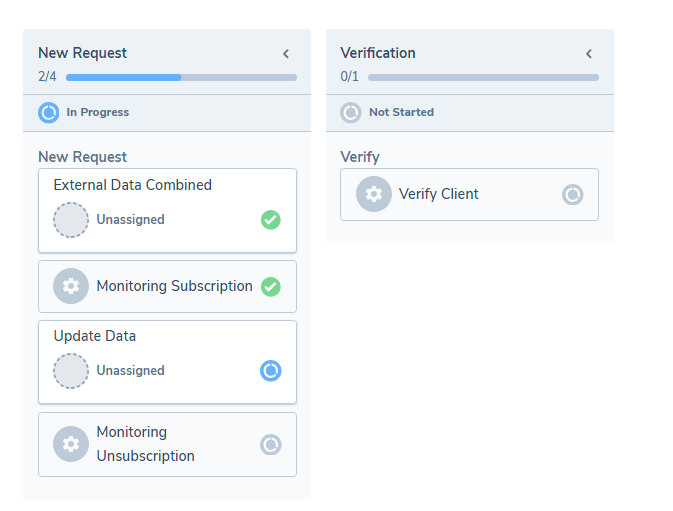
Users can subscribe to the Ongoing Monitoring of an entity by including the External Data Monitoring Subscription service task directly after the External Data Combined task in the Journey. The provider of choice can be configured in the External Data Monitoring Subscription jouney builder task.
Upon completion of the External Data Combined task, the External Data Monitoring Subscription task will run automatically, and will subscribe the entity for Ongoing Monitoring. The Update Categories that are available will be dependent on what the External Data provider supports. For kompany only Client details are supported currently. For D&B, Client and its Related Party details are supported.
Once an entity is enabled for Ongoing Monitoring, the External Data provider will send an alert to Fenergo when there is an update to the subscribed entity, which in turn can trigger an Ongoing Monitoring journey in Fenergo SaaS.
For kompany, the provider will scan the Commercial Registries for changes to the the subscribed entity at a set frequency. If a change is detected, a notification of change is sent to Fenergo. This notification is used to trigger an update journey, where the External Data Task is configured to call for the updated entities dataset.
For D&B, When an update to a subscribed field is available DNB sends a batch file containing all updated DunsId records. Fenergo raises the OngoingUpdate event which will launch a journey for each mapped entity to the incoming DunsIds. The OngoingUpdate event can be mapped to one or more journey schemas in the Journey Builder on the Event Triggers tab.
Unsubscribe from Ongoing Monitoring
To Unsubscribe from Ongoing Monitoring, the configuration user must configure the External Data Monitoring Unsubscription service task in the journey.
Automation
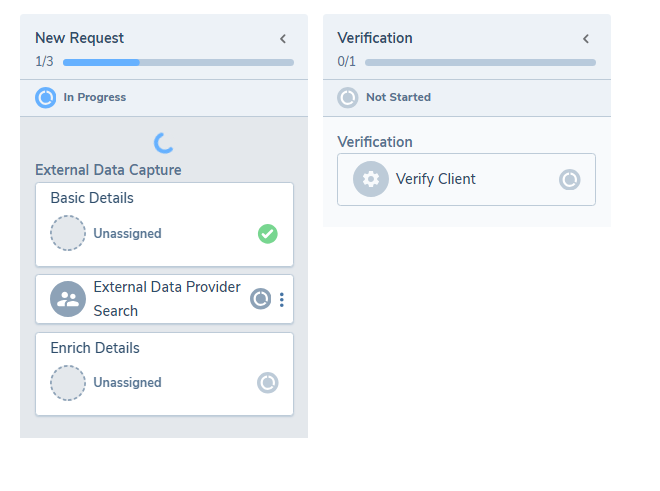
The External Data Combined task can be ran in automated mode in the journey.
When any of the automation settings are configured (see configuration user guide), user access to the task is restricted until the task has completed. The journey Process will show a spinner indicating that automation is in progress and the user will not be able to click into the task until the automation has stopped. Once completed, the task icon colour will change to Green and the user can click inside the task.
If any actions in the task fail for any reason, the automation will cease and the user can enter the task at the point of failure. The task actions (Refresh Search, Profile etc) will be available to users to execute manually.
In the journey, Re-opening the task or the task previous, will result in the automation of the task, based on the configured settings, when the task begins.