Investigating Alerts
TM Alert Investigation Workflow
Suspicious activity, as defined in business rules, will trigger alerts based on the rules which have been set up. It is these alerts that are then investigated by users in the transaction monitoring workflow. Within this process, users determine whether the activity highlighted is indeed suspicious (a true positive) and warrants further action such as reporting. Alternatively, it can be marked as a false positive, needing no further action.
Alerts are assessed through various stages of the flow: 1st review, 2nd review, and compliance review. Transaction and entity information is analysed before transaction and alert level assessments can be confirmed. The alert then moves to the next stage for the next user to action.
Alert Overview Pages
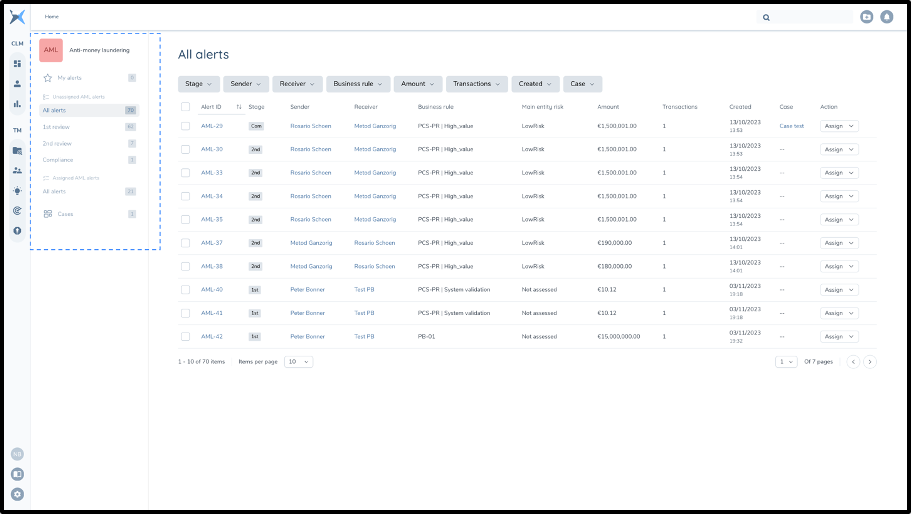
After logging in to the application there are several Alert Overview pages. These pages show a list of all open alerts based on preset filters.
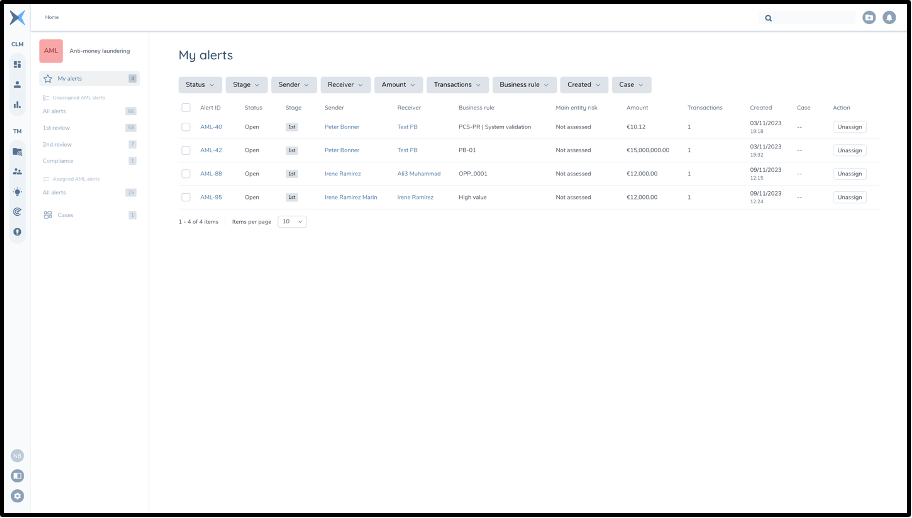
- My alerts shows only Alerts that are assigned to you.
- All the subpages of the unassigned section show alerts in different stages that are not assigned to a particular user yet (you can only see alerts in stages that your role can assess).
- The subpage of Assigned AML alerts shows all alerts that have been assigned to other users.
My Alerts Page
The 'My alerts' page shows all alerts that have been assigned to the user that is logged in. Alert information is included in the list of alerts (as is the case for all alert lists).
The following column fields are shown in the list per alert:
- Alert ID - Identification number which is unique to that particular alert - these always take the format AML-XXX where 'XXX' is a number which increases by 1 for every alert generated.
- Status - status of the alert. Possible alert statuses in the system are open, paused, and close(closed is not possible in this list as closed alerts can't be assigned)
- Stage - review stage of the alert (1st review, 2nd review, Compliance)
- Sender - name of entity(s) who sent any of the transactions in that specific alert. In the case of a single sender the name will appear, in the case of multiple senders, a count of the entities will be displayed. You can click on the name of a single entity to navigate to that entity's page.
- Receiver - name of entity(s) who received any of the transactions in that specific alert. In the case of a single receiver the name will appear. In the case of multiple receivers, a count of the entities will be displayed. You can click on the name for a single entity to navigate to that entity's page.
- Main entity risk - risk level specified for the entities involved in the transaction.
- Total amount - sum of the transaction amounts from all transactions within the alert.
- Transactions - number of transactions in the alert.
- Business rule - which business rule triggered the alert.
- Created - date the alert was created.
- Action - allows the user to Unassign the alert. This will move the alert back to the 'Unassigned AML alerts' page so that other users can now pick up this alert to work on.
The list can be sorted and filtered based on these fields. This is the case for all alert lists in this section.
All Unassigned Alerts
The All alerts page contains all the unassigned AML alerts for the stages that the user in question can assess. This can include alerts in 1st stage, 2nd stage or compliance stage of the alert's assessment process. Alerts in this list have the same fields as the "My alerts" Alerts page.
No user can assess the same alert in multiple stages as the user should not be able to check their own work. Thus, users will not be able to assign these alerts to themselves from these overview menus. An information icon and tooltip will be shown to explain this to the user.
1st Review Alerts
The 1st review page contains all unassigned AML alerts that are waiting to be assigned for the 1st review. The alert list has the same headings and functionality as the all unassigned alerts list but only displays alerts in 1st review stage.
2nd Review Alerts
The 2nd review page contains all unassigned AML alerts that are waiting to be assigned for the 2nd review. The alert list has the same headings and functionality as the all unassigned alerts list but only displays alerts in 2nd review stage.
Compliance Review Alerts
The Compliance review page contains all unassigned AML alerts that are waiting to be assigned for the Compliance review after going through the necessary previous stage(s). The alert list has the same headings and functionality as the all unassigned alerts list but only displays alerts in Compliance review stage.
All Assigned Alerts
The All assigned alerts page contains all alerts that are currently assigned to a user for them to assess. This alert list has the same functionality and headers of those above except there is an extra column to indicate the current Assignee. The action column includes the option to unassign/reassign the alert from the assigned user (depending on role permissions).
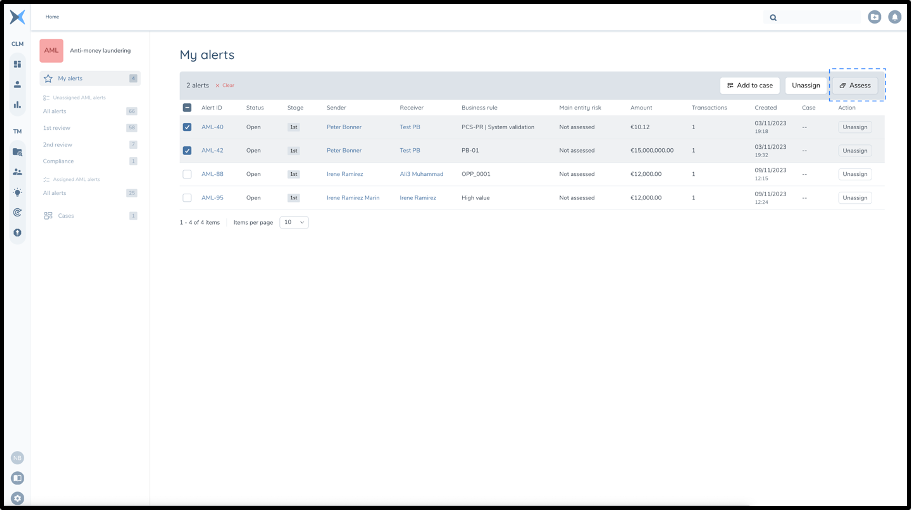
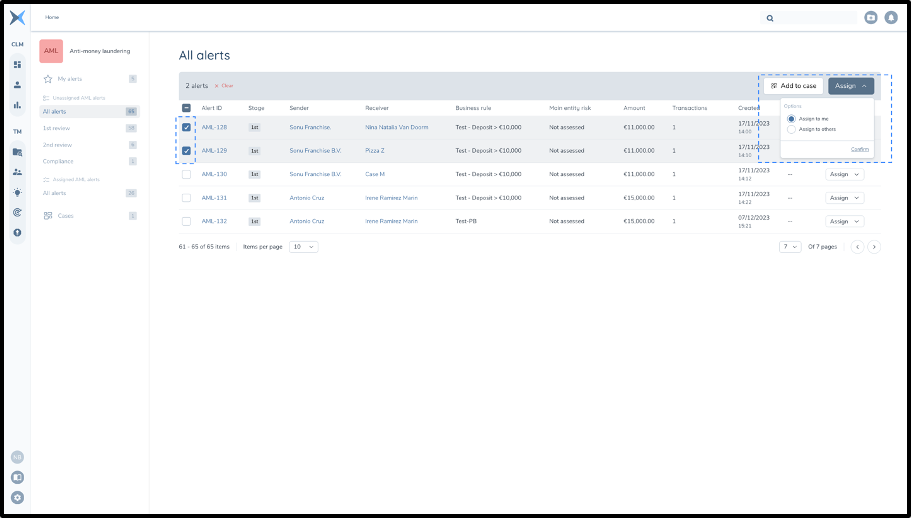
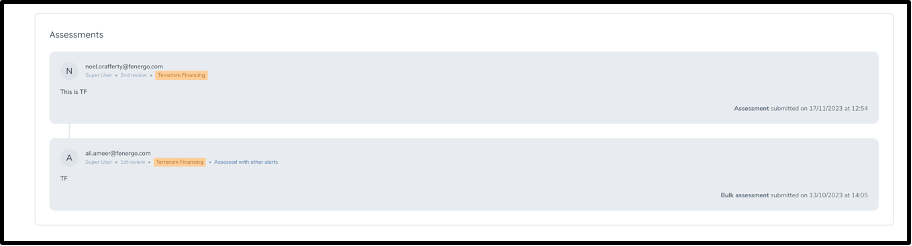
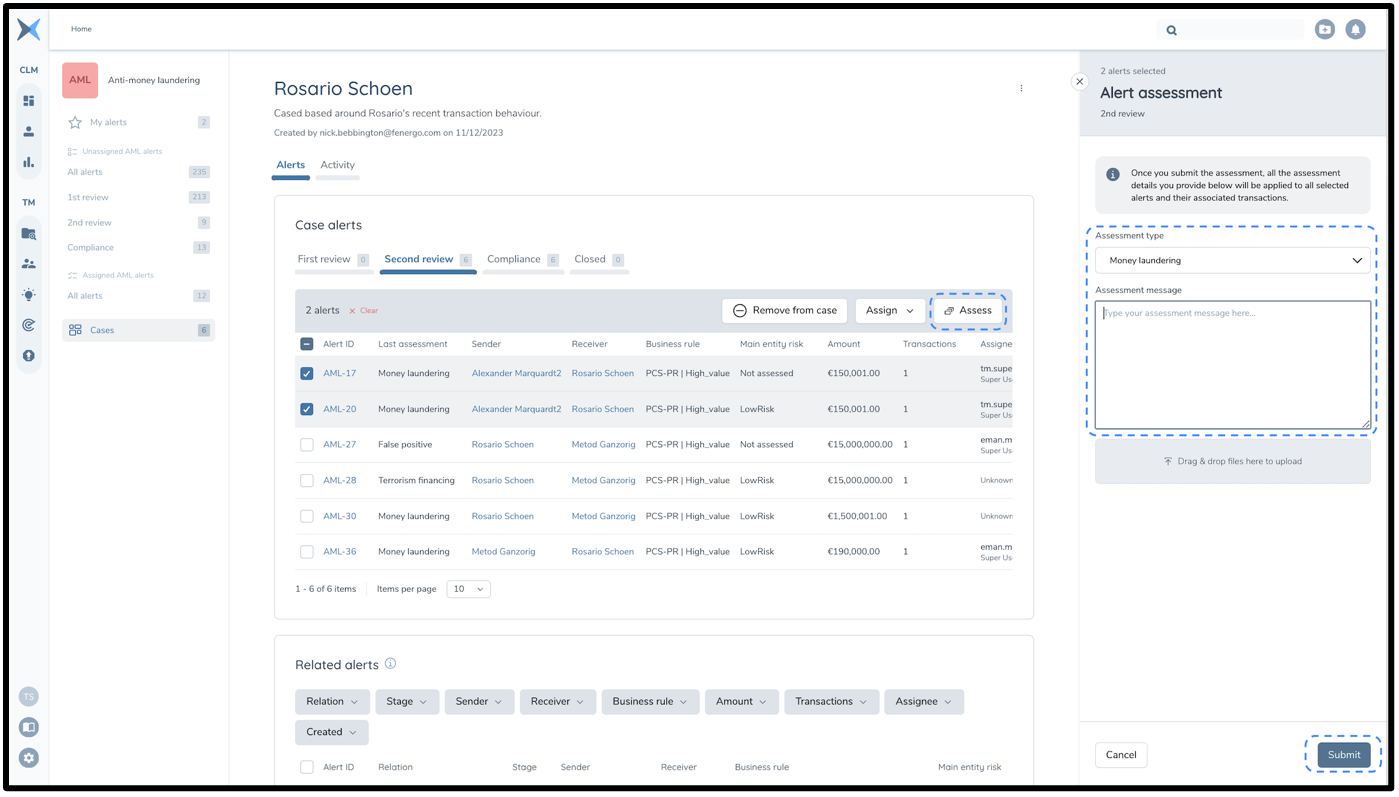
Bulk Assess Alerts
The bulk assess functionality is available to users from their 'My alerts' page. This functionality can be used to assess multiple alerts at the same time with the same assessment outcome. This increases efficiency of assessments.
A user can multiselect alerts in their My alerts page using the checkboxes and select 'Assess' to assess all of these alerts in one go. You must select the assessment type: False Positive (FP); Money Laundering (ML), Terrorist Financing (TF); or Both ML and TF (Both). You must also input an assessment message.
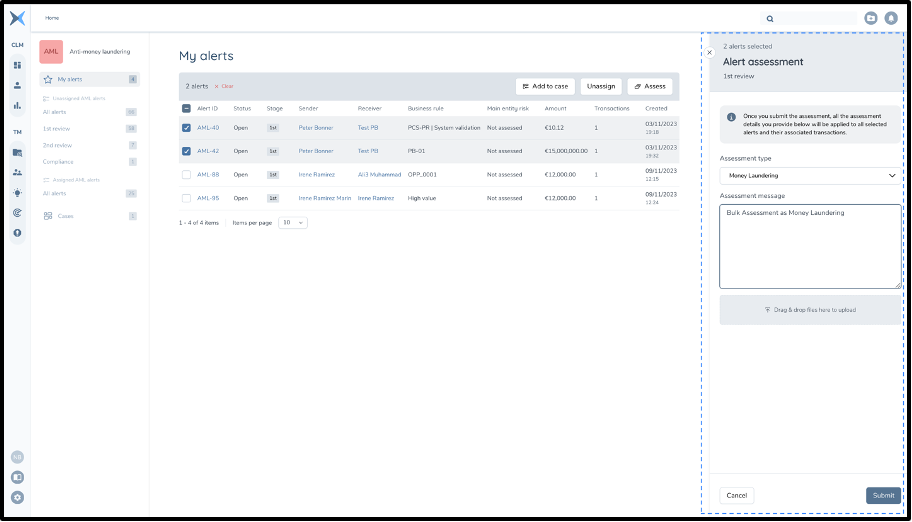
The assessment type and message are then applied to all alerts that were selected for bulk assessment. You can also upload files as in the standard alert assessment process. Any assessment type and assessment message selected in the bulk assessment process will be applied to every alert selected. The assessment type will also in turn be applied to every transaction within those alerts. This will also be reflected in the trail of that alert with an indication on that alert page that it has been assessed with other alerts.
A couple of restrictions are applied to this functionality to ensure that users assess the correct alerts and are properly assessing alerts and not bulk closing them:
-
Number of alerts: The number of alerts which can be assessed together in one bulk assessment is limited to 50. This is done to ensure that users are properly assessing alerts to a minimum standard and not closing alerts instead.
-
Stage of alerts: The stage of all the alerts must be the same to bulk assess them together as different stages (may) require different levels of scrutiny.
If multiple alerts are selected that do not fit within these restrictions, then the "assess" button will not be shown as this option is not then available.
Assign/Unassign/Reassign Alerts
An alert is always either assigned or unassigned. An alert must be assigned to a user for that user to assess the alert. Any user (with permissions) can however comment on an open alert even if they are not assigned to that user.
A user can only assign an alert to themselves or have that alert assigned to them if they have the permissions to assess that alert in its current stage (1st, 2nd, compliance) and have not assessed the alert in a previous stage.
Assigning of alerts to a user can take place from:
- Overview alert lists
- Entity alert lists
- Transaction alert lists
- Within the alert detail page
Depending on the user's role, they can assign and unassign alerts from themselves and others, or directly reassign assigned alerts to themselves or other users.
On the alert detail page and alert lists above these actions can occur on a per alert basis using the button or dropdown for that alert in the list. It is also possible using the checkboxes in the alert lists to perform these actions in bulk on multiple alerts at once.
Alert Investigation Page
Alert Detail Page
The alert detail page shows the essential information for each individual alert. Information includes main entity information, transaction details, and alert activity. The alert detail page for each alert is accessed by clicking on the Alert ID in any of the alert overview lists.
At the top of the page is the Alert's ID, the current stage of this alert and the alert's status.
In the top right of the page, we see to whom the alert has been assigned to (if assigned) and there is the option to assign, unassign or (re)assign the alert, where applicable.
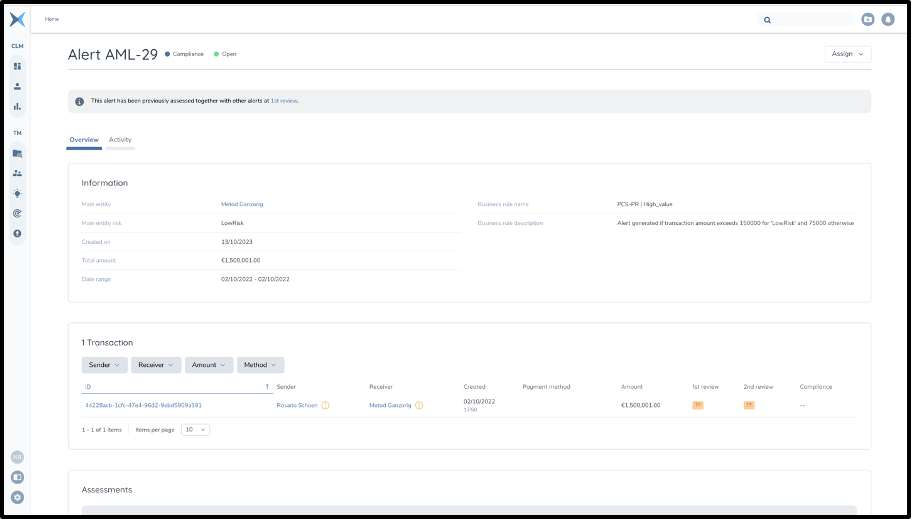
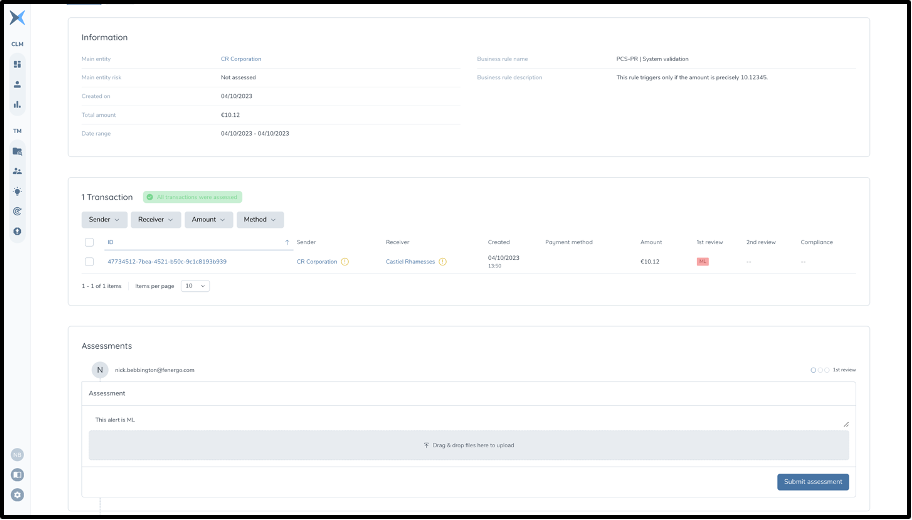
The Alert Details page is split up into the following 3 parts:
- Information
- Transactions
- Assessments
Alerts raised by business rules are limited to a maximum of 1,000 transactions by default. Any rule that may have selected an extremely high number of historical transactions during execution time, it will report the first 1,000 transactions assessed by the rule, in the alert which can be assessed by the analysts.
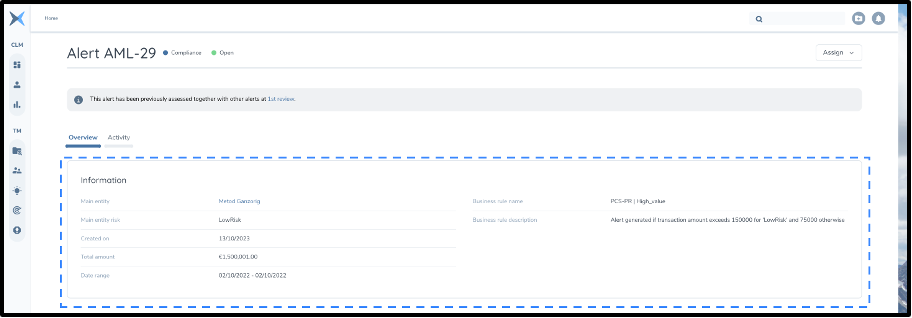
Information
Contains information relevant to the entity(s) involved, and the alert details.
- Main entity - the entity which an alert has triggered on
- Main entity risk - the risk level associated with the main entity
- Created on - The date that the alert was created
- Total amount - The sum amount of all transactions in the alert
- Date range - The earliest and latest date of the transactions in the alert
- Business rule name - Business rule name specified in rule creation
- Business rule description - An expanded explanation on what causes the alert to be triggered
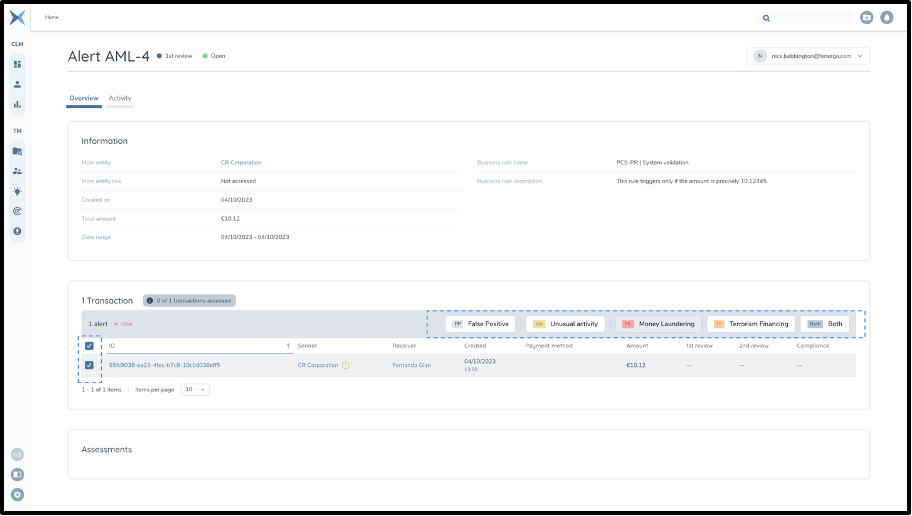
Transactions List
Contains a list of transactions that triggered the alert and respective information per transaction.
- ID - Individual ID of the transaction sent by API
- Sender - The sender of money in the transaction
- Receiver - The receiver of money in the transaction
- Created - The date that the transaction took place
- Payment method - Method used e.g. paypal, visa
- Amount
- 1st review - Assessment given at 1st review stage (if applicable)
- 2nd review - Assessment given at 2nd review stage (if applicable)
- Compliance Assessment given at Compliance review stage (if applicable)
Transactions in this list can also be sorted and filtered.

Transactions Assessment Process
When an alert is assigned to a user, they are then able to assess the transactions within the alert. The user can select 1 or multiple transactions using checkboxes and then assess these transactions as either:
- False Positive,
- Money Laundering,
- Terrorist Financing,
- Both Money Laundering & Terrorist Financing
These assessments can be changed and are not saved until the alert assessment is completed.
When all transactions are successfully assessed a badge above the transactions will change to green to indicate this.
Assessments
This Assessments area shows any assessment information of this alert at previous stages. Once transactions have all been assessed, this section is where users can write their own comments regarding the alert and submit an assessment to complete a review stage of the alert once all transactions within the alert have been analysed.
Alert Assessment Process
Once all the transactions have been assessed within an alert, the Assessment section of the page will change to display an assessment box. The user must then input an assessment message for the alert and can optionally add files to attach to the assessment. The user must click 'submit assessment' to confirm. A modal will be presented which highlights to the user as a final check the assessment message and assessment types chosen for the transactions. The user must here click 'submit' to confirm this assessment at this stage. At this point the alert will move to the next stage according to the workflow configuration. The user will be shown a toast which explains what has happened to the alert.

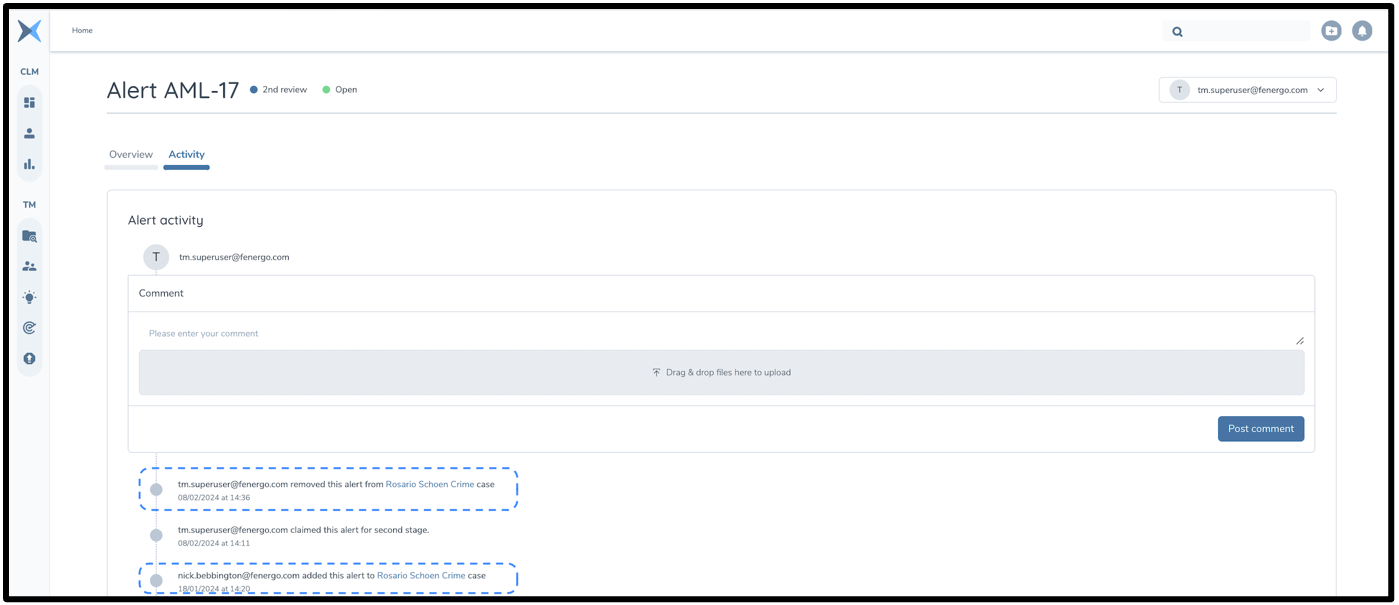
Alert Activity - Trail
This second tab on the alert detail page provides an overview of the alert's lifecycle from its creation. It tracks the assignment and unassignment of the alert, any assessments of transactions and alerts, along with the relevant timestamps for each action. It also includes any comments generated about the alert and assessments written by users (which is also shown in the assessment section) at different stages of the review process, as well as any documents which were uploaded. All trail items have relevant timestamps and clearly specify which user has performed an action to ensure that all actions are auditable.
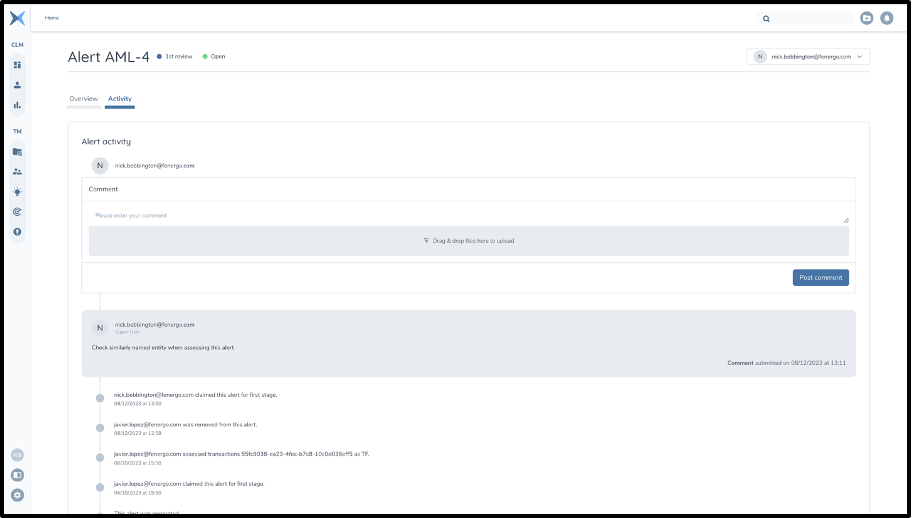
Alert Activity - Commenting And Adding Documents
Within the alerts activity tab users can also comment and add documents to the alert to aid investigation. Comments are then always available to view in this activity tab along with uploaded documents which can then be downloaded.
The following restrictions apply to uploading documents (per comment and assessment):
- Maximum of 5 files per comment/assessment
- Maximum 100MB per file
Files must be one of the following file types:
- bmp (Bitmap Image)
- csv (Comma-separated values)
- doc (Microsoft Office document)
- docm (Microsoft Word Macro-enabled Document)
- docx (Microsoft Office Open XML Format (OOXML) Document)
- dot (Microsoft Word Document Template)
- eml (E-Mail Message)
- gif (Graphics Interchange Format 87a and 89a)
- htm (Hypertext markup language)
- html (Hypertext markup language)
- jfif (JPEG File Interchange Format)
- jpeg (JPEG Image)
- jpg (JPEG Image)
- log (Log File)
- mht (MHTML Web Archive)
- msg (Microsoft Outlook file)
- nsf (Lotus Notes Database Format)
- odt (OpenDocument Text Document)
- oft (Microsoft Outlook file template)
- pdf (Portable Document Format)
- png (Portable Network Graphic)
- ppt (PowerPoint presentation)
- pptx (Microsoft Office Open XML Format (OOXML) Document)
- rtf (Rich Text Format File)
- tif (Tagged Image File)
- tiff (Tagged Image File Format)
- txt (Text)
- xls (Excel spreadsheet)
- xlsm (Microsoft Excel Macro-Enabled Spreadsheet)
- xlsx (Microsoft Office Open XML Format (OOXML) Document)
- xltm (Microsoft Excel Macro-Enabled Spreadsheet Template)
- xml (Extensible Markup Language)
- xps (XML Paper Specification File)
Pausing Alerts
Alerts can be set to the status 'Paused' on the alert detail page using the same dropdown in the top right which is used to assign alerts. This functionality works as a tag to make it clear that there is a reason that you as a user cannot currently continue with your assessment. This may be due to, for example, the need to wait on information from a colleague or the main entity being investigated. This Paused status is clearly indicated in any lists containing the alert. As soon as the user completes an assessment the alert is automatically unpaused. The user can also choose to manually unpause the alert using the original dropdown.
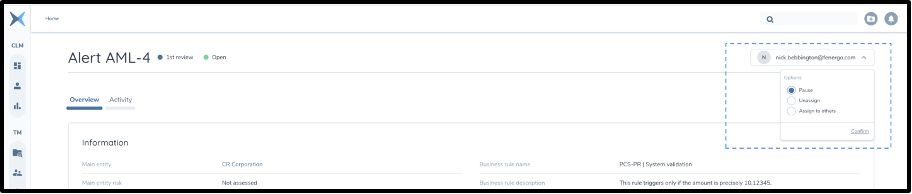
Assign/Unassign/Reassign
An alert can also be assigned/unassigned/reassigned within the alert detail page (dependent on role). Within this page this functionality is only possible for the specific alert in question, not multiselected alerts. The functionality of the button in the top right corner of the page does however work in the same manner as the individual buttons in the alert overview pages.
Flyouts
Within the alert detail pages flyouts can aid investigation by providing additional entity and transaction information within the same investigation page. Flyouts can be accessed by clicking on any entity name or transaction ID which opens the respective entity/transaction. The Flyout appears from the right-hand side and can be closed when the user is finished checking the information. Both the entity and transaction flyout show the most important details for that entity/transaction.
For the entity this includes:
- Personal details
- Address details
- ID documents
- Payment details
- Additional information
- Entity relations
For the transaction this includes:
- A summary
- Sender details
- Receiver details
- Additional information
- Billing address
- Shipping address
Each flyout also displays the 5 most recent alerts related to that entity/transaction, where applicable. From these flyouts the user can navigate to the entity or transaction's full details page or to the alert list of this entity/transaction.
Previously Assessed Transactions
In some cases a transaction may be part of multiple alerts. This can cause an edge case where a single transaction is in multiple alerts but can only be reported once. For this reason, if a transaction is escalated to be reported by being closed as true positive, then it is marked as confirmed true positive in any other alerts. It can then not be assessed again in any other alert and is shown in a list separated from other transactions in those alerts. Any progress in the other alerts containing this transaction is overwritten by a final assessment of true positive (ML, TF, or Both).
If the transaction is assessed in one alert as false positive, however, then the transaction can and must be assessed in other alerts it is a part of. As it hasn't been reported, this transaction could still potentially be escalated. This is important as the context of the alert which the transaction is in may lead to a different assessment than the one made in previous alerts.
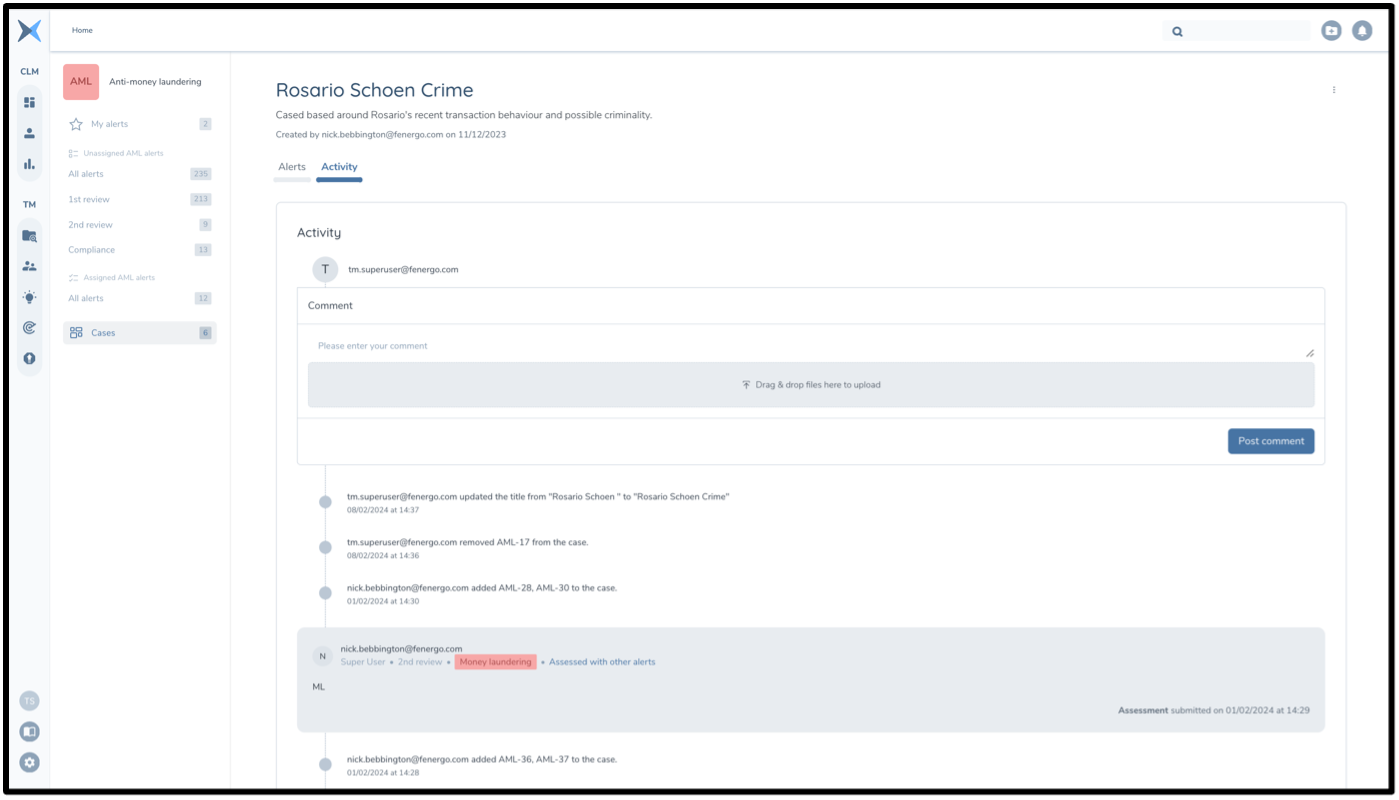
Cases
Cases allow users to group multiple (related) alerts to assess them together or provide additional context. A user may wish to group similar alerts based on a common main entity or business rule, among other things.
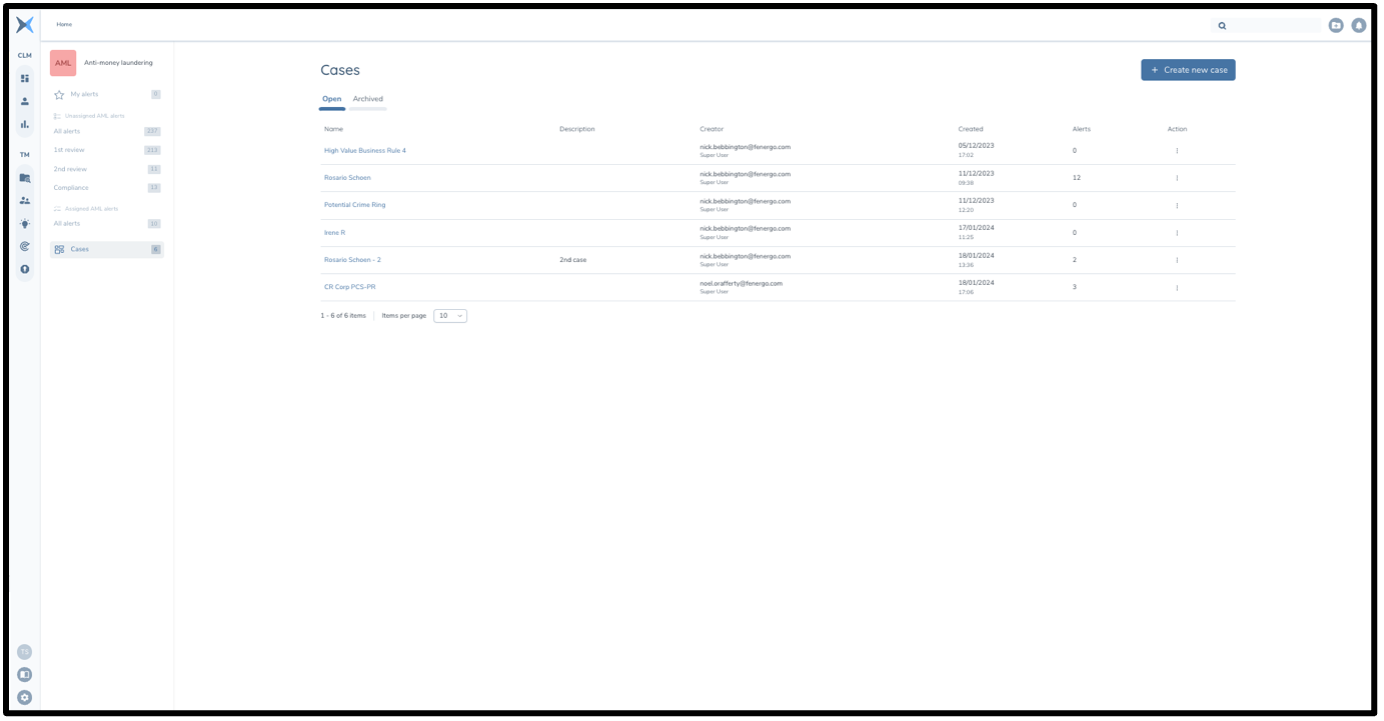
Case Overview Page
The case overview page can be accessed from the side menu of the application by clicking on 'Cases' at the bottom. This will bring you to the case overview page from which you can access all created Cases.
In the case overview page, the two lists of cases, open and archived, are sortable on:
- Name
- Description
- Creator
- Created Date
- Number of alerts
Individual case detail pages can be opened by clicking on their name in these lists.
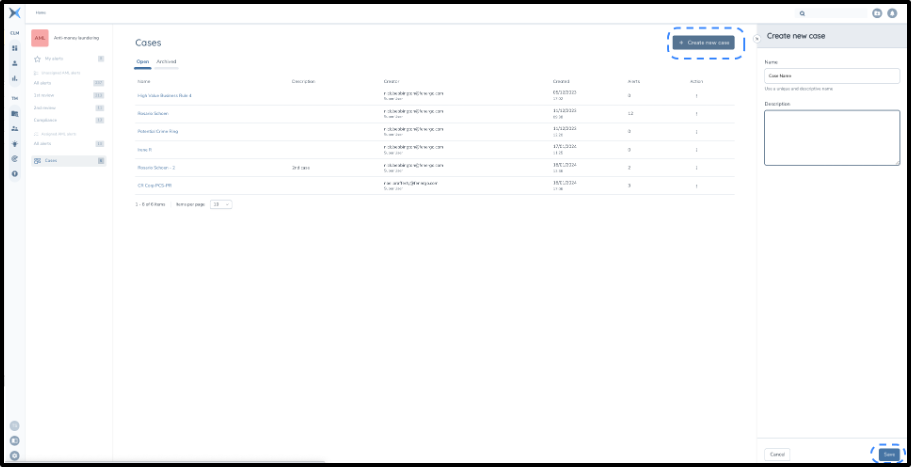
Case Creation
From this case overview page, a new case can be created. This can be done by clicking the blue 'Create new case' button in the top right of the page. At this point you are presented with a flyout where you can specify the case name and description.
The case name field is mandatory as all cases must have a distinguishable name. For this reason, all cases must have a name which is unique to that case. The case description is optional but can be provided to give extra overall context on why a case was created or what alerts should be grouped based on.
A case can be created by clicking the save button at the bottom right of the flyout. At this point a case is created and is added to the 'Open' tab of cases, with the name (and description) specified.
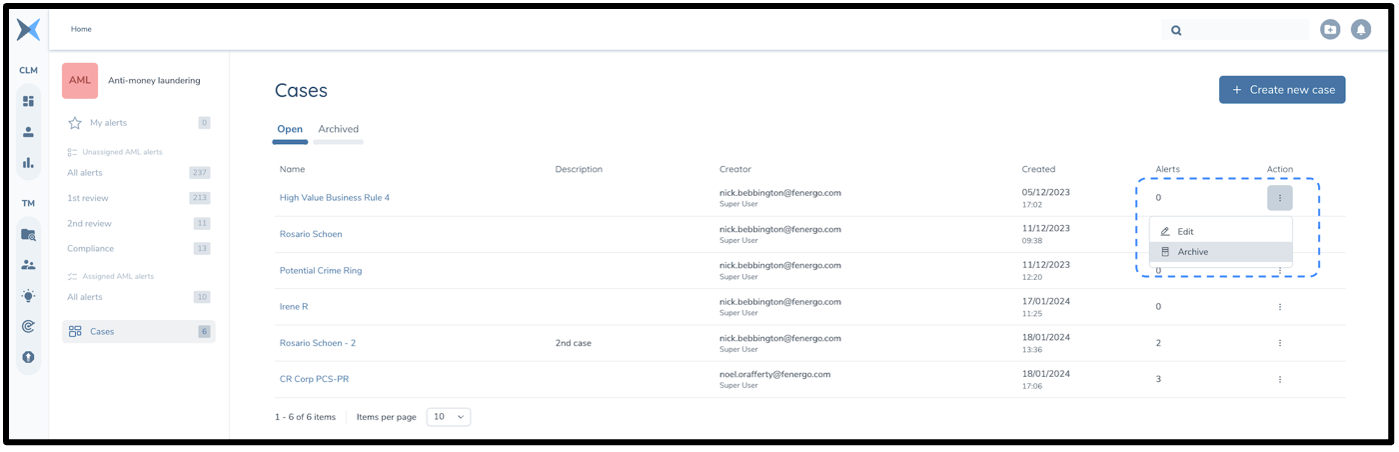
Archiving Cases
Archived Cases are those which have previously been worked on but are no longer active. No actions can be performed on an archived case. This includes not being able to add alerts to or remove them from these cases. It also includes actioning any closed alerts in the case and commenting on the case. These archived alerts are displayed in the second tab of the cases overview page. Cases which are archived cannot be unarchived.
Adding to Case
Add To Case - Alert Overview List
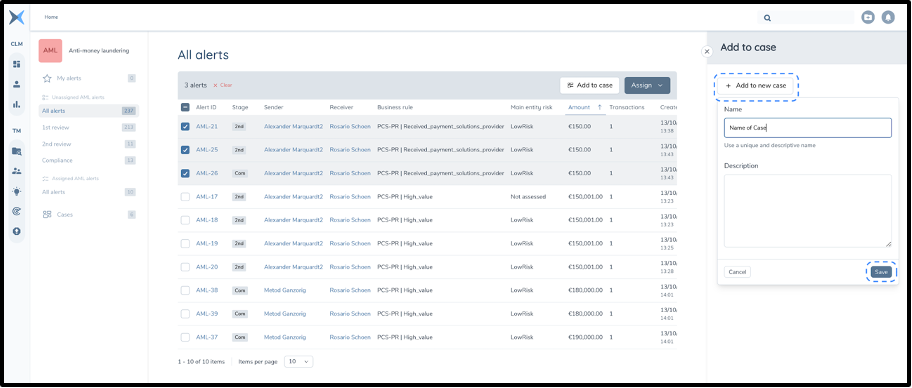
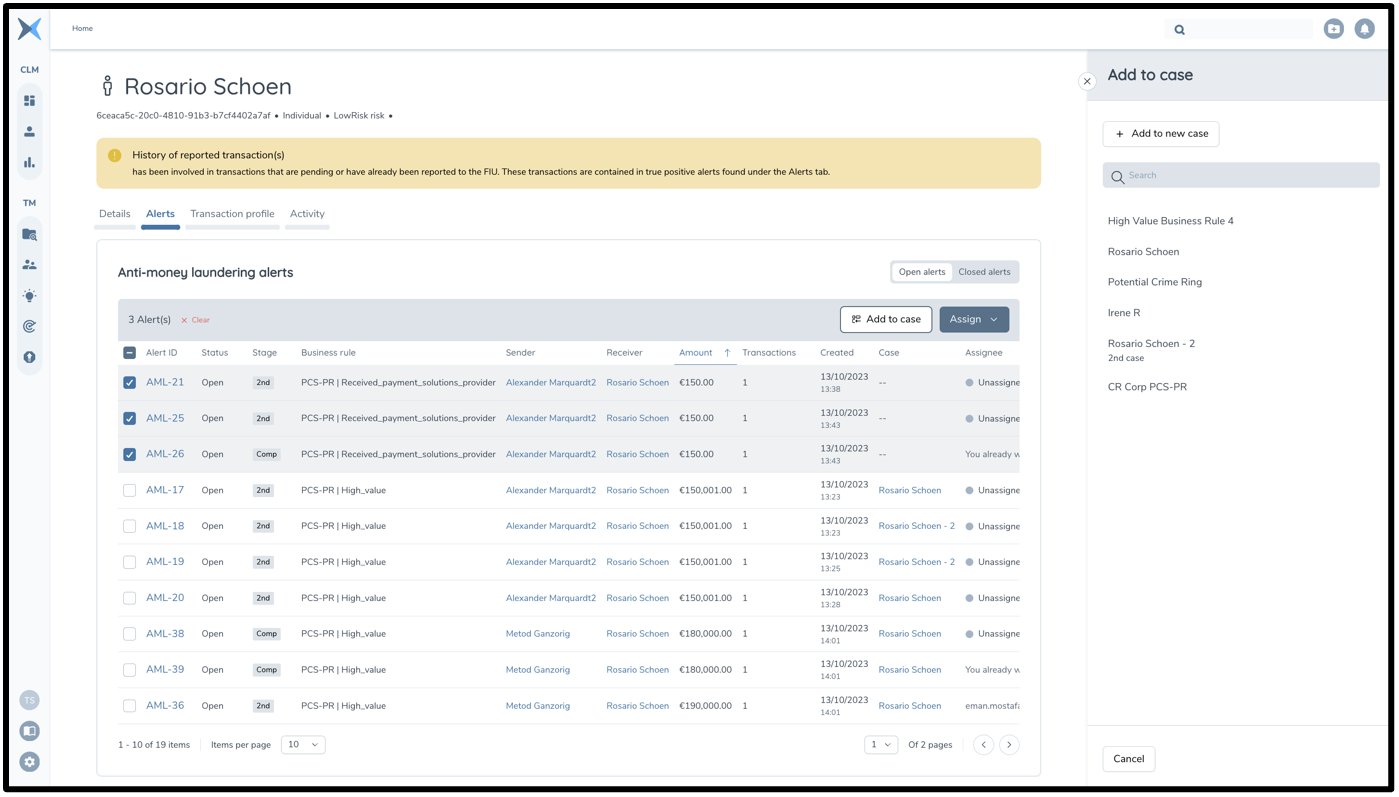
Once a case is created you can add common alerts to the case. This can be done from the alert overview list. This can be done by multiselecting alerts and clicking 'Add to case'.
An alert can only be a part of one case at any time and therefore if one or more alerts selected are already in a case, then the option to add to case will not be available.
After selecting 'Add to case' the flyout presented shows all existing cases and the option to search this case list. A case can be selected and then clicking the 'Save' button in the bottom right of the screen will confirm the adding of the alert(s) to this case.

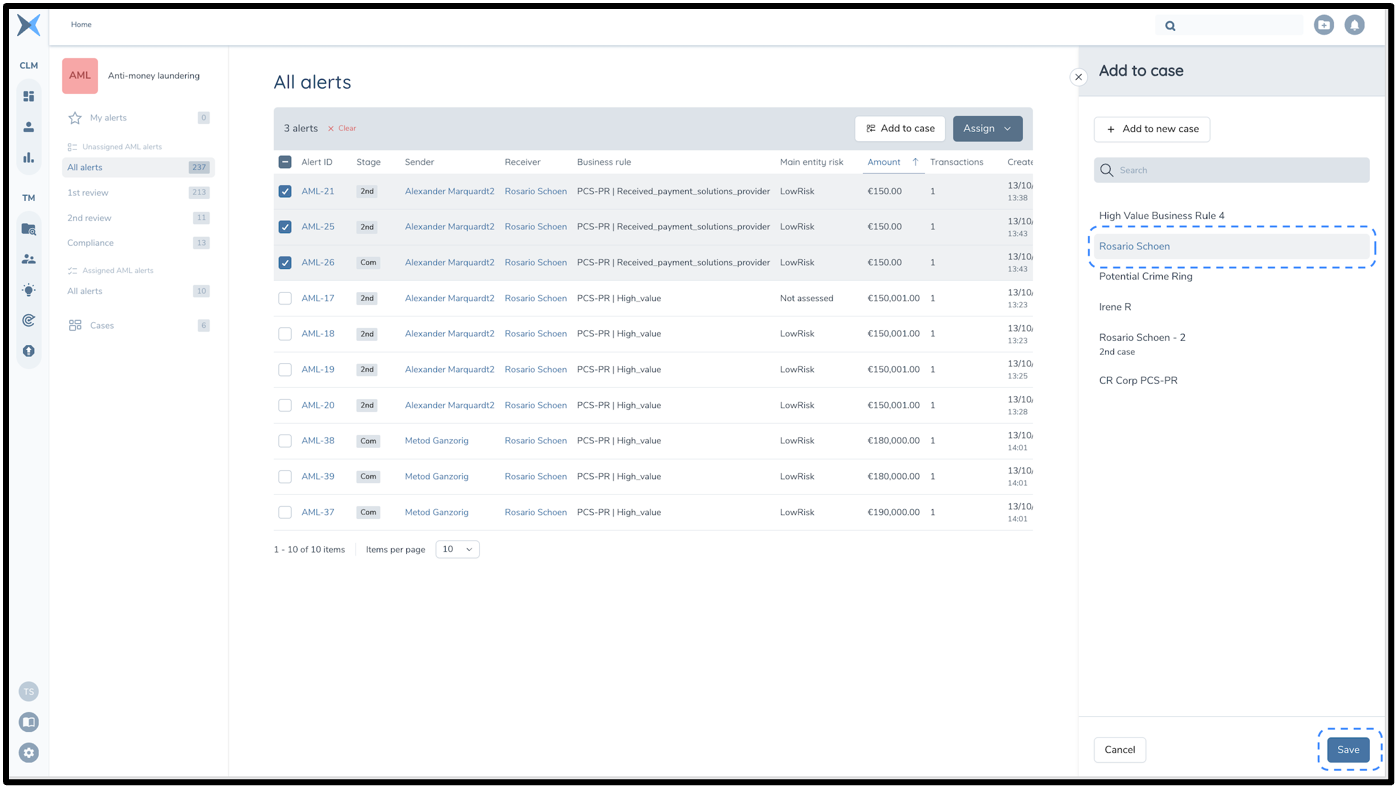
Add Alerts To A Newly Created Case
If a pattern is spotted between alerts in the alert overview lists, then it makes sense to group them at this point. However, the pattern may be spotted before any case has been created for this pattern. For this reason, it is also possible to create a case an add alert(s) when multiselecting and clicking 'Add to case'. At the top of the flyout for adding to a case is a button for 'Add to new case'. When clicked it is possible in the overlay presented to create a new case with a name (and description if chosen). Selecting 'Save' on this overlay will simultaneously create a new case and add the selected alerts to this newly created case.
Add To Case - Entity Alert List
As cases/investigations are often based around a single entity, it is also possible to add alerts to a case (and create them) from an entity's alert list on the entity page. This functionality on the entity alert's list works the same as previously described for the alert overview lists.
Case Detail Page
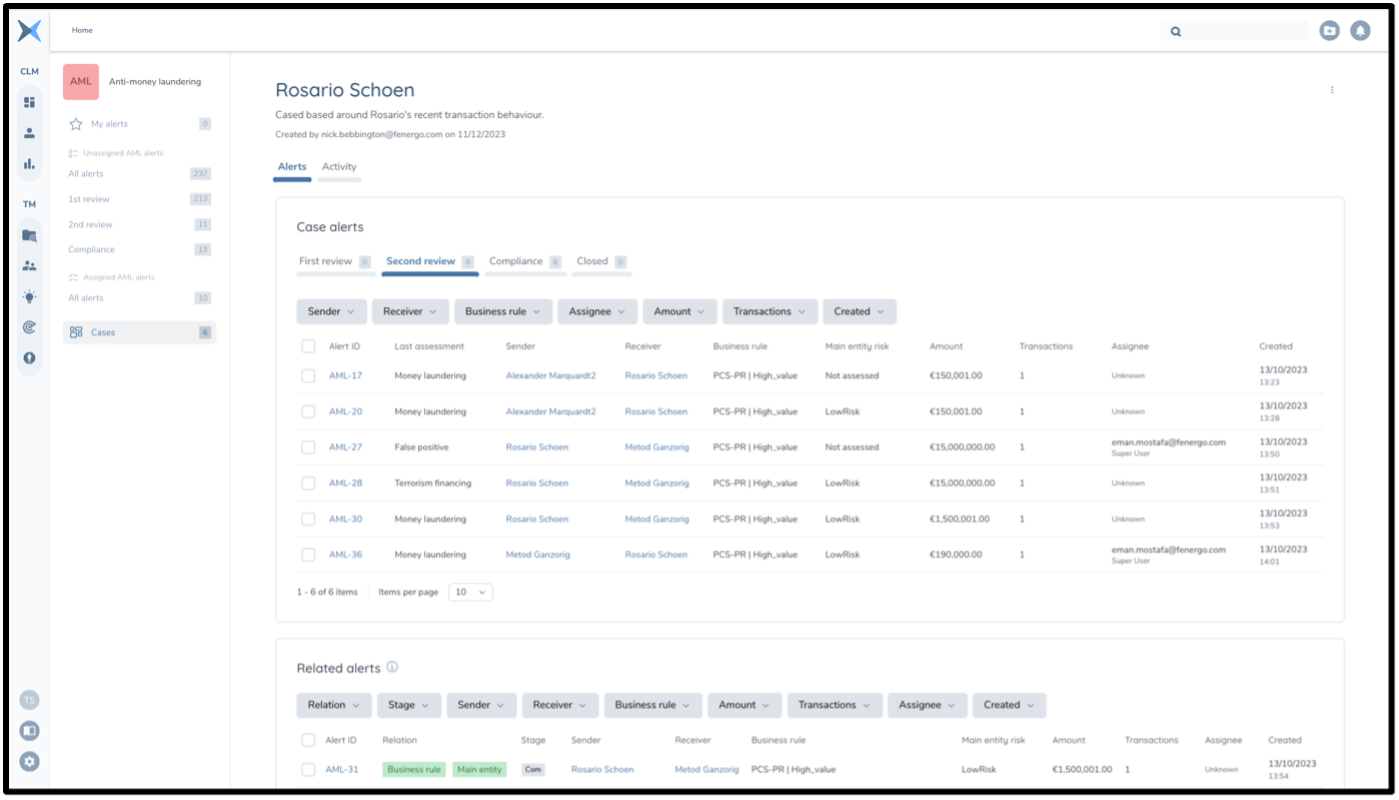
The case detail page shows all information about a case. From this page an individual case can be worked on. This page displays the name of the case, the description and the creation date at the top.
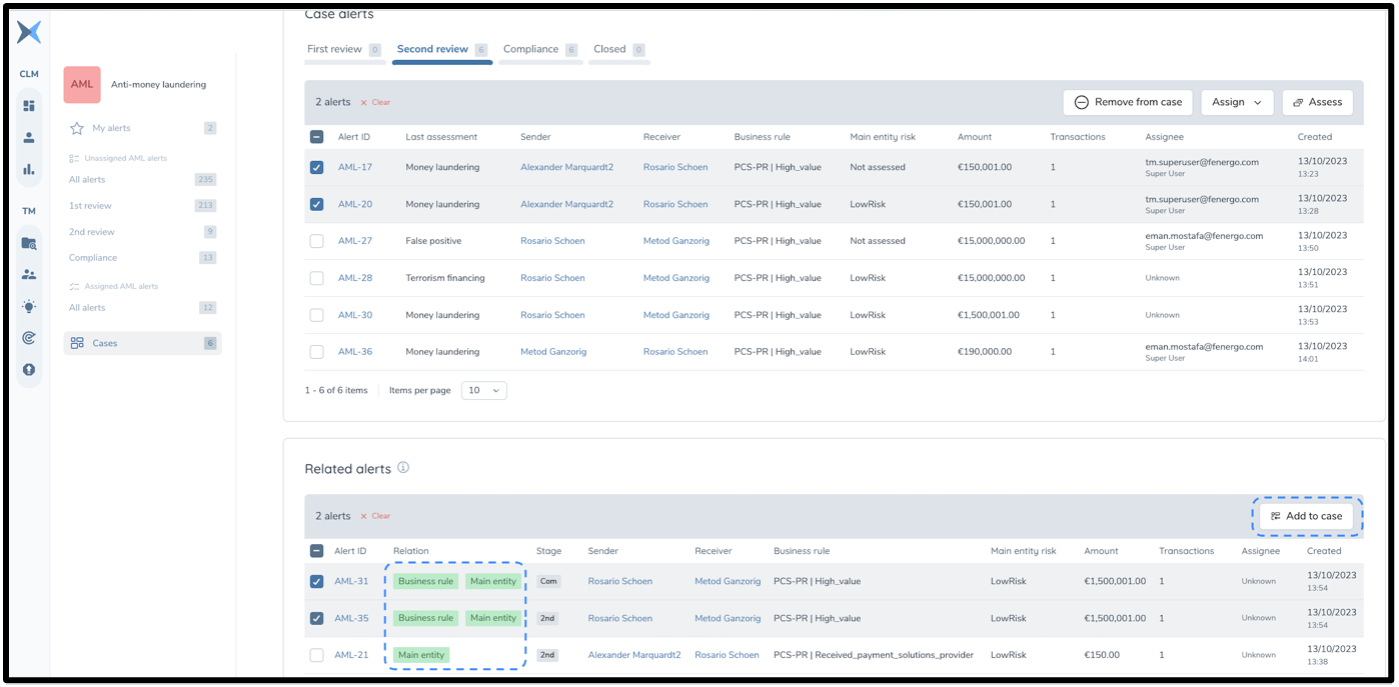
The two tables display a number of alerts. The first table 'Case alerts' displays all alerts which have been added to the case. These are alerts that should then be actioned in the framework of the case. They are split across the various stages of assessment.
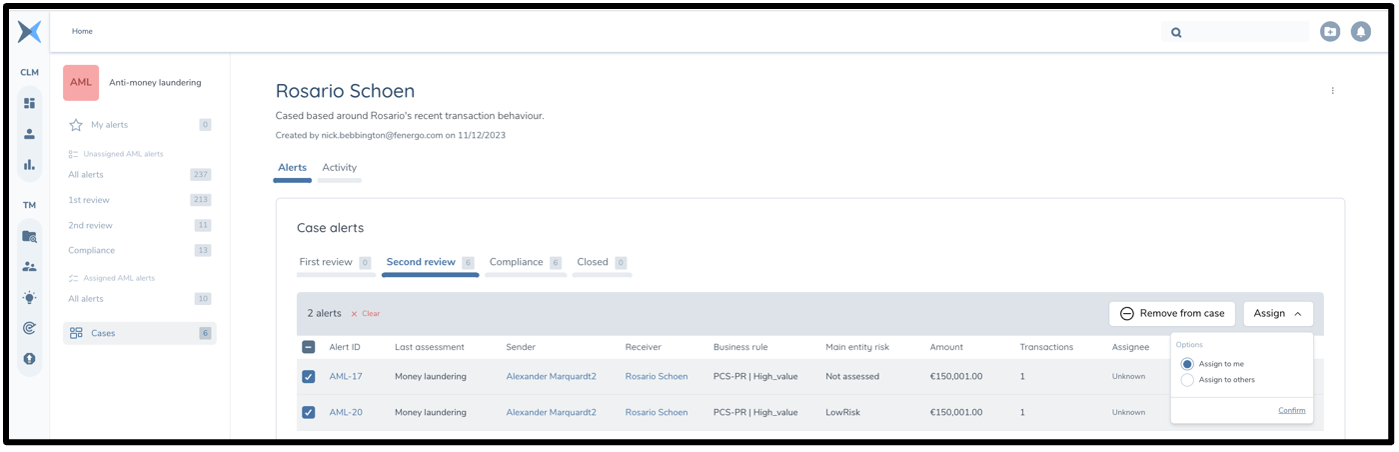
Assign And Assess Alerts
From this table the usual actions can be performed in bulk on these alerts. Multi-selection of alerts allows the user to assign them to themselves or others (dependent on permissions). The user can also remove alerts from the case using multi-select. Once a number of alerts are assigned to a user they are then able to select them and bulk assess them using the standard flyout for bulk assessment. The existing rules for bulk assessment apply:
- Alert must be assigned to me to assess
- Max 50 alerts can be assessed in one single bulk assessment
Related Alerts
The second table of 'Related alerts' shows alerts which are related to the alerts already in the case. This is based on either having the same main entity as the existing alerts or being triggered on the same business rule. This list allows you to see alerts which may have commonality with alerts in this same case page rather than switching to alert lists elsewhere. Related alerts can then more easily be added to the case using the multiselect boxes and clicking to add to case. This list is dynamic based on any new alerts added to this list.
Case Tracking
The actions in cases and tracking which alerts are in which cases is important to ensure all users have quick access to all necessary context. For this reason full trail information is provided as well as various areas of the platform highlighting when an alert is in a case.
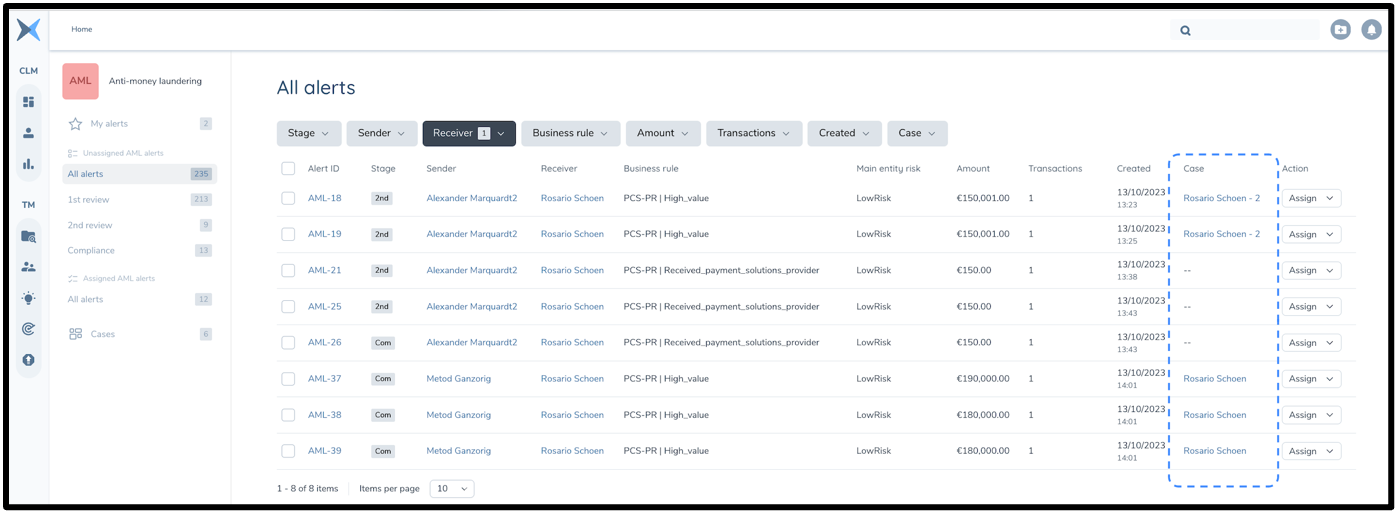
Displaying the case of an alert
If an alert is already in a case, then this can be seen easily in two places - alert lists and the alert detail page.
In the alert overview lists and the entity alert lists there is a column in the tables which specifies which case that alert is in (if it is indeed part of a case). This is especially important as alerts which are already in a case cannot be added to another case. The name of the case in the column is a link which redirects to this case's page.
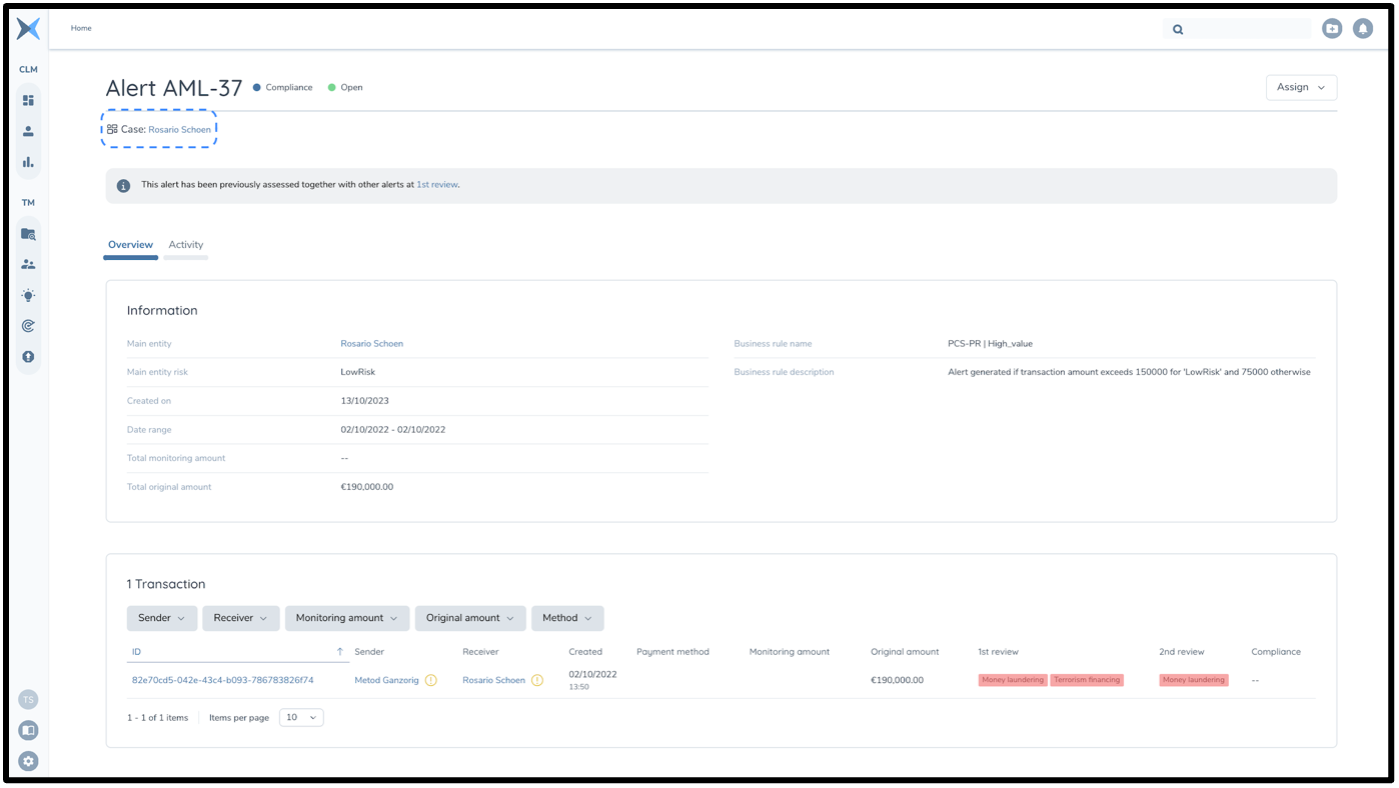
An alert's case can also be seen at the top of the alert detail page below the alert number. The case name can also be clicked here, redirecting to this case's page.
Trail For Case Actions
To keep a clear trail of actions which take place relating to cases the case itself has an activity trail (and commenting). Actions performed on an alert which relate to cases will also be included in the activity of that individual alert.
The case's activity is included under the activity tab. On this tab, commenting is possible (including file upload). This functionality works the same as in the standard activity section of an individual alert. Trail items are also displayed for the following actions, with corresponding time stamps and user information:
- Case created
- Case name or description edited
- Alerts added to case
- Alerts removed from case
- Alert assessed in the case
- Case archived
Case trail items are also included in individual alert pages so that when in an alert detail page, context available is complete. The following trail items are shown beyond the standard alert trail items:
- Alert added to case
- Alert removed from case
Entity & Transaction Pages
Entities Overview List
The Entities page shows the user a list of all entities that have ever had an open alert. It is accessed by clicking on the Entities button in the top navigation bar. Entities listed in this page are those created from being involved in transactions, either as the sender; receiver; sending partner; or receiving partner.
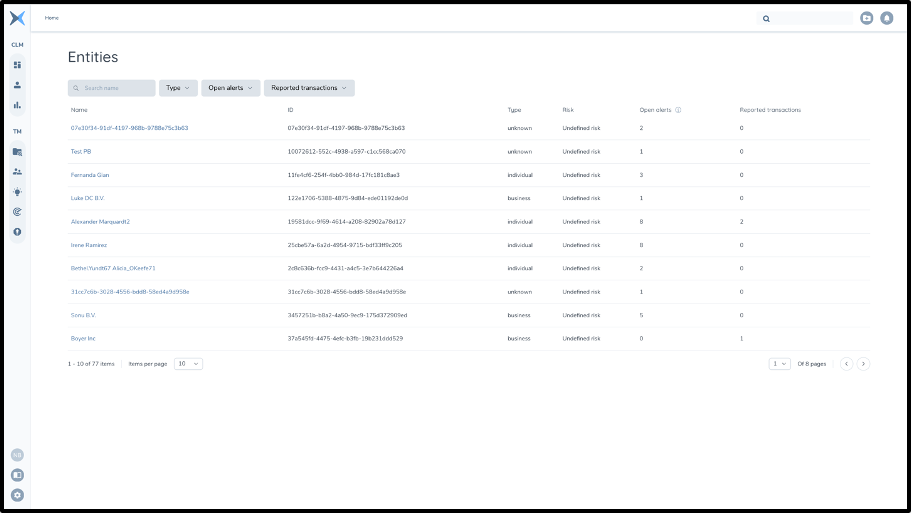
The list of entities provides several details relating to each entity:
- Name - name of the entity
- ID - ID of the entity
- Type - entity type (Individual, Business, or Unknown)
- Entity risk - risk profile of the entity
- Open alerts - number of alerts currently open with the entity involved
- Reported transactions - how many transactions have been reported or are pending reporting which involve this entity
The user can also sort based on these details.
The user has several options to filter through the entities:
- Type - filter through entity types (Individual, Business, Unknown)
- Open alerts - enter a minimum and/or maximum value for open alerts regarding the entity
- Reported transactions - enter a minimum and/or maximum value for reported transactions regarding the entity
The user can also search for an entity by using the Search bar and inputting an entity's name.
Clicking on an entity's name from this list will navigate the user to the Details section of the entity's page. From here the Alerts, Transaction Profile and Activity sections of the entity's page can also be accessed.
Entity Page
Entities have their own page with an overview of information related to the entity; alerts related to the entity; an entity's transaction profile; and an activity section with trail and comments.
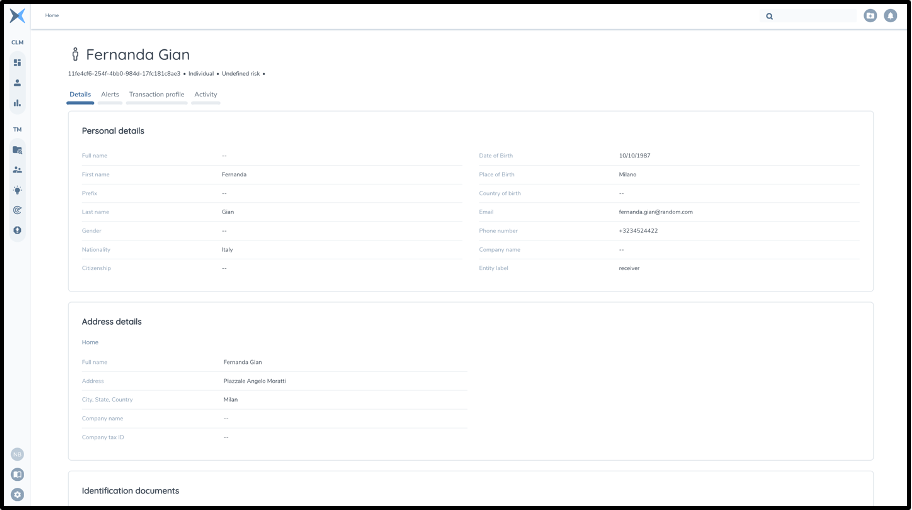
Entity Details
This section of an entity's page contains an overview of all entity information available.
An entity's page can be accessed by clicking on the entity name from the entities list, or from clicking the View entity button (the button located in the flyout when viewing Entity details from the Alert details page).
Depending on whether the entity selected is an Individual, Business or an unknown entity, the information provided will be slightly different. The information available in the Details page is as follows:
-
Personal details - for Individual entity type only
- Details regarding the legal person's name, gender, nationality, date of birth, contact details and place of work
-
Business details - for Business entity type only
- Details regarding entity name and aliases, business type/sector, company registration details and contact information
-
Address details
- Details regarding the entity's address(es). Includes address type (work, home etc) and address
-
Identification documents - for Individual entity type only
- Details regarding the individuals ID including type of ID and relevant ID numbers and issue country
-
Payment details
- For every account linked to the entity, provides information regarding bank details, and account specific details
-
Onboarding and offboarding - for Business entity type only
-
Groups
- Any peer groups that have been specified that the business entity is part of
-
Additional information
- any other attribute sent as an additional field via API
-
Entity Relations
- Relationships to other entities e.g. Cardholder, Company, Contact, Stakeholder, Ultimate beneficial owner
Entity Alerts
This page shows a list of all alerts and alert details that are related to the selected entity. This includes both open and closed alerts.
The page is accessed by clicking on the entity's name from the Entities list and then clicking the Alerts button, or by clicking on the View all alerts button in the sidebar when viewing Entity details from the Alert details page.
In this section, the user can view all Anti-money laundering alerts involving the selected entity - both open (current) alerts and closed (previous) alerts. The user can switch between the Open alerts and Closed alerts using the toggle at the top right of the list.
Once open or closed alerts are selected, the user will be able to view a list of these alerts containing the following information:
-
Alert ID
- Identification number unique to that particular alert. Click on an alerts ID to view a flyout containing Alert details
-
Status
- Status of the alert - open, paused, closed TP, closed FP
-
Stage
- Review stage of the alert (1st, 2nd, Compliance)
-
Business rule
- Which business rule triggered the alert
-
Sender
- The entity(s) which sent money in this alert.
-
Receiver
- The entity(s) which received money in this alert.
-
Amount
- Sum of the amount of all transactions within the alert
-
Transactions
- Number of transactions in the alert
-
Created
- Date alert was created
-
Assignee
- The user that the alert has been assigned to (or 'unassigned')
-
Action
- Allows user to assign/reassign/unassign the alert
These points can be sorted on. There are also several filter options to sort through the lists of alerts:
- Alert ID; Status; Stage; Business rule; Sender; Receiver; Amount; Transactions; Created; and Assignee.
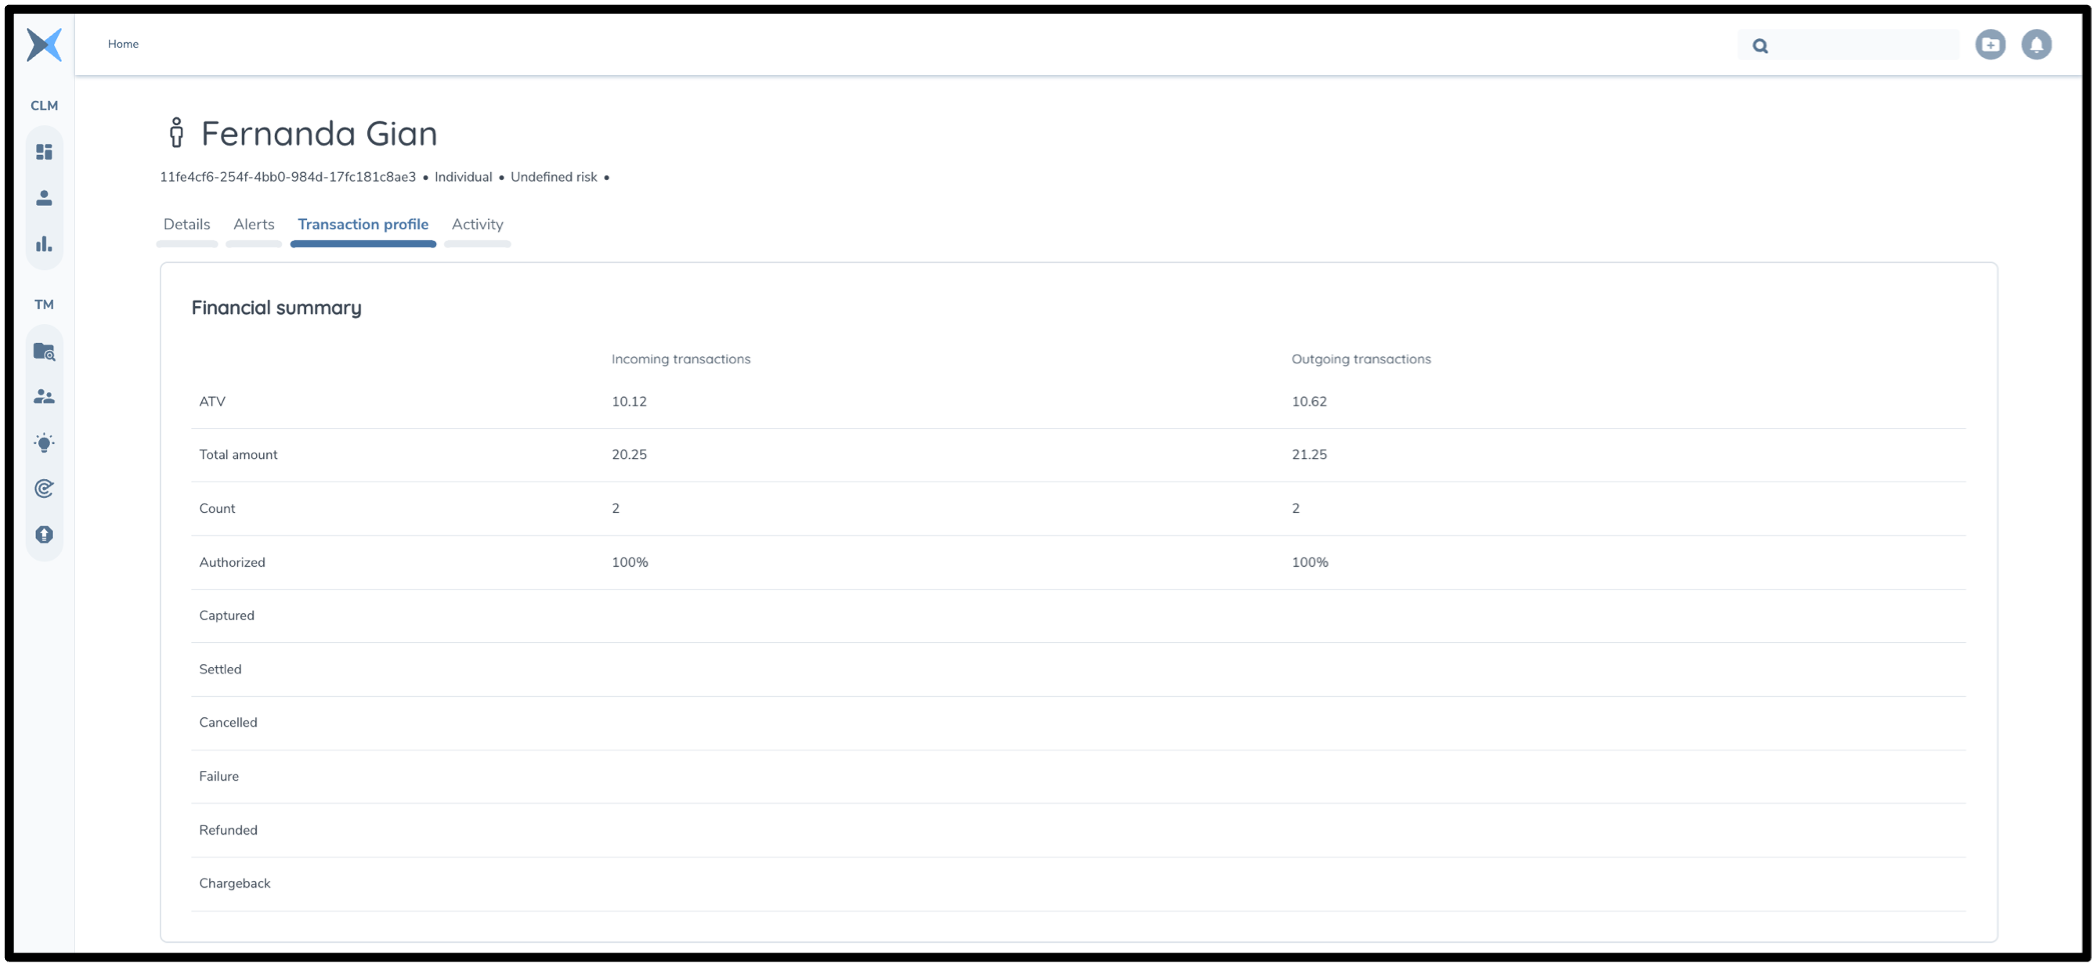
Entity Transaction Profile
Each Entity's page also has a full Entity Transaction Profile which gives user's a more detailed overview of historical behaviour of the entity.
Information in this page gives an overview of patterns of behaviour for both incoming and outgoing transactions.
The first table displayed is a financial summary. This shows values for all available historical data and is updated/recalculated daily. The values here show the monetary amount this entity has sent and received as well as a count of the number of transactions they have sent/received. There is also a breakdown in percentages of the total of the makeup of transaction modification types: Authorised/Captured/Settled/Cancelled/Failure/Refunded/Chargeback.
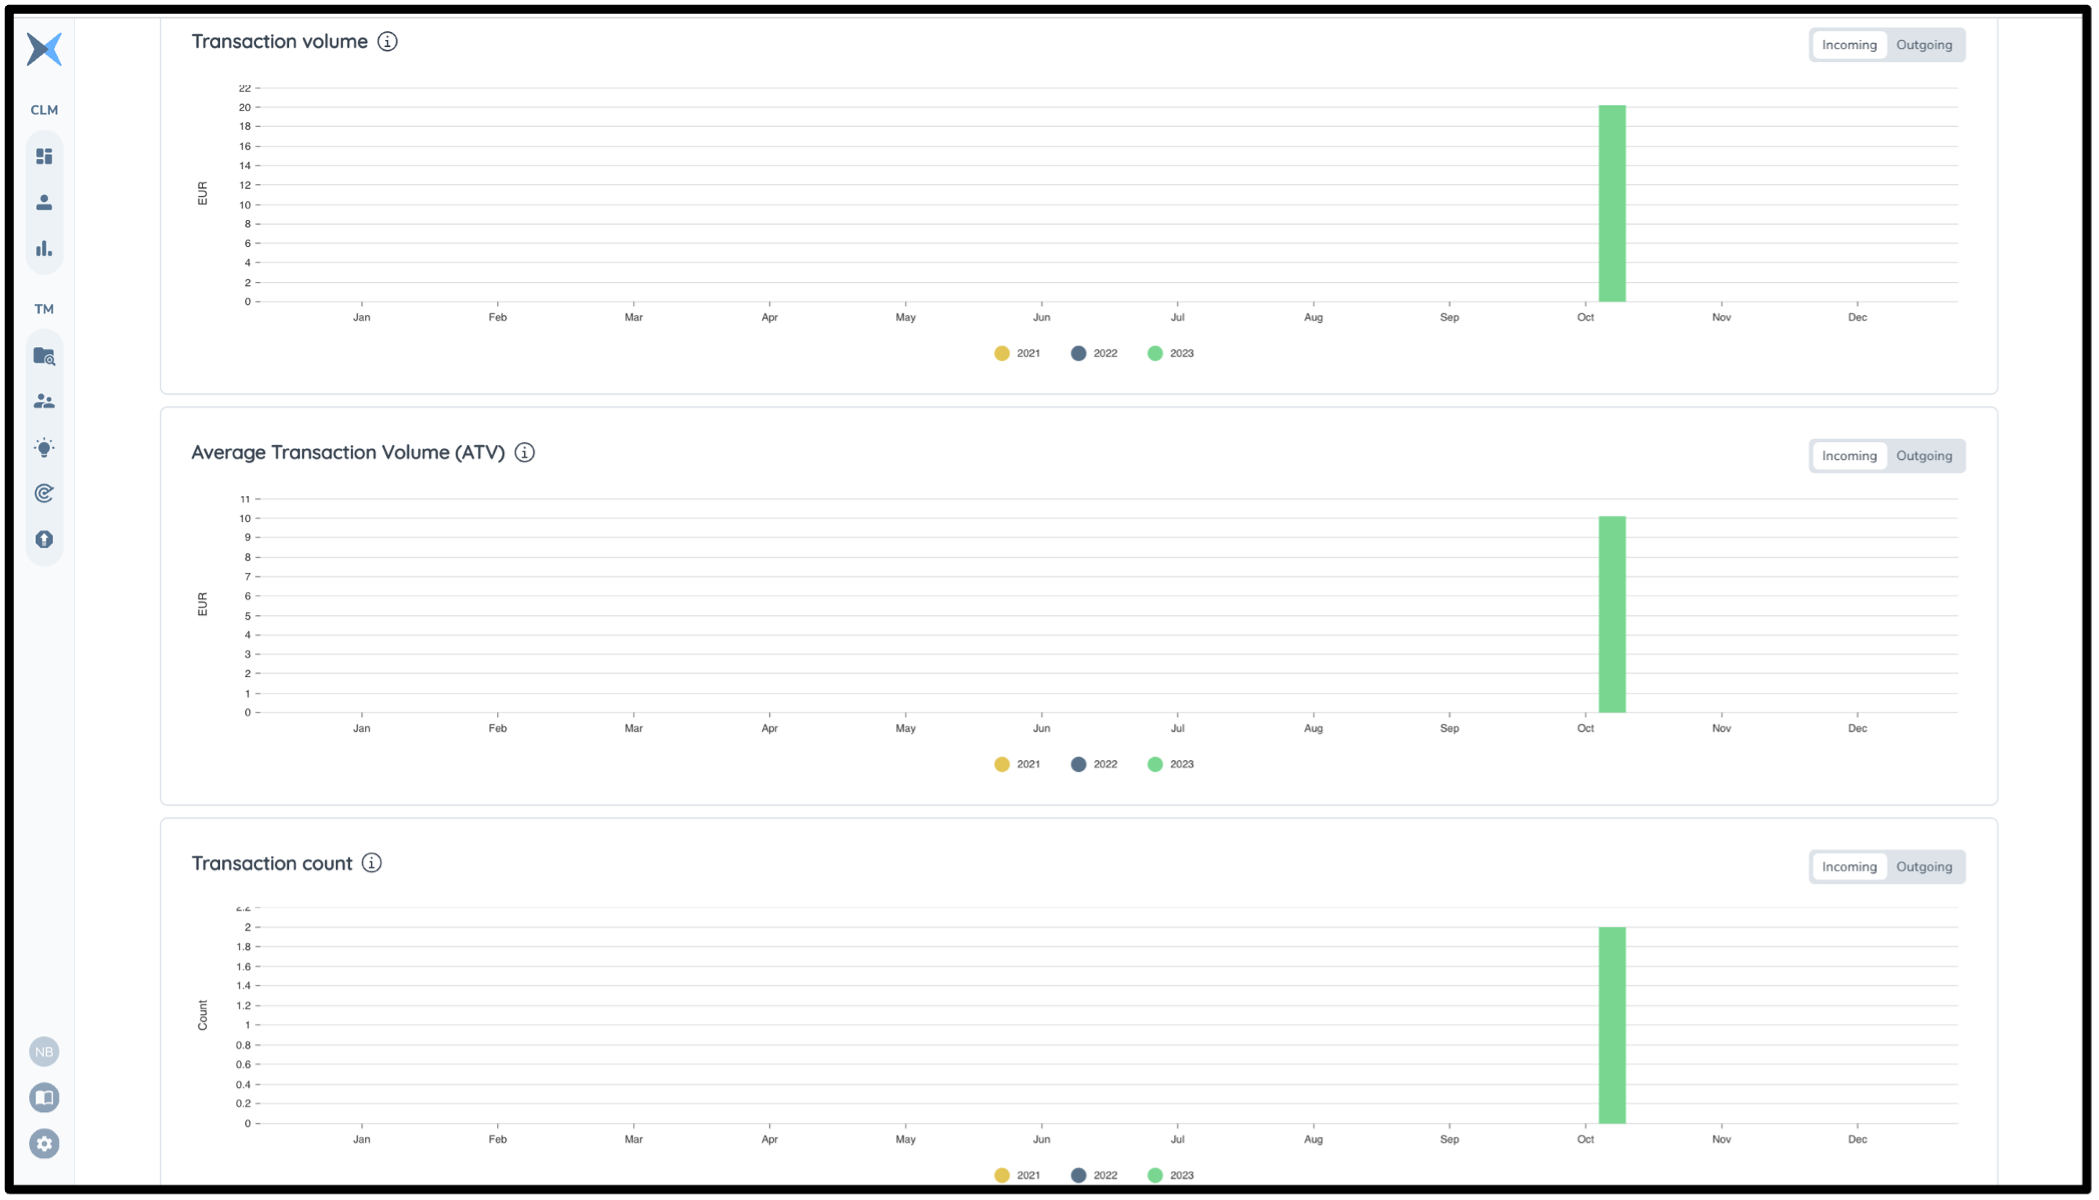
There are also bar graphs showing monthly values for the previous 2 years for:
- Transaction Volume
- Average Transaction Volume
- Transaction Count
The data in these graphs is again split between incoming and outgoing transactions (using a toggle).
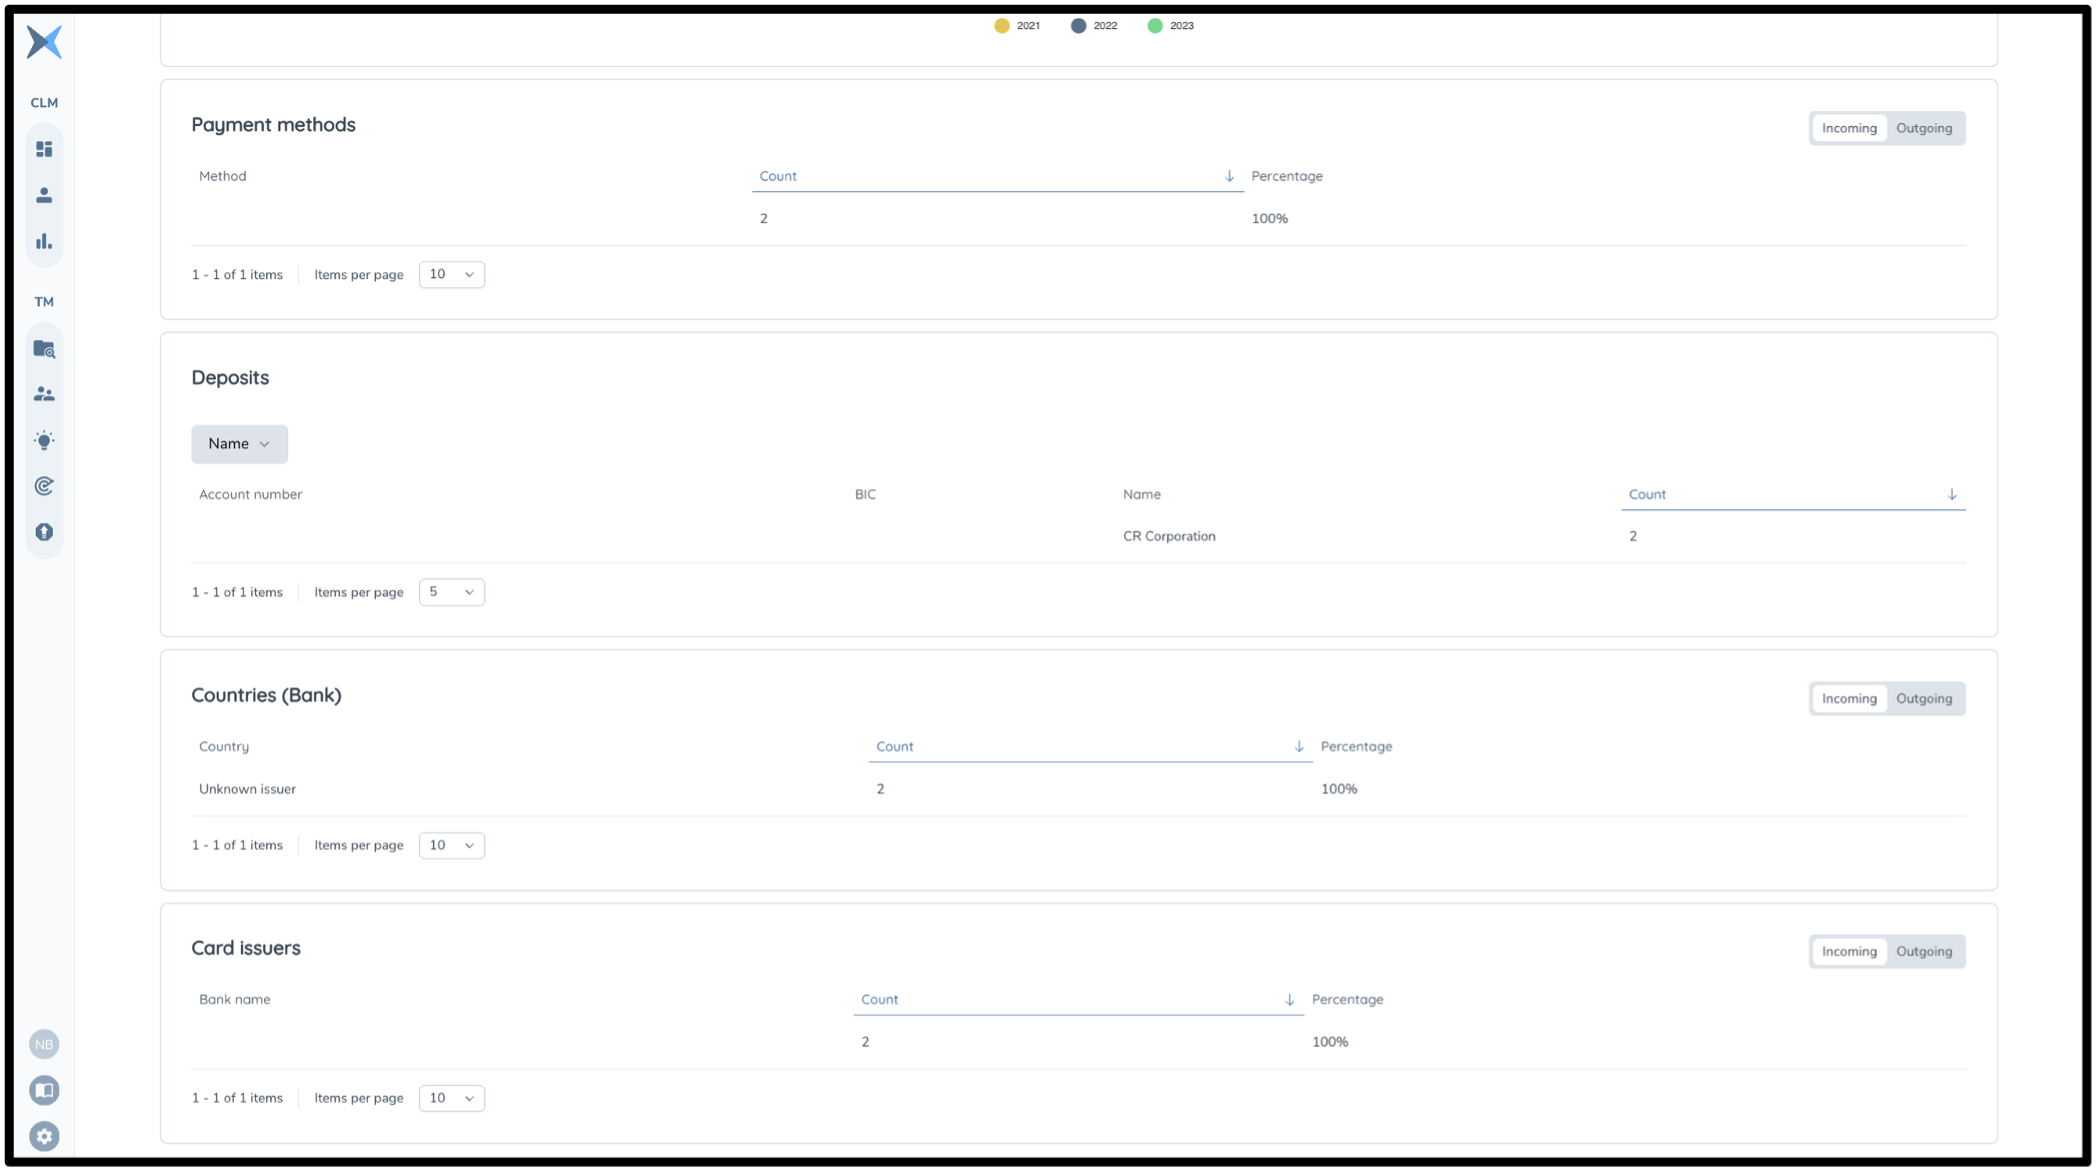
Finally, there are 4 tables showing the most common values for transaction information:
- Payment methods: Lists the most commonly used payment methods e.g. Mastercard, Visa, Paypal etc.
- Deposits: Shows the individuals that have most frequently deposited into the account linked to this entity
- Countries (bank): The sending or receiving bank's location when the entity receives or sends a transaction
- Card issuers: the bank name for the sender/receiver in transactions
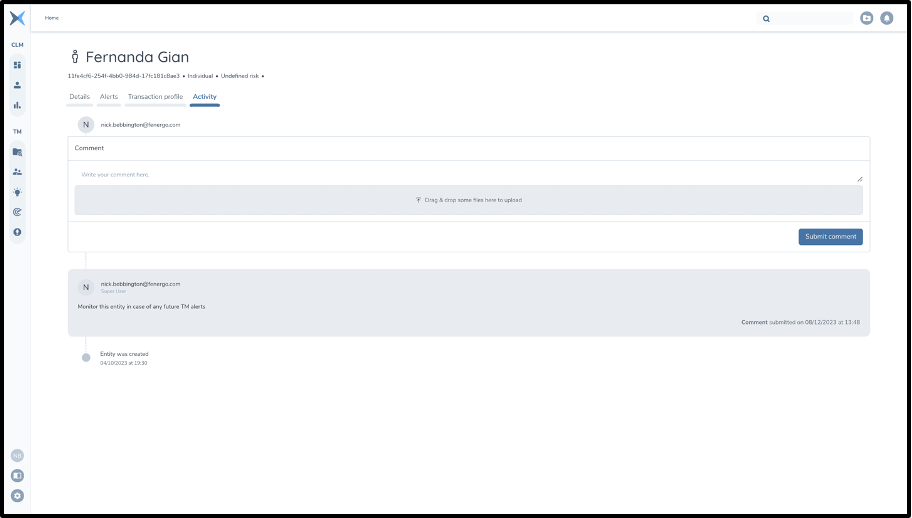
Activity
This section of the Entity's page shows a record of comments and events involving the entity. Any comments made by users including any documents uploaded are shown, as well as a trail item for the creation of the entity.
This page is accessed by navigating to the entity's own page, and then clicking on the Activity tab.
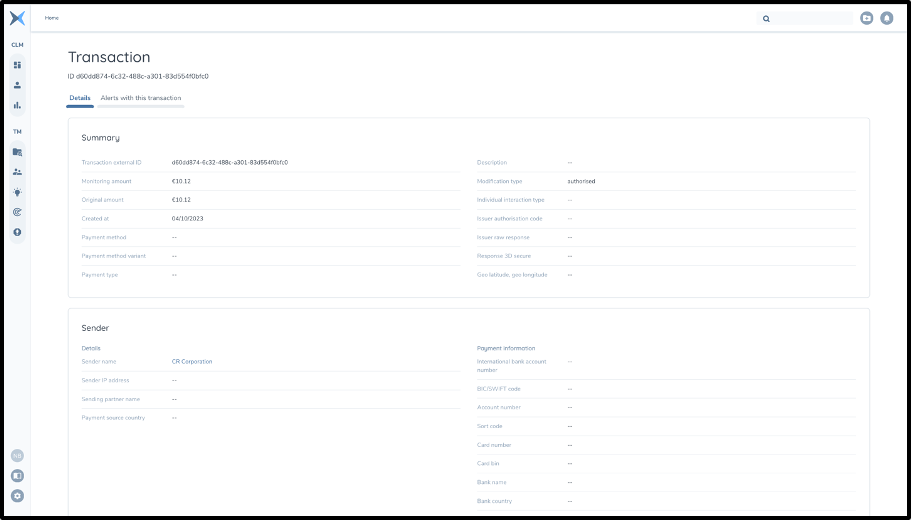
Transaction Page
This page shows all information regarding a transaction. The page cannot be accessed from the Navigation bar, only by clicking on a transaction's ID and then clicking on the View transaction button from the flyout.
Transaction details
The information on the details page is split into 4 parts:
-
Summary
- Summary of details on the transaction: including external ID, creation date, amount, and payment details
-
Sender
- Information on the sending entity: including name, risk level and bank details
-
Receiver
- Information on the receiving entity: including name, risk level and bank details
-
Additional information -Any additional information on the transaction sent via API
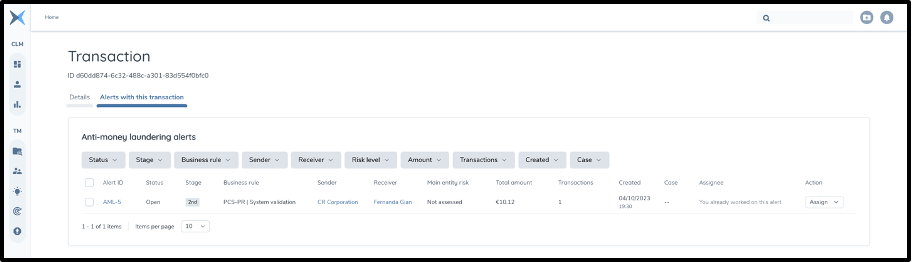
Transaction Alerts
This page shows all alerts that contain this transaction. This includes open and closed alerts.
This page cannot be accessed via the Navigation bar, instead the user must click on a transactions ID and click on the View transaction button on the flyout and navigate to the 'Alerts with this transaction' tab.
The list of alerts here is the same as the list of alerts based on a specific entity. The only difference is that alerts contained in these two tables are based on either an underlying entity or a transaction.
Configuring Alerts
General Assessment Flow - 2 Eye Vs 4 Eye Configuration
The transaction monitoring workflow has the option of two different configurations (which can be set up with the support team). These configurations determine the number of assessments an alert must go through (dependent on assessment type selected). The two configuration options are called "2-eye review" and "4-eye review". These configurations are named as such as they indicate the minimum number of people that would have to assess an alert to close it (1 user for 2-eye review and 2 users for the 4-eye review).
4 - Eye Review Flow
The standard configuration is the 4-eye review. The four eyes principle is a common internal control mechanism whereby an assessment must be done by (at least) two different people to give approval for an action/decision. This ensures that checks are reviewed to pick up any potential information which has been missed in the other stage of assessment. This reduces the number of incorrect false positives, ensuring suspicious alerts are correctly handled.
The following scenarios/flows are possible:
-
False Positive assessment at 1st stage + False Positive assessment at 2nd stage = the alert is closed as false positive at the 2nd stage.
-
False Positive assessment at 1st stage + True Positive assessment at 2nd stage = compliance stage review is needed - compliance stage assessment holds. If compliance stage assessment is False Positive then the alert is closed as False Positive at that stage. If the compliance stage assessment is True Positive then the alert is closed as True Positive and any transactions marked as True Positive are escalated to then be reported.
-
True Positive assessment at 1st stage + False Positive assessment at 2nd stage = compliance stage review is needed - compliance stage assessment holds. If compliance stage assessment is False Positive, then the alert is closed as False Positive at that stage. If the compliance stage assessment is True Positive, then the alert is closed as True Positive and any transactions marked as True Positive are escalated to then be reported.
-
True Positive assessment at 1st stage + True Positive assessment at 2nd stage = compliance stage review is needed - compliance stage assessment holds. If compliance stage assessment is False Positive, then the alert is closed as False Positive at that stage. If the compliance stage assessment is True Positive, then the alert is closed as True Positive and any transactions marked as True Positive are escalated to then be reported.
2 - Eye Review Flow
The 2-eye review configuration is a streamlined workflow where only one user (at a minimum) needs to make an assessment. This configuration may be selected if a company decides that this level of scrutiny is adequate. It may be chosen by smaller companies who do not (yet) have a large compliance team to perform assessments. This flow increases efficiency but simultaneously reduces the thoroughness of assessment.
The following scenarios/flows are possible:
-
False Positive assessment at 1st stage = the alert is closed as false positive at the 1st stage.
-
True Positive assessment at 1st stage = compliance stage review is needed - compliance stage assessment holds. If compliance stage assessment is False Positive, then the alert is closed as False Positive at that stage. If the compliance stage assessment is True Positive, then the alert is closed as True Positive and any transactions marked as True Positive are escalated to then be reported.