ETL Documents
Entity Documents
A key part of Client Lifecycle Management is maintaining the documents that evidence KYC/AML and other regulatory requirements (e.g., Proof of Address, Bank Statements, Corporate Registrations). ETL Documents enables clients to migrate large volumes of files into Fenergo in a structured, policy-driven format. ETL will orchestrate the transfer of files to temporary staging area, validate the data and presence of each file, copy the files to an antivirus bucket and, then load to the final document store where they are linked to the correct entity record.
ETL Documents Capabilities
When using the ETL tool to migrate documents into Fenergo, users can associate the transferred documents with the relevant legal entities and ensure the correct document types and supplementary metadata are applied.
ETL Entity Documents currently supports create operations only. The ability to update existing document metadata will be introduced in a future enhancement.
Supported Use Cases
“I want to load a set of documents for a new entity identified by alternateId via ETL.” “I want to load a set of documents for an existing entity in Fenergo identified by alternateId or fenxId.”
Behaviour & Limits
- All files are scanned by antivirus when transferring documents to the S3 bucket via SFTP.
- Access is restricted to one server per tenant, with each username having its own directory, ensuring strict isolation and preventing any data interference between projects.
Document uniqueness is not enforced during load. Duplicate file names for the same entity may result in multiple uploaded records for the same entity.
Prerequisites to migrating documents
Before you can migrate entity documents, some additional steps are required:
- Generate SSH Keys
- Install an SFTP Client
Generate SSH Keys
Before connecting to the SFTP server, you must generate an SSH key pair consisting of a public key and a private key. You may use any OpenSSH-compatible tool to generate these keys, such as:
- PuTTYgen (recommended for Windows users).
- The built-in ssh-keygen command available on macOS, Linux, and modern Windows versions.
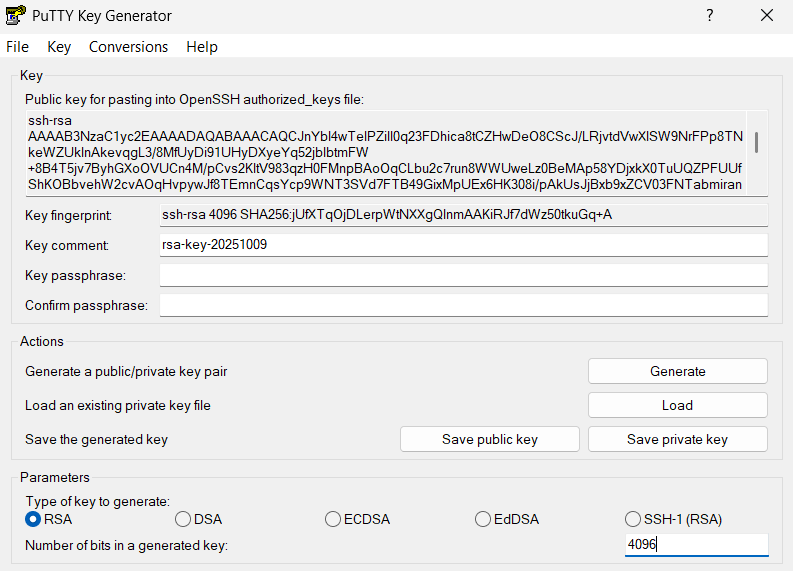
A dedicated download is not required if your operating system already includes SSH key generation tools.
Install and Configure an SFTP Client
To transfer documents into the ETL staging area, you will need an SFTP client such as WinSCP, FileZilla, or any other secure-file-transfer-protocol tool that supports key-based authentication.
Configuration steps may vary slightly between SFTP clients. Always refer to your client’s official documentation for the most accurate guidance.
Your private key must be stored securely on your local device in a protected folder. Never share your private key, anyone with access to it can authenticate to your SFTP environment.
Creating an ETL project with Entity Documents
Create New Project
To initiate a new document migration:
- Select + on the ETL Dashboard.
- Enter a Project Name and Description.
- Select the Entity Document datatype.
No policy is required for Entity Documents, as the policy fields come from the document metadata data group and are not driven by a specific policy.
Document Uploads
Before uploading entity documents to the target environment, secure SFTP credentials must be generated and configured for use with an SFTP client.
Generating SFTP Credentials
Enter the generated Public Key into the designated field and click Start Server. Once a valid public key has been provided, the server will be initialised, and a unique set of credentials will be generated automatically.
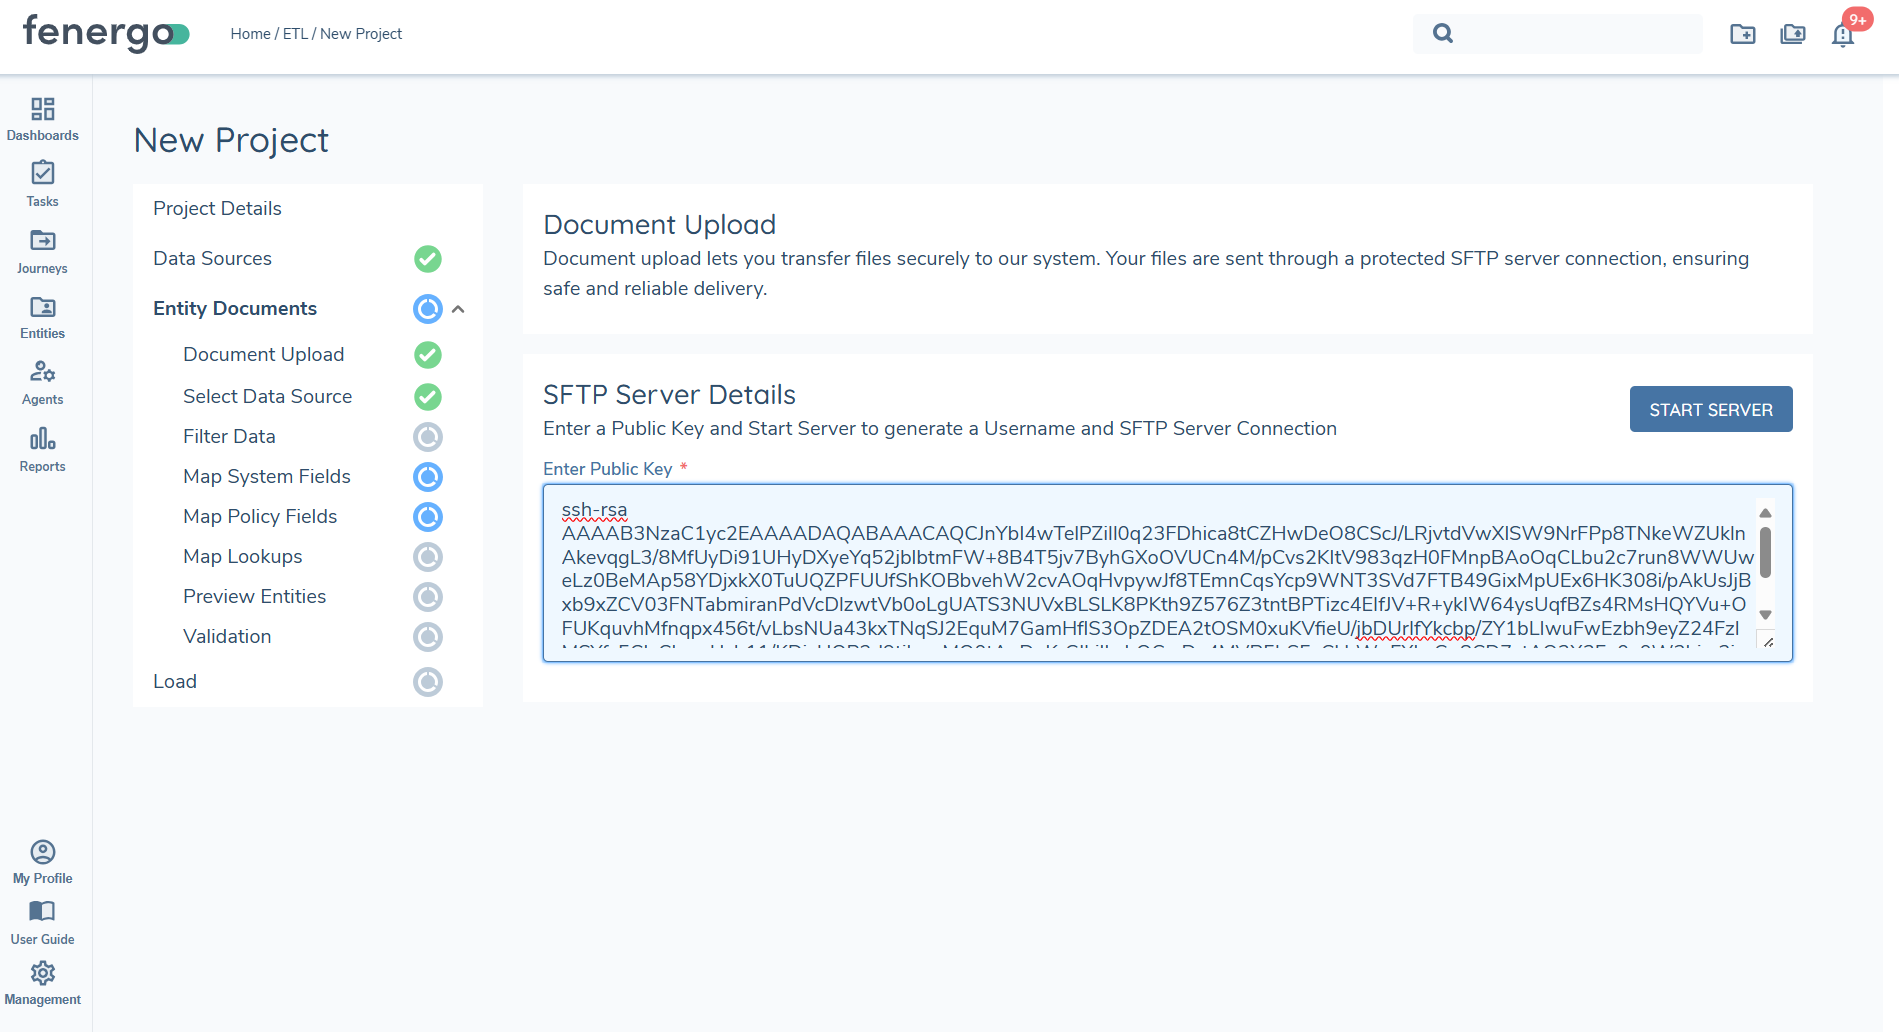
After the server has been successfully created, the username and SFTP server endpoint will be displayed in the user interface. These details, along with the corresponding Private Key stored securely on your device, will be used to establish a secure connection to the SFTP server.
SFTP server endpoints are provisioned on a per-tenant basis. Each username is assigned a dedicated directory within the tenant’s SFTP server and is explicitly linked to a corresponding project ID.
Configuring your SFTP Client
Once the credentials are available in ETL, you can open your SFTP client and enter the generated SFTP server endpoint and username. For Authentication, the Private key will be required to establish the connection.
Configuration steps may differ depending on the SFTP client selected. It is recommended to review and follow the official documentation for your chosen SFTP client to ensure proper setup and secure authentication.
Transferring Files
Once the connection is successfully established, the transfer of files can begin. Use your SFTP client to upload the required entity documents to the designated directory on the server. Ensure that all files are named and structured according to the data source you are using for the migration.
Select Data source
Upload one or more CSV files containing document metadata and entity identifiers.
Ensure your CSV includes all mandatory fields and that reference data values (e.g., Document Types) match what is configured in your environment.
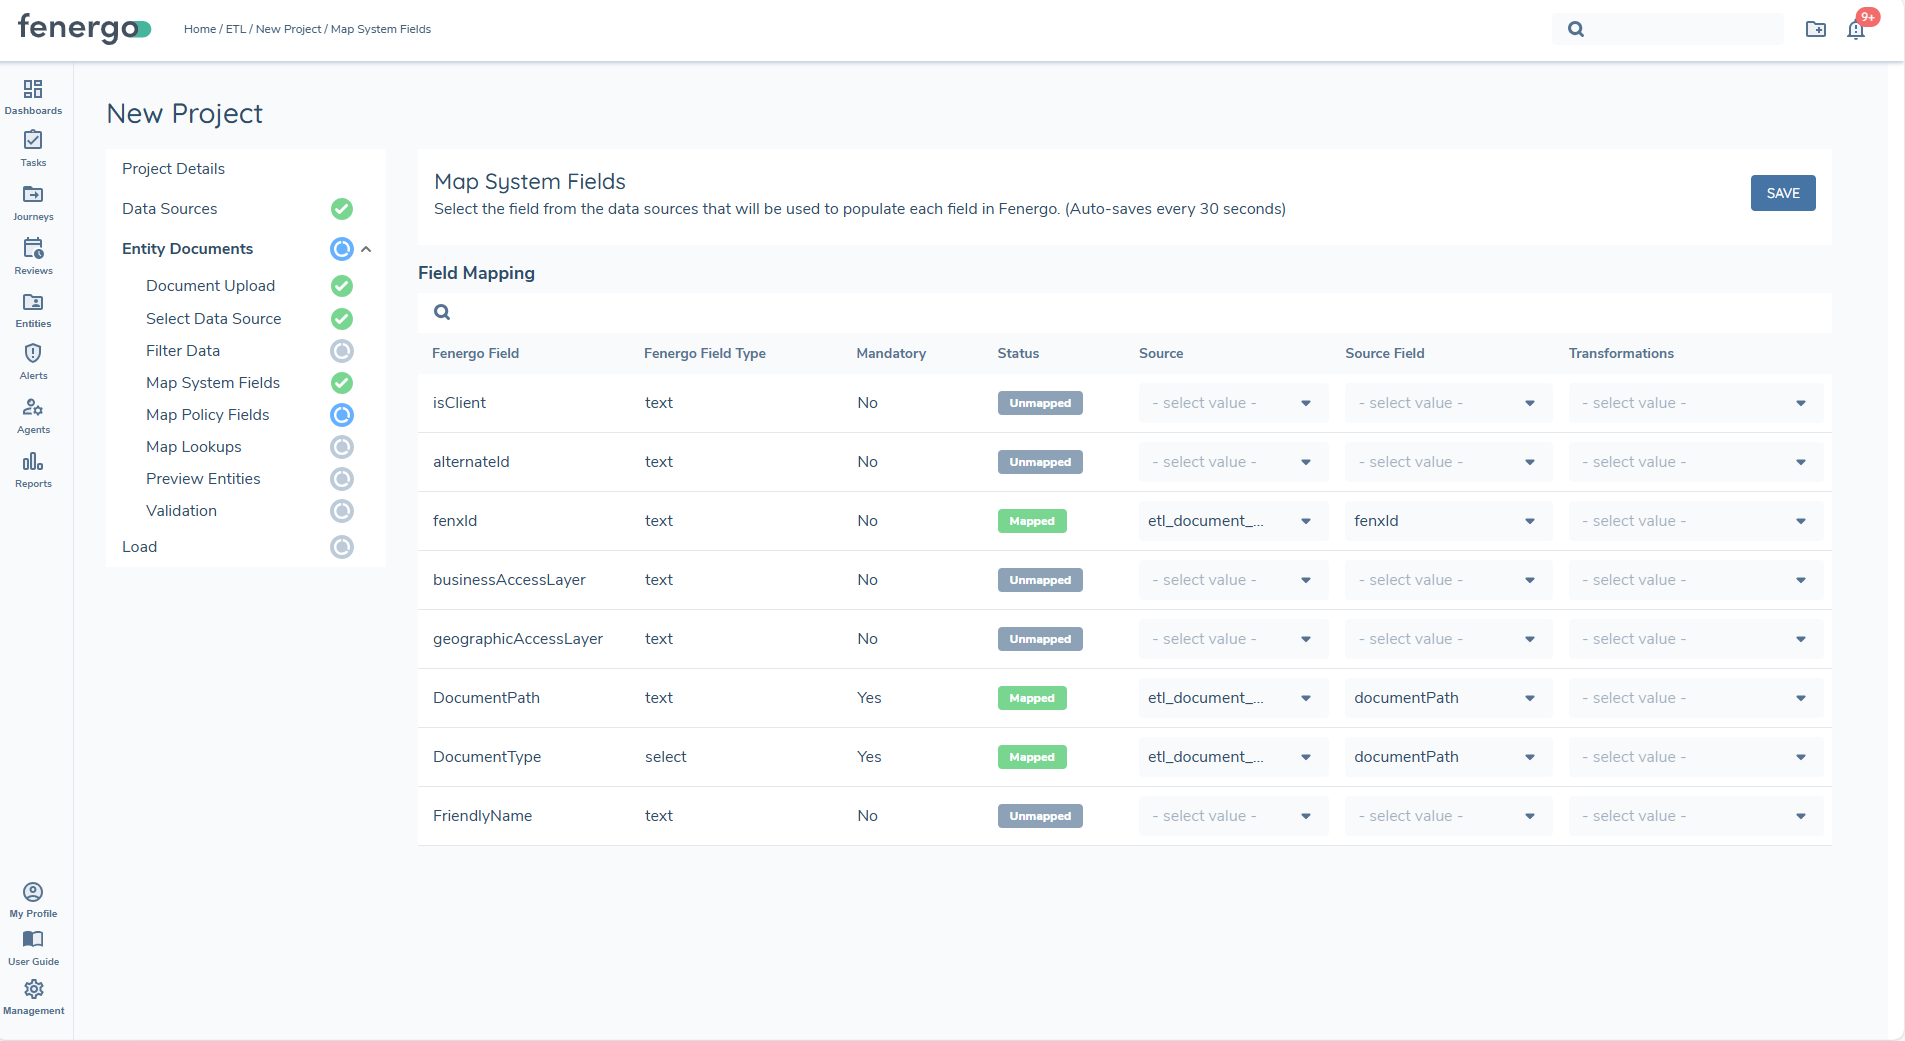
Map System Fields
Once the Primary Data Source has been selected, the next step is to map columns from your data source to the required System Fields
fenxId or alternateId
identifier for your target entity record.
documentPath
Defines where the file resides in the SFTP directory.
- If no folder structure exists → use only the file name (e.g., passport.pdf).
- If folders exist → include full relative path (e.g., kyc/passport/passport.pdf).
- Must include file extension (e.g., .pdf).
Filename is automatically derived from final segment of the documentPath.
Files extensions are required for document path (e.g., passport.pdf).
documentType
The value must align with a Document Type from the Document Types reference dataset.
Only Document Type names are accepted; datakeys are not supported.
friendlyName
Optional display name for the document. If not provided, the system uses the file name by default.
businessAccessLayers
Defines the business units, roles, or functional groups that are permitted to access the document.
geographicAccessLayer
Specifies the geographic regions or jurisdictions that are allowed to view the document.
Map Policy Fields
Map additional metadata defined by your Document Metadata data group. The latest version of these data groups is displayed in the Policy Fields section. If no additional metadata is required, the grid will be empty and the fields are treated as auto completed.
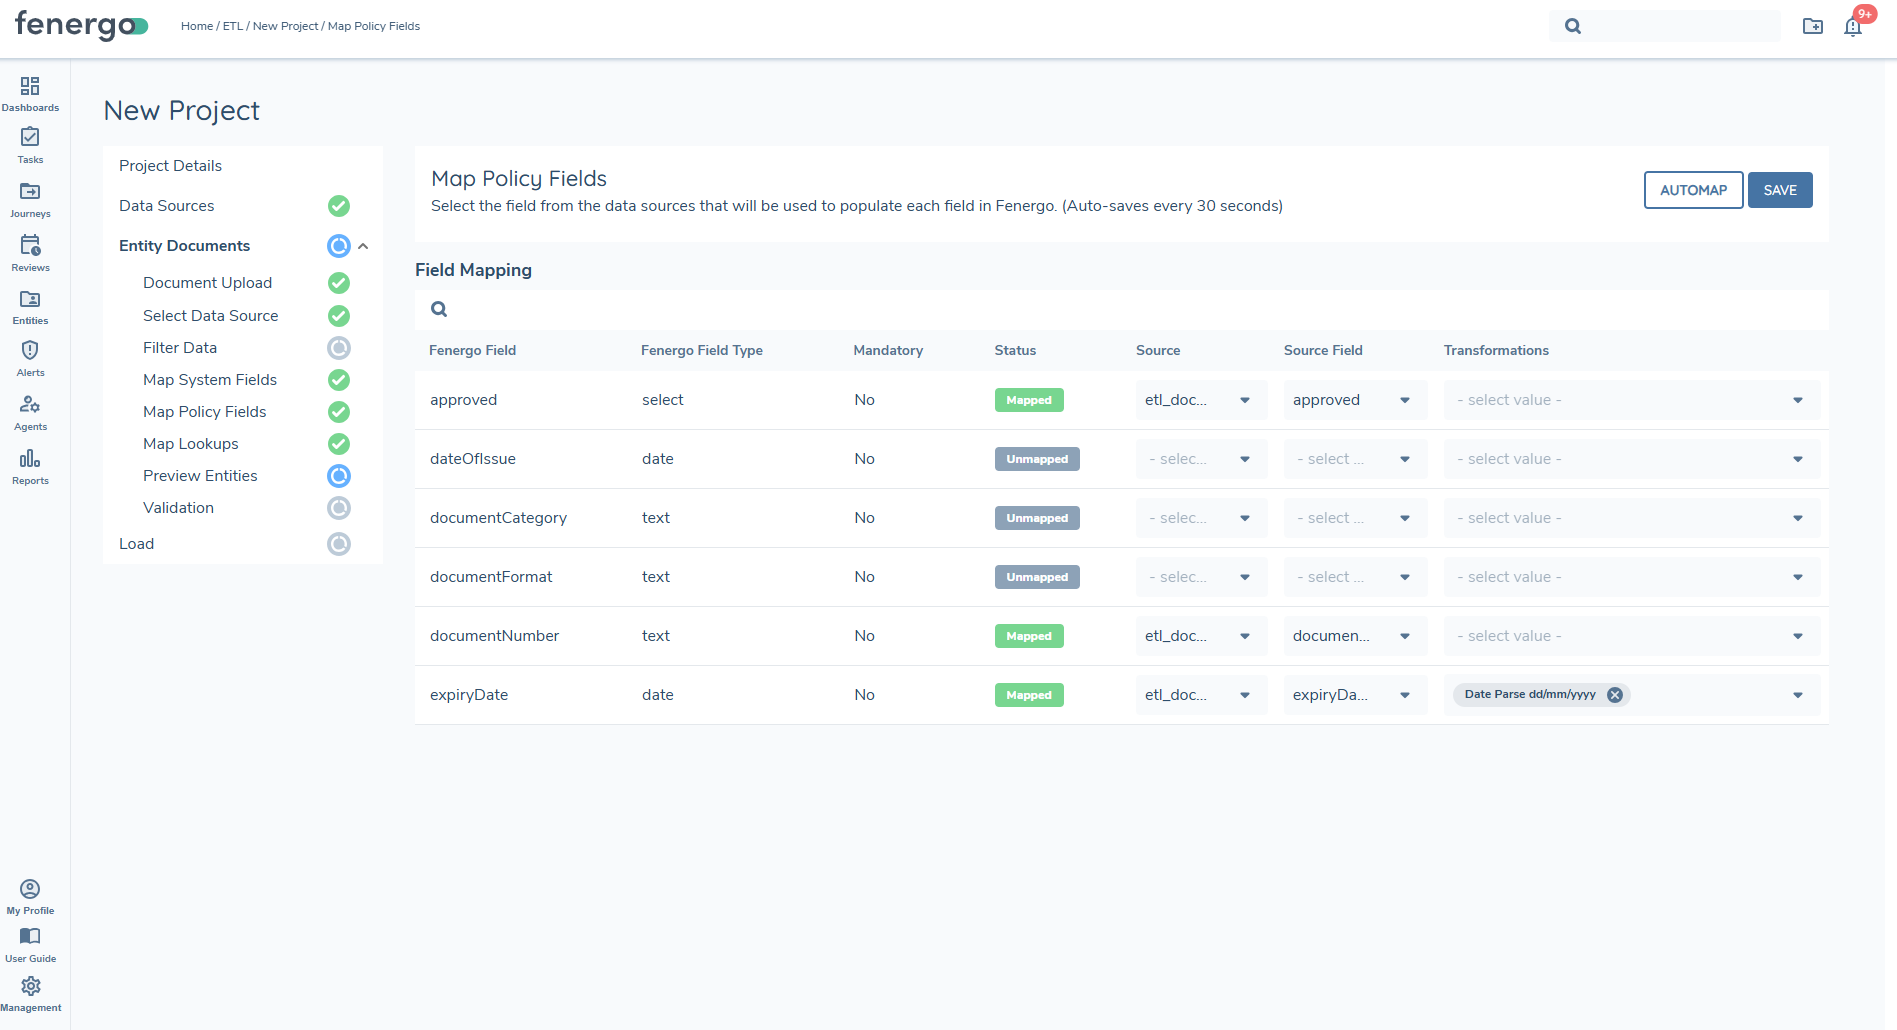
Data groups wil always be empty as we are using the document metadata datagroup within Map Policy Fields.
You must map all mandatory policy fields defined by your selected policy. If any required fields are missing, you will not be able to run Preview, Validation, or Load.
Preview
Before completing the validation process, confirm that all referenced files exist in the SFTP directory. The Grid View provides a comprehensive overview of each document, including identifiers, paths, document types, friendly names, access layers, and mapped metadata. Review this information carefully to validate file integrity and ensure each record is correctly aligned with the intended entity before proceeding.
Validation
Check the dataset against your project’s configuration.
- Document Types must match your tenant’s reference data.
- Metadata fields with defined lookups are validated.
- Existence is confirmed for each documentPath.
If any records fail validation, they are listed with detailed messages. Correct the data and re-run validation. Records that fail validation cannot be loaded into Fenergo.
Common Validation Errors
DocumentType
If your data source does not contain a document type you will be shown the current error messages:
- [DocumentType] [DocumentTypeValidator] Document type cannot be empty
If your data source contains a document type that does not exist within your tenant, you will be shown the current error messages:
- [DocumentType] [DocumentTypeValidator] Document type does not exist
DocumentPath
if your file does not exist in the documentPath provided you will be prompted with the following error message:
- [DocumentPath] [DocumentFileExistenceValidator] Document file does not exist in the specified path
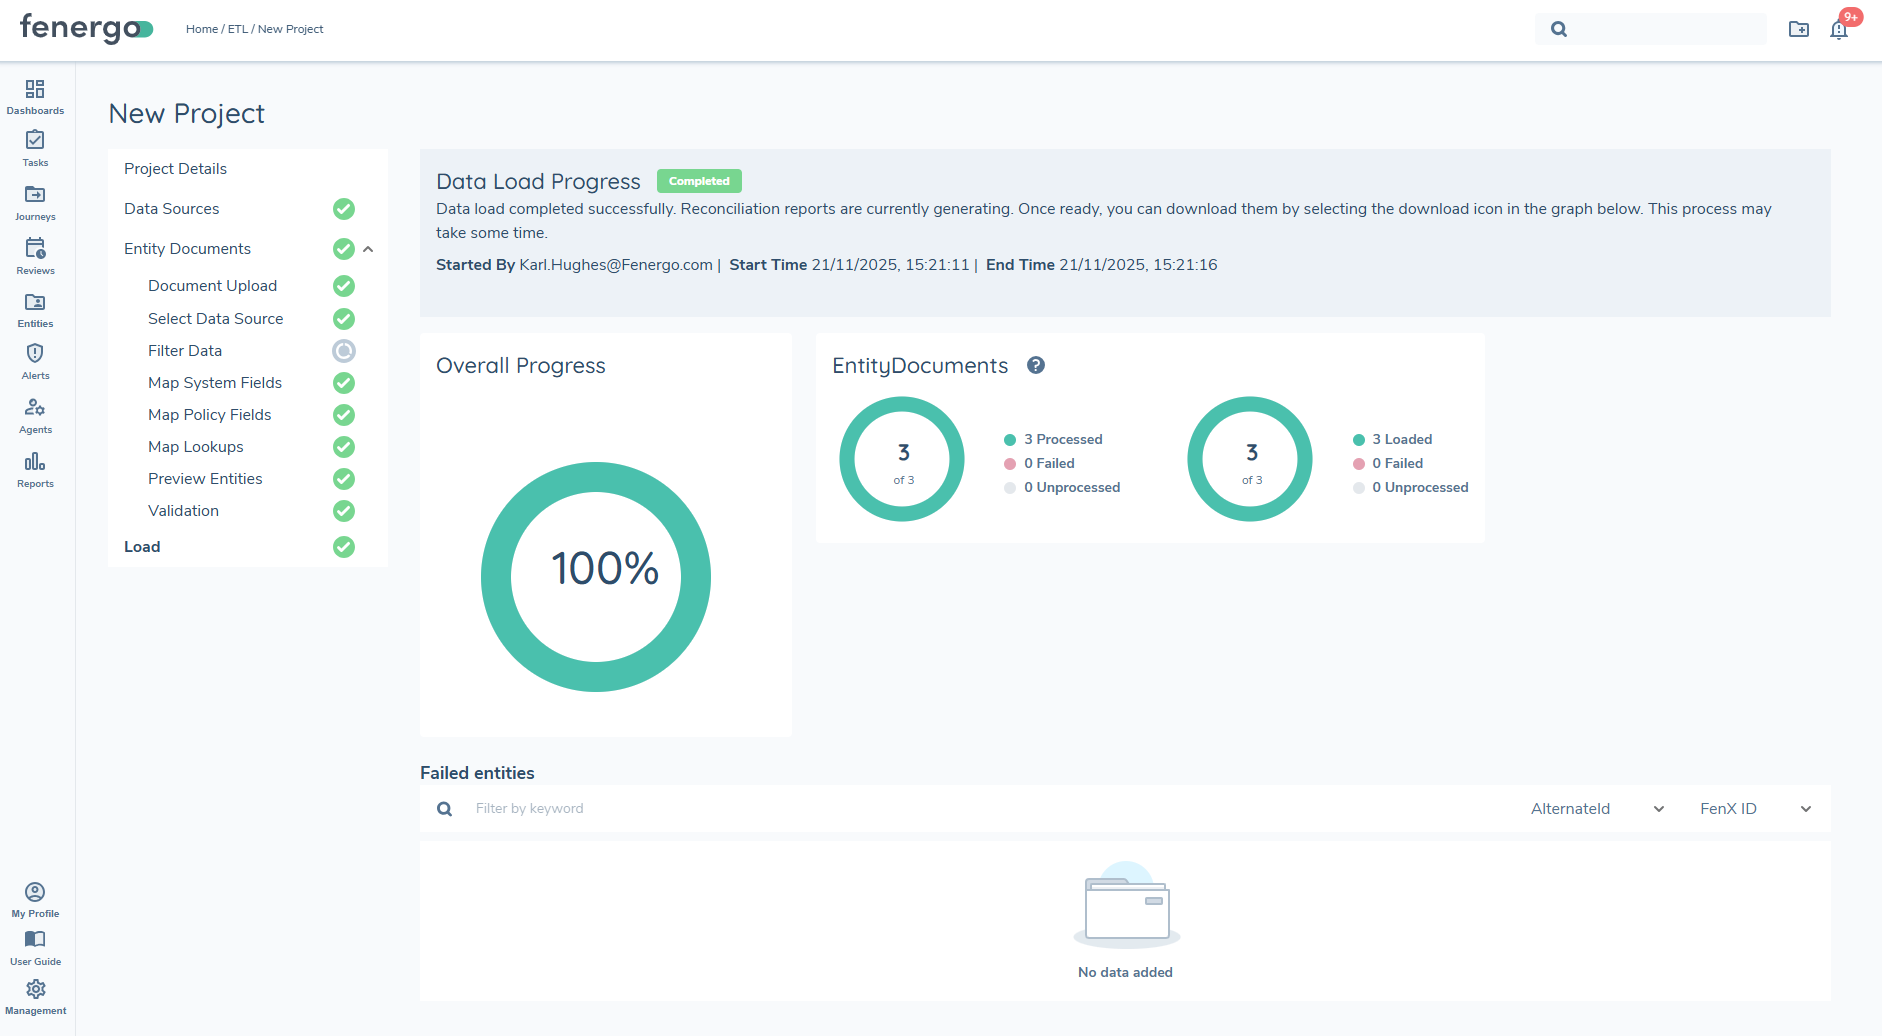
Load
Proceed to Load once validation is successful. The load process is broken down into two distinct steps.
Preparation step
During the preparation steps:
- For any alternateID provided for the entity the process will retrieve the actual fenxID
- The fenxID will be validated if they were provided in the datasource
- For any issues in the preparation step the load will fail and an new migration project must be created
Load step
- Copies the documents from the temporary S3 bucket to the antivirus bucket
- Once Antivirus is complete, the document is moved to the final destination URI.
- Creates & links the Document with metadata and access layers to the correct target entity.
- Produces an output report: Loaded / Error, with messages and identifiers.
Common Load Errors
If the data source files contains an fenxId that does not exist the upload process will fail, and you will be prompted with the following error message:
- Entity does not exist