ETL Products
A key part of Client Lifecycle Management is understanding the financial products a client holds such as accounts, loans, or other products. This information supports regulatory compliance, risk assessment, and overall client management.
Different jurisdictions may require specific data points or documents depending on the product type and client location. In Fenergo, products are managed as structured records linked to clients and other entities.
Fenergo clients can migrate existing product data from legacy systems into Fenergo using ETL. This includes core product details and the associated relationship to the product owner. The ETL process ensures product data is accurately mapped to Fenergo’s model and supports compliance from the start.
This functionality is now available in production environments. Currently there is a limit of 10,000 products per ETL project. This limit can be increased by contacting support.
ETL Products Capabilities
When using the ETL tool to migrate product data into Fenergo, users can transfer one or more products linked to a legal entity within Fenergo, as well as update product details such as product type, status, classification, and other key attributes.
Supported Use Cases
- "I want to create a product alternateId for a new entity ownerAlternateId via ETL"
- "I want to create a product alternateId for an existing entity in Fenergo fenxId"
- "I want to update an existing product using the alternateId or fenxId ** within Fenergo"
Each product record must be linked to a single entity using either an ownerAlternateId or ownerId (Fenergo Identifier). System validation ensures the correct mapping and prevents duplicates where product IDs are reused.
An owner must be specified for product creation. This owner may be included/created in the ETL project or be an existing Fenergo entity. Adding associations to product (outside of the owner association created on product creation) must be created separately using product-to-entity associations.
Prequisites to Migrating a Product
Before you can migrate products via ETL, some setup is required:
-
Create a Policy and Configure Product Fields: A policy must be created and configured with the required fields to support product creation in Fenergo. These fields define how product data is interpreted and validated during the ETL process. The policy setup must include the appropriate categories, target entity, and field types.
-
Ensure Reference Data Lookups Are Available: Certain product fields rely on lookup values maintained in the Reference Data Editor. These must be pre-configured before starting your migration. Examples include, Product Family, Product Type and Product Status
Product properties will be validated against the policy during ETL. If your CSV data contains values that do not match the configured lookup lists, the product records will fail validation. Make sure all product-related values in your file align with the current reference data in your environment. You can use ETL to validate this.
Create Versus Update
Create
When creating products, the identifier from the source system is saved as the alternateId in Fenergo. If the alternateId exists, the system updates the corresponding record. If it does not exist, a new record is created with the incoming data. To create a product an associated owner must be provided, if the owner is a brand new entity created within the ETL project with products, use ownerAlternateId for an existing owner entity, use ownerId.
Only one of each identifier is permitted per ETL project and all ETL operations are consistantly aligned to the selected identifier.
Updates
To update a product, either the product fenxId or the alternateId can be used as the unique identifier, but only one identifier is permitted per ETL project.
If updates are based on data extracted from the source system, the alternateId serves as the unique identifier.
Conversely, if updates are based on data extracted from Fenergo, the product fenxId would be the unique identifier.
When updating an existing product, a user cannot change the owner of a product, via ETL or within the application. Currently this attribute is ignored, however shortly the product team will introduce validation preventing this will be introduced
When updating a product you can perform the following actions:
- Add data to a field
- Update an existing field
- Delete a value from a field
To delete a value from a field, enter NULL in the corresponding cell for the field you want to clear.
Comparisons involving the alternateId are case-sensitive. This ensures that variations in letter case (e.g., "ABC123" vs. "abc123") are treated as distinct identifiers, if the CASE is different in the unique identifiers it may result in a CREATE instead of an UPDATE
Creating a New ETL Product Migration Project
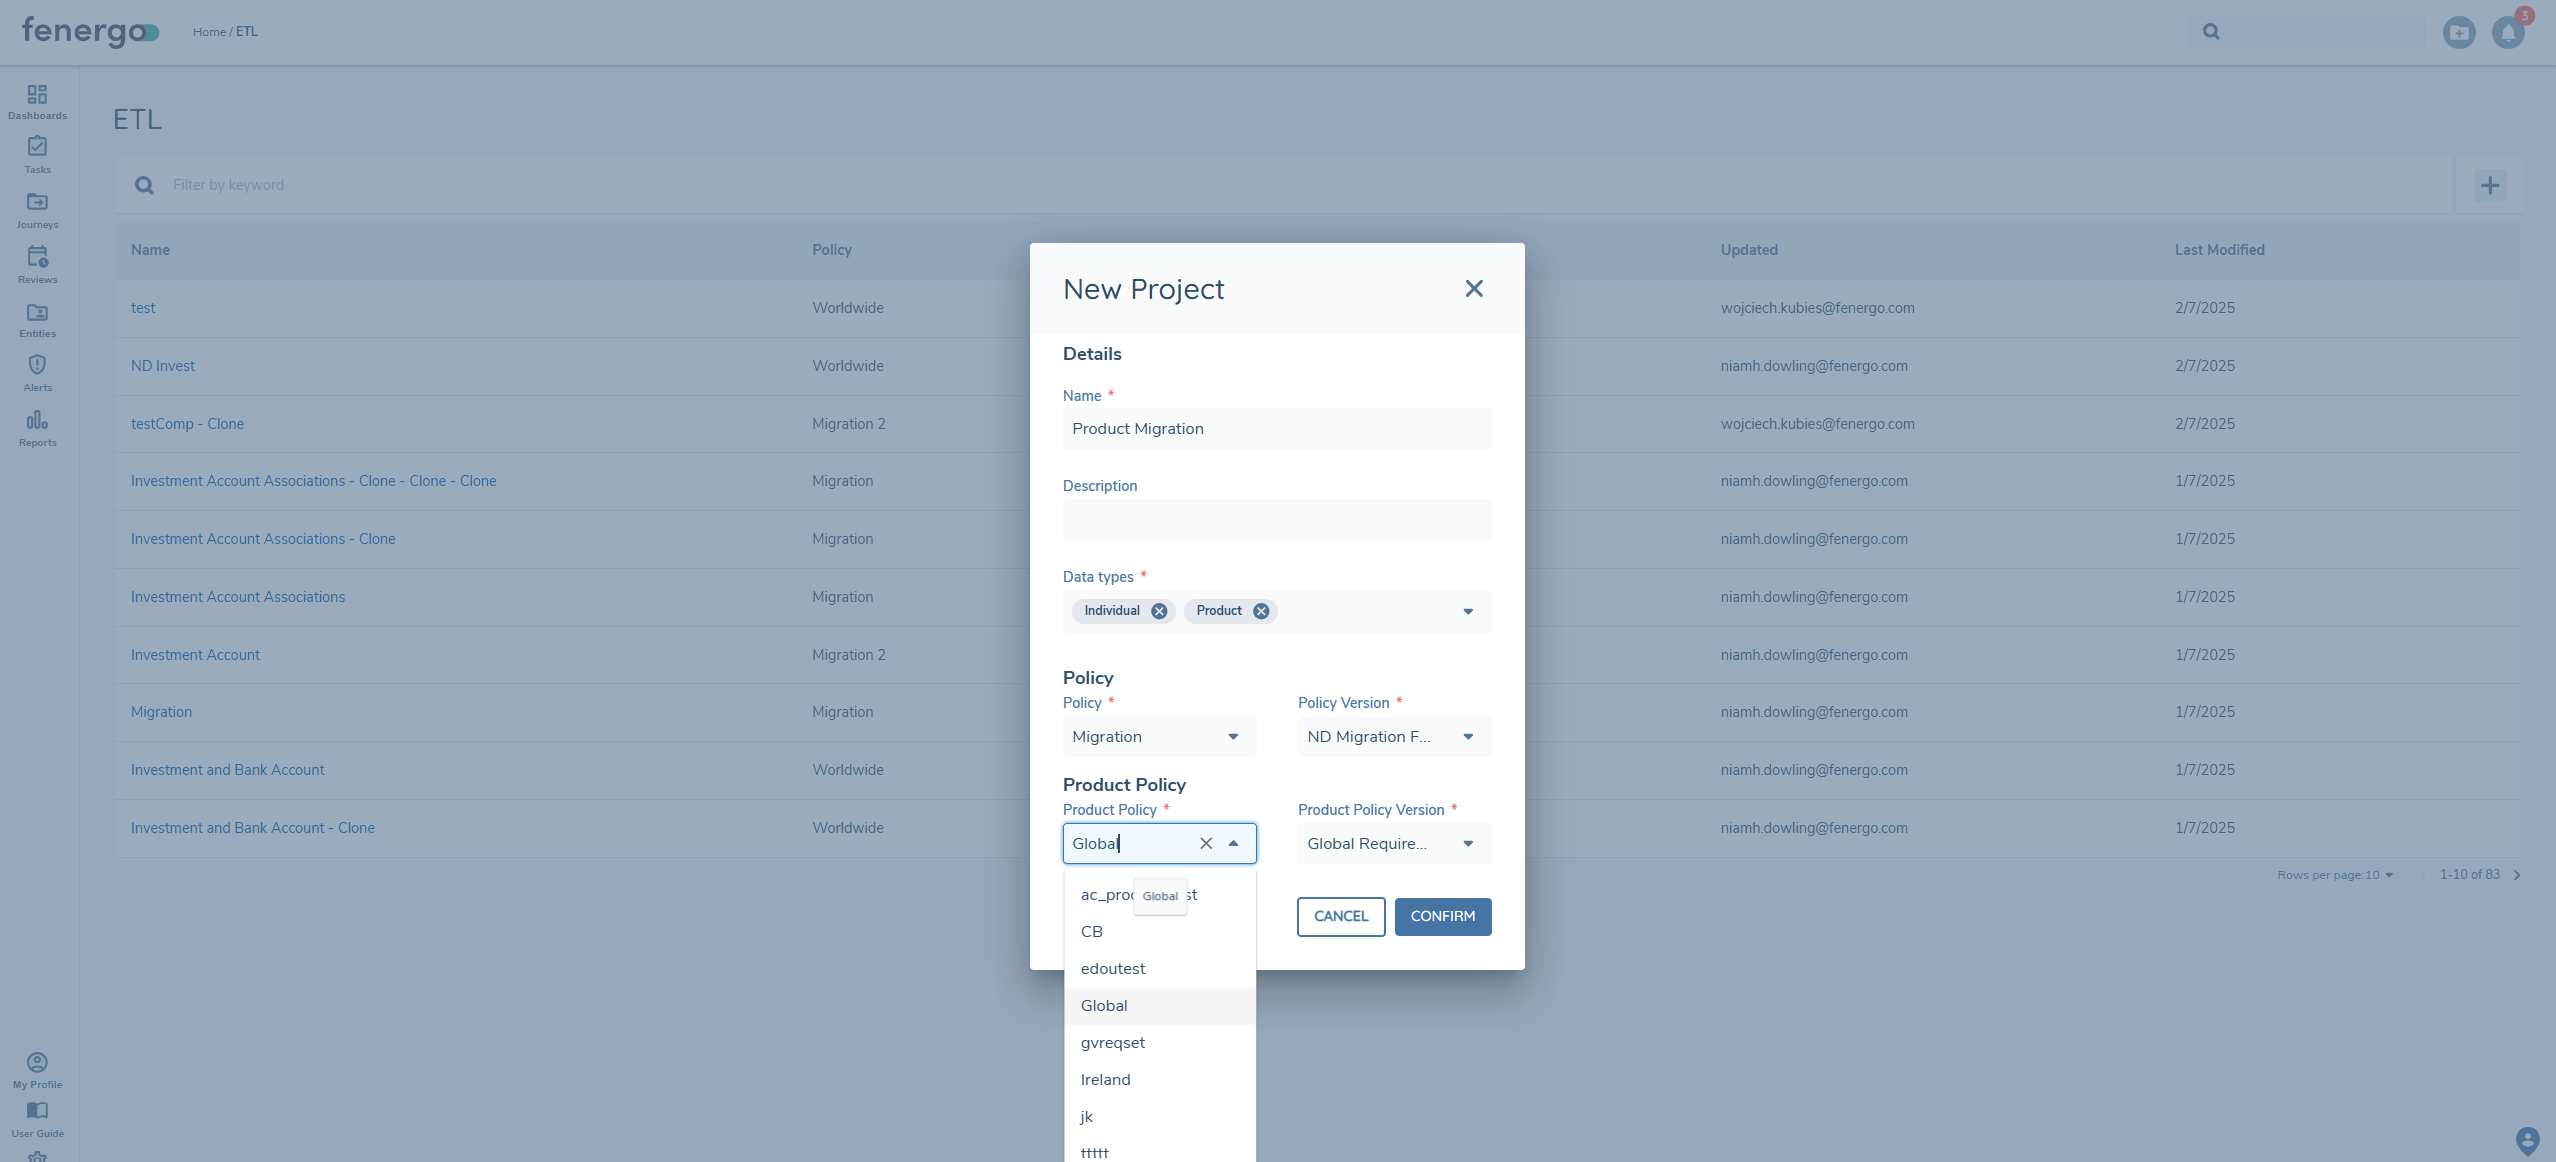
Create New Project
To initiate a new product migration, users should select the ‘+ ADD’ button on the top-right of the ETL Dashboard. This opens a modal where users can:
- Enter a Project Name
- Enter a Project Description
- Select the Data types you want to use in the migration project, products can be included with other entity types.
- Select the Policy to define how client or entity data will be processed
- Select a Products Policy and Policy Version to apply the correct entity data structure and validations
Uploading Datasources
Once your new migration project has been created, you can begin adding the Data Sources. These are your CSV files that contain the core product and entity data to be transferred into Fenergo. To upload your files, simply drag and drop them into the upload area, or click to browse and select them manually.
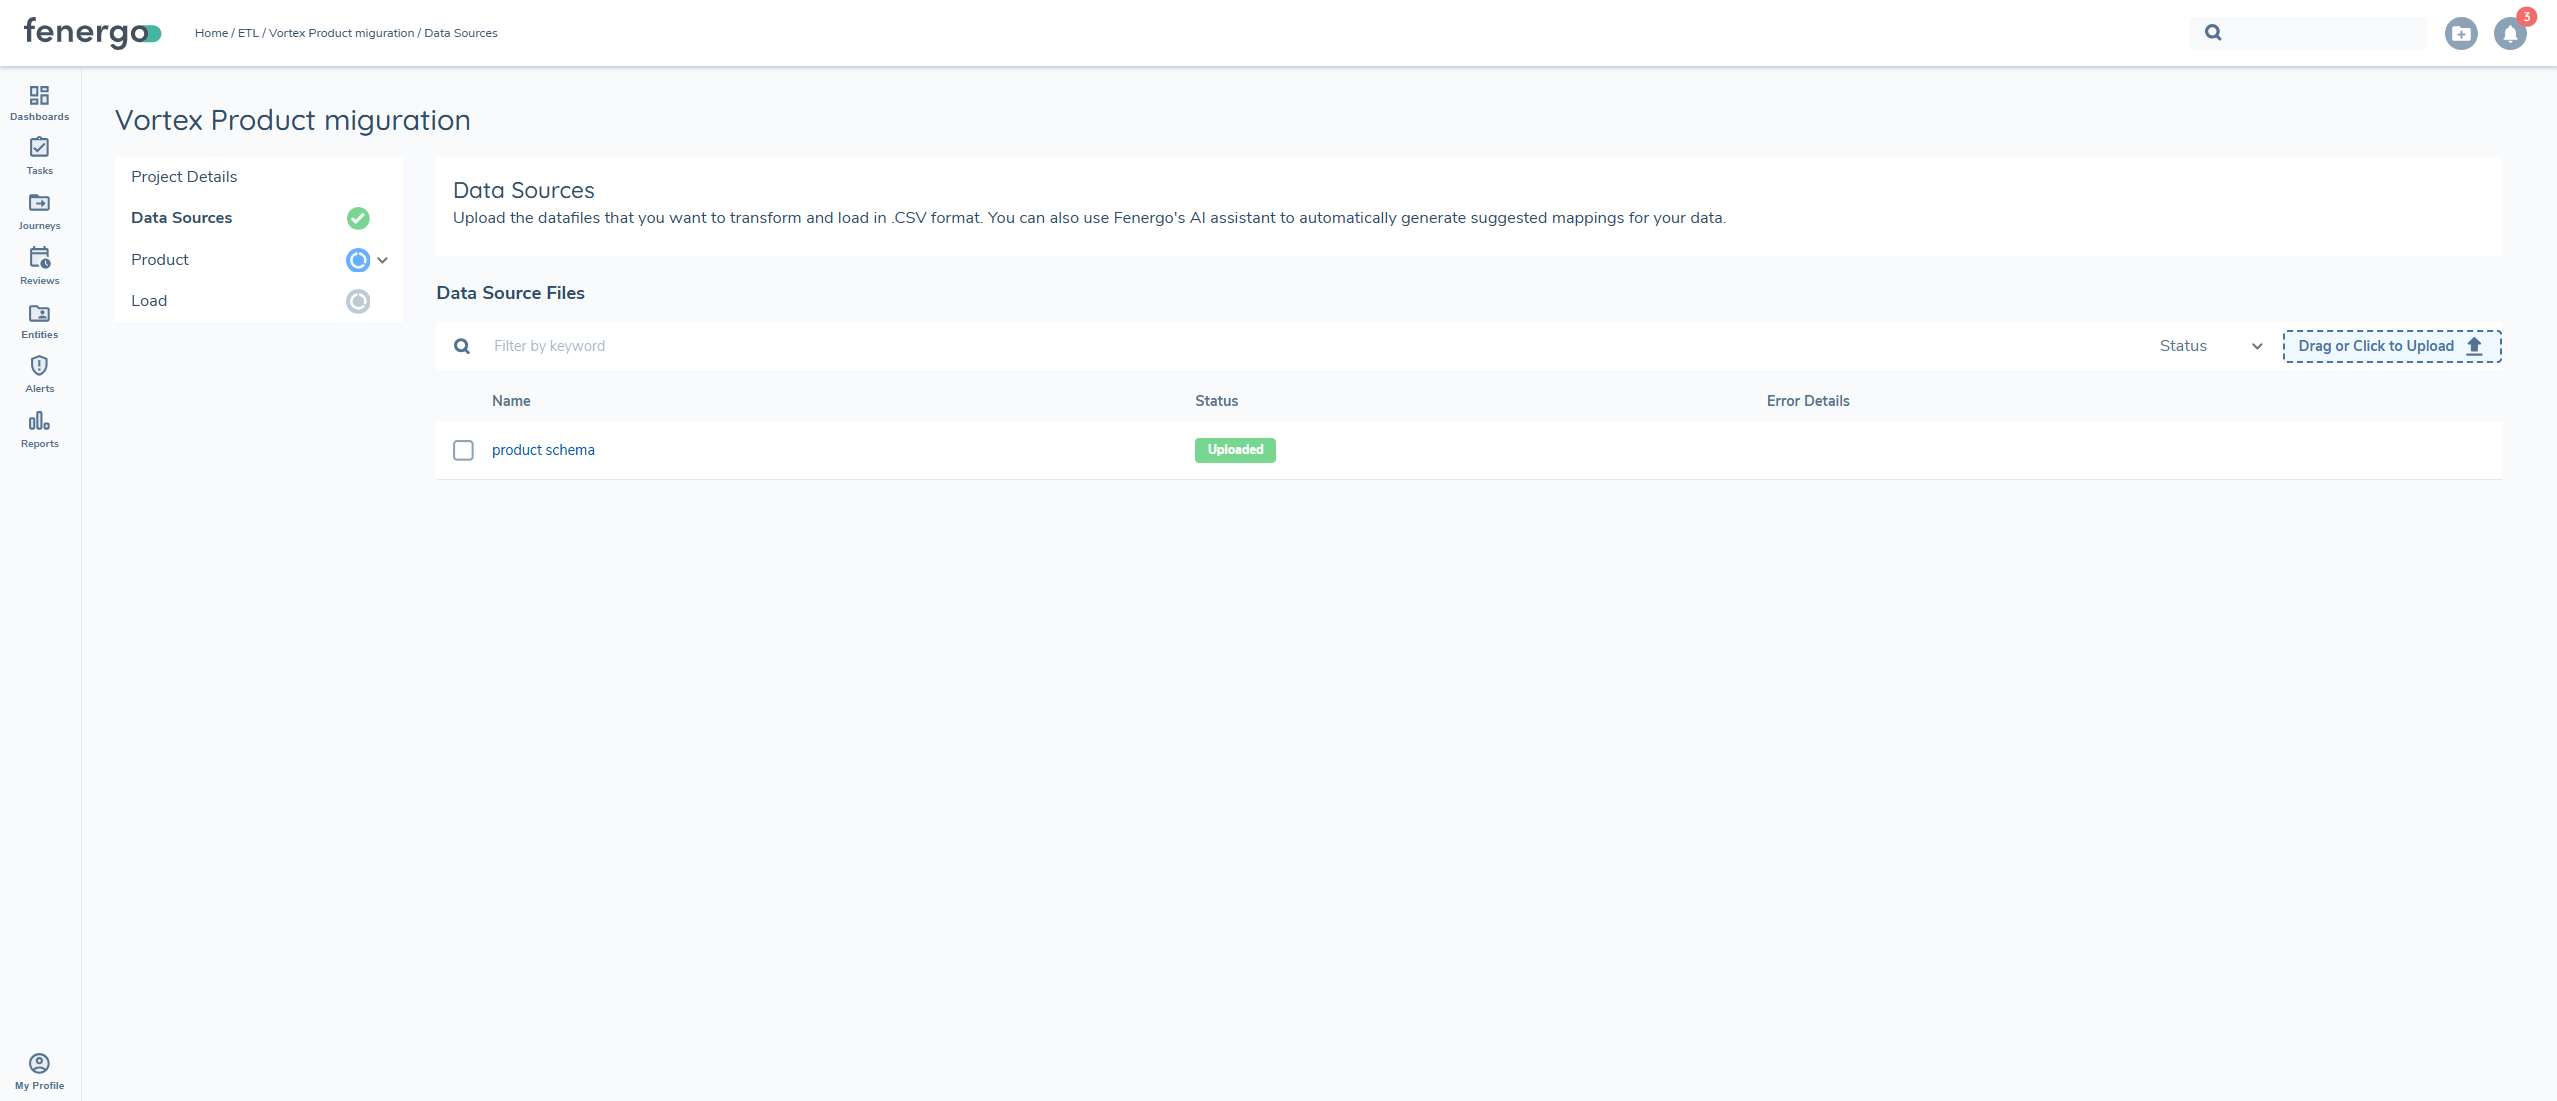
Ensure your CSV files follow the required format and include all mandatory fields as defined in the selected policies. See ETL Prerequisties.
Select Data Source
After uploading your Data Sources, you’ll need to select the Primary Data Source. This is the file that contains the main product data to be processed during migration. If your product information is spread across multiple files, you can use joins to combine the data.
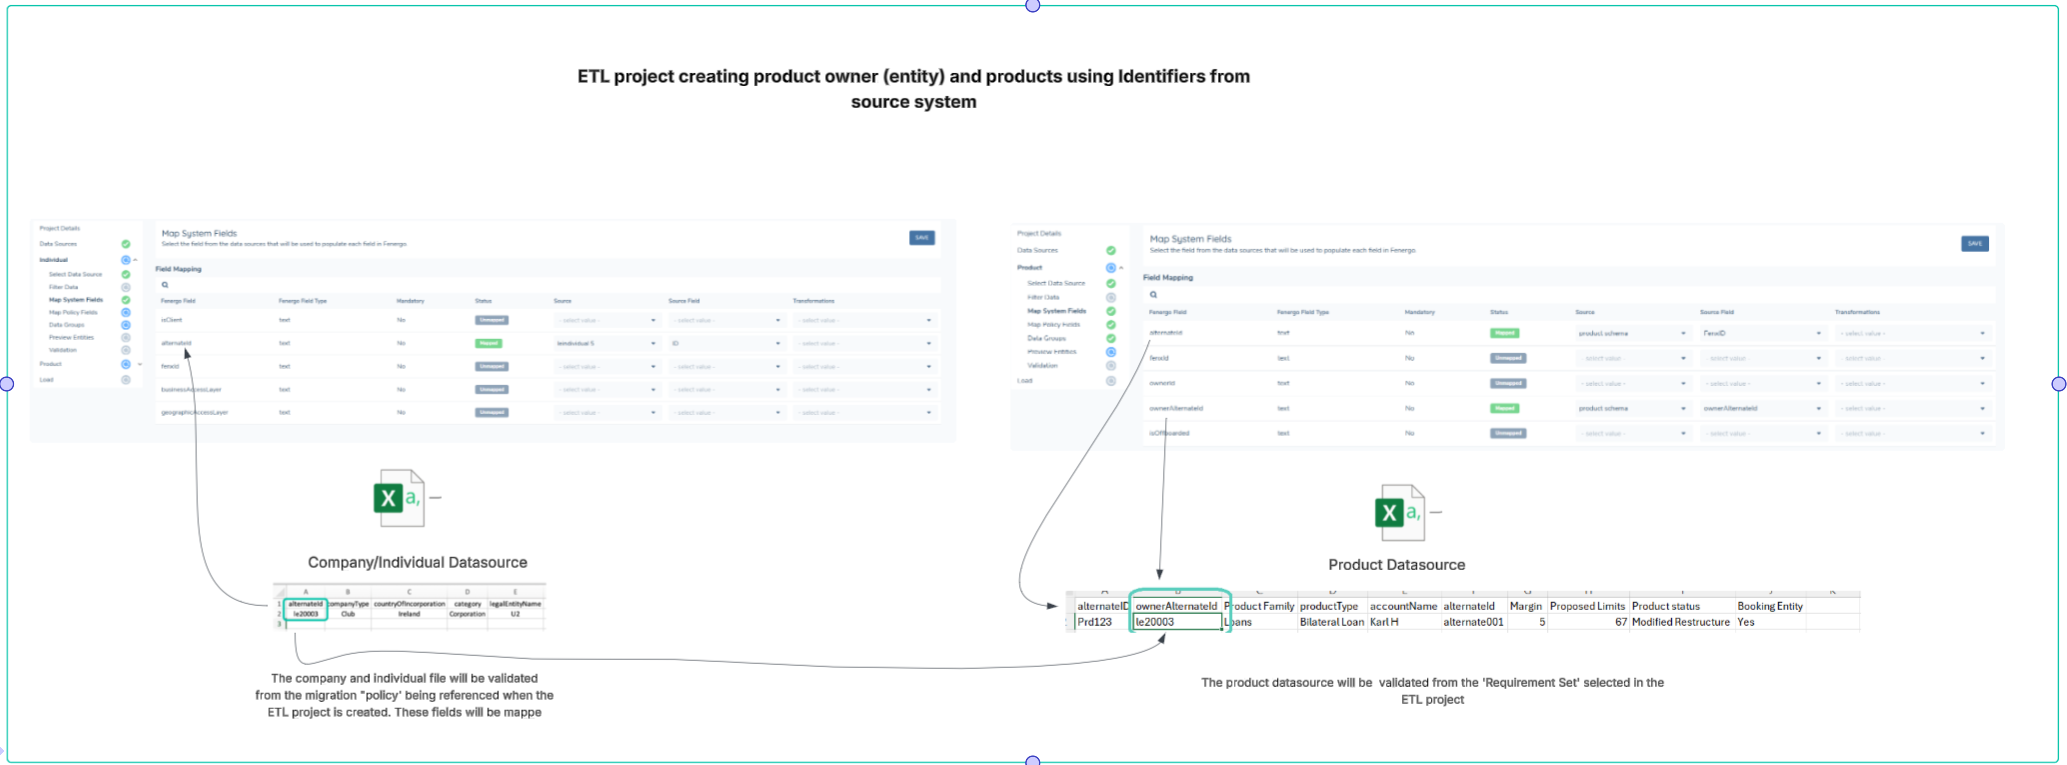
Map System Fields
Once the Primary Data Source has been selected, the next step is to map your System Fields. This includes key identifiers such as the Product ID and the Entity (Owner) ID.
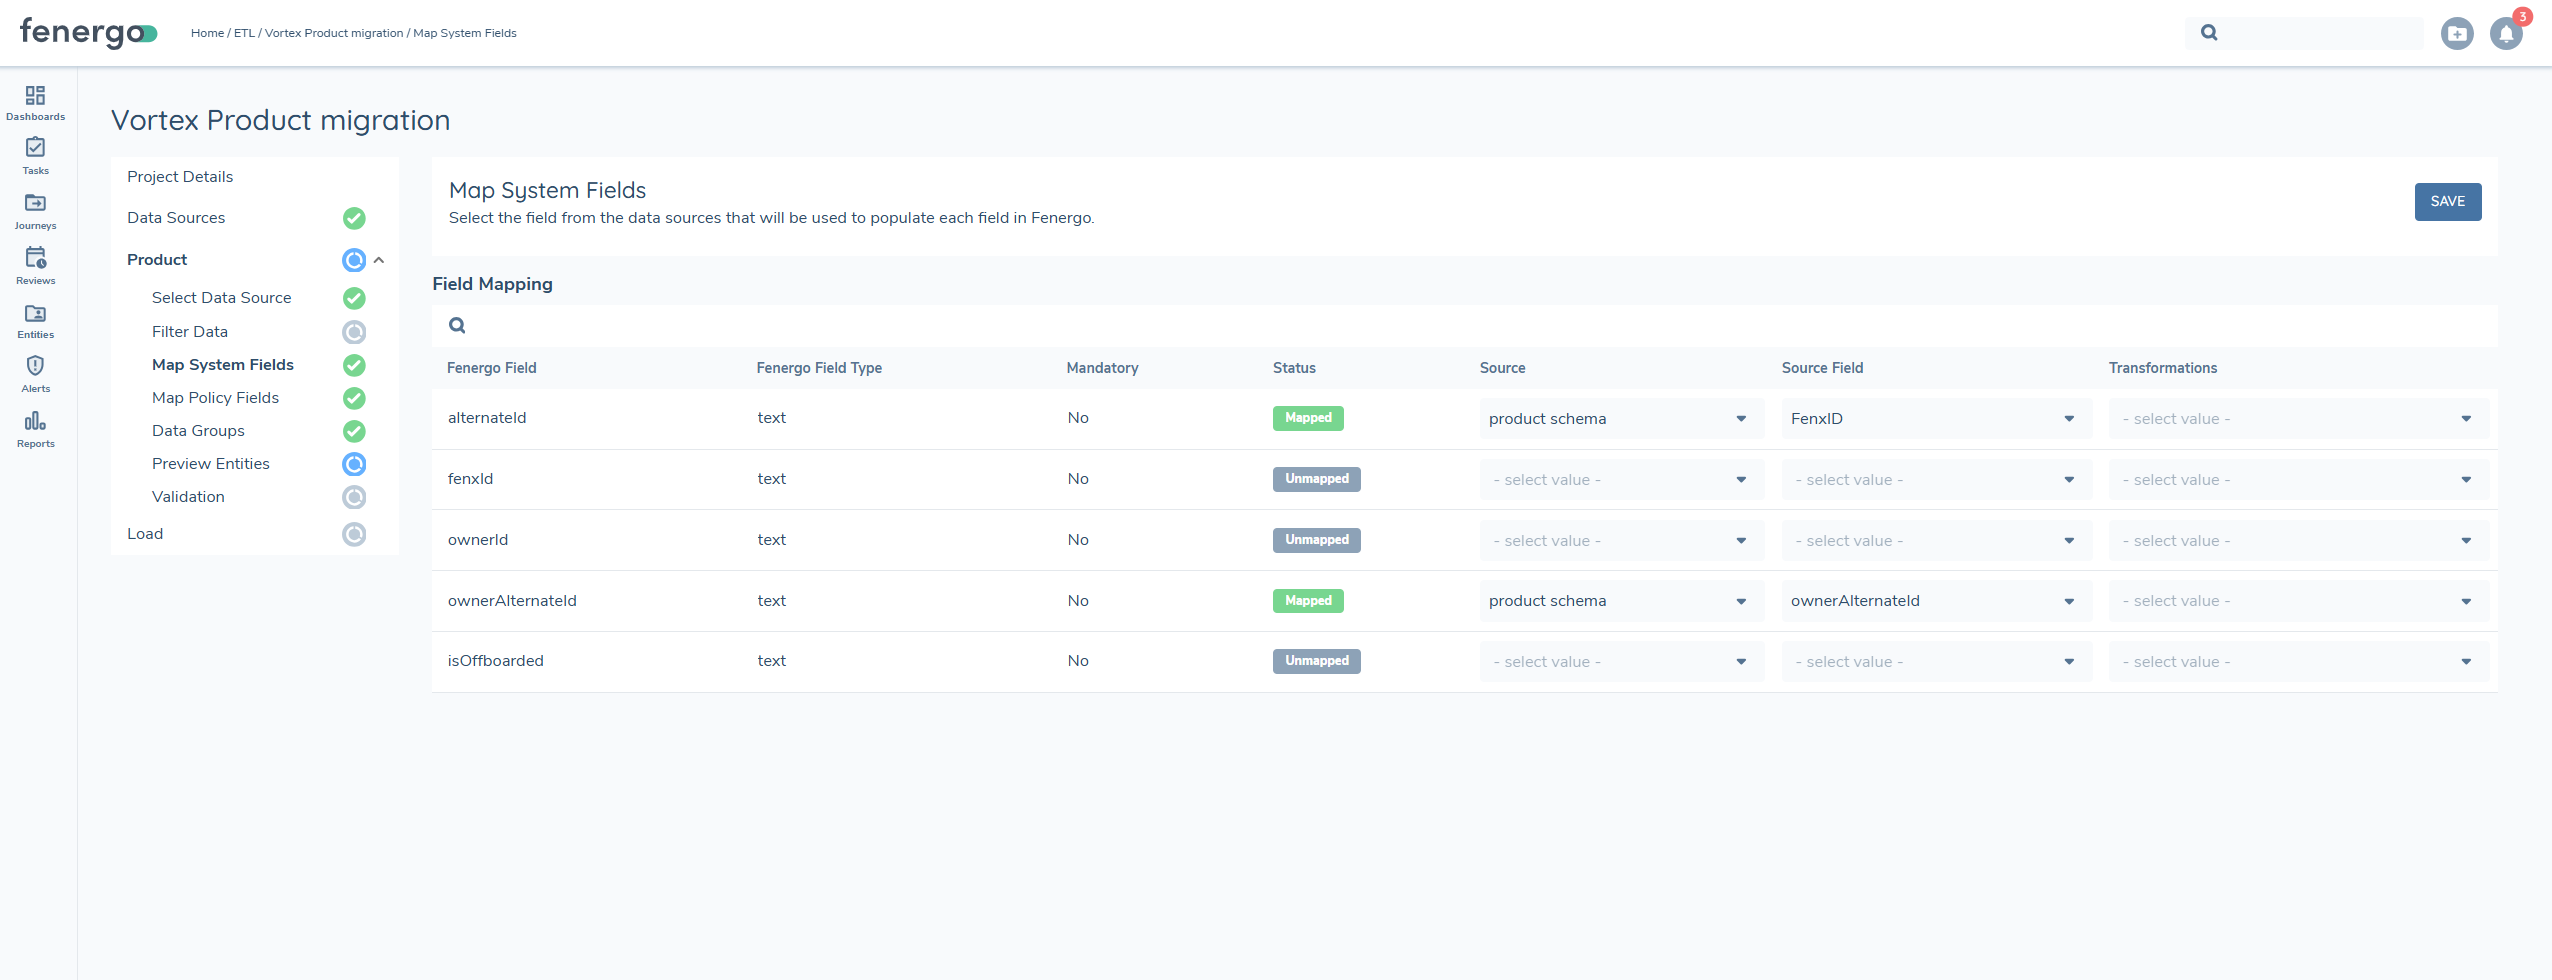
- alternateId: unique identifier in the source system for the product
- fenxid: the unique identifier in fenergo for the product
- ownerid: the unique identifer of an existing entity in fenergo that will be the owner of the product
- ownerAlternateid: unique identifier in the etl project for the entity that will be the owner of the product in context (from source system).
- isOffboarded: flag to indicate if product will be loaded as offboarded and verofied
Map Policy Fields
In this step, you'll map fields from your source file to the corresponding Fenergo Product Requriement Fields. This ensures your data is correctly understood and validated based on the structure defined in your selected product policy. Typical fields might include product type, product family, status, currency, and other key attributes.
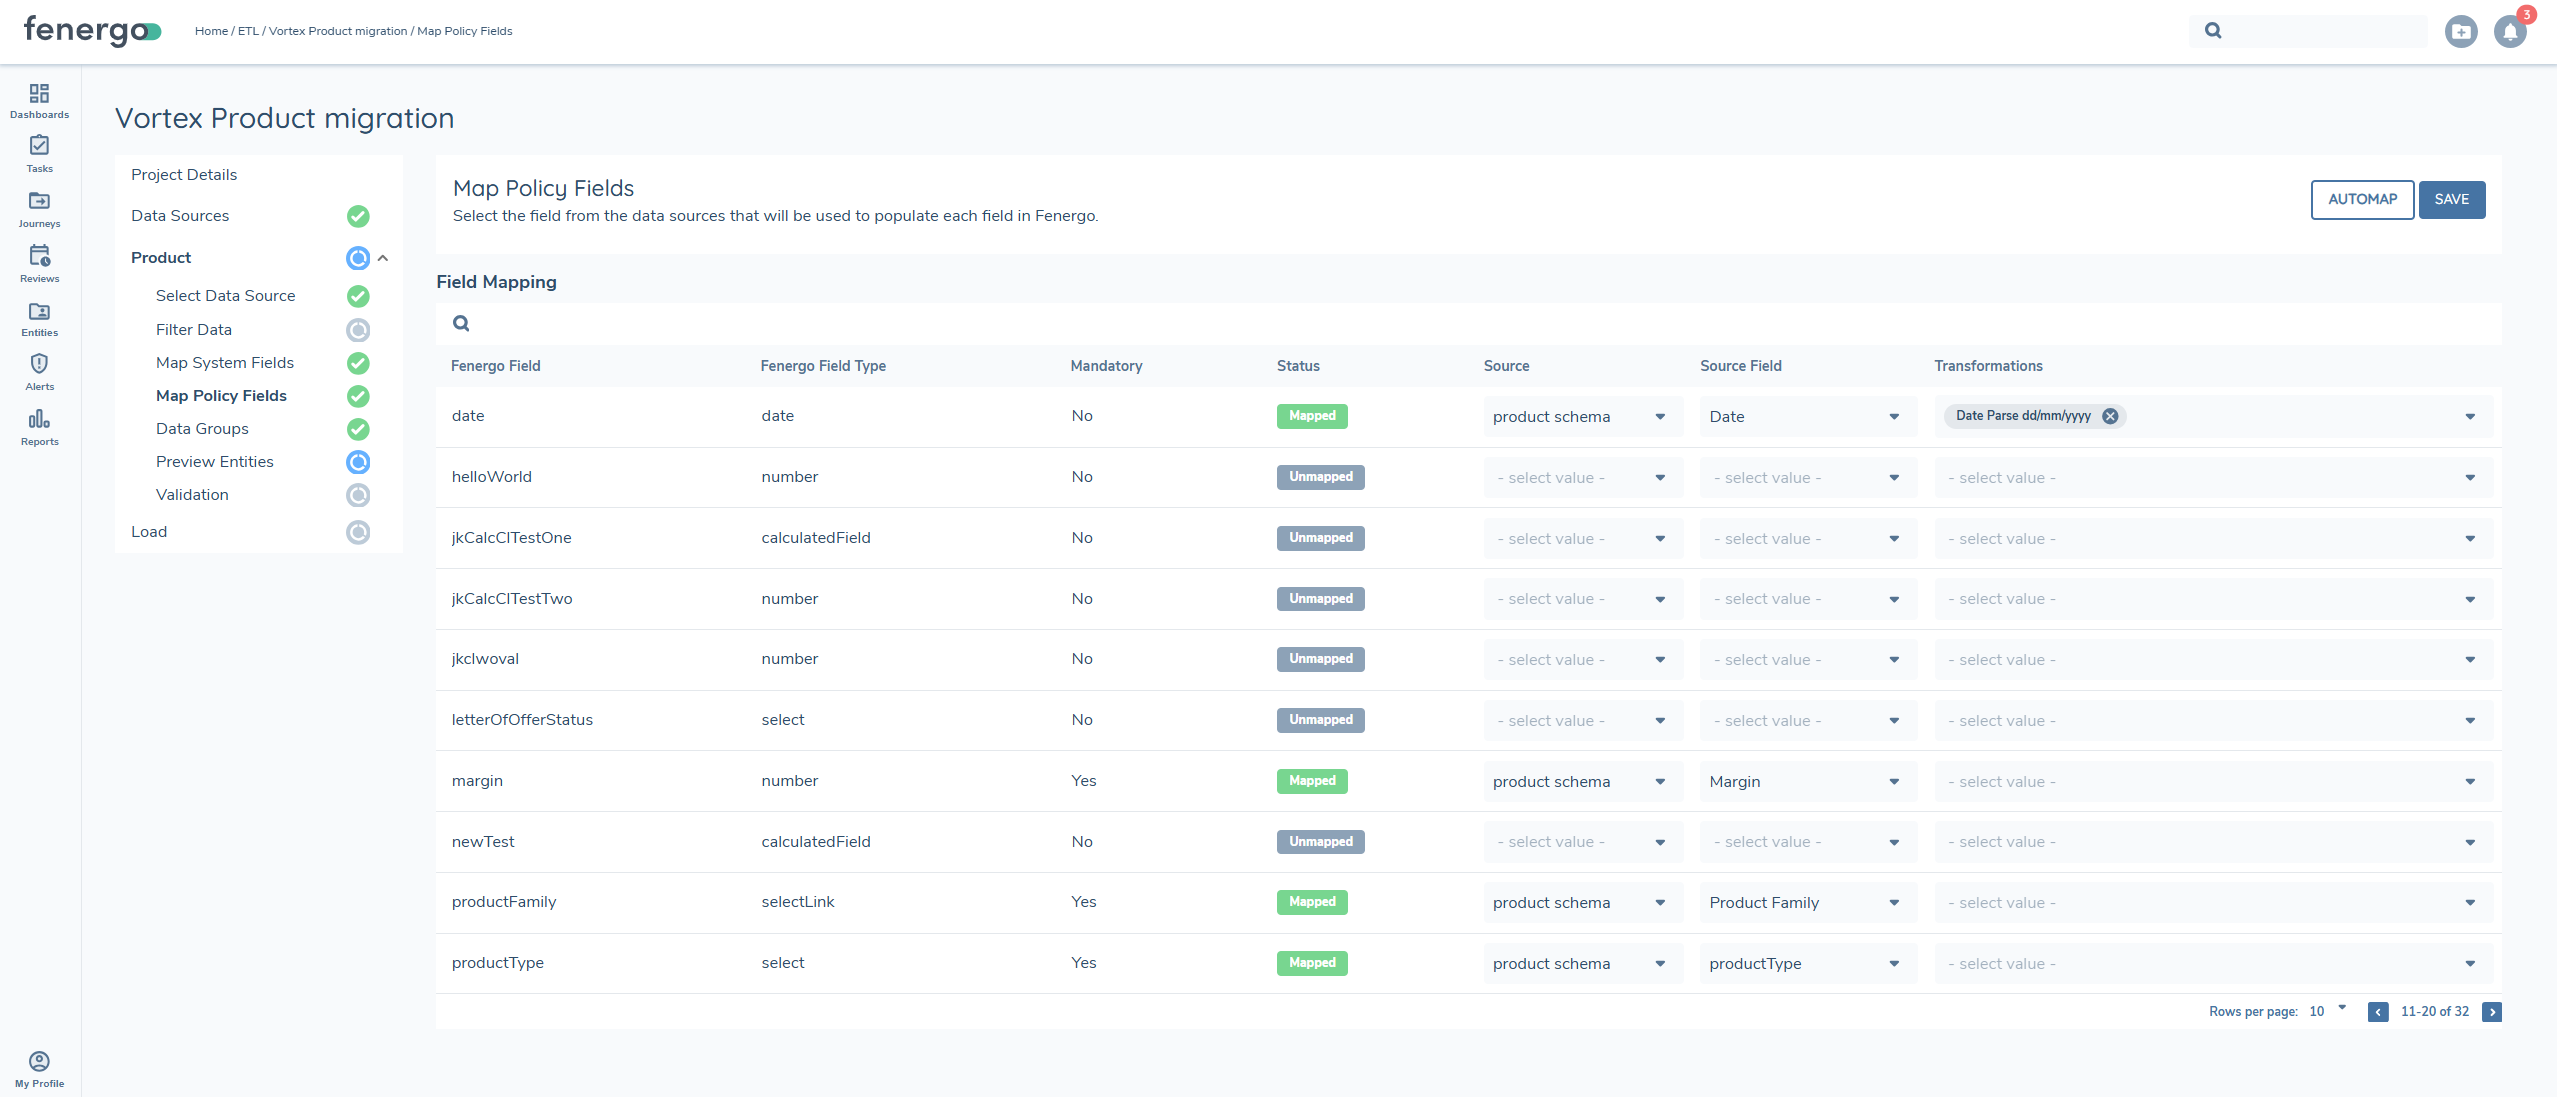
You must map all mandatory fields as defined in the selected policy. If any required fields are missing, you will not be able to run the Preview, Validation, or Load process to proceed with the migration.
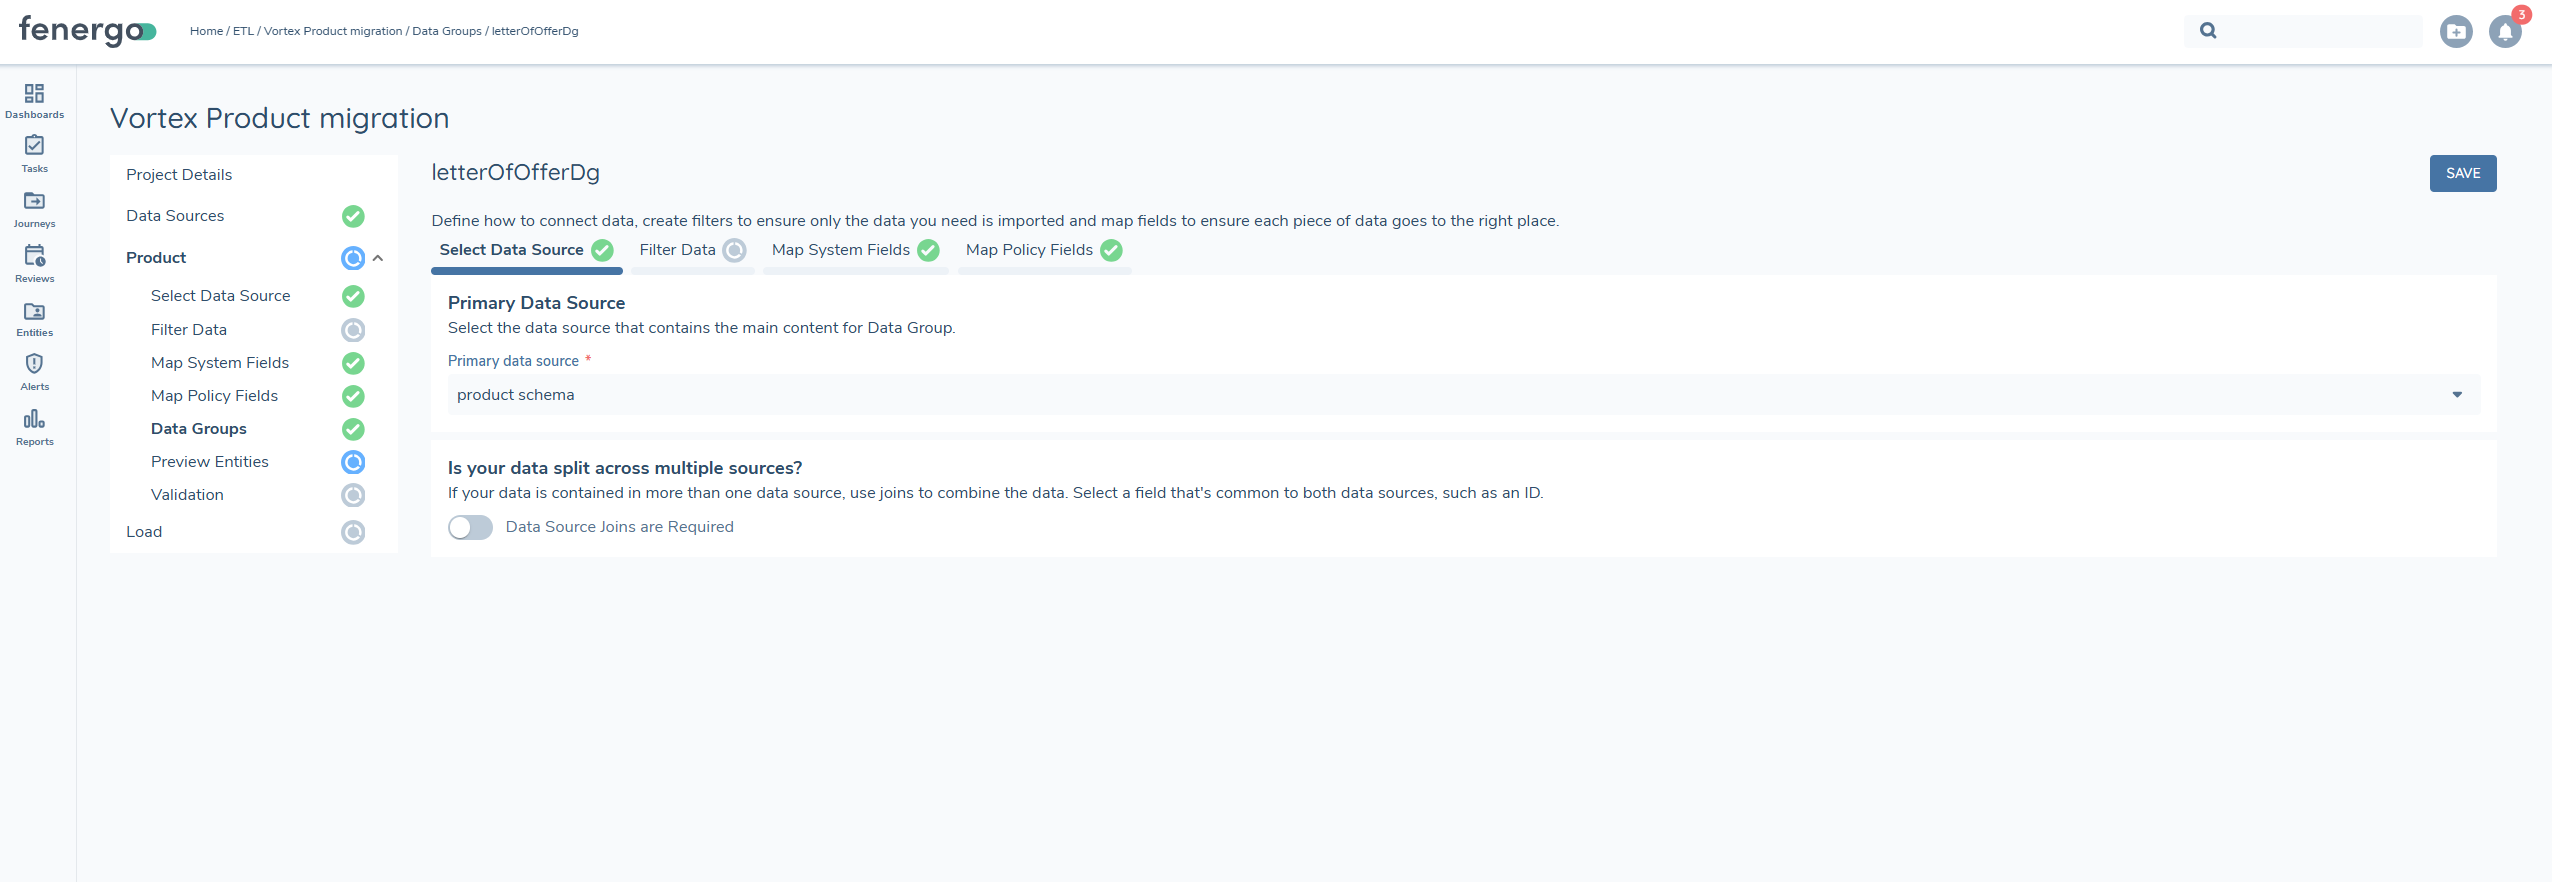
Data Groups
Data Groups allow you to include structured sub-sections of product-related data such as Product Name, Product Type, or Trading Location within your source file. Each Data Group is added as a separate tab in the upload file and requires both System Fields and Policy Fields to be mapped. To configure a Data Group:
- Select the Primary Data Source that contains the Data Group content
- Map System Fields, such as parentFenxId or parentAlternateId, to link the Data Group to the appropriate product in your source file
- Map all required Policy Fields as defined in your selected product policy
When updating a product's Data Group (e.g. product pricing), the new data will replace any existing entries in FenX. If only one new entry is included and existing entries are omitted, only the new entry will be retained. To prevent data loss, always include all current and new Data Group entries for each product in the file.
Preview
Once all mapping is complete, you can Preview as they would appear once loaded into FenX using the current configuration. You can either:
- Select a product record from View Sample Entities table, or
- Enter a specific ID to preview how that record will be processed
This step allows you to confirm field mappings and data formatting before running the Validation and Load processes.
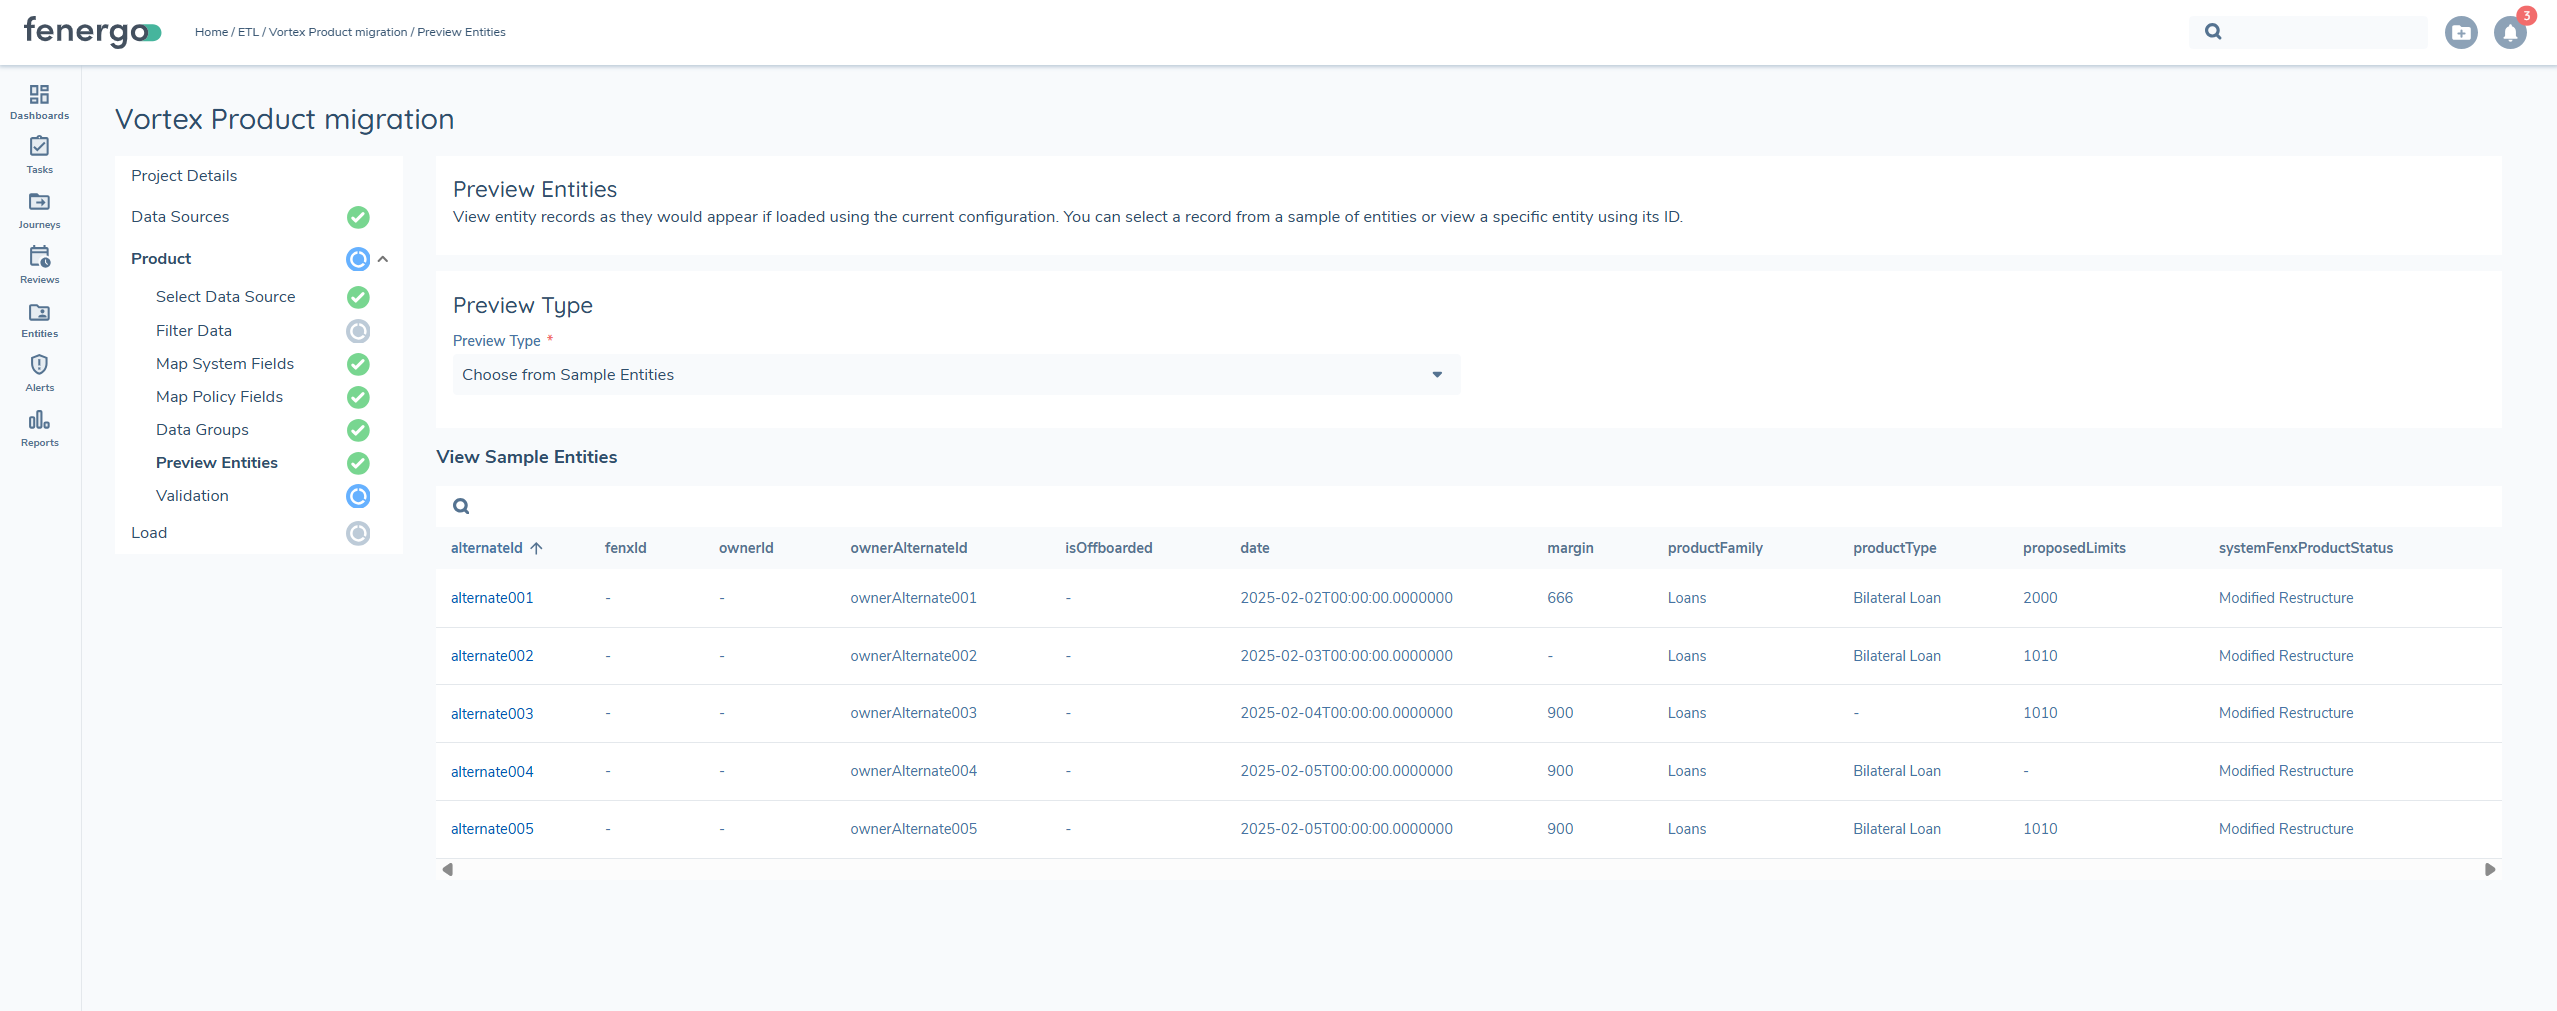
Use this preview to confirm required fields are populated, transformations are correctly applied and lookup values align with your reference data.
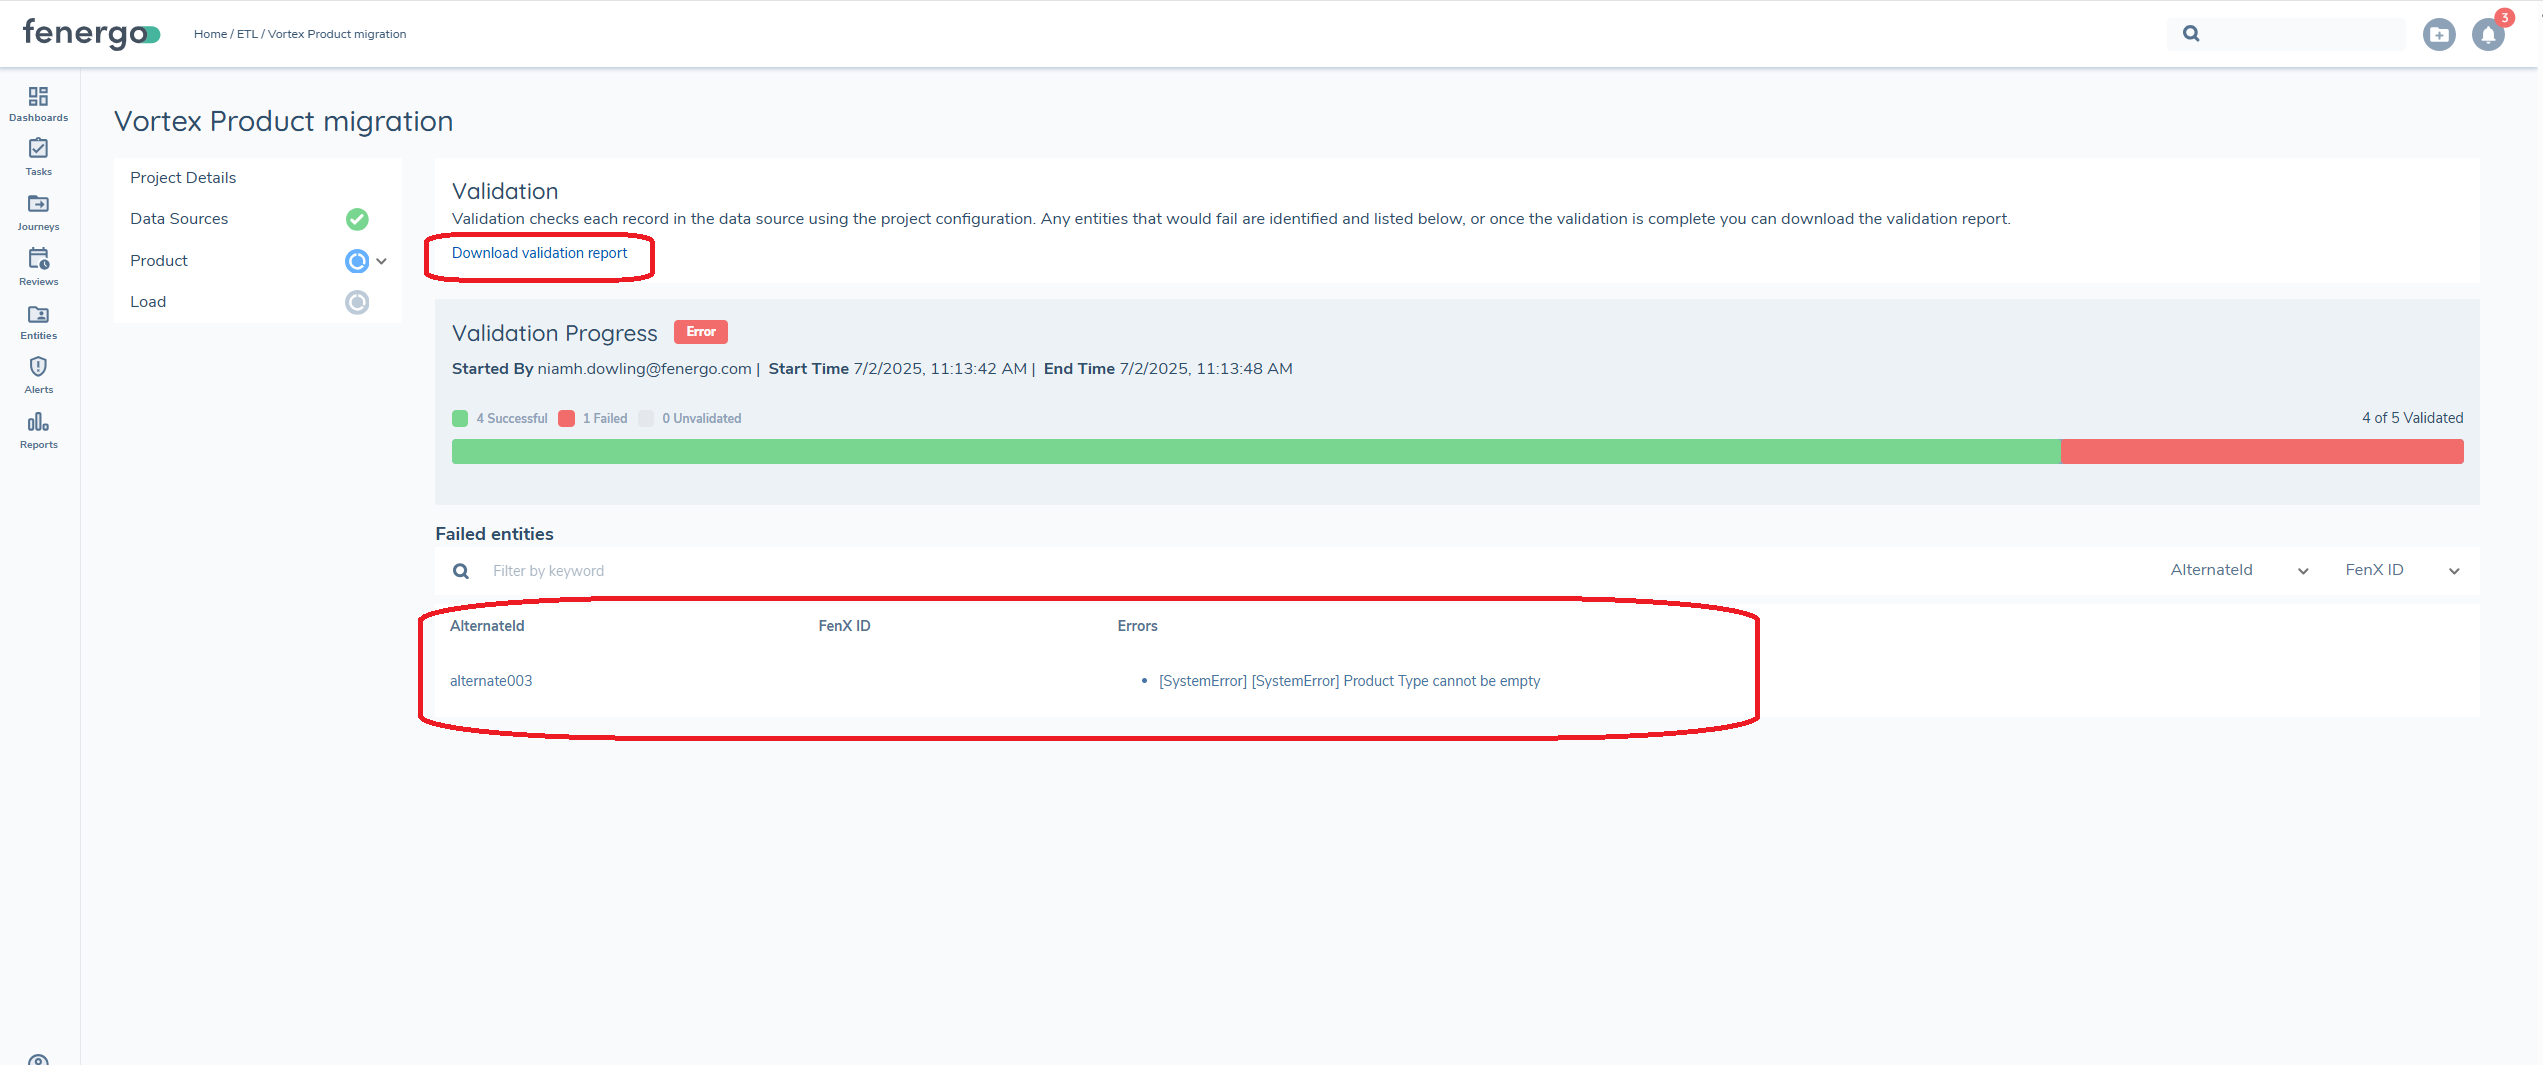
Validation
Validation checks each record in the data source using the project configuration. Any entities that would fail are identified and listed below, or once the validation is complete you can download the validation report.
Validation Success:
If all records pass validation, you’ll receive a confirmation message. You can proceed directly to the Load step to complete the migration. You may still download the Validation Report for your records, although no issues were found.
Validation Failed:
If any records fail validation, they will be flagged and listed below. Common reasons for failure include:
- Missing required fields
- Invalid reference data (e.g. product type not found in lookup)
- Incorrect formatting or data types
You can download the Validation Report, which provides detailed error messages and the specific rows that failed. Use this report to correct issues before revalidating your data. Records that fail validation cannot be loaded into FenX until the errors are resolved.
Load
Once validation has completed successfully, you can proceed to the Load step to import your product data into FenX. The load process is broken down into two distinct steps.
- The preparation step
- The load step
During the preparation step, the system verifies any ownerId provided in the file. If a ownerId is provided, it is validated in the initial step. If an ownerAlternateid is provided instead, the system retrieves the corresponding ownerId (Fenergo ID) before proceeding with the link between the product and the product owner. This represents the first progress donut.
The second icon corresponds to the actual loading of the product and associating it to an owner
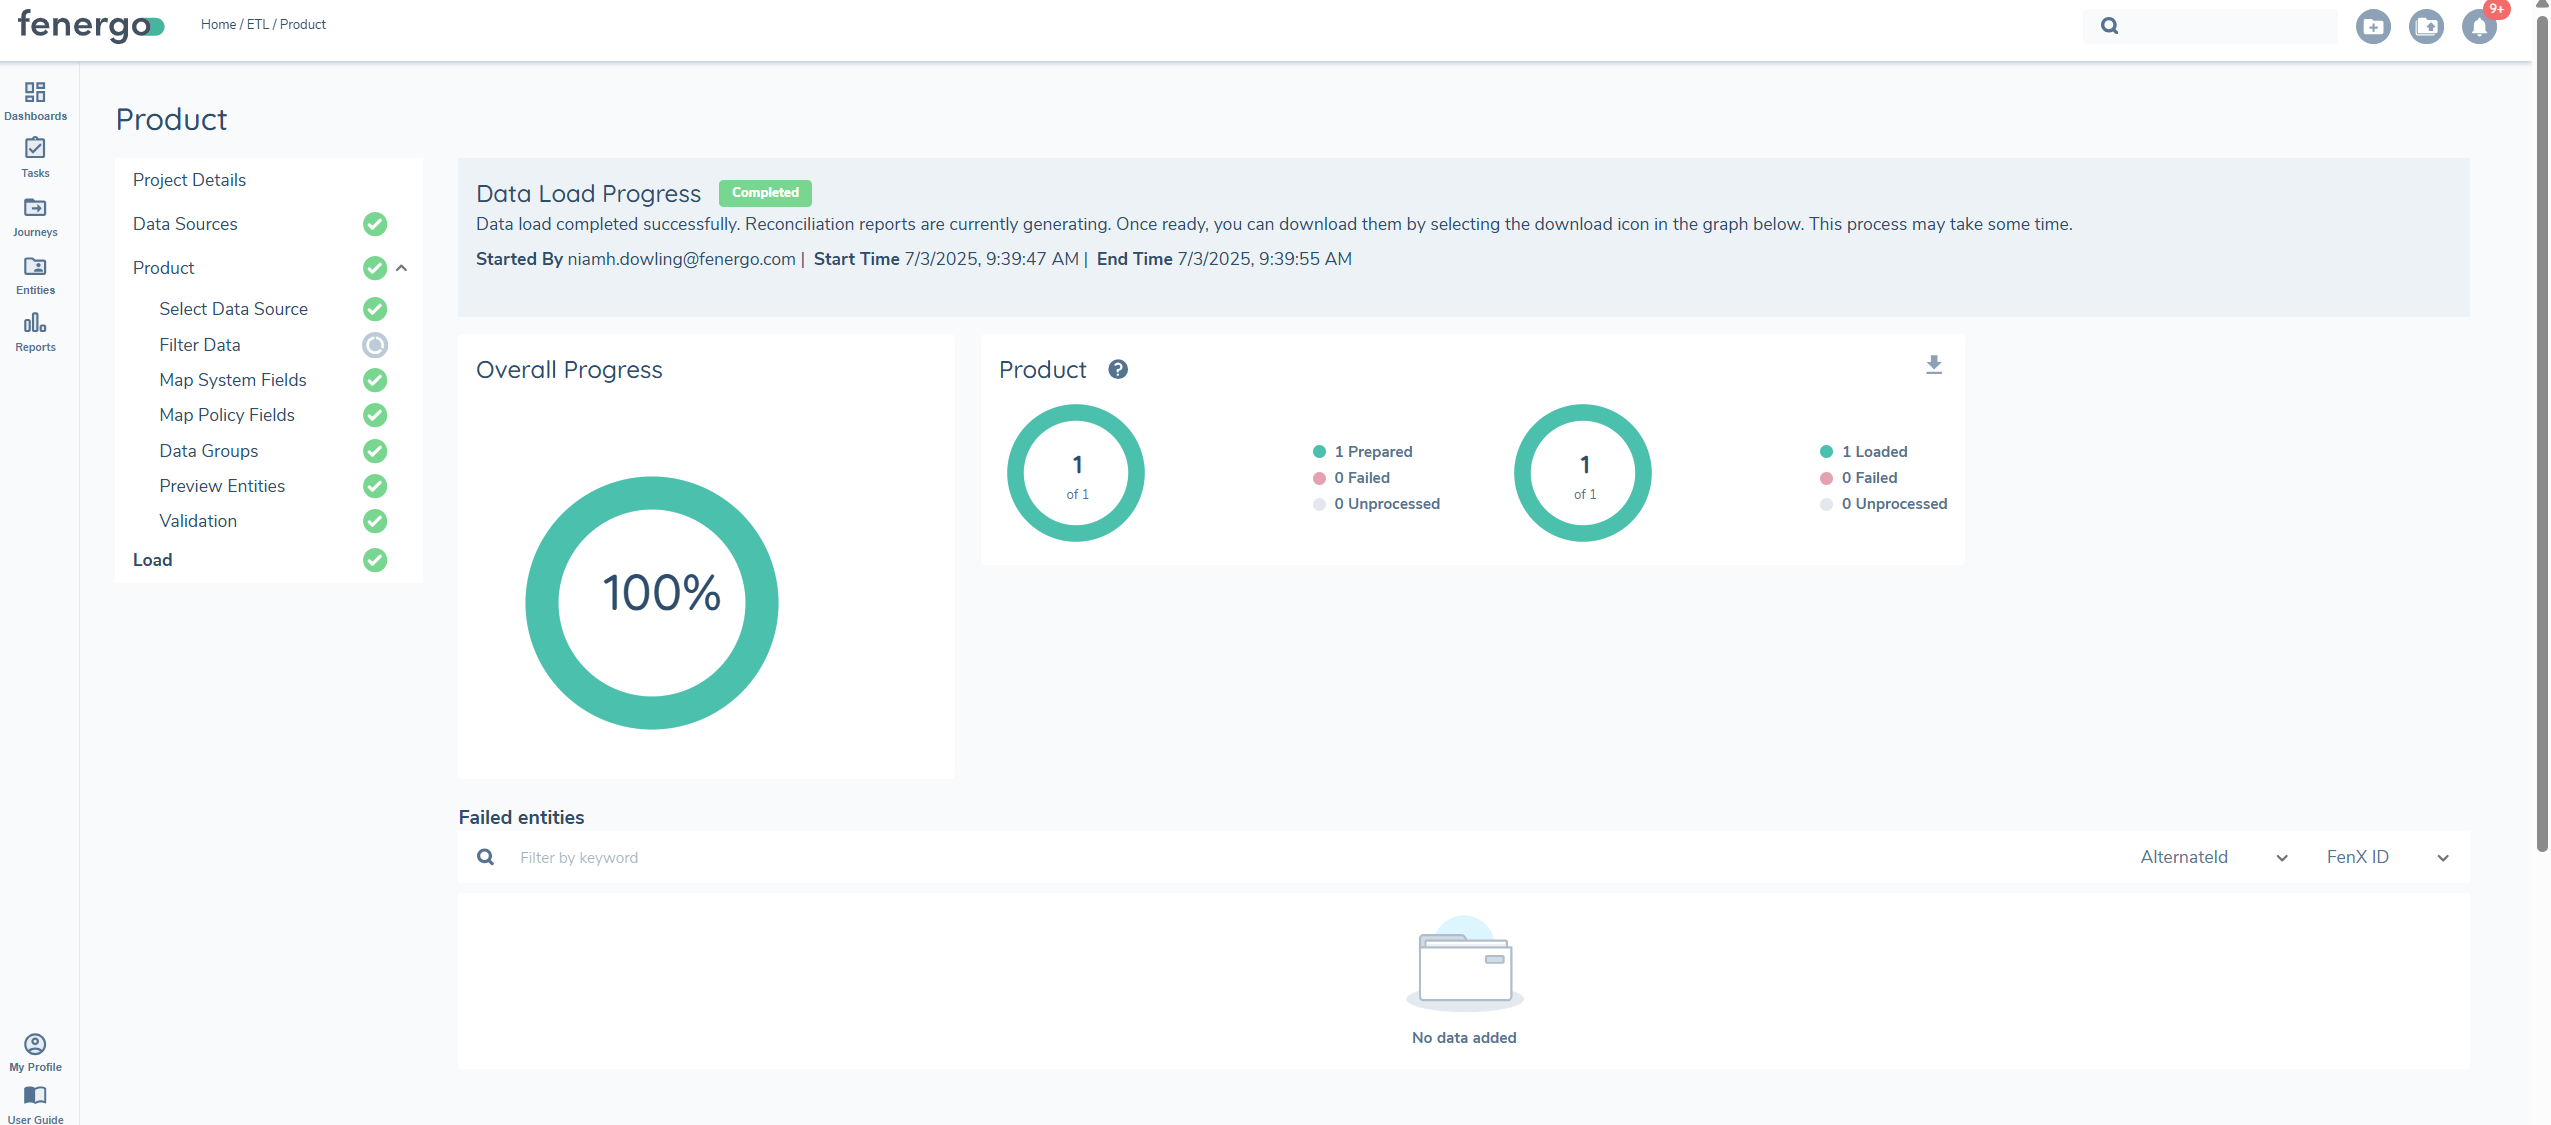
If during the load process the system cannot find the corresponding ownerId , the load process for products will fail. The user will need to create a new ETL project for products, resolve the ID issue, and re-load.
As the load progresses, each record is processed based on your configuration and mappings. If any records fail during this step, they will be listed in the status table below, showing:
- Product Identifier (fenxId or alternateId)
- Error details Failed records will not be loaded into FenX. You can review errors, correct your data, and reattempt the load if required.
Any products that failed to create will appear on the reconcilation report.
Loading a Product as Offboarded
By default, any product loaded via ETL is treated as Onboarded and Verified. However, if a product has been offboarded and should be marked accordingly in FenX, the ETL tool supports this through a dedicated field.
How to Flag a Product as Offboarded:
To mark a product as Offboarded, the following must be done:
- Include the field isOffboarded in your data source file
- Map isOffboarded in the System Fields during configuration
- Set the value to true for any product that should be flagged as offboarded
System Behaviour:
| IsOffboarded Value | Product Status After Load: |
|---|---|
| true | Offboarded and verified |
| false/blank/Not mapped | verified |
A new system flag Offboarded has been introduced to clearly distinguish offboarded products from those that remain active. This flag appears in the product metadata and is visible across relevant views and API responses. You cannot update an offboarded product to onboarded and vice a versa. This must happen in journey,
You can visually confirm the offboarded status in the product record using the "Offboarded" chip in the UI or through API metadata fields post-migration.