ISDA Amend
This section outlines how the user operates the ISDA Amend tasks inside of a journey. Once the configuration has been completed (see Configuration Guide), the user can now make calls to the S&P Markit ISDA External service, for datasets related to their protocols of choice, by searching and Linking to those datasets. The data from those datasets can be imported into Fenergo and is stored against the Entity record for the Entity in question and for a Managed Relationship, if configured.
Searching for ISDA Protocol Datasets
When the user lands in the Initial ISDA Data Sourcing Task, they have the option to Complete the task and move on, by clicking the Complete button in their journey, or they can call for ISDA Data. By completing the task without linking to any datasets, the user will not pull any data from S&P Markit ISDA service.
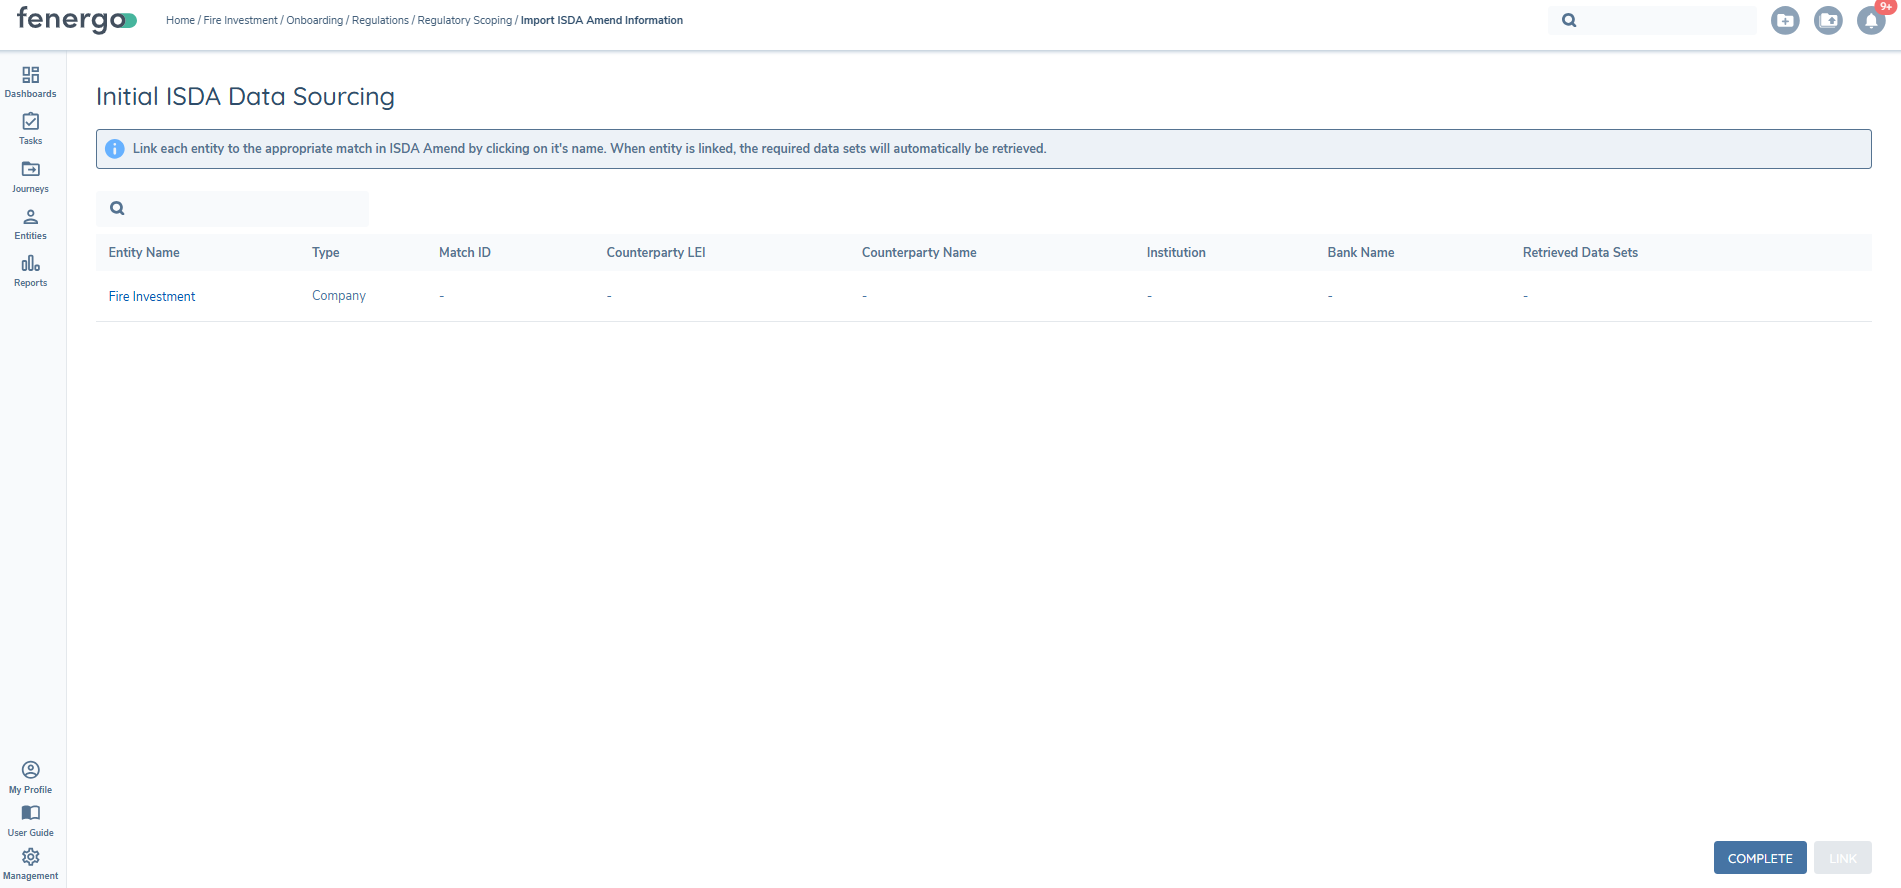
To call for ISDA Data the user must click on the Entity Name hyperlink in order to open up the Search modal.
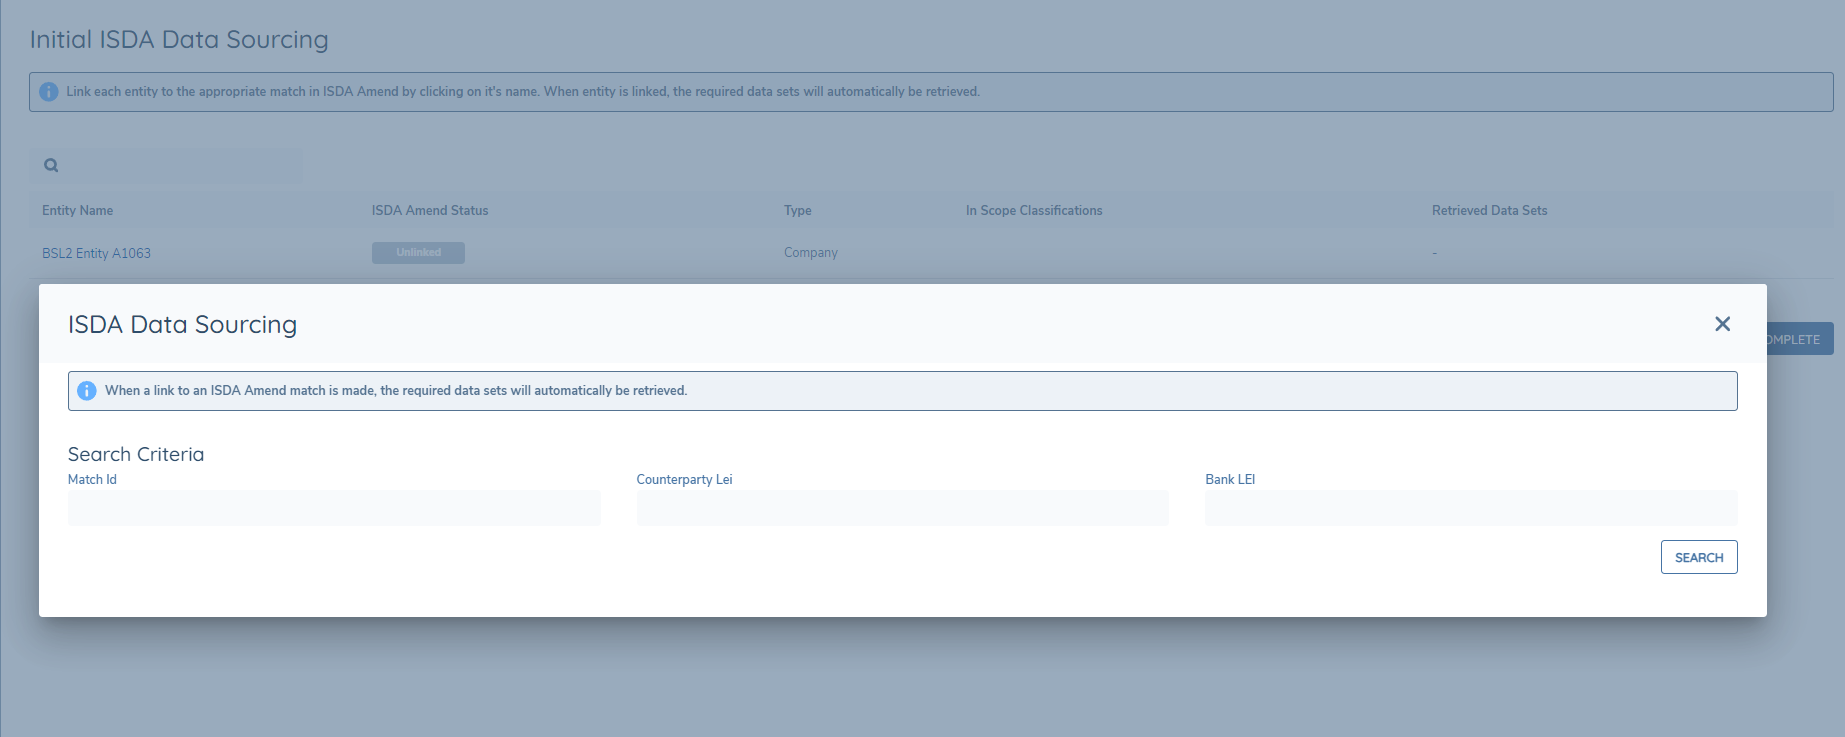
The Search modal allows the user to search for ISDA datasets based on a number of search criteria:
- MatchID
- Counterparty LEI
- Counterparty LEI & Bank LEI
When the search criteria has been entered, and the Search button is clicked, if the search criteria has any matches, those matches will be returned to the modal and will be available for users to Link to.
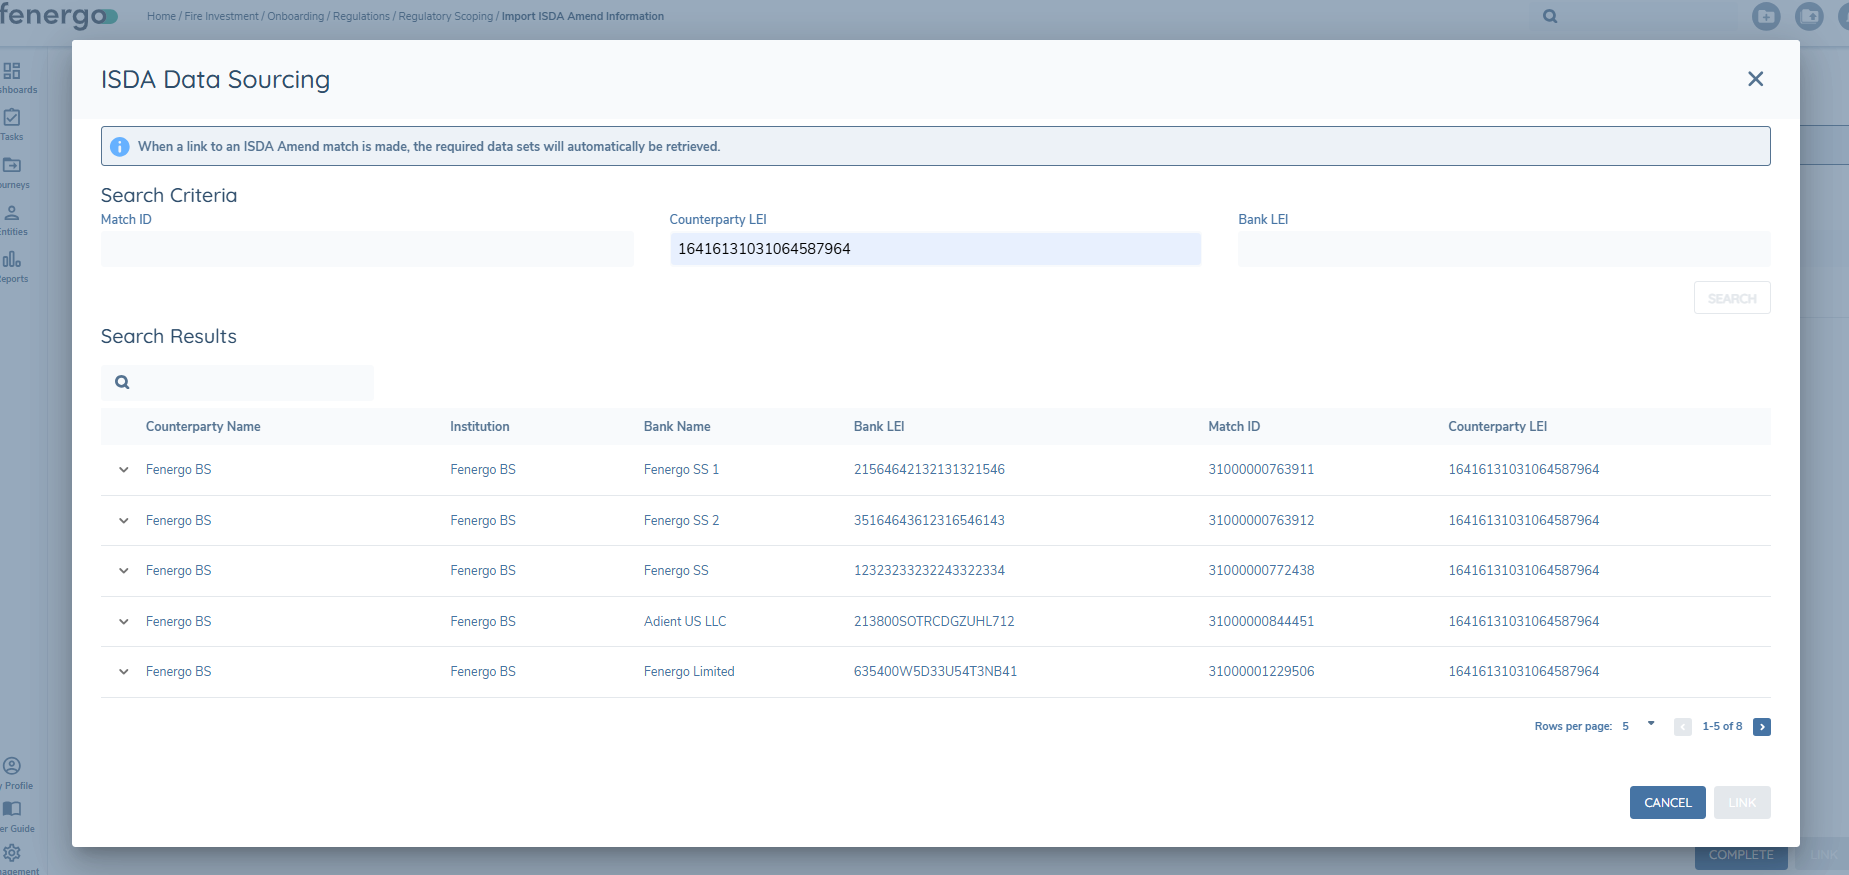
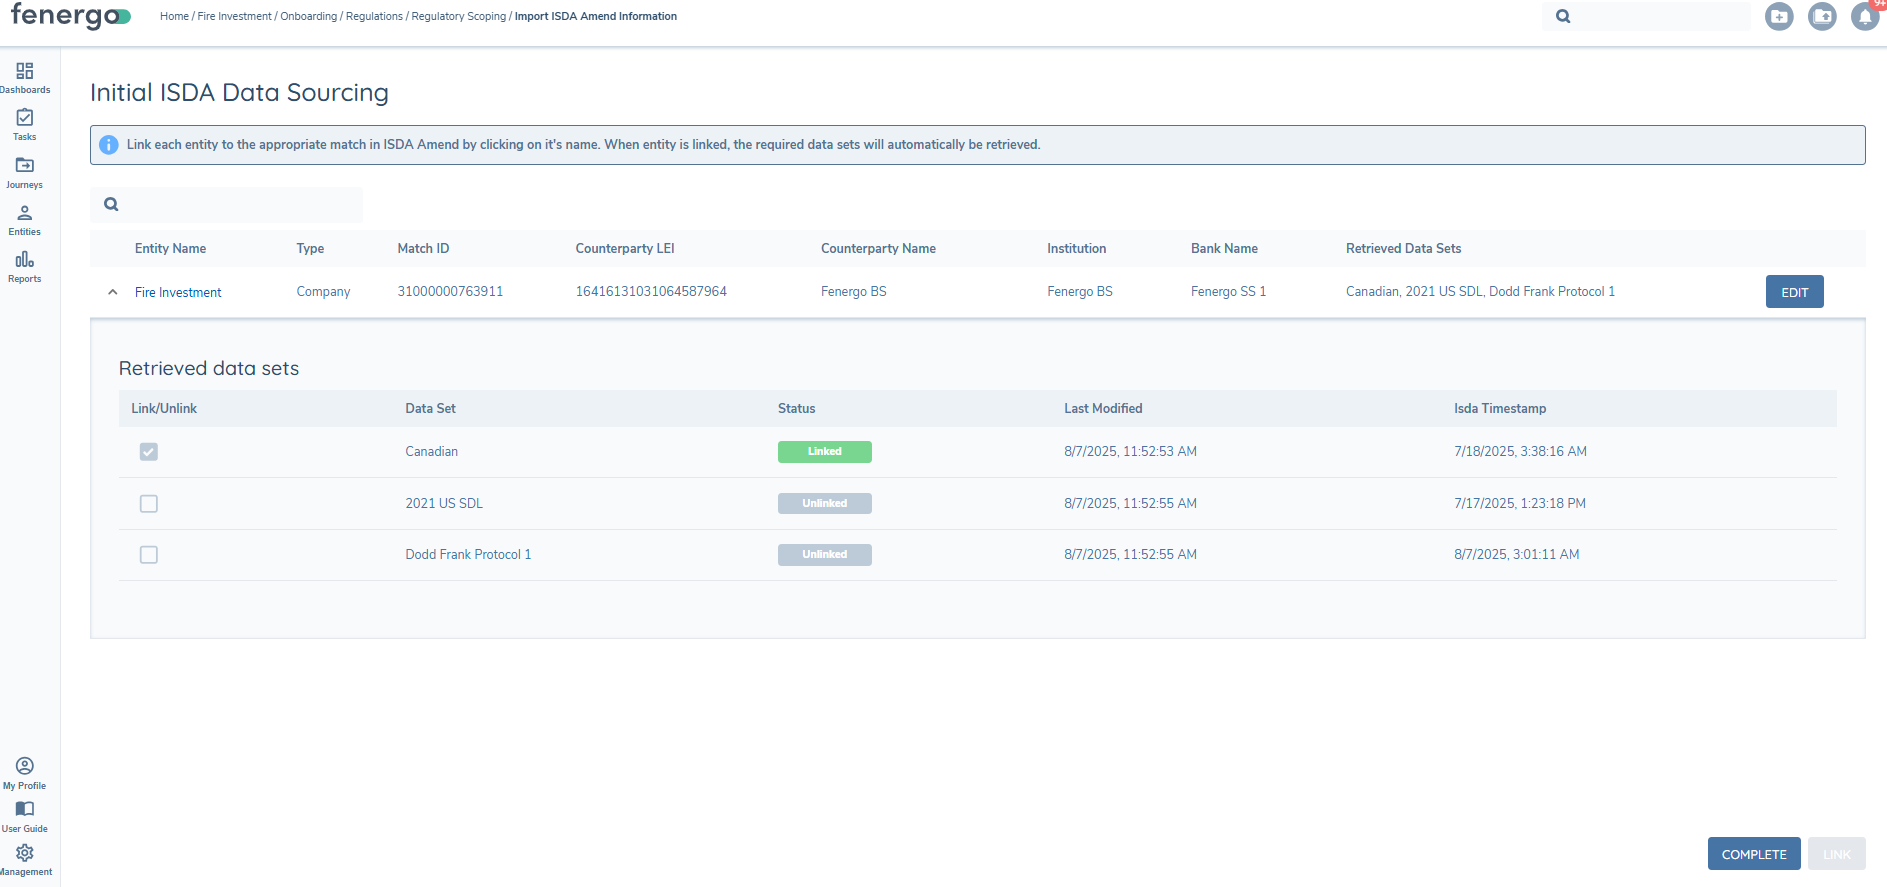
The user can select the specific datasets they want to link to from the returned Search Results. Click the down arrow next to the returned result and a new grid will be displayed. Each row has it's own Link or Unlink option.
The user needs to manually select the datasets to link to and then click the Link button. This will update the Status chip for the linked datasets to “Linked” and they will turn green.
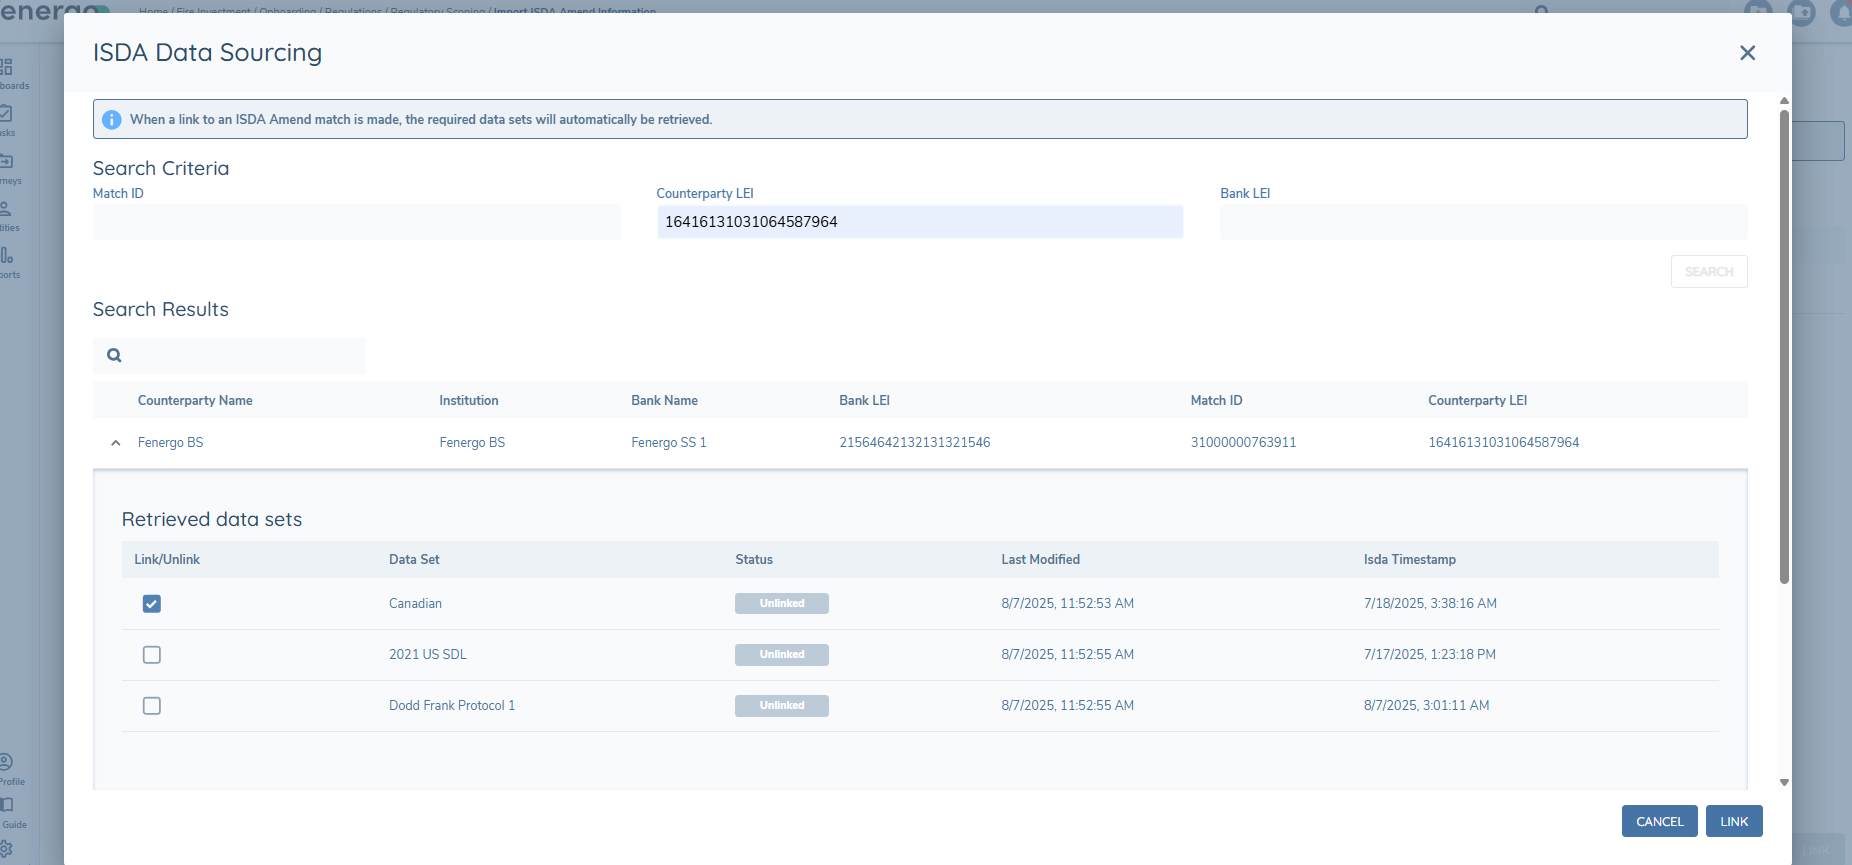
When the datasets have been linked successfully, the ISDA Amend Status chip will change from Unlinked to Linked and the data is now stored on the Entity Record.
The Data Set Column will show the datasets retrieved. The Status column will differenciate Linked versus Unlinked datasets. The Last Modified column shows the date that this data set was last updated in Fenergo. The ISDA Timestamp will show the date and time of the last update in ISDA.
Displaying the data
For all data fields that we want to return data from ISDA, they will need to be added to policy in the category ISDA Search Response and then mapped to a corresponding field in the ISDA Amend section of External Data configuration. The fields can then be added to any other category to display on a data task and show the user the results collected from ISDA.
Using the Final Isda Data Sourcing Task
The Final Isda Data Sourcing task can be used after the Inital Isda Data Sourcing task has been completed, if new datasets have come into scope, based on the response returned from the original call. When the user lands in the task, and the In Scope Classifications column shows datasets in scope, these datasets will be called for once the CALL ISDA IN SCOPE button is clicked.
Datasets are then retrieved in the same manner as the Initial Isda Data Sourcing task

Consuming Ongoing Updates to ISDA Datasets
To ensure compliance, and keep datasets in sync, Fenergo supports the Ongoing Updates of ISDA related datasets, where changes have been made to the data in those datasets or if a MatchId has been removed for any dataset.
A backend scheduling service will run automatically, on a twice daily basis, at 9am and 5pm UTC, to poll S&P for ISDA related dataset changes, for ISDA subscribed entities, based on the ISDA Last Updated timestamp. If the Checker Service finds that an update has been made, the Processor Service will begin to process the update, by automatically launching a new journey of type ISDA Amend Update.
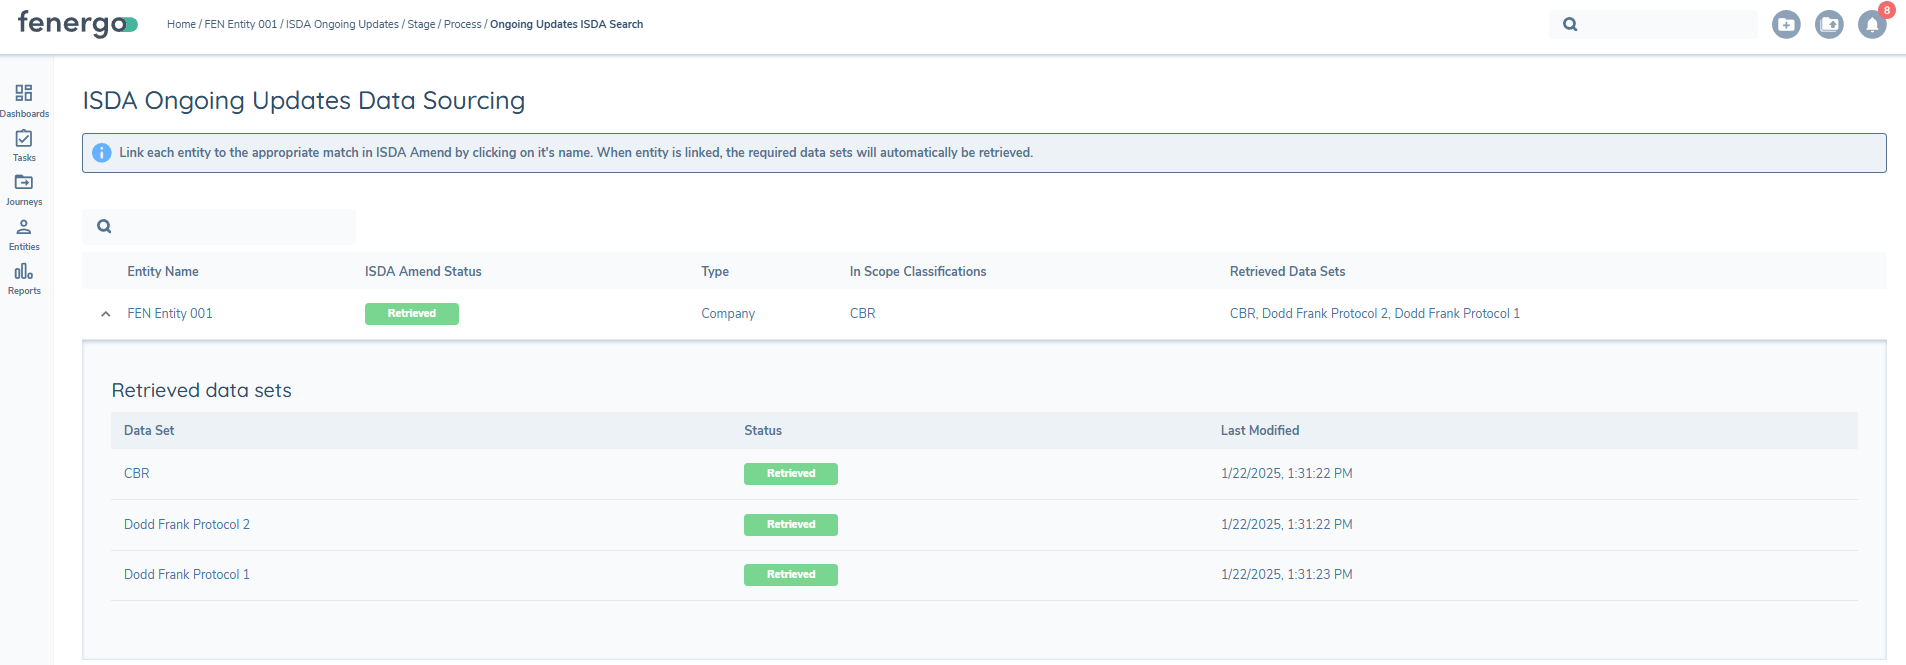
To consume the updated data, the journey should contain a task entitled ISDA Ongoing Updates Data Sourcing, which will call S&P for the latest ISDA dataset, for any datasets have been updated. This task will close automatically when an update to a linked dataset is returned. In this scenario, the change will be pulled from S&P and the task will autoclose. In the case that there is an error or data could not be returned from S&P, then the task will remain open for the user to close manually.
To consume any changes involving removed Match Id's, the journey can use the standard Initial ISDA Data Sourcing Task, which will allow the user to search by the original MatchId, or a different one if required.
ISDA Grid Persistence in Maintenance Journeys
The ISDA Data Sourcing task in a maintenance journey will display the results grid from the last completed search, showing both previously linked and unlinked datasets with linked datasets clearly indicated. If no changes are needed, completing the task will preserve the entity's existing ISDA links.
To add or remove datasets under the same match ID or to look for a new match ID in a new maintenance journey, the user will click on the entity name which will open the search with your previous criteria pre-populated, ready to refine and return the latest data. A confirmation modal will summarize the datasets added or removed before any changes are applied.
Configuration
This section outlines the configuration required to enable users to call S&P Markit ISDA from journeys within Fenergo.
Configuration users can use Fenergos No-Code mapping tools for each of the ISDA Amend Protocols, to map fields from the ISDA Datasets, back to fields in Policy for use within the application. Each supported Protocol has its own individual mapping tool (adaptor) that contains lists of the available datapoints from each Protocol. Matching Policies are created in Policy, to enable the data mapping. Fenergo SAAS uses the API only approach to call S&P for ISDA Amend Protocol datasets. The file upload is not supported at this time.
To display the results from linked datasets, the fields from ISDA Search Response must be configured with the same datakeys in any new category you use. This category can then be added to the task within the Journey Configuration.
Permissions
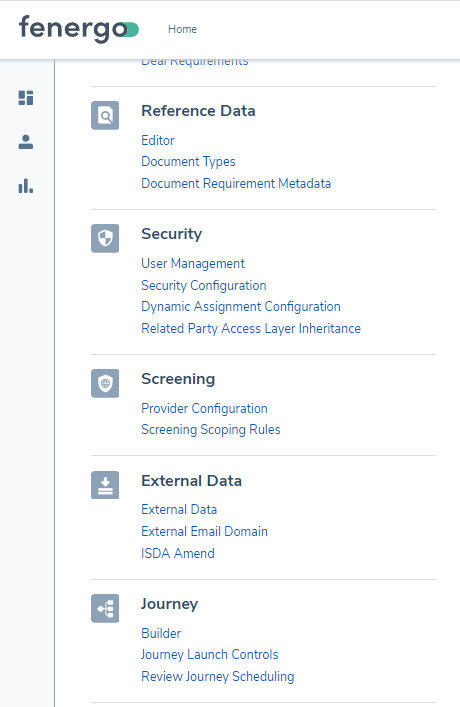
Access to the ISDA Amend Configuration area is through the External Data area in the Management section on the Landing page, and is controlled by Permissions in the Security Configuration section. Users must have the ISDA Access and Configuration permissions enabled in order to access the configuration area.

Once permissions have been granted the user can click on the ISDA Amend Hyperlink to access the configuration screens.
Mapping Protocols to Policies
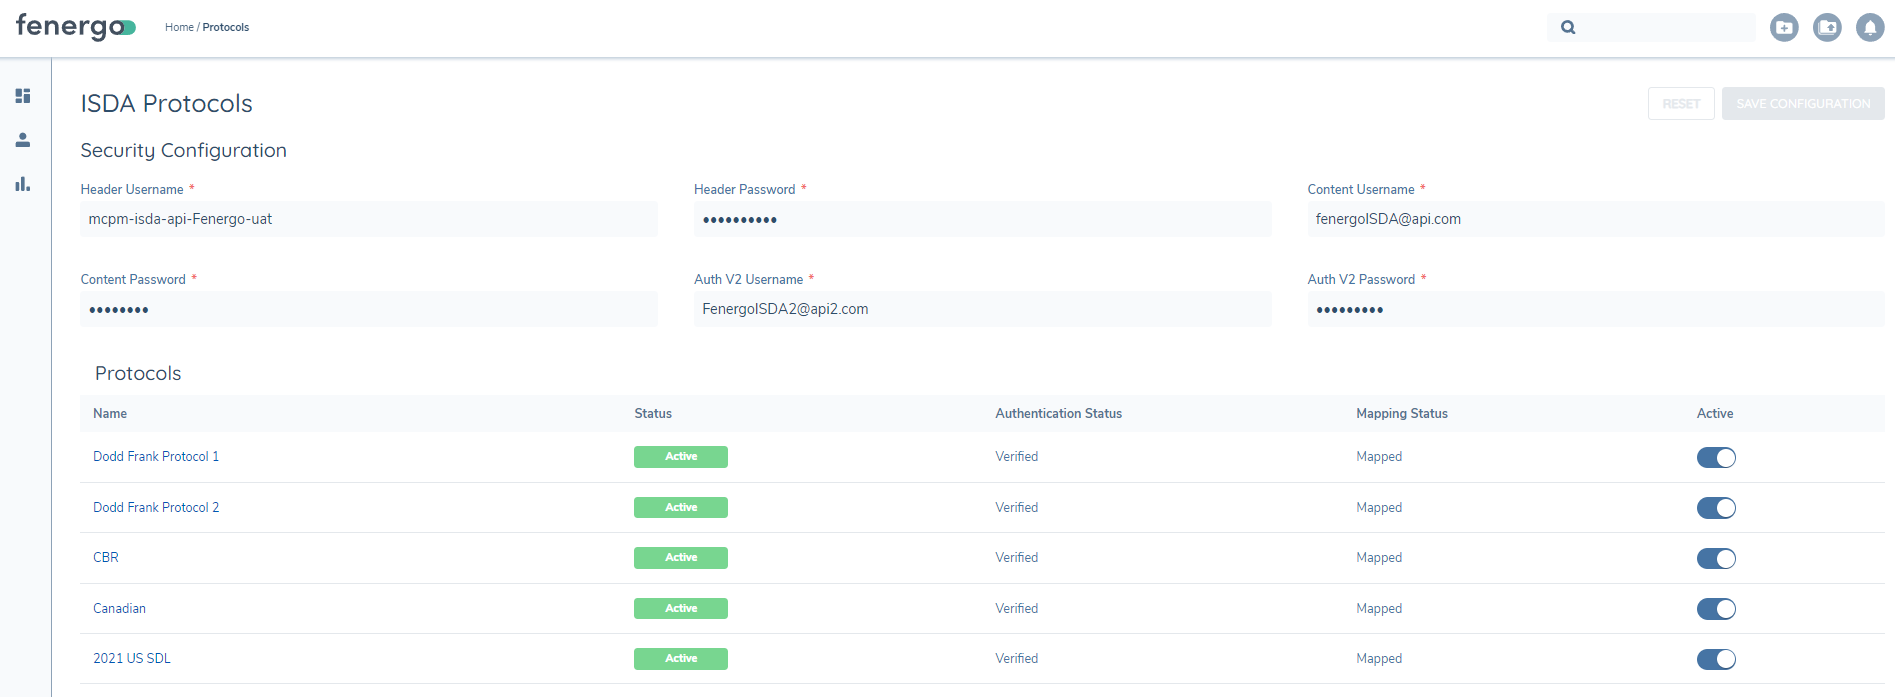
When the user lands in the Protocol configuration screen, they can enter their security credentials, provided by S&P, to enable them to call for ISDA data successfully, from Fenergo. When the user enters their security configuration credentials, they must click the Save Configuration button to save the credentials.
The list of available Protocols will exist under the Protocols heading, indicating their current active status and if mappings have been completed for each one. Protocols must be Active and Mapped in order for them to be used in the Journey Task.
The user can then click on the hyperlink of the Protocol they want to configue. This will open up the first mapping configuration screen which will allow the user to configure mapping for both the Company and Managed Relationships.
The user can Activate or De-activate the Company and/or the Managed Relationship form this area and can see visual indicators for the Search Request and Search Response mappings status. When the user has completed the subsequent mappings they must click the Save Configuration Button on this screen also, which will validate the latest schema and save the latest mappings.

To acces the No-Code mapping tool for the Company or Managed Relationship (MR), the user must click on the hyperlink for each one. This will open up the Mapping tool screens and display the datapoints available from ISDA that can then be mapped to policy fields.
NOTE In order for the Mapping tool to show the ISDA Datapoints, an associated policy must already be created. The mapping policy Jurisdiction names must be the following:
- Dodd Frank Protocol 1 = DF1
- Dodd Frank Protocol 2 = DF2
- CBR = CBR
- 2021 USSDL = ussdl
- Canadian = Canadian
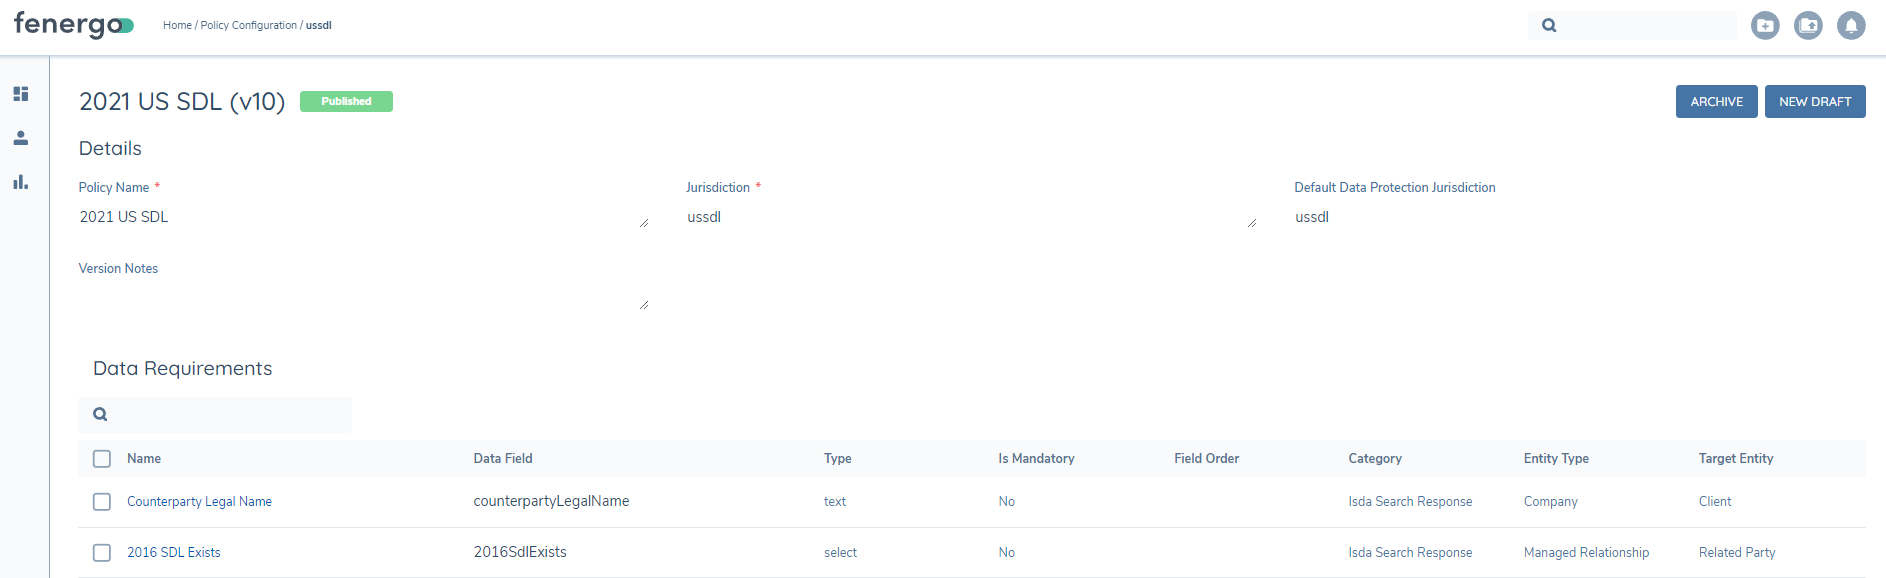
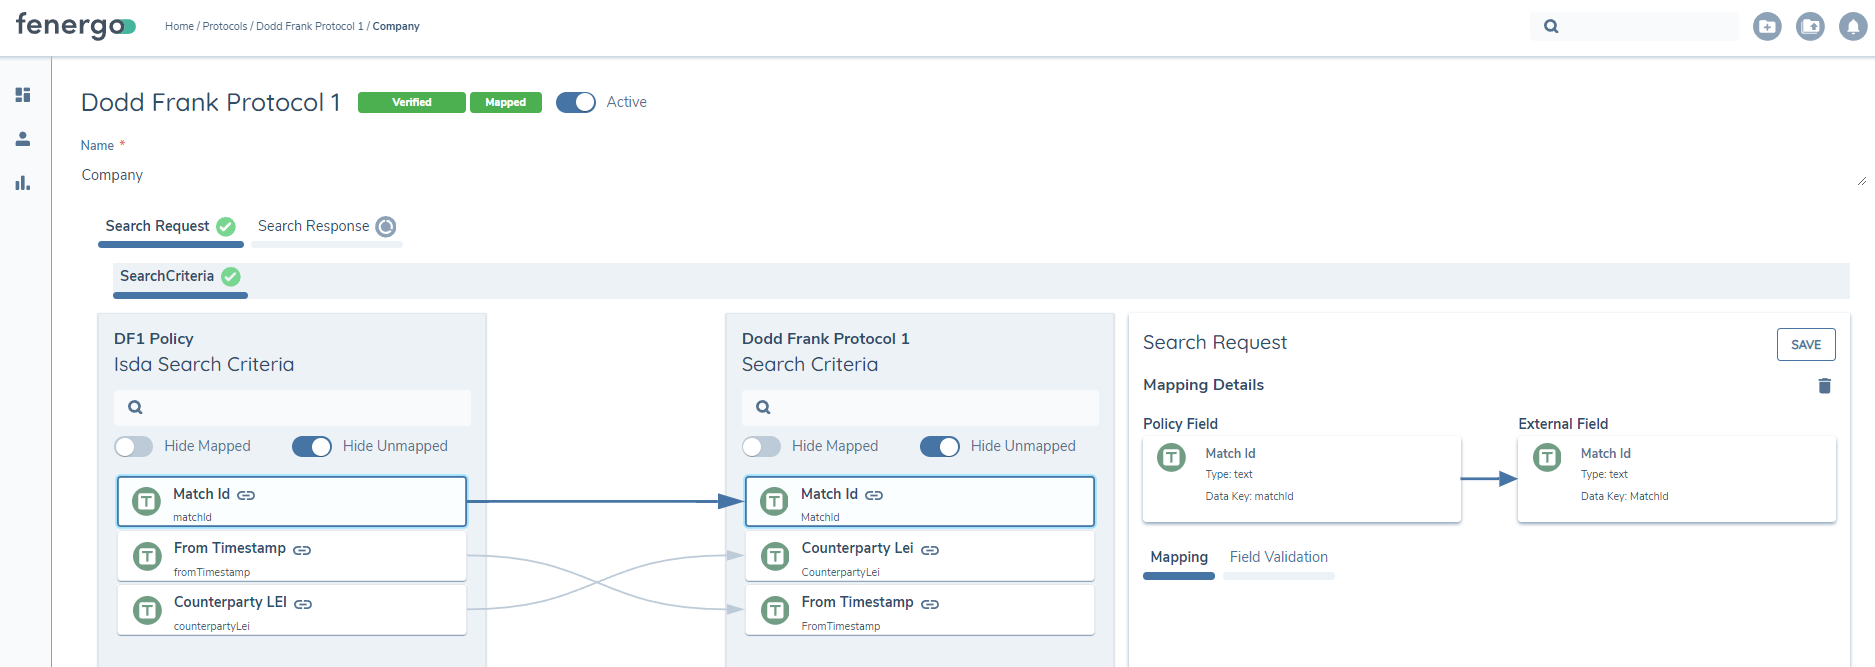
Once the policy has been created with the correct Jurisdiction name, the user will see the fields from that Policy on the left side of the Mapping Tool and the available ISDA fields on the Right side.
The user can then begin to map the fields to each other, by clicking on the field they want to map, and then clicking on the corresponsding field on the opposite side. Those fields will then be mapped together once the Save button has been clicked.
Whenever that dataset is returned from ISDA in the journey, the datapoint value returned, will be mapped to the corresponding field in Policy.
The mapping tool supports multiple data types:
- Text Fields
- Select Dropdowns (lookups)
- Numbers
- DataGroups & Multi-DataGroups
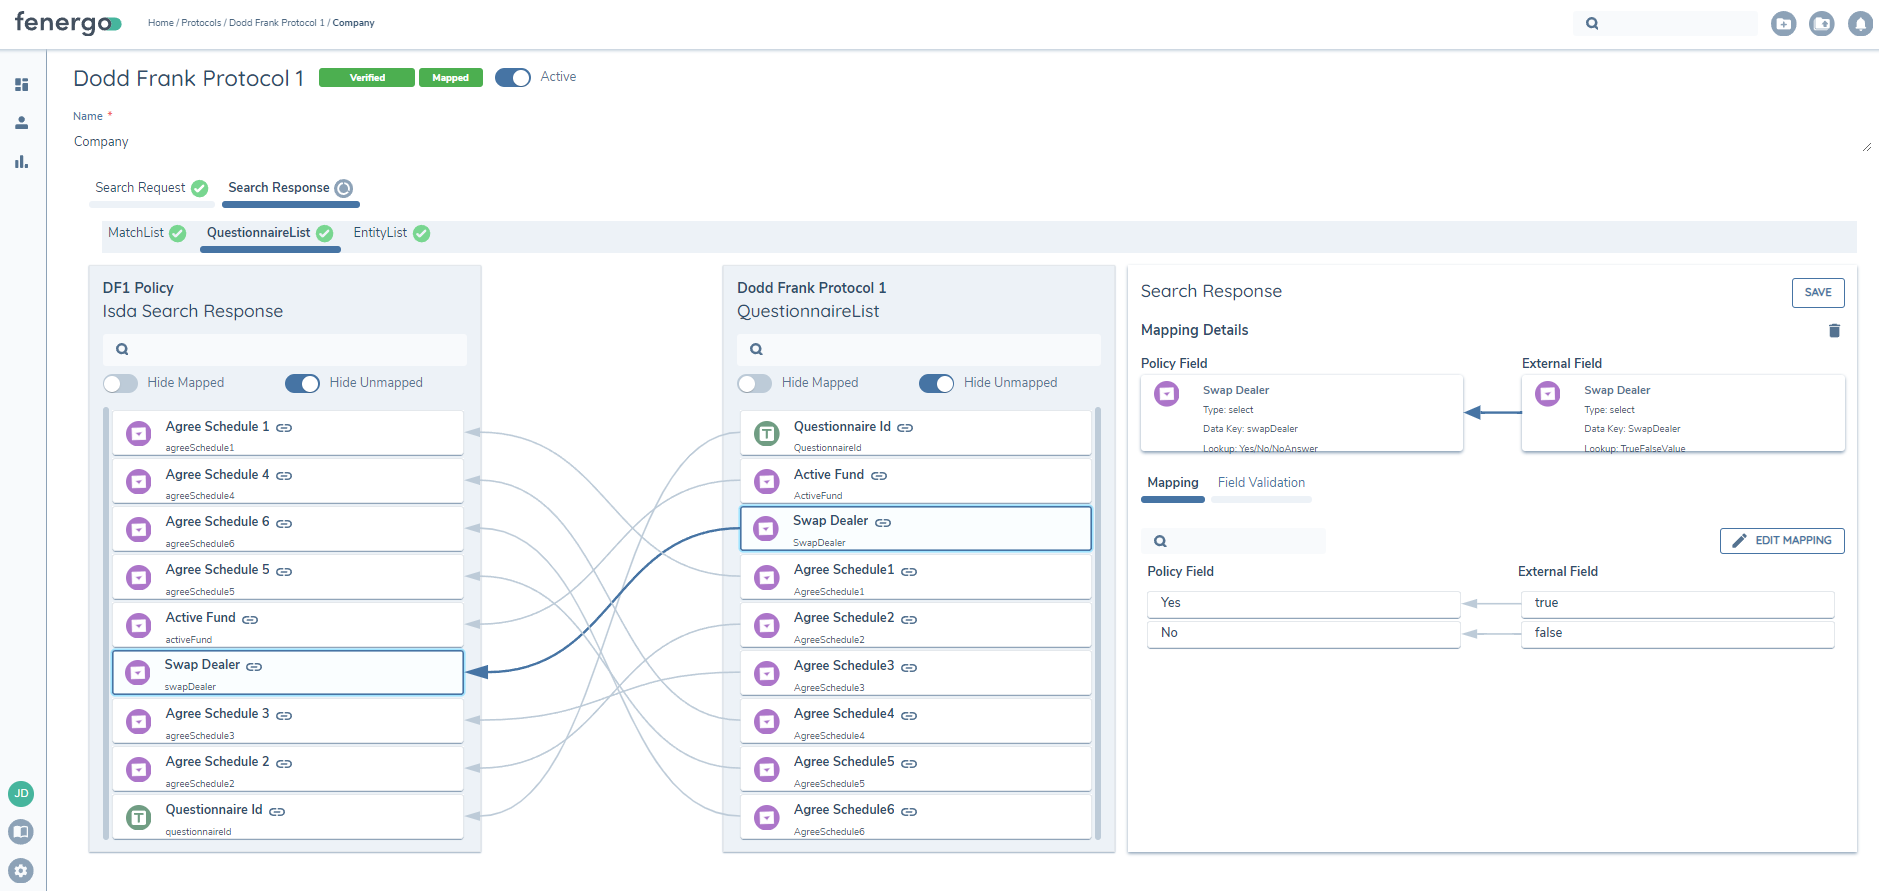
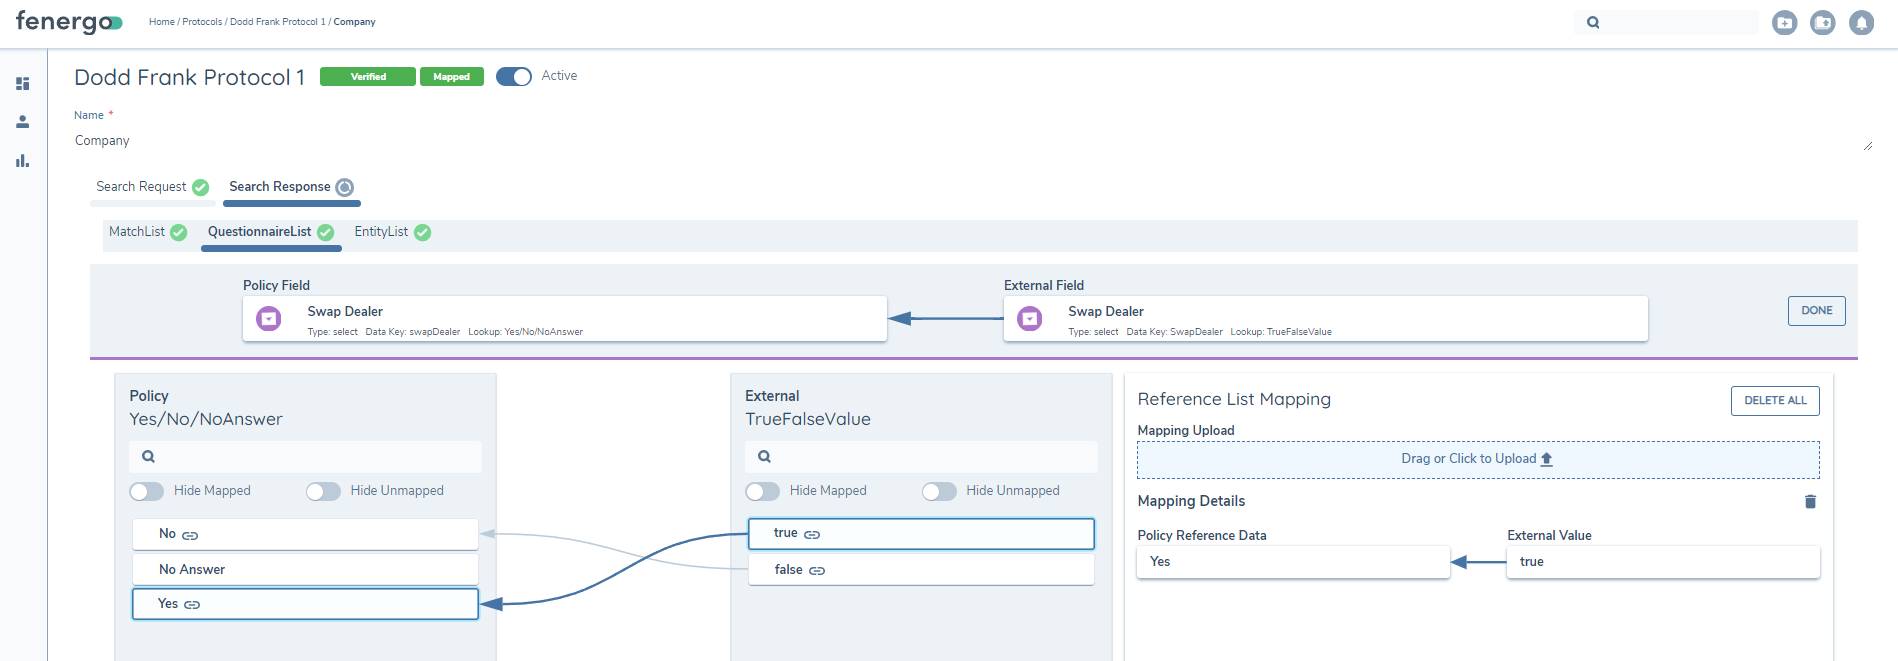
In order to map fields inside Select Dropdowns or Datagroups the user can click the Edit Mappings button while mapping. This will open up a subsection and enable the user map fields inside the Select or Datagroup.
Users can remove mappings by clicking the Thrashcan Icon.
Configuring the ISDA Journey Task
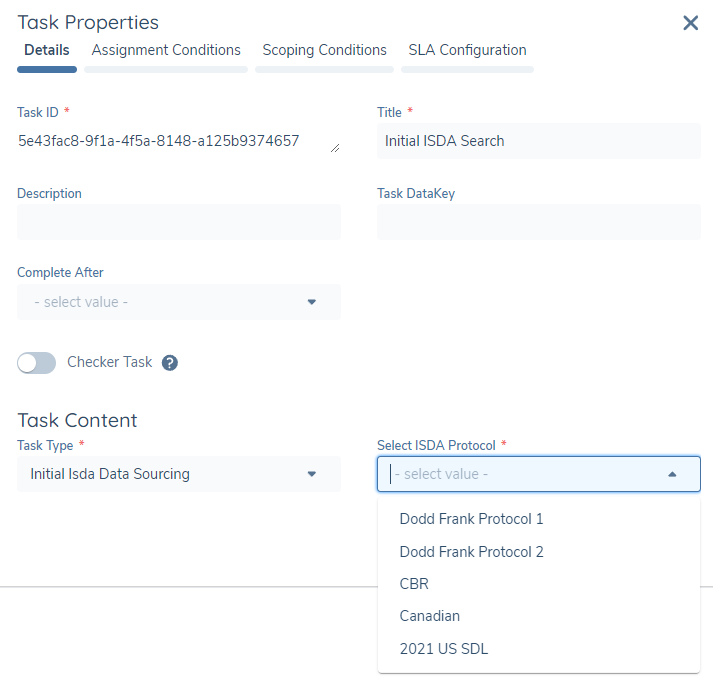
As part of the ISDA Integration there are two new tasks that can be configured in the Journey Builder in order to make the call to S&P for ISDA Data.
- Initial ISDA Data Sourcing: When this task is selected, configuration users can also select the Protocol datasets they want to call for, by selecting the available protocols form the Select ISDA Protocol dropdown list. If the corresponding Protocol mapping is completed and enabled, the Protocol will appear in the list for selection.
A Data task type can be configured after the Initial ISDA Data Sourcing task to display the results obtained from the linked data sets.
Configuring Ongoing Updates (Journey & Task)
In order to configure the Ongoing Updates for datasets, the configuration user must create a new Journey of type ISDA Amend Update.
Note: When creating this journey type in the Reference Editor, the title must exactly match the above, in order for it to be picked up by the Processor service.

In order to consume the updates, the task ISDA Ongoing Updates Data Sourcing must be included in the journey.

This task will automatically close by the system when an updated data set is obtained from ISDA. The task will only remain open if there was an error returning a result and therefore the user has to manually remediate the task.
Once the task is included and configured, the system can call for the updates to the changed datasets and bring the updated data back into Fenergo, to be stored on the Entity Record.
Configuring Ongoing Updates (Removed Match Id's)
In order to configure the Ongoing Updates for Removed MatchId's, the configuration user must create a new Journey of type ISDA Amend Update Manual.
Note: When creating this journey type in the Reference Editor, the title must exactly match the above, in order for it to be picked up by the Processor service.
In order to consume the updates when a Match Id has been removed, the system will launch a journey of type ISDA Amend Update Manual, which should contain the Initial ISDA Data Sourcing Task, which allows the users call ISDA for the updated Match Id information.
ISDA Scheduler
The ISDA Scheduler automatically checks for updates to ISDA protocols. A new journey is triggered when changes are detected, such as updates to data or the removal of a protocol from a Match ID.
The frequency of these scheduled checks can be configured by users with the ISDA Configuration permission.
Accessing Scheduler Settings
A gear icon is available on the ISDA Amend Protocols page. Selecting this icon opens a side panel where the Scheduler Frequency field can be configured.
Scheduler Frequency Options
Users can choose how often the scheduler runs per day. Each option corresponds to predefined execution times (UTC).
- 1x per day: 09:00
- 2x per day: 09:00, 17:00
- 3x per day: 09:00, 13:00, 17:00
- 4x per day: 09:00, 13:00, 17:00, 21:00
- 5x per day: 09:00, 13:00, 17:00, 21:00, 01:00
Applying Changes
Any updates to the scheduler frequency take effect from midnight (UTC). This means changes will apply starting the following day.
API Failure Notifications
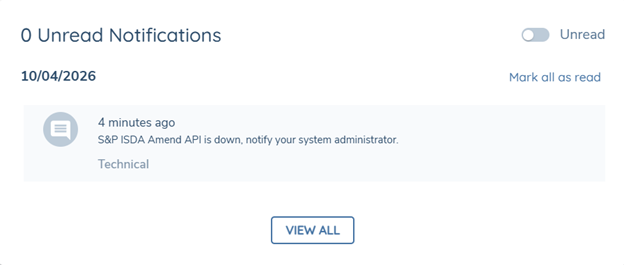
If the ISDA Amend API within Fenergo becomes unavailable while a user is completing the ISDA Data Sourcing task, the system will surface a clear notification in the Notification Centre. The message they receive will read "Fenergo API is down, notify your system administrator."
If the S&P Counterparty Manager ISDA Amend API is down, the message will read "S&P ISDA AMEND API is down, notify your system administrator”.
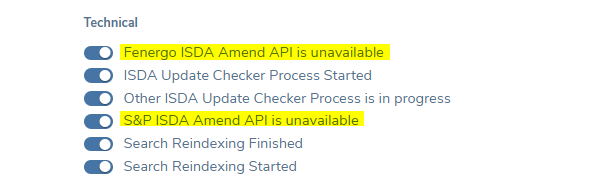
The user can opt in or out to receive these notifications via their profile page under the Technical heading. The user can also opt in to receive an email notification for the same message via the profile page.
In both cases, users should contact their system administrator to investigate and resolve the connectivity issue before attempting the search again.