Calculated Fields
The feature of Calculated Fields allows users to leverage Fenergo’s calculation engine to perform calculations based on the formula configured.
Calculated Fields are configured in Policy as a dynamic result which is computed on the fly based on the specified formula and the current values of the referenced fields. This dynamic nature allows for real-time updates.
Calculation Configuration
To start the configuration, the user needs to make sure that they have the appropriate Calculation Configuration permissions assigned to them.
The Calculation Configuration area can be accessed by navigating to Policy on the Management Menu and finding the three applicable Calculation Configuration links.
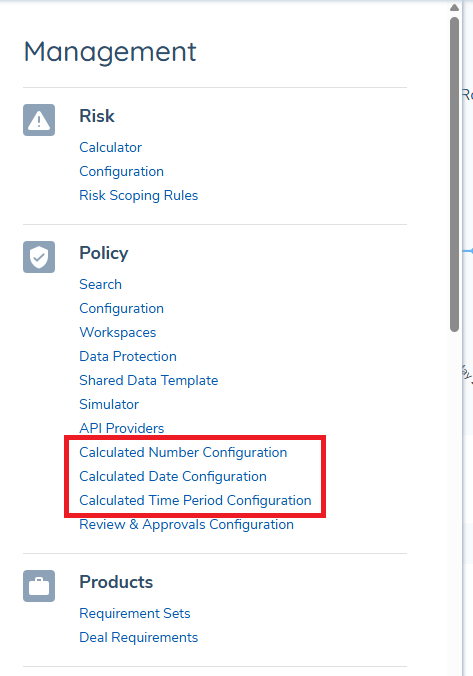
From the Calculation Configuration page a user can add new Formulas, and access any existing Rule Formulas.
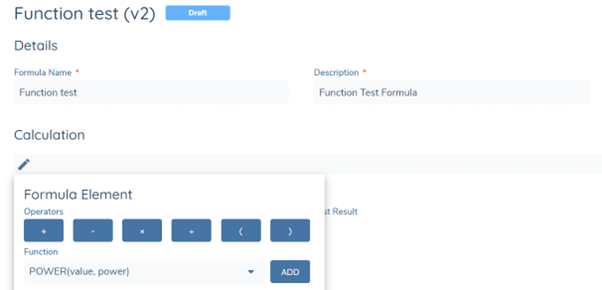
To create a new Formula, click on the Add button. From this screen, the user can name their Formula and enter the description for that.
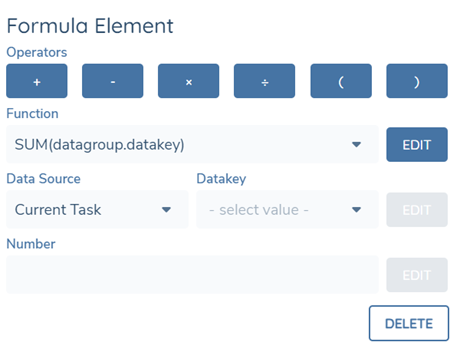
User needs to use the formula builder to create the formula. By clicking the Edit pencil icon, a popover modal will appear for the user to select the Formula Element.
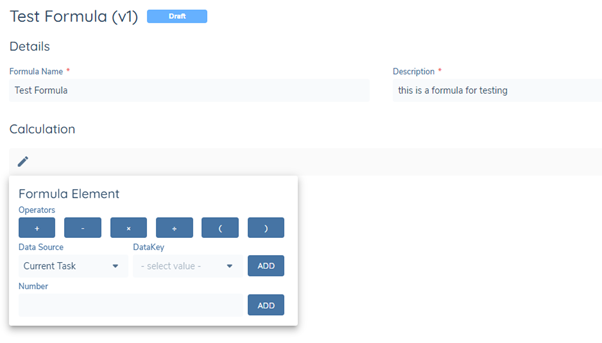
There are three types of formula elements:
- Operators: Arithmetic operators to support addition, subtraction, multiplication, division. Parentheses are also supported to indicate the order of operations.
- Datakey:
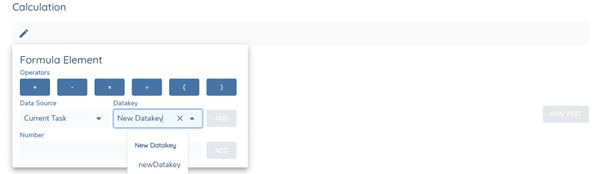
- User can select the datakey of an existing number field configured in Policy Data Requirements from the dropdown.
- User can enter a new Datakey value into the field. If the Datakey has not been used to configure a number field in Policy, the value will appear under the “New Datakey” section in the dropdown. The pre-population logic of a new datakey is inherited from Policy. For the formula to work, the user needs to publish the formula with the new datakey value and then configure a number field with the exact same datakey in the Policy Configuration. The formula will not work in the task, if the new datakey is not added in Policy or there is a mismatch of datakeys.
- A column within a data group can also be used in a formula when paired with a calculation function. If the calculation aggregates the values of a single column, users should select "datagroup.datakey" for the formula. Alternatively, when the Data Source is set to "Current Data Group Item" and the calculation spans multiple columns within the same data group as the calculated field, users should directly select the datakey of the data group column.
- Number: User can enter any number they want to use for calculation. Number separator is also supported for numbers in the formula.
Once the element has been selected, the user has the option to make changes to edit or delete the existing elements. By clicking the element in the formula builder, user can either Edit or Delete the elements. By hovering the mouse between two elements, the edit pencil icon will appear for the user to insert any elements in between.
Data Source
When a datakey is involved in the formula configuration, it is mandatory to select the data source of the datakey.
Data source refers to which domain the datakey is coming from and the formula will use the datakey’s value from the selected data source for calculation.
If a datakey of the selected data source appears multiple times in a single journey, the value in the latest completed task will be used for calculation.
Following data sources are supported for calculation configuration:
- Current Task: data source for data keys within the same task as the calculated field (exclude datakeys within the same data group as the calculated fields).
- Current Data Group Item: data source for datakeys within the same data group as the calculated field. For datakeys outside the data group, select “Current Task” or other data source accordingly.
- Related Client: data source for data keys within the Data task type.
- Related Products: data source for data keys within the Manage Products task type.
- Related Collateral: data source for data keys within the Manage Collateral Task type.
- Related Asset: data source for data keys within the Assets modal for the Manage Collateral Task & the Collateral Linkage in the Manage Deals task.
- Related Association: data source for datakeys within the Collateral Linkage in the Manage Deals task.
Certain data sources are structured as Nested Data Sources, meaning that multiple items are contained within each data source. Each item has its own set of attributes or values. For example, within the Related Product data source, there can be multiple individual products. The calculation can be performed either at the data source level, aggregating the value of all items, or at the item level, calculating the value for each specific product.
Cross-Data Source Calculation
Cross-data source calculation refers to performing calculation that involve data from multiples data sources within the same journey. This could entail aggregating data from one data source and using it to perform calculation in another data sources.
The data source can be selected in the formula builder when users configure the formula. Below is a mapping between selected data source and the task, enabling calculations using data from that specific data source.
Below is a mapping between selected data source and the tasks supporting calculated field, enabling calculations using data from that specific data source.
| Task \ Data Source | Current Task | Current Datagroup Item | Related Products | Related Client | Related Collateral | Related Deals | Related Assets | Related Associations |
|---|---|---|---|---|---|---|---|---|
| Entity Data Task | Y | Y | Y | N | N | Y | N | N |
| Manual Credit Assessment | Y | Y | Y | N | N | N | N | N |
| Manual Credit Screening | Y | Y | N | N | N | N | N | N |
| Manage Product Task | Y | Y | N | N | N | N | N | N |
| Manage Collateral Task | Y | Y | N | N | N | N | Y | N |
| Manage Deals | Y | Y | Y | N | Y | N | N | Y* |
Note * Related associations available to use in calculations are Deal to Collateral only
Function Configuration
The calculation formula builder offers a range of calculation functions, including Power, Rounding, Absolute, and Summing for selected columns within a data group. Each function can be applied independently or integrated with others, providing flexibility and versatility in formula configuration.
Both numbers and new/existing datakeys can be used as arguments in the functions.
Power Function
The power function allows the user to raise a number to a certain exponent.
The user can find the power option under the Function dropdown. The function will be displayed in the format of POWER(value,power). Users need to enter the base number as the value, and the exponent as the power. For example, to calculate 2 raised to the power of 3, the user should enter POWER (2,3) in the formula builder.
Along with the number value, new/existing datakeys can also be used as arguments in the power calculation.
Rounding Function
The formula builder supports three types of rounding:
-
Round: The Round function if the next digit is 5 or higher. Otherwise, this function rounds down.
- Examples:
- 2.6 rounds to 3
- -2.6 rounds to -3
- 2.4 rounds to 2
- -2.4 rounds to -2
- Examples:
-
Round up: The RoundUp function rounds a number up, away from zero, to a specified number of digits.
- Examples:
- 2.4 rounds to 3
- -2.4 rounds to -3
- Examples:
-
Round down: The RoundDown function rounds a number down, towards zero, to a specified number of digits.
- Examples:
- 2.6 rounds to 2
- -2.6 rounds to -2
- Examples:
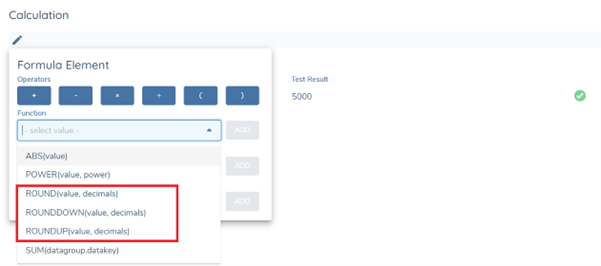
The rounding functions will be displayed in the format of Function(value,decimals). User need to enter the number or field with number value to round as “value”, and specify number of decimal places to round to. Use a positive value to indicate decimal places right of the decimal separator, a negative value to the left, and zero for a whole number.
Calculation within the Nested Data Sources
With nested data sources identified above under Data Source section, we support calculations at either the data source level, where values of all items are aggregated, or at the item level, where the value for each specific item within the data source is calculated.
Data Source Level Calculation
The user can configure a formula to calculate values at the data source level. For instance, they can calculate the sum, average, minimum, or maximum of the product limits for all products within the Related Product data source. The calculated fields will need to be configured in a separate task which supports calculations, distinct from the Product task. The user can use the appropriate function to compute the datakey within the relevant data source. For example, to calculate the sum of product limits for all products within the Related Product data source, the formula should be configured as Sum(productLimit) with “Related Product” selected as the data source.
Individual Item Level Calculation
The user can also configure a formula to calculate values for each individual item. For instance, they can calculate the asset valuation total for each collateral added within collateral task. The calculated field should be configured within the current task where the calculation is being performed. For example, to calculate the sum of valuation for all assets within a single collateral, the formula should be configured as Sum(valuation) with “Current Task” selected as the data source.
Filter Condition
The filter condition allows users to apply conditional logic to the formula, and only the data that meets certain criteria to perform the calculation. The calculations will be performed based on whether a specified condition is true or false. The filter condition must be paired with a function in the formula.
Filter Condition Application
Filter Condition can be applied to a nested data source, or a data group in a non-nested data source. As mentioned above, nested data sources (related products, related collateral, related deals, related asset, related association) contain multiple items and each item has its own set of attributes.
If the filter condition applies to a nested data source, it will filter the items within the data source and calculate the value only associated with the item that meets the condition. For example, Summing the product limits of all products within the related product source only if the product type equals to Credit Card.
If the filter condition applies to a data group in a non-nested data source, it will only filter the data requirement within a data group using another data requirement in the same data group. For example, Summing the revised fees of a product only if the fee type does not equal to Credit Facility Fee. In this case, both the revised fees and Credit Facility Fee are data requirements within the same data group.
If the datakey configured is within a data group and a nested data source, the filter will only be applied at the nested data source level.
Filter Conditions can only be configured for datakeys that exist in a published version of policy.
Filter Condition Configuration
If a datakey is eligible for filter conditions, the "Filter Conditions" tab within the element modal will become editable. The header under this tab will indicate whether the filter conditions will apply at the nested data source level or the data group level. Users can choose from a selection of operators and have the flexibility to utilize text, number, or select dropdown field values to define the filter conditions. To activate the filter conditions in the formula, users must click the "SAVE" button located at the bottom.
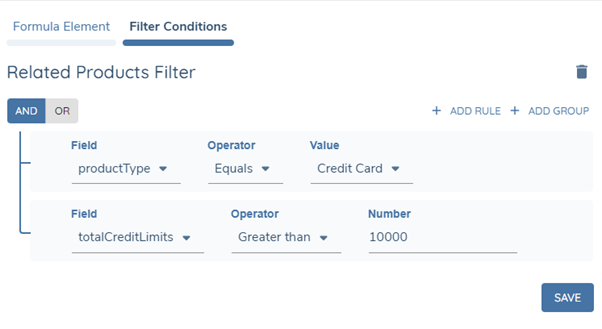
Each datakey can only have one filter condition configured, but multiple rules and groups can be set up within that filter condition.
Min & Max Function
The calculated field can return the minimum and maximum value in a set of values.
The user can select the Min and Max function from the Function dropdown. The function will be displayed in the format of Min/Max (value,…) . The parameters in the function can either be numbers, datakeys, or a single column within the data group that contains numbers only.
When there are multiple parameters to be added in the function, user can click on the pencil icon to open the popover modal and click the “,” icon next to the Function section. The pencil icon will appear within the bracket once the function is selected, or by hovering between the argument and bracket. The user can also click on the pencil icon to delete the parameter by clicking the “DELETE PARAMETER” button in the modal. If a value has been entered as a parameter, the user can choose whether to delete the parameter, or delete the value only by clicking the parameter. At least 1 parameter is required for the function.

Multiple datakeys and numbers can be entered when working with min/max function, while only a single column within a data group is allowed. The data group column should be formatted as "datagroup.datakey" in the function.
Average Function
The calculated field can return the average (arithmetic mean) of a list of data.
The user can select Average function from the Function dropdown. The function will be displayed in the format of Avg (value,…) . The parameters in the function can either be numbers, datakeys, or a single column within the data group that contain numbers only.
Similar to the min and max functions, when a user click the pencil icon in the function, a popover will appear to allow them to add or delete a parameter. In additional, multiple datakeys and numbers can be entered when working with min/max function, while only a single column within a datagroup is allowed. At least 1 parameter is required for the function.
Average, which is the arithmetic mean, and is calculated by adding a group of numbers and then dividing by the count of those numbers. When one of the arguments has no value in the task, the argument will not be included in the average unless a value of 0 is entered.

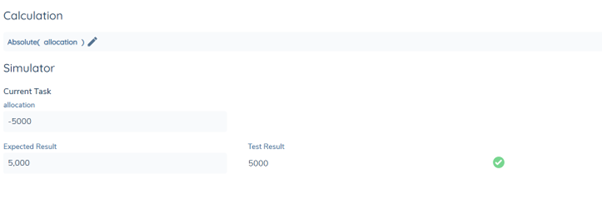
Absolute
The absolute function, displayed as Abs(Value), is a mathematical operation that returns the absolute value of a number. The absolute value of a number is its magnitude without considering its sign.
For example:
- Abs(5) = 5
- Abs (-5) = 5
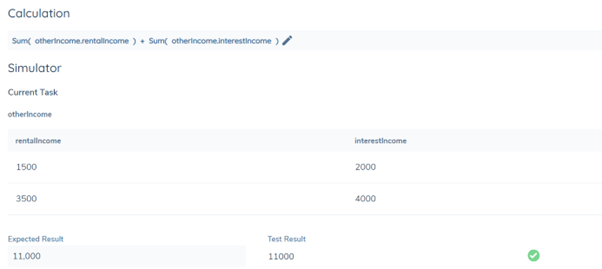
Summing the Column within a Data Group
The purpose of Sum function is to calculate the total of all entries of a specified column within a data group. The data group column should be formatted as "datagroup.datakey", where the chosen datakey specifies the column to be summed. Users needs to use the Datakey field to specify the columns within the datagroup for which the Sum calculation is to be conducted.
Even if the user enters a datakey for a non-existing column in the correct format into the Datakey field, the calculation will still function as intended as long as an exact match of the datakey and datagroup is configured and published in the policy configuration.
The summed result will be displayed in a separate calculated field within the same task, pre-configured by the user, and it will not be visible within the data group.
This function is also supported in the Formula Simulator. Once a “datagroup.datakey” is entred in the formula builder, a test data group will appear in the simulator for the user to entere the test data.
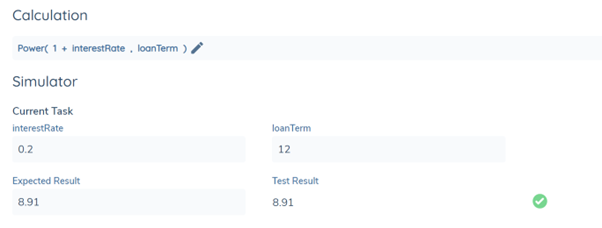
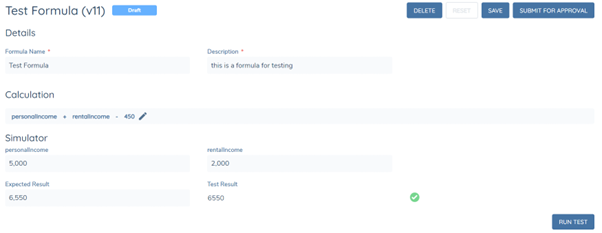
Formula Simulator
There is a Simulator section below the formula builder, which allows the user to test the formula without launching a new journey.
All datakeys selected in the formula builder will populate in the simulator for user to input value.
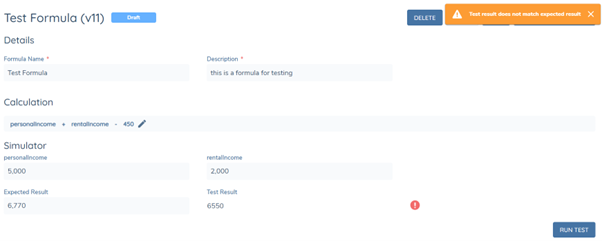
There are two static fields for the Simulator - Expected Result and Test Result. Expected Result is a user-input field, based on the value entered in the simulator. Once the formula element fields and expected result field are completed, the user can click the “RUN TEST” button to start the simulator. The Test Result will be calculated automatically.
The Simulator can be run regardless of whether the formula configuration is at a draft or published stage.
The green tick indicates that the value of Test Result matches with the expected value.
If the test result does not match with the expected result, then the user will see the red warning sign and error message appears. The formula can still be published even though the two values are not matching.
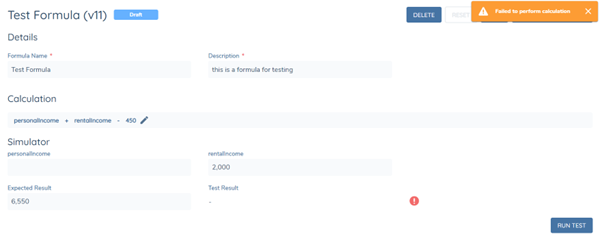
If any of the datakeys is missing value or the formula configured is not valid, then the simulator cannot be run.
Policy Configuration for Calculated Fields
Once the user has configured the formula in Calculation Configuration, the next step is to link the formula to a calculated field.
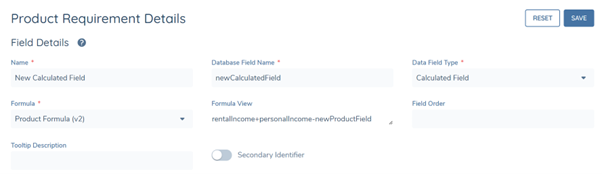
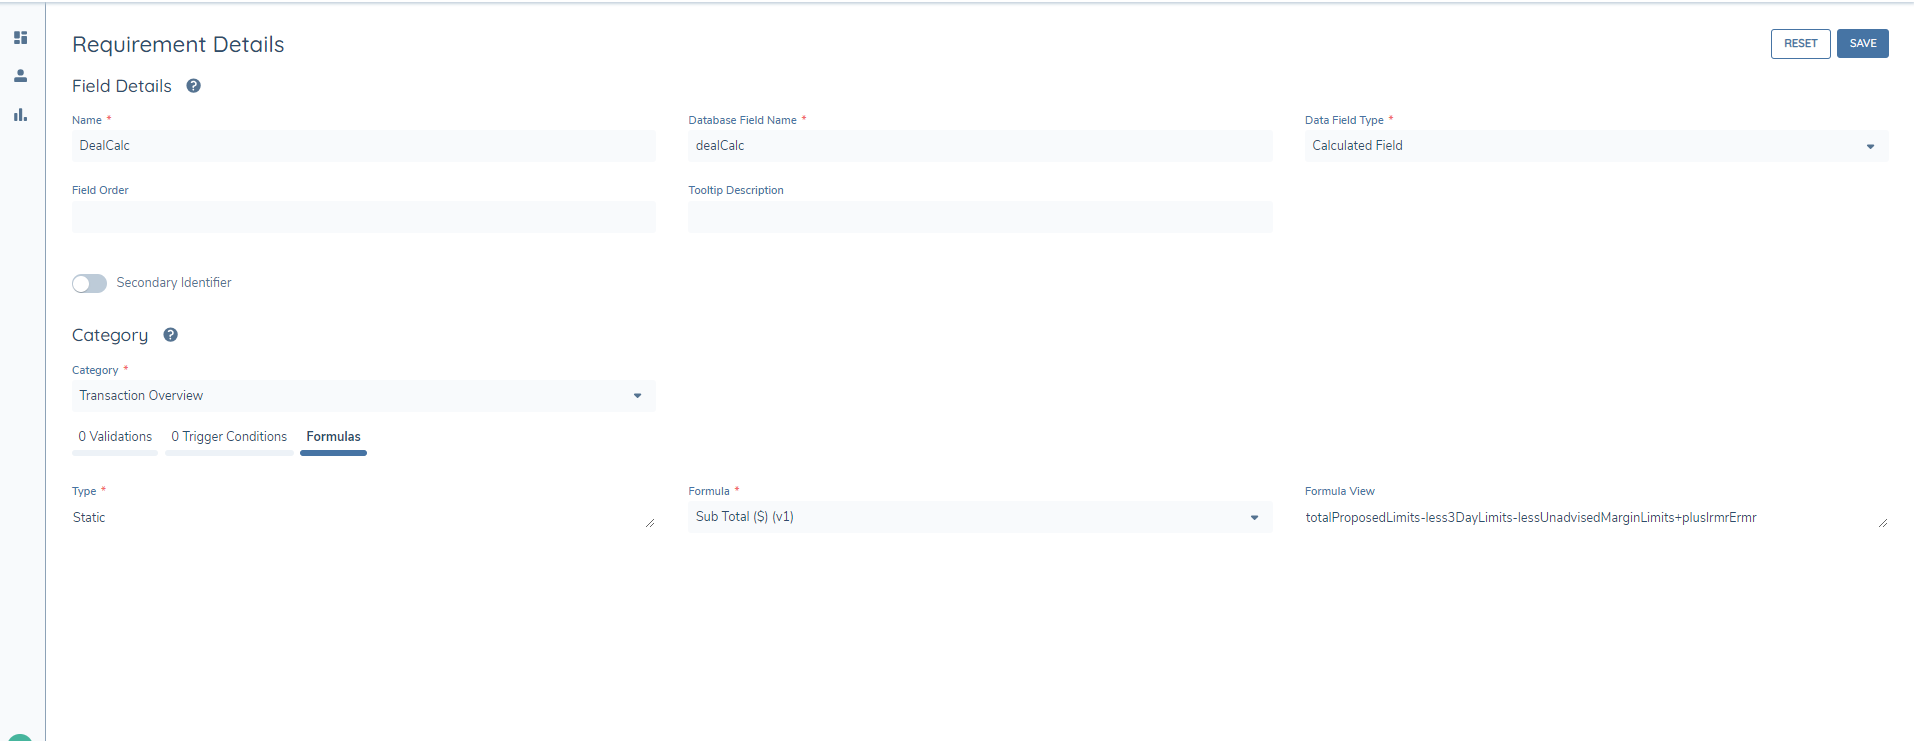
The user needs to select “Calculated Field” as the data field type. A dedicated “Formulas” tab will appear below for the user to select which formula to apply. “Formula View” field will display the formula selected in the read-only view.
Configuring Calculated Field in Policy

Configuring Calculated Field in Product Policy
Configuring Calculated Field in Deal Requirement Sets
If there are any changes in the formula configuration, the user needs to reselect the latest formula in the Policy to reflect the changes. Vice versa, if there are any changes for the datakey in the Policy Configuration, the user needs to update that in the formula configuration as well.
The Calculated Field type in Policy supports two data validation rules: Mandatory and Value Limit. With the validation rules, the task can only be saved or completed if the calculated field value satisfies the validation criteria.

Policy Trigger Conditions support the Calculated Number Field Type. Calculated Number Fields can be used to trigger other fields, based on the applied condition.
Calculation within the Task
The calculated fields feature is currently supported in Data task, Manual Credit Assessment task, Product task and Deal task. To enable the calculation, the calculated fields need to be in the same task as the fields with datakeys selected in the formula.
If any datakey in the formula is missing in the current task or no value has been entered, the calculated field will fail to show any result as the calculation cannot be performed.
Calculated Dates
A calculated date is essentially a date that has been determined by adding or subtracting a specific time period from another date. For example, if you have a starting date of January 1st, 2024, and you want to calculate a date 30 days later, the calculated date would be January 31st, 2024.
Calculated Date Configuration
Similar to Calculated Number Configuration, the user needs to make sure that they have the appropriate Calculation Configuration permissions assigned to them.
The Calculated Date Configuration area can be accessed by navigating to the Credit Policy section of the Management menu.

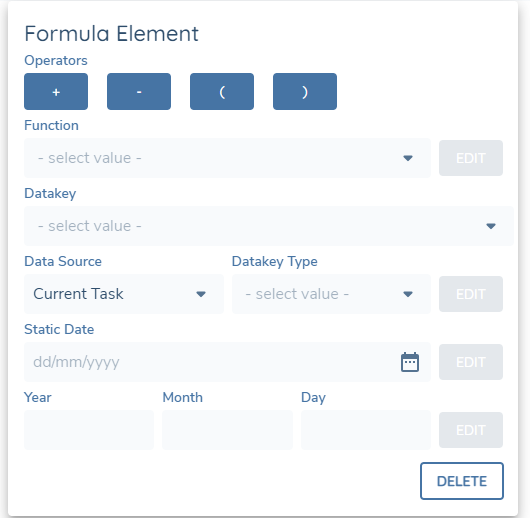
The formula builder for Calculated Date supports four types of elements:
- CurrentDate Function: Users have the option to incorporate the CurrentDate, along with a specified time zone, into the formula to compute the calculated date.
- Datakey: Users can choose either an existing data key or create a new one. They must specify the data key type from four options: Date, Day, Month, or Year. Since a calculated date results from adding or subtracting a time period from another date, both the date and time period can be configured as fields in the task. Users can use the data key functions to select a date-type field datakey and select Date as the type. Similarly, they can select a number-type field or a text-type field containing only numeric values and choose Day/Year/Month as the data key type. For instance, to calculate 1 year 1 month from a specific date, two data key fields should be used, selecting Year and Month as the types respectively. When the user selects Day/Year/Month as the data key type, the value entered in the task must be a whole number. Calculations for the field cannot involve numbers with decimal places. Currently, Current Task and Current Data Group Item data sources are supported for Calculated Dates.
- Static Date: Users can also incorporate a static date by utilizing the date picker within the formula builder.
- Static Period: To enable calculations such as adding a static period to a date, users can input values for years, months, and days in the designated section. Decimal places and negative numbers are not supported. Users can choose to input the period with differing terms as a single element (e.g., date + 1y1m1d) or separately (e.g., date + 1y + 1m + 1d).
For date calculations to function correctly, the first element within the formula must be in a date format. Otherwise, the formula will not operate as intended.
A date cannot be added with another date in the formula builder.
Policy Configuration for Calculated Date Fields
Currently, Policy and Product Policy supports Calculated Dates.
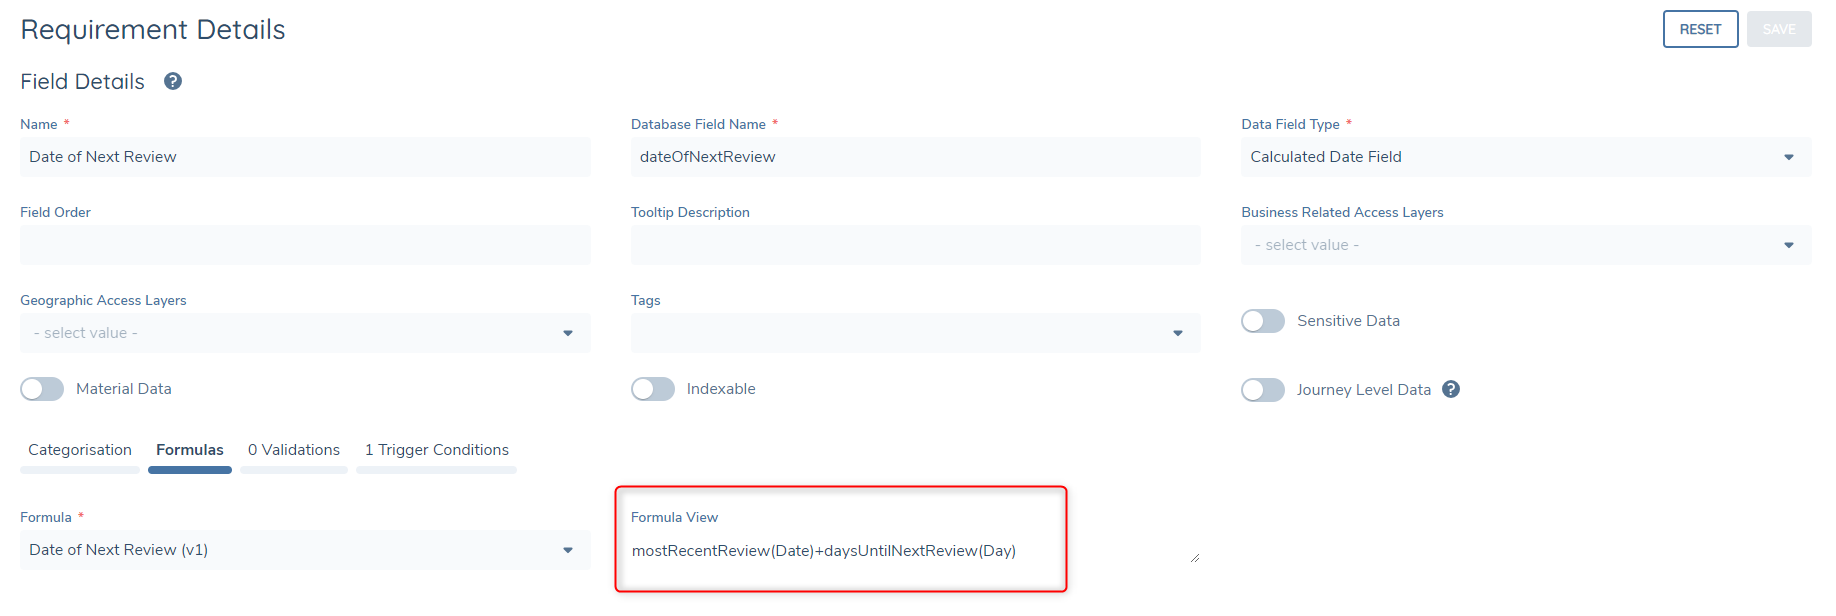
Once the user has configured a Date Formula, the next step is to link the formula to a calculated date field.
The user needs to select “Calculated Date Field” as the data field type. The “Formula View” field will display the formula selected in the read-only view. It will also specify which Datakey Type has been applied to each Datakey.
Calculated Time Periods
A calculated time period is the result of a date being subtracted from another date. The reason this is a different field type is because the final result is a time period, rather than a date.
Calculated Time Periods are available in Entity and Product Policy.
Calculated Time Period Configuration
The user needs to make sure that they have the appropriate Calculation Configuration permissions assigned to them.
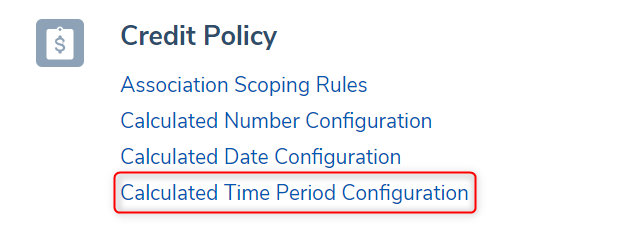
The Calculated Time Period Configuration area can be accessed by navigating to Calculation Configuration within the Management menu.
The formula builder for Calculated Time Period supports the same elements as calculated Dates. See the Calculated Date Configuration above for more information.
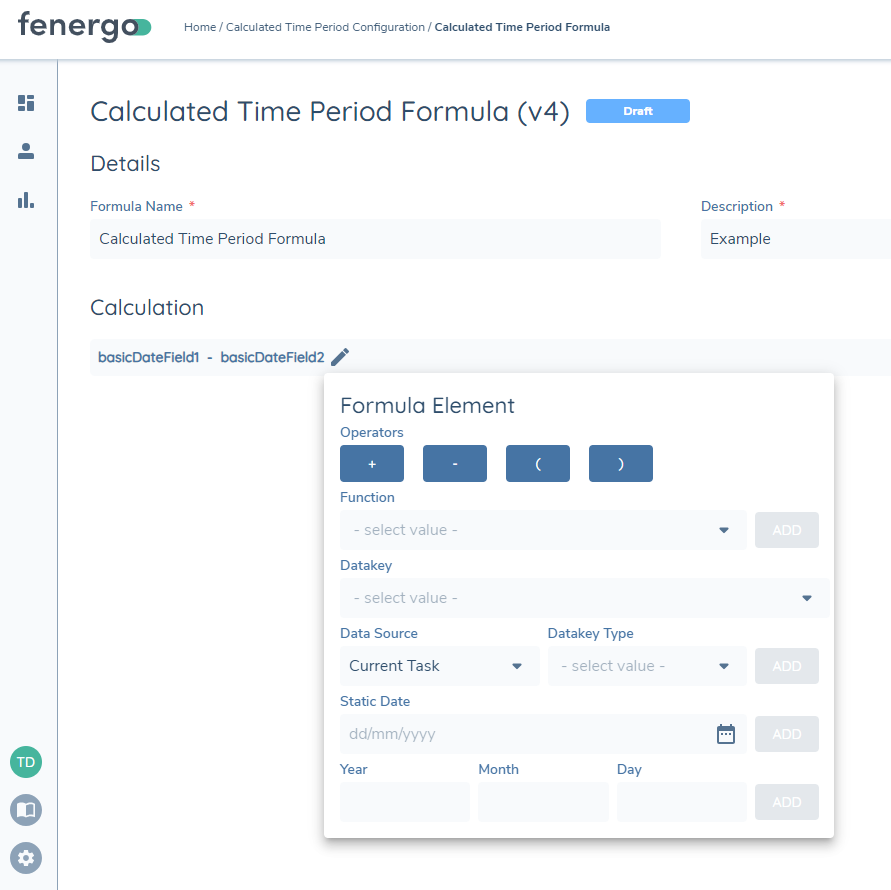
The process for configuring a calculated time period field type is the same as a calculated number or date:
- Configure your desired formula in calculated time period configuration.
- Create a new calculated time period field type in either policy or product policy.
- In the formula tab via the dropdown to insert the calculated time period formula.
Calculated Dates and Calculated Time Periods share the same Formula Builder, however their output is what separates them as different field types. See a simplified view below to help grasp this concept.
Calculated Dates:
- Date + Time Period = Date
- Date – Time Period = Date
- Date + (Date – Date) = Date
- Date – (Date – Date) = Date
Calculated Time Periods:
- Date – Date = Time Period
Note: Time Period result will be in days.
Formulas that will not be accepted include:
- Date + Date (Doesn’t make logical Sense)
- Time Period + Date (Wrong Order)
- Time Period – Date (Wrong Order)
In the above view, wherever you see “Date” this can be a:
- Date Field
- Text Field (Must have a valid date format e.g. yyyy-mm-dd)
- Text Area Field (Must have a valid date format e.g. yyyy-mm-dd)
- Calculated Date Field
- Static Date
Wherever you see “Time Period” this can be a:
- Number Field
- Text Field (Must be a time period e.g. 10d)
- Text Area Field (Must be a time period e.g. 10m)
- Calculated Number Field
- Calculated Time Period Field (e.g. 10y)
- Static Year, Month or Day (e.g. 4m)